Imagine the satisfaction of crafting something useful with your own hands. Building wooden car ramps isn’t just a practical project; it’s an opportunity to embrace your creativity and resourcefulness.
Maybe you’ve been looking for a way to safely elevate your car for maintenance, or perhaps you’re simply eager to tackle a new DIY challenge. Whatever your reason, constructing car ramps from wood can be both fulfilling and fun. In this guide, you’ll discover step-by-step instructions and essential tips to ensure your ramps are sturdy and reliable.
We’ll help you choose the right materials, avoid common pitfalls, and make sure your ramps are safe for use. Ready to dive in? Let’s transform that vision of homemade car ramps into reality, offering not just utility but a sense of accomplishment.

Credit: www.pinterest.com
Materials Needed
Gather essential materials like sturdy wooden planks, screws, a saw, and a drill. Sandpaper smooths edges, while a measuring tape ensures precision. A protective finish adds durability.
Building car ramps from wood can be a rewarding DIY project, but before you start, gathering the right materials is crucial. The quality and type of materials you choose can greatly affect the durability and safety of your ramps. Understanding what you need will save you time, money, and potential frustration. Let’s dive into the essentials.Wood Selection
Choosing the right type of wood is your first step. Opt for strong, durable wood like untreated pine or plywood. These materials are known for their strength and ability to withstand heavy weights. Ensure the wood is free from cracks or splits to prevent any structural weaknesses.Fasteners And Hardware
Fasteners play a vital role in holding your ramp together. You’ll need screws or nails that are at least 2.5 inches long to ensure a secure fit. Consider using galvanized screws to prevent rust. Having a few extra fasteners on hand can be a lifesaver if you drop or misplace one during assembly.Tools Required
Gather basic tools such as a saw, drill, measuring tape, and a level. A circular saw can make cutting wood quicker and more precise. A power drill with drill bits appropriate for wood will make assembling your ramp easier and faster. If you don’t have a level, using a smartphone app can be a handy alternative to check your ramp’s balance.Protective Gear
Safety should always come first. Equip yourself with safety goggles, gloves, and a dust mask. These items will protect you from wood splinters and sawdust. Trust me, wearing gloves saved me from countless blisters when I built my first ramp.Finishing Materials
To extend the life of your ramps, consider using sealants or wood preservatives. These materials help protect the wood from moisture and insects. A non-slip surface can be created by applying textured paint or adding grip tape, ensuring your car safely travels up and down the ramp. Are you ready to start your project? With the right materials and tools, you’re well on your way to building sturdy wooden car ramps. Have you thought about where you’ll store them once complete? Planning ahead will make the entire process smoother and more enjoyable.
Credit: www.youtube.com
Choosing The Right Wood
Building car ramps from wood requires choosing the right type of wood. The choice impacts durability, safety, and ease of construction. Different woods offer varying strengths and costs. Understanding these differences helps in making an informed decision. Let’s explore the best wood options for your car ramps.
Choosing Between Hardwood And Softwood
Hardwoods are dense and strong. They support heavy vehicles well. Oak and maple are popular hardwoods. They resist wear and last longer. Softwoods like pine are lighter and cheaper. They are easier to cut and shape. Consider vehicle weight when choosing.
Understanding Pressure-treated Wood
Pressure-treated wood resists moisture and insects. This makes it ideal for outdoor ramps. It lasts longer in harsh conditions. The treatment process strengthens the wood. Ensure it is safe and free from harmful chemicals. Always check labels before buying.
Considering Plywood For The Base
Plywood is versatile and strong. It provides a stable base for ramps. Choose thick, high-quality plywood. It should handle the weight of the vehicle. Look for exterior-grade plywood for added durability. It withstands weather and heavy use.
Evaluating The Cost Factor
Different woods come at different prices. Hardwoods are usually more expensive. Softwoods and plywood are budget-friendly. Balance cost with safety and durability. Investing in quality wood saves money long-term. It reduces the need for frequent repairs.
Checking For Wood Quality
Inspect wood for defects. Cracks and knots weaken the structure. Choose straight and smooth pieces. This ensures stability and safety. Avoid wood with splinters or rough edges. They can cause injuries and damage to vehicles.
Design And Measurements
Building car ramps from wood requires careful design and precise measurements. The right design ensures safety and functionality. Accurate measurements lead to a stable structure. This section will guide you through essential design elements and measurements.
Understanding The Purpose Of Your Ramps
First, consider the purpose of your ramps. Are they for a sedan or an SUV? Different vehicles need different ramp sizes. Think about the vehicle’s weight too. This will affect the wood type and thickness.
Choosing The Right Dimensions
Decide the ramp length and height. Longer ramps reduce the incline. This makes it easier to drive up. Measure the vehicle’s ground clearance. Ensure the ramp height fits without scraping.
Determining The Width
The ramp width is crucial. It should be wider than the tires. This provides stability and safety. Measure the tire width. Add a few extra inches for safety.
Calculating The Angle Of Incline
The angle of incline affects usability. A steep angle may be unsafe. Calculate the angle based on ramp height and length. Aim for a gentle slope for easier access.
Planning For Support And Stability
Support beams add stability. Plan where to place them. More beams mean stronger ramps. Ensure even distribution for balanced support.
Materials And Tools Checklist
List the materials needed. Include wood, screws, and tools. Make sure you have everything before starting. This saves time and prevents delays.
Cutting The Wood
Building car ramps from wood involves careful cutting and assembling. Choose sturdy wood like pine or oak. Measure the height needed and cut the wood into planks. Assemble with nails or screws for stability. Ensure the ramp surface is smooth to prevent slipping.
Cutting the wood is a crucial step in building car ramps from wood. This process requires precision and careful planning to ensure the safety and durability of your ramps. Whether you’re an experienced DIY enthusiast or a beginner, understanding the basics of cutting wood can make a significant difference in your project.Measure Twice, Cut Once
Before you start cutting, ensure you have accurate measurements. A small error can lead to misalignment and instability. Use a tape measure to mark the dimensions on the wood. Double-check these measurements to avoid wasting materials.Choosing The Right Saw
The type of saw you choose can impact the quality of your cuts. A circular saw is ideal for straight cuts, while a jigsaw is better for curves. For precise, clean cuts, make sure your saw blade is sharp. A dull blade can splinter the wood, compromising the ramp’s integrity.Safety First
Safety should be your top priority when cutting wood. Always wear safety goggles to protect your eyes from flying debris. Use clamps to secure the wood to your workbench. This prevents the wood from slipping, ensuring cleaner cuts and reducing the risk of injury.Practice Your Technique
If you’re new to using power tools, practice your cutting technique on scrap wood. This helps you gain confidence and perfect your skills. Experiment with different cutting speeds and angles. This can help you understand how to handle the tool for the best results.Check For Smooth Edges
After cutting, inspect the wood for rough edges. Smooth them with sandpaper to prevent splinters and ensure a snug fit during assembly. Consider the feeling of accomplishment when you run your hand over a smooth edge. It’s a small detail, but it makes a huge difference in the final product.Evaluate Your Progress
After cutting all the pieces, lay them out to ensure everything fits together. This step can save you from potential headaches later. Ask yourself: Are all the pieces aligned properly? If not, adjust your cuts before proceeding to the assembly stage. Cutting wood can be satisfying and rewarding. It’s an opportunity to hone your skills and create something useful. Have you ever had a project where the cutting phase was pivotal? Your approach to cutting might just set the tone for the entire build.Assembling The Ramp
Building car ramps from wood can be a rewarding project. The assembly process requires attention to detail. Each part must be sturdy and precise for safety. This section guides you through assembling your wooden ramp step-by-step.
Creating The Base
The base is the foundation of your ramp. Begin by cutting wood to your desired width. Ensure each piece is the same length for stability. Lay the pieces parallel on the ground. Secure them together using strong wood screws. This forms a solid base to support the incline.
Building The Incline
Next, construct the incline. Cut wood at an angle for the slope. Attach these angled pieces to the base. Use screws to fasten each piece securely. Check the incline for smoothness. A gradual slope is best for easy driving.
Securing The Structure
Once the incline is attached, reinforce the structure. Add support beams underneath. These beams should be perpendicular to the incline. Secure them with screws for added strength. Test the ramp with weight to ensure stability. A secure ramp means safe usage.
Adding Safety Features
Building car ramps from wood requires essential safety features. Ensure ramps have non-slip surfaces and secure edges to prevent accidents. Reinforce with durable materials for added stability.
Building car ramps from wood is a rewarding DIY project, but ensuring safety is paramount. Incorporating safety features not only protects your vehicle but also ensures your peace of mind. Let’s explore how you can add essential safety elements to your wooden car ramps.Non-slip Surface
A non-slip surface is crucial to prevent accidents. Imagine driving your car up the ramp and suddenly losing traction. Scary, right? To avoid this, add a non-slip surface to your ramps. Consider using adhesive anti-skid tape. It’s easy to apply and comes in various sizes. Simply clean the ramp’s surface, peel off the backing, and firmly press the tape onto the wood. Alternatively, you can use a non-slip paint. This paint contains gritty particles that provide extra grip. Apply it with a brush or roller for even coverage.Side Rails
Side rails are your safety net. They prevent your car from veering off the ramp. Without them, a slight miscalculation could lead to a costly mistake. You can construct side rails using sturdy wooden planks. Attach them securely along the sides of the ramp. Ensure they are high enough to guide your tires but not so high that they interfere with the vehicle’s clearance. Another option is to add metal brackets at intervals. These provide additional support and stability to the rails. Use screws to attach them firmly to the wooden planks. Are there other safety features you’ve considered for your ramps? Think about what would give you the most confidence when using them. Safety is an ongoing process, and your insights could be valuable for others undertaking this project.Testing The Ramp
Constructing car ramps from wood involves careful planning and precise measurements. Select sturdy wood and ensure it can support vehicle weight. Testing the ramp’s stability is crucial for safety.
Testing the ramp is a crucial step in ensuring your DIY car ramp is safe and effective. You’ve put in the hard work, measuring and cutting wood, assembling the pieces, and now it’s time to see if it all comes together smoothly. But before you drive your car up that ramp, let’s go through some essential checks to make sure it’s up to the task.Inspecting The Structure
First, take a good look at the ramp’s structure. Are all the pieces securely fastened? Check for any loose screws or nails. A wobbling ramp is a clear sign that something isn’t right. If you find any weak spots, reinforce them immediately. Your safety is worth a few extra minutes of tightening and adjusting.Testing With Weight
Before driving your car onto the ramp, test it with a smaller weight. Use something like a heavy toolbox or sandbags. This will help you see if the ramp holds up and distributes weight evenly. If it creaks or shifts, it’s better to find out now than when your car is halfway up.Checking The Surface
The surface of the ramp should be smooth and free from splinters. Run your hand over it to feel for any rough areas. A smooth surface ensures your car tires will grip properly, reducing the risk of slipping. If needed, sand down any rough patches for a safer ascent.Ensuring Stability On The Ground
Place the ramp on a flat, sturdy surface. Test its stability by gently pushing on it with your foot. If it rocks or moves, adjust its position until it feels solid. A stable base is crucial for the ramp to support the full weight of your vehicle without shifting.Taking The First Drive
When you’re confident in the ramp’s stability, it’s time for the real test. Slowly drive your car onto the ramp, paying close attention to any unusual sounds or movements. Keep someone nearby to guide you and watch for any signs of distress. This first drive is all about caution and observation.Reflecting On The Process
Once you’ve successfully tested the ramp, take a moment to reflect on the process. What worked well? What could be improved? This reflection can help you in future projects. Remember, every DIY project is a learning experience, and your insights can be invaluable for the next time you tackle a similar task. By following these practical steps, you’ll ensure your car ramp is both safe and functional. Are there any other creative ways you’ve tested DIY projects? Share your thoughts and experiences in the comments!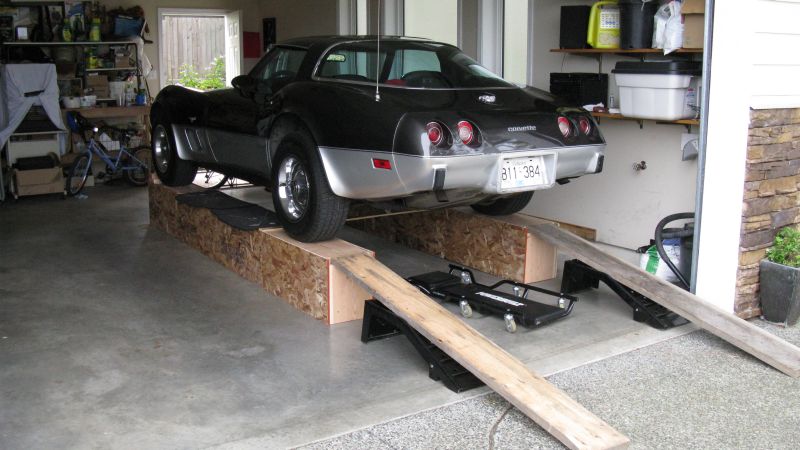
Credit: www.corvetteforum.com
Maintenance Tips
Crafting sturdy car ramps from wood requires the right materials and precise measurements. Choose strong wood like oak or pine. Always ensure even cutting for a stable surface.
When it comes to maintaining your DIY wooden car ramps, a little care can go a long way. Regular maintenance not only extends their lifespan but also ensures your safety. Have you ever built something yourself, only to watch it wear out too soon? With these tips, you can prevent that from happening to your ramps. Let’s dive into some practical, straightforward advice to keep your wooden ramps in top shape.Inspect For Damage Regularly
Make it a habit to check your ramps for any signs of wear and tear. Look for cracks, splinters, or loose nails. These small issues can quickly become big problems if left unattended. If you notice any damage, address it immediately to prevent further deterioration.Keep Them Clean
Dirt and debris can accumulate on your ramps over time. Use a broom or a vacuum to clean the surface regularly. This not only keeps them looking neat but also prevents any potential slipping hazards. Have you ever slipped on a ramp? A clean surface can make all the difference.Protect From Moisture
Moisture is the enemy of wood. If your ramps are exposed to the elements, consider applying a water-resistant sealant. This simple step can protect the wood from warping or rotting. Remember, a dry ramp is a safe ramp.Store Properly When Not In Use
When your ramps aren’t in use, store them in a dry place. Keeping them off the ground can prevent moisture damage. Do you have a garage or shed? These can be ideal spots to keep your ramps safe from the weather.Reinforce Joints And Connections
Check the joints and connections of your ramps periodically. Over time, screws and bolts can loosen. Tighten them as needed to ensure stability. Imagine driving up a ramp with a loose joint—it’s not just risky, it’s dangerous.Reapply Protective Coatings
Reapply any protective coatings or sealants as needed. Depending on the climate, this might be an annual task. A fresh coat of sealant can add an extra layer of protection and keep your ramps looking new. It’s a small task that can have a big impact on longevity. By following these maintenance tips, you can enjoy your DIY ramps for years to come. Do you have any tips or tricks you’ve discovered while maintaining your wooden creations? Share your experiences in the comments below!Conclusion
Building car ramps from wood can be a rewarding project. It requires basic tools and materials. Follow safety guidelines to prevent accidents. Measure your car’s weight and dimensions accurately. Choose quality wood for durability. Assemble the ramps step by step.
Test the ramps with caution. Ensure they hold the car’s weight securely. Regularly inspect them for wear. Proper care extends their lifespan. Enjoy the satisfaction of using your handmade ramps. Share your experience with friends or family. Encourage others to try this DIY project.
Building ramps can be practical and fun.