You know the frustration of a car breakdown at the most inconvenient time. Picture this: you’re on the road, and suddenly you notice a wobble.
After pulling over, you find a broken lug nut stud. This small piece of metal can cause big problems if not fixed. But don’t worry; you can handle this! With a few tools and some guidance, you can replace a lug nut stud on your own.
Imagine the confidence you’ll feel cruising down the road, knowing that you took control of the situation. Ready to dive in and learn how? Let’s get started, and soon you’ll be back on track with a stronger, safer vehicle.
Tools And Materials Needed
Changing a lug nut stud requires specific tools and materials. Essential items include a lug wrench, a hammer, and a socket set. A new stud and wheel bearing grease are also needed.
Changing a lug nut stud might seem daunting at first, but with the right tools and materials, you can handle it like a pro. Whether you’re fixing a damaged stud or simply replacing it, having the correct equipment is crucial for a smooth process. Gather your tools and materials ahead of time to ensure the job goes smoothly and safely.Essential Tools You Will Need
First on your list should be a socket wrench. This versatile tool will help you remove the lug nuts with ease. Make sure you have the right size socket to fit your vehicle’s lug nuts. A hammer is also necessary, especially when it comes to knocking out the old stud. A standard hammer usually works, but a mallet can be gentler on your car’s components. Don’t forget a stud installer tool. This handy tool ensures the new stud is seated correctly, preventing future mishaps.Materials Required For The Job
You’ll need replacement lug nut studs, which are typically available at auto parts stores. Ensure they match the specifications of your vehicle. Invest in anti-seize lubricant. Applying this to the stud threads can prevent rust and make future removals easier. A torque wrench is also essential. It ensures the lug nuts are tightened to the correct specifications, which is crucial for safety.Safety Gear And Precautions
Always wear safety glasses to protect your eyes from flying debris when removing or installing studs. Gloves are a must; they protect your hands from sharp edges and provide a better grip. Consider using a wheel chock. This simple device prevents the vehicle from rolling, adding an extra layer of safety while you work.Additional Helpful Items
A floor jack is indispensable for lifting the vehicle safely. It allows you to access the wheel hub with ease. Include a jack stand for added security. Never rely solely on the floor jack when working under a vehicle. A wire brush can be handy for cleaning the wheel hub surface before installing the new stud. It ensures a clean, smooth fit. — Having the right tools and materials is half the battle won. Have you ever tackled a car repair with insufficient tools and regretted it? Learning from those experiences can make you more prepared next time. With everything lined up, you’ll find the process of changing a lug nut stud far less stressful and much more efficient.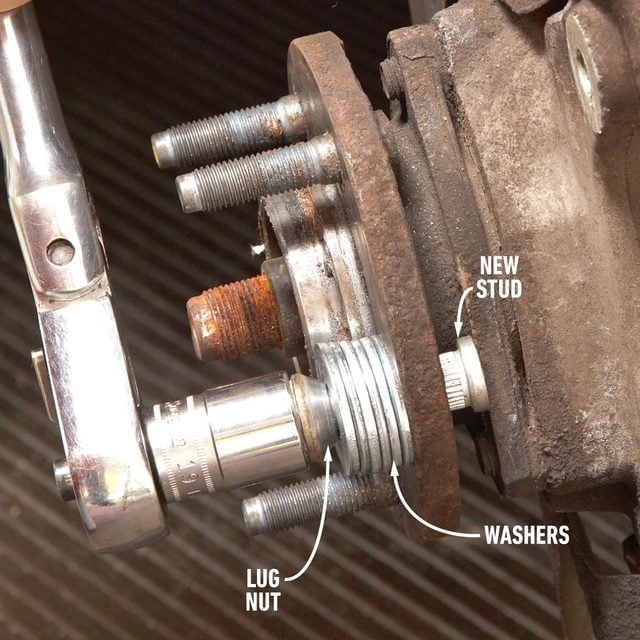
Credit: www.familyhandyman.com
Safety Precautions
Ensuring safety is crucial while changing a lug nut stud. Wear gloves and eye protection to prevent injuries. Secure the vehicle with wheel chocks and use a jack stand for stability.
Changing a lug nut stud might seem like a straightforward task, but ensuring your safety should always be your top priority. Without the right precautions, you might face unnecessary risks. Before you get your hands dirty, let’s explore some safety measures to keep you protected and your vehicle secure.Wearing Protective Gear
Safety starts with what you’re wearing. Always put on a pair of durable gloves to protect your hands from sharp edges and hot surfaces. Eye protection is crucial as well, since small metal fragments or dust can easily harm your eyes. A sturdy pair of boots will shield your feet from any accidental drops. Remember the time I learned the hard way when a wrench slipped from my hands? Ever since, I never skip my boots.Securing The Vehicle
Before you start, ensure your vehicle is parked on a flat, stable surface. Use wheel chocks to prevent any accidental movement. Invest in a good-quality jack and jack stands. Never rely solely on a jack to hold the vehicle up; it’s not worth the risk. Check if the parking brake is engaged. Imagine working under a vehicle that suddenly rolls away—it’s a scenario you definitely want to avoid. These safety precautions might seem like extra steps, but they are essential. What’s your safety routine when working on a car?Removing The Wheel
Removing the wheel is the first step in changing a lug nut stud. Carefully loosen the lug nuts and lift the wheel off the ground. Once the wheel is removed, you can access the damaged stud for replacement.
Removing the wheel is a critical step in the process of changing a lug nut stud. It’s the gateway to accessing the stud itself, so getting it right is essential. Before diving into the nitty-gritty, ensure you have all your tools ready. This task isn’t just about strength; it’s about technique. If you’ve ever struggled with a stubborn lug nut, you know how frustrating it can be. But fear not, with the right approach, you can make the process smoother. Let’s start by loosening those lug nuts and lifting your vehicle safely.Loosening The Lug Nuts
Begin by locating the lug wrench in your toolkit. This tool is your best friend for this task. Before lifting the vehicle, use the wrench to slightly loosen the lug nuts while the wheel is still on the ground. This initial loosening prevents unnecessary spinning when the wheel is elevated. Apply pressure carefully and turn the wrench counterclockwise. If the lug nuts are resistant, a quick tip is to use your foot for extra leverage. Make sure you don’t remove them entirely; just loosen them enough to make the next steps easier. Ever tried loosening a lug nut only to find it stubbornly stuck? A little trick is to apply a penetrating oil and let it sit for a few minutes.Lifting The Vehicle
Now that the lug nuts are loosened, it’s time to lift the vehicle. Use a jack to elevate it off the ground. Ensure you’re on a flat, stable surface to prevent any accidents. Place the jack under the vehicle’s designated jacking point, usually found in the owner’s manual. Slowly pump the jack handle to lift the car. Once it’s raised, secure it with jack stands for added safety. Ever had a jack slip because of a rush job? Make sure you double-check the placement before proceeding. With the vehicle lifted, removing the wheel becomes a breeze. It’s not just about getting the job done; it’s about doing it safely. Are you ready to tackle the next step with confidence?
Credit: www.youtube.com
Accessing The Damaged Lug Nut Stud
Accessing the damaged lug nut stud is crucial for vehicle safety. This process involves removing specific parts to reach the stud. Care and precision are needed to avoid further damage. With the right tools, this task becomes manageable. Let’s explore the steps involved in accessing the damaged lug nut stud.
Removing The Brake Components
Start by safely lifting the vehicle. Use a jack and secure stands. Next, remove the wheel to expose the brake components. Begin with the brake caliper. Use a wrench to unscrew the bolts. Carefully slide the caliper off the rotor. Keep it supported to prevent strain on the brake line. Then, remove the rotor. It might need a gentle tap if stuck. Place it aside. Now, the hub assembly is visible.
Locating The Damaged Stud
With the hub assembly exposed, identify the damaged stud. Look for any signs of wear or breakage. It usually appears bent or missing. Rotate the hub to check each stud. Once identified, mark it for easy reference. This ensures you remove the correct one. The damaged stud might require a closer inspection. Sometimes, dirt and debris obscure the damage.
Removing The Old Stud
Removing the old stud is a key step in changing a lug nut stud. Begin by safely lifting the vehicle and removing the wheel. Use a hammer and punch to knock out the damaged stud. Ensure the area is clean before inserting the new stud.
Changing a lug nut stud might seem daunting at first, but with the right approach, you can tackle it like a pro. Removing the old stud is a crucial step in this process. It’s essential to do it carefully to avoid damaging other parts of the wheel assembly. Understanding the tools and techniques involved can save you time and stress. You’ll be one step closer to getting your vehicle back on the road.Hammering Out The Stud
To start, ensure your vehicle is secure on a jack or jack stand. Remove the tire to expose the damaged stud. A hammer is your main tool here. Position the hammer directly on the stud’s end. With a firm grip, give it a steady, forceful hit. You might need a few swings to dislodge it completely. If your stud is stubborn, don’t panic. A little patience and persistence can make a big difference. Remember, safety comes first, so wear protective gear and keep your focus sharp.Using A Press If Necessary
If hammering doesn’t do the trick, a press might be your next best option. This tool offers more controlled force, ideal for challenging studs. Align the stud with the press to ensure direct pressure. Slowly apply force, watching as the stud begins to move out of place. Using a press can feel more technical, but it’s a great backup. It’s also a good investment for frequent DIYers. Have you ever felt stuck and then found a tool that made everything easier? This could be your moment. Taking the time to choose the right method can prevent future headaches. Each tool has its place, and knowing when to use them is key. What’s your go-to strategy when faced with a stubborn task?Installing The New Stud
When it comes to fixing a vehicle, few tasks are as satisfying as completing a repair job yourself. After successfully removing the damaged lug nut stud, it’s time to install the new one. This part of the process can seem daunting, but with a bit of guidance, you’ll have your vehicle back in top shape in no time. Let’s dive into the steps to get your wheels securely back on track.
Aligning The New Stud
First things first, aligning the new stud is crucial. You want to ensure it’s perfectly positioned to prevent any future issues.
Start by inserting the new stud into the hub from the back. Carefully maneuver it until the stud head is flush against the hub. You might need to wiggle it slightly to find the sweet spot where it fits snugly.
Have you ever tried fitting a puzzle piece that just wouldn’t go in? It’s all about finding that exact alignment. Once it’s in, you’ll know it’s right because it’ll feel seamless.
Securing The Stud
Now that your stud is aligned, securing it is the next step. This part ensures the stud stays in place, holding the wheel securely.
Place a few washers on the stud to distribute the pressure evenly, then thread a lug nut onto the stud. This setup is essential as it helps pull the stud through the hub.
Use a wrench to tighten the lug nut, drawing the stud securely into the hub. You should feel the stud slide into place as you tighten.
Have you ever wondered how mechanics make it look so easy? It’s all about using the right tools effectively. Once secured, give it a final check to ensure everything feels tight and stable.
Are you ready to hit the road with confidence, knowing your wheels are secure? With your new stud installed properly, you’re all set for smooth sailing. Installing a new lug nut stud might seem like a small task, but every detail counts in vehicle maintenance.
Reassembling The Brake Components
Reassembling brake components ensures everything fits correctly after changing a lug nut stud. Secure the rotor and caliper back to their original positions. Verify all bolts are tightened to prevent any issues when driving.
Reassembling the brake components is a crucial step in changing a lug nut stud. After successfully replacing the stud, your vehicle’s performance depends on correctly putting everything back together. Missing a step or misaligning parts could affect your car’s safety. So, take your time with this process and ensure each component is precisely where it needs to be.Reattaching Brake Parts
Begin by positioning the rotor back onto the hub. Make sure it fits snugly and doesn’t wobble. This step is essential for maintaining smooth braking. Next, secure the caliper bracket by tightening its bolts firmly. This ensures the bracket is stable and won’t move when you apply the brakes. Now, slide the brake pads back into the caliper. Double-check that they sit correctly in the grooves. If they’re misaligned, the brakes might squeak or not function properly.Checking For Proper Alignment
Once you’ve reassembled the brake parts, it’s time to check for proper alignment. Spin the rotor by hand to ensure it turns smoothly without any resistance. If it catches or grinds, something might be out of place. Also, inspect the caliper and pads to confirm they aren’t touching the rotor unnecessarily. Misalignment here can cause uneven wear and tear on your brakes. Finally, take a step back and assess the overall setup. Does everything look like it did before you started? This visual check can be a lifesaver, preventing any potential issues on the road. Have you ever reassembled brake components only to find you missed something crucial? What did you learn from that experience? Share your insights in the comments!Reinstalling The Wheel
After successfully replacing the lug nut stud, it’s time to reinstall the wheel. Properly reattaching the wheel ensures safe driving. Follow these steps to secure it correctly.
Tightening The Lug Nuts
Place the wheel back onto the hub. Align the holes with the lug nut studs. Hand-tighten each lug nut in a crisscross pattern. This prevents uneven pressure on the wheel. Use a torque wrench to tighten the nuts securely. Follow the manufacturer’s recommended torque specifications. This ensures the wheel is firmly attached.
Lowering The Vehicle
Carefully lower the vehicle using a jack. Ensure the wheel is firmly on the ground. Remove the jack completely. Double-check the lug nuts’ tightness once more. Confirm they are secure and properly torqued. This final check guarantees safety while driving. Your vehicle is now ready for the road.
Final Checks And Test Drive
Changing a lug nut stud is a task that requires attention to detail. You’ve followed the steps diligently, but before you hit the road, it’s crucial to ensure everything is in perfect order. The final checks and a test drive will give you the confidence that your car is safe and ready for the journey ahead. Let’s dive into the key steps that will make sure your hard work pays off.
Inspecting For Tightness
Once you’ve installed the new stud, give it a thorough inspection. Check if the lug nuts are securely fastened. A loose nut can lead to serious safety issues. Use a torque wrench to tighten the nuts to the manufacturer’s specifications. Imagine the peace of mind you’ll feel knowing that everything is snug and secure.
Have you ever had a moment where you thought you tightened something only to find it loose later? Double-check your work now to avoid that unsettling feeling. A simple re-check can save you from potential problems down the road.
Conducting A Short Drive
Now, it’s time to take your car for a short drive. This isn’t just any drive—consider it a test to ensure the studs and nuts are properly installed. Start with a smooth road to gauge any unusual vibrations or noises.
As you drive, pay attention to the steering and handling. Does everything feel normal? Testing your vehicle in real-world conditions helps identify any issues you might have missed in the garage.
After the drive, inspect the lug nuts once more. This post-drive check is essential. It guarantees that your car is not just moving, but moving safely. Your diligence now pays off in peace of mind and road safety. So, what did you learn during the test drive? Was everything as expected?
Changing a lug nut stud might seem straightforward, but thoroughness in these final checks ensures your safety. You’ve put in the effort; now ensure it’s flawless before you venture out on longer drives. These steps are your toolkit for a confident and secure driving experience.

Credit: www.wikihow.com
Conclusion
Changing a lug nut stud can feel daunting. But with patience, you’ll succeed. Start by gathering all the right tools. Follow the steps carefully for safety. Pay attention to details like torque settings. These ensure the wheel is secure. Practice makes perfect, so don’t rush.
Mistakes can happen, but learn from them. Your car’s performance depends on proper repair. Remember, every small repair adds value. Your efforts keep your vehicle running smoothly. So, take your time and do it right. With practice, you’ll gain confidence.
Soon, you’ll change lug nut studs like a pro. Keep learning and improving.