Changing lug nuts might seem like a daunting task, but it’s a skill that can save you both time and money. Imagine being stuck on the side of the road with a flat tire and realizing you could fix it yourself if only you knew how to handle those stubborn lug nuts.
By learning this simple yet crucial task, you’re not just gaining a new skill—you’re empowering yourself to tackle unexpected roadside challenges with confidence. In this guide, we’ll break down the process into easy steps, so you can quickly and safely change lug nuts like a pro.
Ready to boost your car maintenance skills and feel more secure on the road? Let’s dive in and discover how you can take control of this essential task.
Tools And Materials Needed
Changing lug nuts requires a lug wrench, a jack, and replacement nuts. Ensure you have safety gloves and a flashlight. These tools help in safely and efficiently replacing lug nuts on your vehicle.
Changing lug nuts might seem like a daunting task, especially if you’re not a regular DIYer. But with the right tools and materials, you can confidently tackle this job yourself. Imagine the satisfaction of knowing you can handle this essential maintenance task without a trip to the mechanic. Let’s dive into the tools and materials you’ll need to get started.Jack And Jack Stands
You’ll need a sturdy jack to lift your vehicle. This tool is crucial for accessing the lug nuts safely. Ensure you have jack stands to secure the vehicle once it’s lifted. It’s a step that ensures your safety, so don’t skip it!Lug Wrench
A lug wrench is your best friend in this process. This tool helps you loosen and tighten the lug nuts. Opt for a cross-shaped wrench for better leverage. If you’ve ever struggled with a stubborn nut, you know how vital this tool is.Torque Wrench
A torque wrench ensures the lug nuts are tightened to the manufacturer’s specifications. This tool prevents over-tightening, which can cause serious damage. Have you ever wondered why some tires wear out faster? Improper lug nut tension could be the culprit.Wheel Chocks
Safety first! Use wheel chocks to prevent the vehicle from rolling while it’s lifted. This small step can make a big difference in preventing accidents. Sometimes, the simplest precautions are the most effective.Gloves And Protective Gear
Don’t underestimate the importance of personal protective gear. Gloves protect your hands from dirt and potential injuries. Have you ever finished a DIY task only to find your hands covered in grime? Proper gear makes all the difference.Spare Lug Nuts
It’s always wise to have spare lug nuts on hand. They come in handy if you discover any are damaged or worn. Think of it as your emergency backup plan.Rags Or Towels
Keep a few rags or towels nearby to clean your hands or parts as needed. It’s a small detail that makes the process smoother. Plus, it saves you from using your shirt sleeve in a pinch! Before you start, gather these tools and materials. Having everything ready will make the process smoother and more efficient. Are you ready to get your hands dirty and change those lug nuts like a pro?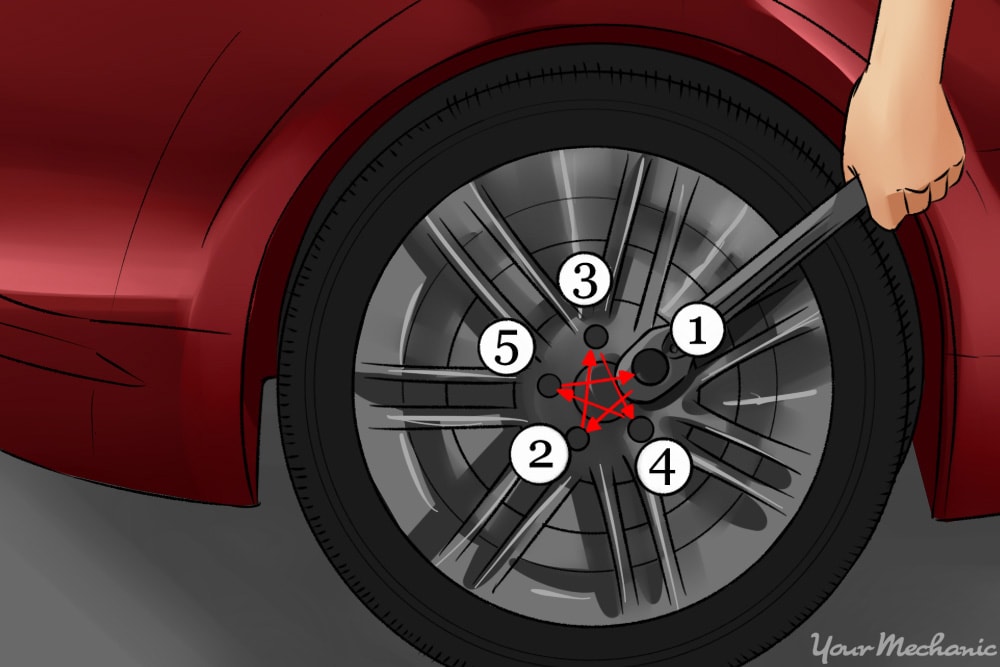
Credit: www.yourmechanic.com
Safety Precautions
Changing lug nuts requires careful attention to safety measures. Ensure the car is on a flat surface and use wheel chocks. Wearing gloves and safety goggles protects hands and eyes during the process.
When changing lug nuts on your vehicle, safety should be your top priority. Taking a few precautionary steps can prevent accidents and ensure the task is completed smoothly. Imagine the peace of mind knowing you’ve secured your car properly and safely. Let’s explore the essential safety precautions you need to consider.Wear Proper Safety Gear
Always have the right safety gear ready. A sturdy pair of gloves can protect your hands from cuts and scrapes. Safety glasses are also a smart choice to shield your eyes from any debris.Park On A Flat Surface
Ensure your vehicle is parked on a level and stable surface. This prevents the car from rolling unexpectedly. If you’re on a slope, use wheel chocks for added security.Engage The Parking Brake
Activate the parking brake before starting any work. It adds an extra layer of security by preventing your car from moving. This small step can make a big difference in keeping you safe.Use The Right Tools
Using the correct tools is crucial. A lug wrench and jack that fit your vehicle are essential. Using ill-fitting tools can cause damage and make the job harder.Inspect Your Tools
Before you start, check your tools for any signs of wear or damage. A faulty jack or wrench can lead to dangerous situations. If in doubt, replace them with quality tools.Stabilize The Vehicle
Once the car is jacked up, ensure it’s stable before removing any lug nuts. Give the car a gentle push to ensure it doesn’t wobble. If it does, reassess your setup.Avoid Distractions
Focus solely on the task at hand. Put your phone away and minimize any distractions. A moment of inattention can lead to mistakes.Check Weather Conditions
Consider the weather when planning to change your lug nuts. Rain, snow, or extreme heat can affect your safety. If it’s not ideal, wait for better conditions or find a sheltered area. Remember, these precautions are not just suggestions; they’re vital steps to ensure your safety. Have you ever had a close call because you skipped a safety step? Taking these simple actions can save you from potential mishaps. Stay safe and confident while changing your lug nuts.Loosening The Lug Nuts
Changing lug nuts is simple with a few steps. First, loosen them before lifting the car. Use a wrench for better grip. Then, remove the nuts completely to change the tire. Reverse the process to secure the new tire in place.
Practice ensures confidence and safety.
Loosening the lug nuts on your car is a crucial step when changing a tire. It’s not just about muscle; it’s about doing it right and safely. Many drivers have found themselves stranded because they couldn’t budge those stubborn nuts. Understanding how to loosen them effectively can save you time and frustration. Let’s dive into the practical steps that can make this task a breeze.Positioning The Wrench
The first step is to position the wrench correctly. Ensure that the wrench fits snugly onto the lug nut. A proper fit prevents slipping and potential injury. You should place the wrench so that the handle is parallel to the ground. This position gives you the best leverage when you apply force. Remember, a small adjustment can make a big difference.Applying Force Safely
Applying force is where many people go wrong. It’s not about how strong you are but how you use your body weight. Stand with your feet shoulder-width apart for balance. Push down on the wrench handle with controlled force. If you need more leverage, try stepping on the wrench gently. You’ll be surprised how much easier it is when you let gravity do the work. Have you ever wondered why some lug nuts feel like they’re welded in place? It could be rust or over-tightening. In such cases, a penetrating oil can work wonders. Spray it on and let it sit for a few minutes before trying again. By tackling each lug nut with care and the right technique, you’ll find them loosening without much fuss. Have you ever tried a different technique that worked for you? Share your tips and tricks in the comments below!
Credit: www.greatwater360autocare.com
Lifting The Vehicle
Lifting the vehicle is crucial when changing lug nuts. Ensuring safety and stability is key. Improper lifting can lead to accidents or damage. Follow these steps to lift the vehicle safely.
Using A Jack Properly
Find a flat, stable surface before using the jack. Position the jack under the car’s designated lift points. Consult your vehicle’s manual for these locations. Make sure the jack is secure and centered. Slowly raise the vehicle until the wheel is off the ground.
Never put any part of your body under the car during lifting. Always double-check the jack’s stability. This prevents sudden falls and injuries. Keep the jack handle clear of obstacles.
Securing The Vehicle
Once lifted, secure the vehicle using jack stands. Place the stands under sturdy parts of the car. Ensure they are equally balanced and stable. Lower the vehicle onto the stands slowly. Verify the car is firmly resting on the stands.
Shake the car slightly to test stability. The vehicle should not move or wobble. Never rely solely on the jack for support. Use wheel chocks on other wheels to prevent rolling. Safety measures reduce the risk of accidents.
Removing The Lug Nuts
Loosen the lug nuts before lifting the vehicle. Use a wrench to turn counterclockwise. Remove nuts completely once the car is raised.
Removing the lug nuts is a crucial step in changing a tire. Whether you’re dealing with a flat or upgrading to a new set of wheels, knowing how to efficiently remove the lug nuts can save time and effort. Many people find this step intimidating, but with the right approach, you’ll be on your way to becoming more self-sufficient on the road. Let’s dive into the process, ensuring each step is clear and easy to follow.Taking Off The Nuts
Before you start, ensure your car is parked on a level surface and the parking brake is engaged. This provides stability and safety. Use a lug wrench to loosen each nut slightly before you lift the vehicle with a jack. This prevents the wheel from spinning as you work. Loosen the nuts in a star pattern. For instance, if there are five nuts, loosen them in a diagonal sequence—this ensures the wheel doesn’t warp under uneven pressure. Once the vehicle is lifted, fully remove the nuts and set them aside in a safe place.Handling Stubborn Nuts
Sometimes, lug nuts can be stubborn and refuse to budge. This can be due to rust or over-tightening. If you encounter this issue, try using a longer wrench for more leverage. A breaker bar can also be handy for this situation. Applying a bit of penetrating oil and allowing it to sit for a few minutes can help loosen rusty or corroded nuts. If you’re still struggling, consider tapping the wrench gently with a rubber mallet to break the seal. Have you ever been in a situation where a simple task turned unexpectedly difficult? Handling stubborn nuts can feel like that, but patience and the right tools can make a world of difference. Remember, practice makes perfect. The more familiar you become with these steps, the more confident you’ll feel tackling them in the future. Always ensure safety is your top priority. What’s your trick for handling stubborn nuts?Installing New Lug Nuts
Changing lug nuts involves removing the old ones and securing new ones with a wrench. Make sure the vehicle is stable and the nuts are tightened properly to ensure safety. Regular checks can prevent wheel issues and maintain smooth driving.
Installing new lug nuts is a crucial step in securing your vehicle’s wheels. Proper installation ensures safety and performance. Let’s walk through the process to get it right.Aligning The Wheel
Start by placing the wheel onto the hub. Ensure the holes in the wheel align with the studs. This alignment is vital for proper installation. Misalignment can lead to safety issues on the road.Tightening The Nuts
Begin threading each lug nut by hand. This prevents cross-threading, which can damage the studs. Once all lug nuts are in place, use a lug wrench. Tighten each nut in a crisscross pattern. This ensures even pressure on the wheel. Avoid over-tightening to prevent damage. Use a torque wrench for accurate tightening. Check your vehicle’s manual for specific torque settings.Lowering The Vehicle
Lowering the vehicle is an essential step in changing lug nuts. Once the lug nuts are properly tightened, it’s time to safely bring your car back to ground level. Ensure everything is done correctly for a smooth and safe process.
Safely Lowering The Car
First, check that all lug nuts are secure. Use a lug wrench to confirm tightness. Place the jack handle in the proper position. Slowly turn the handle counter-clockwise to lower the car. Maintain control as the vehicle descends. Keep hands and feet clear of the car’s path. This prevents injury and ensures safety.
Once the car is close to the ground, pause. Verify the jack is stable and positioned correctly. This avoids sudden movements or shifts. Slowly continue lowering the car until it rests on the ground.
Final Check For Tightness
With the car on the ground, perform a final check. Ensure all lug nuts are tight. Use the lug wrench for verification. Double-check each nut for security. Tight lug nuts prevent wheel wobble and ensure safe driving.
Inspect the wheel visually. Confirm the wheel sits evenly and securely. This final check guarantees your safety on the road. Your vehicle is now ready to go.
Common Mistakes To Avoid
Mistakes often occur when lug nuts are changed. Incorrect torque can damage threads or rims. Ensure correct sequence for even tightening.
Changing lug nuts might seem like a straightforward task, but many people make mistakes that can lead to frustration or even damage to their vehicle. It’s important to know what these common pitfalls are, so you can avoid them and ensure a smooth process. Understanding what not to do is just as crucial as knowing the steps to follow. Let’s dive into these mistakes and learn how you can steer clear of them.Not Checking The Lug Nut Size
Using the wrong size socket is a common blunder. Before you start, verify the size of your lug nuts. The wrong size can strip the nuts or damage the threads. Check your car manual or online specifications for the correct size.Ignoring Torque Specifications
Applying too much or too little torque is a recipe for disaster. Lug nuts need a specific amount of torque to ensure safety. Too tight can warp the brake rotor, while too loose can lead to wheel detachment. Use a torque wrench to get it just right.Skipping The Cross Pattern Tightening
Many people tighten lug nuts in a circular pattern, but this can cause the wheel to mount unevenly. Always tighten in a cross pattern. This ensures even pressure and keeps the wheel balanced.Neglecting The Condition Of Lug Nuts
Worn or rusted lug nuts should be replaced. Ignoring their condition can lead to difficulty during removal and compromise safety. Examine them closely and replace any that show signs of wear.Overlooking Safety Precautions
Safety should never be an afterthought. Ensure your car is on a stable surface and use wheel chocks. You don’t want the car moving while you’re working. It’s not just about efficiency, but your safety too. Avoiding these mistakes can save you time, hassle, and ensure your vehicle remains safe on the road. Have you ever encountered any of these issues? How did you handle it? Sharing your experiences can help others learn and avoid similar mistakes.Maintenance Tips
Changing lug nuts is a critical part of maintaining your vehicle’s safety. Regular maintenance ensures the process is smooth and hassle-free. Here are essential tips to keep your tools and nuts in perfect condition.
Regular Check-ups
Inspect lug nuts every few months. Look for signs of rust or wear. Regular inspection prevents unexpected issues. Tighten loose nuts with the proper torque. This ensures your wheel stays secure. Also, check for any damage to the threads.
Proper Storage Of Tools
Store tools in a dry place. Moisture can cause rust. Keep them organized for easy access. Use toolboxes with compartments. This prevents loss or damage. Clean tools after each use. Dirt can affect their performance. Proper storage extends their lifespan.

Credit: www.wikihow.com
Conclusion
Changing lug nuts is simple with the right steps. Gather your tools first. Loosen the nuts before lifting the car. Use a jack safely. Remove the nuts and swap the tire if needed. Tighten them in a criss-cross pattern. Ensure they’re secure for safe driving.
Check your work twice. Practice makes it easier next time. Always prioritize safety. With these tips, changing lug nuts becomes manageable. Keep learning and stay prepared for your next car challenge.