Are you tired of driving at night with dim headlights that barely light up the road? Imagine cruising with bright, clear visibility, feeling safer and more confident behind the wheel.
If you’ve invested in LED headlight bulbs, you’re already on the right track to achieving this. But did you know that correctly clocking your LED bulbs can make a significant difference in performance? You might be wondering what clocking even means and how it can enhance your driving experience.
Don’t worry—you’re about to discover a simple yet effective way to maximize your headlights’ potential. Stick around, and you’ll learn the secret to making your night drives more illuminating and enjoyable.

Credit: goperformance.helpscoutdocs.com
Benefits Of Led Headlight Bulbs
LED headlight bulbs use less power. This helps save energy. Cars run better with less energy. Less energy means less fuel used. This is good for the environment.
LED bulbs last much longer than other bulbs. You change them less often. This saves money over time. Long-lasting bulbs mean less work for you.
LED lights are very bright. They help you see better at night. Better vision keeps you safe on the road. Clear lights make driving easier.
Tools Required For Installation
Screwdrivers are important. Use them to remove old bulbs. Pliers help with tight spots. Wrenches are handy for loosening bolts. A small flashlight can help see better. Tape keeps wires tidy. Gloves protect your hands. Safety glasses keep your eyes safe. These are basic tools. They make the job easy.
Gloves keep your hands safe. They stop cuts and bruises. Safety glasses protect your eyes. They block dust and dirt. Ear protection can be useful. It stops loud noises. Face masks guard against fumes. These items keep you safe. Safety is important. Always wear them.
Preparing Your Vehicle
First, gather your cleaning tools. Use a soft cloth and mild soap. Gently scrub the headlight surface. Remove dirt and grime for clear visibility. Rinse with clean water and dry. This ensures a clean area for your work. Clean headlights help in better light distribution.
Check the wires carefully for any damage. Look for cuts or breaks. Ensure all connections are tight and secure. Loose wires can cause the lights to flicker. If you find any issues, fix them before proceeding. Proper wiring ensures the headlights work well. Safety first!
Step-by-step Installation Guide
First, open the hood of your car. Locate the headlight housing. Find the bulb socket at the back. Twist the socket counterclockwise. Gently pull out the old bulb. Handle the bulb carefully to avoid breaking it.
Take your new LED bulb. Align it with the socket. Insert it gently. Twist clockwise to secure it. Make sure it fits snugly. Test the bulb by turning on the headlights. Check the beam pattern. Adjust if needed.
Inspect all wires and connections. Look for loose ends. Tighten them if necessary. Ensure wires are not tangled. Check for secure fittings. Use zip ties if required. Test the connections again. Ensure everything works fine.
Adjusting The Beam Pattern
Park the car on a flat surface. Turn on the headlights. Check the beam pattern on a wall. The beams should form a straight line. Use a screwdriver to adjust the headlight screws. Move the beams up or down as needed. They should not point too high or low. Test by sitting in the driver’s seat. Ensure they aim straight ahead.
Drive the car to a dark area. Observe the light spread. It should cover the road evenly. Avoid creating blind spots. Adjust if needed for best visibility. Ensure the beams don’t blind oncoming drivers. Test on different roads. Make sure the light is bright and clear. Repeat the adjustment if necessary.
Troubleshooting Common Issues
Flickering lights can be very annoying. This happens with LED bulbs sometimes. Poor connections often cause this flicker. Check the bulb’s connection to its socket. Make sure it’s tight and secure. Loose connections can lead to flickering.
Voltage issues might also cause flickers. Some cars may not provide steady power. A CAN bus adapter can help fix this. It stabilizes the power supply. Old wiring could be another reason. Inspect the wires for damage or wear. Replace if needed.
Compatibility is key with LED headlights. Some LEDs don’t fit all cars. Double-check your car’s model before buying. Ensure the LED is right for it. Some LEDs need a special adapter. This helps them work properly.
Car’s electrical system might not support the LED. Check your car’s manual for details. Sometimes, a simple software update can solve the problem. Visit a professional if unsure about compatibility.
Maintenance Tips
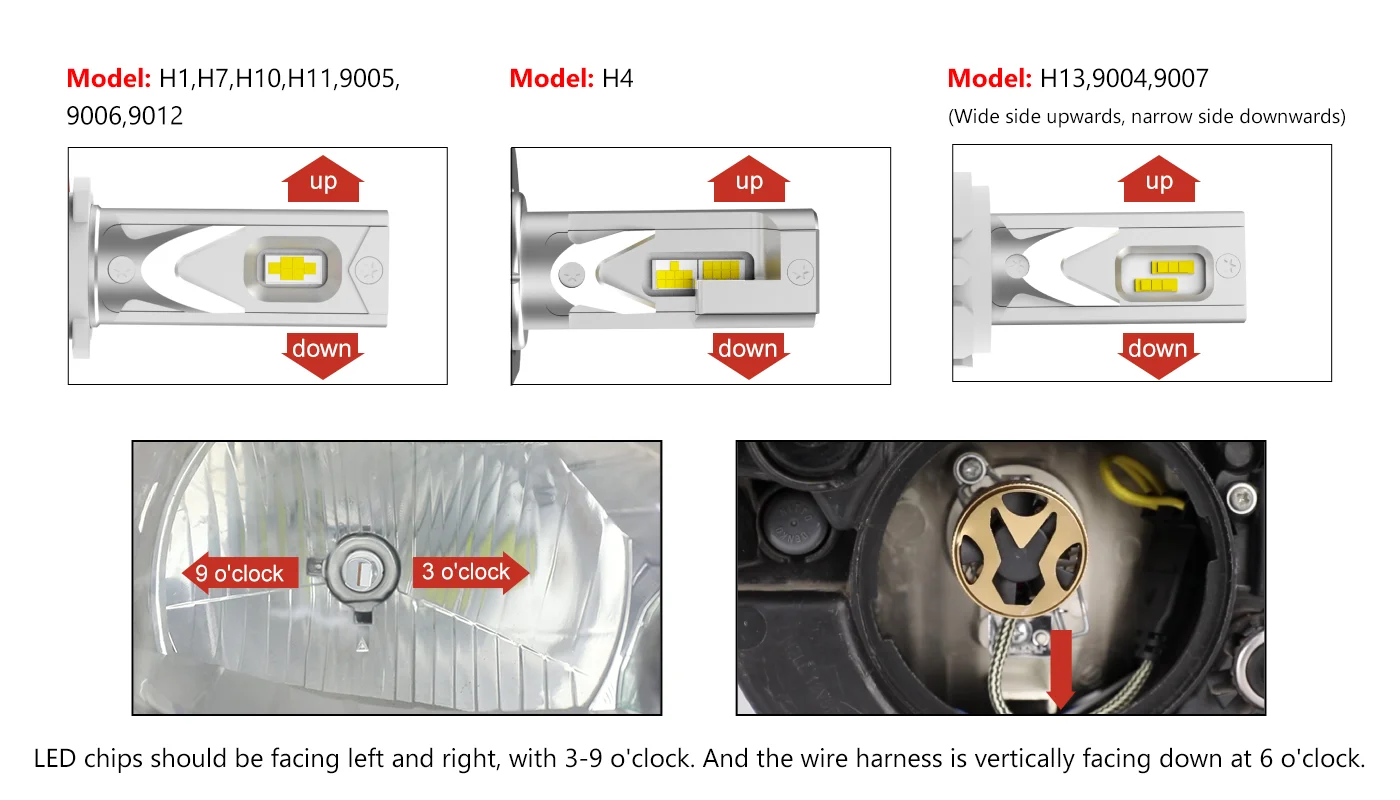
Align LED headlight bulbs by adjusting their position for optimal light distribution. Ensure the bulbs are securely fitted in the socket. Test the alignment by checking the beam pattern on a wall. Properly clocked bulbs enhance visibility and improve driving safety.
Regular Cleaning
Keeping LED headlight bulbs clean is important. Dust and dirt can make them dim. Use a soft cloth to wipe them. Avoid using water. Water can damage the bulbs. Clean them every few weeks. This keeps them bright and clear. Dusty bulbs are not safe for night driving.
Checking For Loose Connections
Check the bulbs for loose connections. Loose connections can make bulbs flicker. Flickering lights can be dangerous. Tighten any loose parts carefully. Use the right tools for this job. Secure connections help the bulbs work well. Check connections every month.
Credit: www.boslla.com
Legal Considerations
Understanding legal considerations is crucial when adjusting LED headlight bulbs. Compliance with local laws ensures safe driving and avoids fines. Proper installation maintains optimal performance without causing glare for other drivers.
Compliance With Local Laws
Check if your LED headlights are legalin your area. Many places have specific rules. Some areas require certain brightness levels. Others may need specific beam patterns. Always ensure your headlights meet these requirements. This helps avoid fines and keeps you safe. Not following the law can lead to trouble.
Avoiding Glare
Glare can blind other drivers. It’s important to adjust headlights correctly. Aim them so they don’t shine too high. This keeps roads safe for everyone. Always use a wall or flat surface for adjusting. It helps in setting the right angle. Proper adjustment ensures clear vision without causing harm.

Credit: winpower-led.com
Conclusion
Changing LED headlight bulbs is simple with the right steps. Follow the process carefully. Ensure bulbs fit snugly for optimal performance. Proper alignment prevents glare and enhances safety. Double-check connections for secure placement. Test headlights to ensure they work correctly.
Seek help if unsure about any step. Remember, patience leads to better results. Regular maintenance extends bulb life. Keep your headlights clean for clear visibility. Enjoy the benefits of improved lighting. Drive safely with well-aligned LED headlights. Your journey becomes safer and more pleasant.