Imagine transforming your car’s interior into a cozy, stylish sanctuary, all with the magic of crochet. Not only can you customize your car seat covers with your favorite colors and patterns, but you can also add a personal touch to your daily commute.
In this guide, we’ll show you how to crochet a car seat cover that not only elevates your car’s aesthetics but also provides comfort and warmth. You’ll discover step-by-step instructions that are simple to follow, even if you’re new to crochet.
By the end of this article, you won’t just have a beautiful, handcrafted seat cover; you’ll have a newfound sense of accomplishment and creativity. So, grab your crochet hook and yarn, and let’s get started on this exciting DIY project that promises to enhance every drive!

Credit: www.youtube.com
Materials Needed
Gather yarn, a crochet hook, and scissors for crafting your car seat cover. Choose durable yarn for longevity. Ensure your crochet hook matches the yarn weight.
When crocheting a car seat cover, gathering the right materials is essential. Each item you select impacts the final look and feel. Let’s explore what you need for this project.Yarn Selection
Choosing the right yarn is crucial. Soft yarns make comfortable covers. Cotton or acrylic yarns are popular choices. They are durable and easy to clean. Pick a color that matches your car’s interior. You may need several skeins for full coverage.Crochet Hook Size
Using the correct crochet hook size is important. It affects the tightness of your stitches. A larger hook creates looser stitches. A smaller hook makes tighter ones. For car seat covers, a medium size like H/8 (5 mm) works well. Always check your yarn label for recommendations.Additional Tools
A few extra tools simplify your work. Scissors help cut yarn cleanly. A yarn needle is useful for weaving in ends. Stitch markers keep track of your progress. A measuring tape ensures the cover fits perfectly. Gather these before starting your project.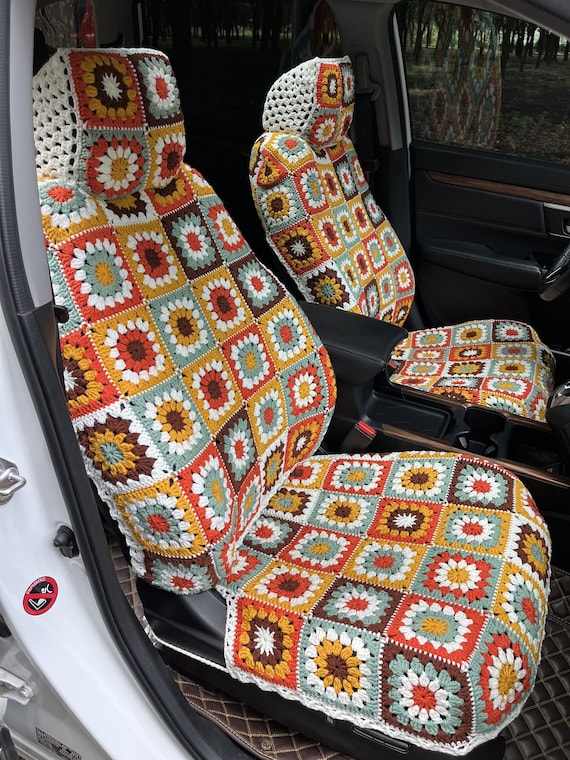
Credit: www.etsy.com
Choosing The Right Pattern
Choosing the right pattern for a crochet car seat cover is crucial. A well-selected pattern enhances your vehicle’s interior and meets your needs. Beginners may prefer simple designs, while experienced crocheters might opt for more intricate styles. The pattern choice affects the difficulty level and the customization options.
Pattern Complexity
Pattern complexity varies from beginner to advanced levels. Simple patterns often feature basic stitches, making them easy for newcomers. They allow quick progress and less frustration. Advanced patterns include elaborate designs with multiple stitch types. These patterns offer a rewarding challenge for seasoned crocheters. Consider your skill level before selecting a pattern.
Customizing Design
Customizing your crochet car seat cover design adds a personal touch. Choose colors that match your vehicle’s interior for a cohesive look. Patterns can be adjusted for size and fit, ensuring comfort and style. Add unique motifs or textures to make the cover stand out. Experiment with different yarn types for varied effects. Customization makes your project uniquely yours.
Measuring Your Car Seat
Creating a crochet car seat cover begins with accurate measurements. Proper sizing ensures a snug fit. This helps the cover look neat and feel comfortable. Measuring might seem simple, but it requires attention to detail. Let’s explore how to measure your car seat effectively.
Dimensions To Consider
Start by measuring the width of the seat. Use a measuring tape for accuracy. Record the distance from one side to the other. Next, measure the depth. This is the distance from the backrest to the front edge. Finally, measure the height from the bottom to the top of the backrest. These dimensions guide your crochet project.
Accounting For Stretch
Crochet yarn can stretch with use. Consider this factor while measuring. Choose yarn that stretches a little for flexibility. Plan for slight give in the final product. This ensures a comfortable fit over time. Adjust your measurements to accommodate potential stretching. Keep the stretch factor in mind as you crochet.
Credit: www.reddit.com
Starting The Base
Crafting a car seat cover with crochet starts with creating a strong base. This foundation ensures stability and comfort. Begin by setting up the base, as it plays a vital role in shaping the cover.
Creating The Foundation Chain
The foundation chain is the first step. Use a soft, durable yarn. Measure the seat width. Chain stitches until you reach the desired length. This chain serves as the backbone for your cover.
Building The Initial Rows
Once the foundation chain is ready, start the initial rows. Single crochet stitches work best here. They provide a neat, tight finish. Crochet along the chain, maintaining even tension. This builds the solid base needed for your seat cover.
Crocheting The Seat Cover Body
Create a cozy car seat cover with crochet by starting with the seat cover body. Choose a durable yarn for lasting use. Follow a simple pattern to cover the seat neatly and securely.
Crocheting the seat cover body is an exciting step that brings your project to life. It’s where your creativity shines and the functional aspect of your crochet skills is put to the test. You might find this part slightly challenging, but it’s also incredibly rewarding.Stitch Techniques
Selecting the right stitch can make a big difference in your seat cover’s durability and appearance. Choose a stitch that is sturdy yet aesthetically pleasing. A simple single crochet stitch provides thickness and stability, ideal for car seat covers. Consider trying a textured stitch for added comfort. The popcorn stitch can add a unique look and feel to your seat cover. Mixing stitches can also create an interesting pattern, making your seat cover a standout piece.Maintaining Consistent Tension
Consistent tension is key in crochet. It ensures your seat cover is even and snug. If your tension is too tight, the cover might not fit well, causing frustration. Too loose, and it won’t hold up over time. You can test your tension by making a small swatch first. This helps you adjust your hand movements and yarn handling before tackling the entire piece. Remember, practice makes perfect. Have you ever noticed how a slight change in tension can alter the look of your crochet? This is why it’s important to pay attention to your grip and yarn flow. It’s one of those small details that make a big difference.Adding Details And Texture
Enhancing your crochet project with details and texture brings life to car seat covers. Use varied stitches for a unique design. Mixing colors and patterns adds personality and charm, making your car interior more inviting.
Adding details and texture to your crochet car seat cover can transform a simple project into an eye-catching masterpiece. Think about the last time you sat in a car with a seat cover that had an interesting pattern or vibrant colors. Didn’t it make the journey a bit more enjoyable? By focusing on adding details, you can create a seat cover that is both functional and aesthetically pleasing. This section will guide you through incorporating patterns and adding color variations to give your car seat cover a unique touch.Incorporating Patterns
Patterns can add depth and interest to your crochet project. You might start with basic stitches, but don’t stop there. Explore more complex patterns like chevrons or waves to create visual appeal. Consider how different patterns can change the look of your seat cover. A diamond pattern can add a touch of elegance, while stripes can give a sporty vibe. Use patterns to reflect your personal style. Practice a few pattern swatches before committing to your entire seat cover. It’s a great way to experiment without unraveling large sections. Which pattern best represents your style?Adding Color Variations
Color is a powerful tool in crafting. Think about what colors will complement your car’s interior and stand out against the upholstery. Using multiple colors can add dynamism and prevent your project from looking flat. Consider using a gradient effect, where colors subtly blend into one another. This can be achieved with yarn that shifts colors or by alternating different colored yarns. Would a pop of bright color make your seat cover more exciting? Don’t be afraid to use contrasting colors for a bold look. A black and white combination, for example, can be striking and modern. How will your color choices reflect your personality and enhance your car’s interior? By focusing on these elements, your crochet car seat cover can become a true reflection of your creativity.Fitting And Adjusting
Creating your own crochet car seat cover adds a personal touch to your vehicle. Once the crochet work is complete, ensuring a perfect fit becomes crucial. Proper fitting and adjusting enhance comfort and showcase your craftsmanship. Let’s explore how to make your car seat cover fit snugly.
Testing Fit On The Seat
Place the crochet cover on the car seat gently. Ensure it aligns with the seat’s contours. Check if it covers all necessary parts without bunching. Sit on the seat to test comfort. Observe if the cover stays in place while moving.
Examine the cover from different angles. Ensure it doesn’t obstruct any seat functions. Look for areas where the cover might slip or shift. Make notes of sections needing adjustments.
Making Necessary Adjustments
Identify loose or tight areas on the cover. Adjust crochet stitches if required. Tighten stitches for loose areas. Loosen them for tight sections. Use yarn or elastic to secure the cover. Attach hooks or ties for better hold.
Re-test fit after adjustments. Ensure the cover is secure and comfortable. Make minor tweaks if needed. Aim for a flawless fit that enhances your car’s interior.
Securing The Cover
Securing your crochet car seat cover is crucial for safety and appearance. A well-secured cover remains in place during drives. It ensures comfort and maintains aesthetics. This section guides you through attaching fasteners and ensuring stability. Follow these steps for a secure fit.
Attaching Fasteners
Start with selecting the right fasteners. Buttons, snaps, or ties work well. Sew these fasteners at strategic points on your crochet cover. Place them at the edges and corners for a snug fit. Use a strong thread to attach them securely. Fasteners should withstand daily use and movement.
Ensure fasteners are easy to open and close. They should not damage the crochet fabric. Test each fastener to confirm they hold firmly. Adjust placement if needed for better security.
Ensuring Stability
Stability prevents the cover from slipping or sliding. Consider adding a non-slip backing to your cover. This can be sewn or glued on. It grips the seat, providing extra stability.
Check the cover’s fit regularly, especially after installation. If it shifts, adjust the fasteners or add more. A stable cover enhances comfort and safety during travel.
Care And Maintenance
Crocheting a car seat cover brings comfort and style to your vehicle. Knowing how to care for it ensures it lasts longer and looks great. Proper maintenance keeps it vibrant and functional.
Cleaning Guidelines
Regular cleaning helps maintain the freshness of your crochet car seat cover. Always check the yarn type before washing. Some yarns require gentle hand washing. Use mild detergent and cold water. Avoid bleach to keep colors bright.
For machine washing, use a delicate cycle. Place the cover in a mesh laundry bag. This prevents tangling and stretching. Air drying is best. Lay it flat on a clean towel. Avoid direct sunlight to prevent fading.
Repair Tips
Small snags and tears can happen. Repair them quickly to prevent further damage. Use a crochet hook to pull loose threads back into place. Reinforce weak areas with matching yarn. This strengthens the cover and maintains its shape.
For larger tears, consider patching. Cut a piece of fabric slightly larger than the tear. Secure it with yarn and a crochet hook. This creates a durable fix and blends seamlessly with the design.
Conclusion
Creating your own car seat cover can be rewarding. It adds a personal touch. With practice, crochet becomes easier. You can choose colors that match your style. A handmade cover also brings comfort. Plus, it protects your car seat. Crafting these covers is fun.
It’s a relaxing hobby. Don’t worry about mistakes. Each effort improves your skill. Soon, you’ll crochet like a pro. Share your creations with friends. Inspire them to try too. Enjoy the journey of crafting. Happy crocheting!