Are you ready to unlock your artistic potential and learn how to draw a steering wheel? Whether you’re a budding artist or just looking to improve your drawing skills, mastering the art of sketching a steering wheel can be both fun and rewarding.
Imagine the satisfaction of bringing to life an essential part of what drives us forward, quite literally! In this guide, you’ll discover simple, step-by-step instructions that make drawing a steering wheel as easy as taking a Sunday drive. You’ll gain insights into the shapes and details that make a steering wheel look realistic, all while boosting your confidence in your drawing abilities.
Keep reading, and you’ll soon realize that drawing a steering wheel is not just about lines and circles—it’s about seeing the world with an artist’s eye. Let’s dive into this creative journey, and watch your skills take the wheel!

Credit: www.youtube.com
Materials Needed
Gather pencils, erasers, and a ruler for drawing a steering wheel. Keep paper and a compass handy too. These materials help create smooth lines and curves.
Before you start drawing a steering wheel, you’ll need to gather some essential materials. Having the right tools can make a huge difference in your creative process. Imagine trying to bake a cake without a whisk or a spoon; it’s doable, but far from ideal. The same principle applies here. With the right materials, you’ll be well-equipped to bring your vision of a steering wheel to life. ###1. Drawing Paper
Choose a quality drawing paper that suits your style. A sketchpad with smooth pages can be perfect for detailed work, while a rougher texture might add character to your sketch. You might already have a favorite brand, but consider trying something new to see how it affects your drawing. ###2. Pencils
A range of pencils is essential. You’ll want a harder pencil, like a 2H, for initial sketches and outlines. Softer pencils, such as 2B or 4B, are great for adding depth and shading. Don’t limit yourself to just one type; experiment with different hardness levels to see what works best for your steering wheel design. ###3. Erasers
A good eraser is your best friend in any drawing project. You’ll need a regular eraser for larger areas and a kneaded eraser for precision work. Kneaded erasers can be shaped to fit any part of your drawing, making them invaluable for intricate details. ###4. Ruler
Accuracy is key when drawing a steering wheel. A ruler helps maintain symmetry and proportion. It’s especially handy when you’re working on the circular parts of the wheel, ensuring that your lines are straight and even. ###5. Compass
A compass is a must-have for creating perfect circles. It allows you to draw the outer and inner circles of the steering wheel with ease. If you’ve never used a compass in your drawings, you might be surprised by how much it simplifies the process. ###6. Fine Liners Or Ink Pens
Once your pencil sketch is complete, fine liners or ink pens can add a professional touch. These tools help define the lines and bring out the details. Use them to highlight specific parts of your steering wheel, giving it a polished finish. ###7. Coloring Tools
Whether it’s colored pencils, markers, or pastels, adding color can bring your steering wheel to life. Think about the colors you see in real cars and how they might enhance your drawing. Adding color can also help you visualize different design options. ###8. Reference Image
A reference image is incredibly helpful, especially if you’re aiming for realism. Find a picture of a steering wheel that inspires you. Having a visual guide can keep you on track and provide ideas for textures and details you might not have considered. Gathering these materials before starting your drawing will set the stage for success. What tools do you usually rely on for drawing? Have you ever tried adding new materials to your toolkit? Reflecting on these questions might just spark your next creative breakthrough.Setting Up Your Workspace
Creating art requires a conducive workspace. An organized setup enhances creativity and focus. When drawing a steering wheel, your workspace should be neat and comfortable. This ensures you have everything you need within reach. A well-prepared area helps you stay immersed in your art.
Choose A Well-lit Area
Good lighting is essential. Natural light is ideal. It reduces eye strain and highlights details. If natural light isn’t available, use a bright desk lamp. Position it to minimize shadows on your paper. This ensures your lines are clear and precise.
Organize Your Drawing Materials
Gather all necessary materials beforehand. Keep pencils, erasers, and paper nearby. Use a pencil holder or tray for easy access. This prevents interruptions while drawing. Having everything ready saves time and maintains your focus.
Ensure Comfortable Seating
Your chair should support good posture. Comfort prevents fatigue during long sessions. Adjust your chair to suit your height. Ensure your feet rest flat on the floor. This promotes better concentration and reduces physical strain.
Minimize Distractions
Choose a quiet area for your workspace. Turn off unnecessary electronics. Inform others of your drawing time. Use noise-canceling headphones if needed. A distraction-free environment boosts creativity and productivity.
Keep Your Workspace Clean
Clutter can hinder creativity. Regularly tidy your workspace. Store unused items in drawers or cabinets. A clean desk fosters a clear mind. It also makes it easier to find your tools.
Incorporate Inspiration
Surround yourself with inspiring objects. Display art pieces or photographs. Hang posters of your favorite artists. These can spark ideas and motivate you. Inspiration fuels creativity.
Drawing The Outer Circle
Create a perfect steering wheel by first drawing the outer circle. Use a compass for a neat, round shape. Ensure the circle is smooth to form the wheel’s boundary.
Drawing the outer circle of a steering wheel is a crucial step in ensuring the overall shape is accurate and realistic. This part sets the foundation for the entire drawing, so it’s essential to get it right. Whether you’re a beginner or a seasoned artist, mastering this step will enhance your confidence and improve your drawing skills. ###1. Prepare Your Drawing Surface
Before you begin, ensure your paper is smooth and your pencil is sharp. A clean surface helps create precise lines. Have an eraser handy for any adjustments. ###2. Find The Center Point
Start by lightly marking the center point on your paper. This acts as a guide for drawing your circle evenly. Imagine the steering wheel is a clock face; this point is the center. ###3. Use A Compass Or A Circular Object
A compass can be a useful tool for drawing a perfect circle. Adjust it to your desired radius and draw lightly around the center point. If you don’t have a compass, use a circular object like a lid or a cup. This ensures that your circle is symmetrical. ###4. Consider The Size
Decide on the size of your steering wheel. A standard steering wheel has a diameter of about 14 inches. Scale this down appropriately for your drawing. This will give you a more realistic proportion. ###5. Draw Lightly At First
Sketch the circle lightly so you can easily erase and refine it. This allows you to make corrections without leaving dark lines. It’s easier to adjust a light sketch than to fix a heavy-handed line. ###6. Check For Symmetry
Once the circle is drawn, take a step back and check for symmetry. Does it look balanced? Are the edges even? You can use a ruler to measure the distance from the center point to the edge at several points around the circle. ###7. Adjust As Necessary
If your circle seems off, don’t hesitate to adjust it. Erase and redraw until it meets your satisfaction. Remember, patience is key to achieving a perfect circle. ###8. Reinforce The Outline
Once you’re satisfied with the shape, reinforce the circle by drawing over it with a slightly firmer hand. This creates a more defined edge that will guide the rest of your drawing. ###9. Reflect On Your Process
After completing the outer circle, take a moment to reflect. Did you find any part challenging? What might you do differently next time? This reflection helps improve your technique. Drawing a steering wheel’s outer circle requires patience and precision. Have you ever struggled with drawing circles? How did you overcome the challenge? Share your experiences in the comments below.Creating The Inner Circle
Creating the inner circle of a steering wheel is essential. It forms the core of your design. This is where precision counts. A perfect circle sets the foundation for the rest of the drawing. It’s important to get this right. Let’s dive into the steps.
Step 1: Choose The Right Tool
Start by selecting a compass. A compass helps you draw perfect circles. Ensure it’s sharp and well-calibrated. This ensures smooth lines.
Step 2: Determine The Circle’s Size
Decide on the size of your steering wheel. A typical size is about 4 inches in diameter. Adjust your compass to this size. This will guide the circle’s dimensions.
Step 3: Find The Center Point
Mark the center point on your paper. This is crucial for accuracy. Use a ruler to locate the center. This will anchor your compass.
Step 4: Draw The Circle
Place the compass point on the center mark. Gently draw the circle with steady hands. Make sure the pencil remains firm on the paper. This prevents wobbly lines.
Step 5: Refine The Circle
Examine the circle for irregularities. Make adjustments if necessary. Use an eraser for small corrections. A clean circle enhances the overall design.
Adding The Spokes
Starting with the center circle, draw lines radiating outwards to form the spokes. Ensure equal spacing for balance. These lines connect the outer circle to the inner hub, creating the steering wheel’s structure.
Adding spokes to your steering wheel drawing can transform a simple circle into a detailed and realistic artwork. The spokes are not just connectors; they define the structure and style of the steering wheel. They offer an opportunity to showcase your creativity and attention to detail. Whether you opt for a classic three-spoke design or a modern five-spoke pattern, the choices are endless. Let’s dive into how you can add these crucial elements to your drawing.Understanding The Importance Of Spokes
Spokes are more than just lines. They give character to your steering wheel and make it look authentic. Think about how different designs can change the look and feel of a car. Consider the difference between a sporty car and a vintage vehicle. The spoke design sets the tone for the entire drawing.Choosing The Right Number Of Spokes
Decide how many spokes you want. Most steering wheels have three or four spokes. A three-spoke design is common in sports cars, offering a sleek and minimalistic look. A four-spoke design, on the other hand, is often seen in classic cars, providing a balanced and traditional appearance.Positioning The Spokes Correctly
Align the spokes evenly around the center of the wheel. This ensures symmetry and balance in your drawing. You might want to use a ruler or a straight edge to keep lines straight. Imagine how a real steering wheel looks when you’re driving. You can even sit in your car and observe the angles and positions for accuracy.Adding Details To The Spokes
Consider adding textures or patterns to your spokes. This can be as simple as adding shading or more complex designs like grooves or metallic finishes. Think about how light interacts with the spokes. A little shadow can make them look more three-dimensional and lifelike.Reviewing Your Work
Take a step back and look at your drawing. Do the spokes look proportional and evenly spaced? It’s easy to get lost in the details and forget the overall look. Ask yourself if the design feels right. If something seems off, don’t hesitate to make adjustments. After all, your drawing should reflect your personal style and vision. Your steering wheel drawing is now complete with beautifully designed spokes. You’ve added depth and personality, turning a simple shape into a dynamic piece of art. What other elements could you add to make your drawing stand out even more?Sketching The Center Hub
Creating the center hub of a steering wheel involves drawing a perfect circle. Next, add details like spokes and buttons. Keep it simple and focus on symmetry for a realistic look.
Drawing a steering wheel might seem daunting at first, but breaking it down into manageable parts can simplify the process. One crucial component is the center hub, which acts as the focal point of your drawing. If you can sketch the center hub accurately, the rest of the wheel will naturally fall into place. So, how do you start? Let’s dive into the process of sketching the center hub, the heart of any steering wheel illustration.Understanding The Hub’s Structure
Begin by observing real steering wheels. Notice how the center hub connects the wheel’s spokes. It’s usually circular or slightly oval, often featuring brand logos or buttons. Grasping these details helps you replicate the real-world look in your drawing. This step requires observation more than artistic skill.Drawing The Initial Circle
Start with a clean sheet of paper and a pencil. Draw a light circle in the center to represent the hub. Use a compass if you have one, or trace a round object like a bottle cap. This ensures symmetry, which is key for a realistic look.Adding Depth With Shading
Shading is what brings your drawing to life. Lightly shade one side of the hub to create a sense of depth. Consider where the light would naturally fall. Picture the hub under a light, and let that guide your shading.Detailing The Center Features
Next, add any specific details like a logo or buttons. Keep these elements proportional to your hub’s size. You might remember a time you noticed a car’s steering wheel logo. Use that memory as a reference for size and placement.Evaluating Your Sketch
Step back and look at your hub. Does it look balanced? Are the details accurate? This evaluation is a critical part of the process. It helps refine your skills and improves your future sketches. Remember, the more you practice, the better your sketches will become. A well-drawn center hub sets the tone for the entire steering wheel illustration. So, why not grab your pencil and start drawing today?Detailing The Grip
Detailing the grip of a steering wheel brings it to life. This part needs precision and care. It shows the wear and touch of hands. A well-detailed grip can make your drawing stand out. Let’s dive into the steps to create an authentic grip.
Creating The Basic Shape
Begin with a simple curved line. This line will form the outer edge of the grip. Keep it light, so changes are easy.
Defining The Thickness
Draw another parallel line inside the first. This defines the grip’s thickness. Ensure both lines follow the same curve.
Adding Texture
Texture brings realism. Use short, curved lines along the grip. These lines mimic the leather or rubber surface.
Emphasizing Shadows
Shadows add depth. Darken areas where the grip curves away. This highlights the light source direction.
Incorporating Details
Add small details like stitching. Draw tiny, evenly spaced lines. They should follow the curve of the grip.
Finishing Touches
Review your work. Ensure all parts look consistent. Make adjustments for balance and proportion.
Refining The Spokes
Drawing a steering wheel involves attention to detail. The spokes play a key role. They connect the outer wheel to the center. Refining them brings your drawing to life. Focus on symmetry and proportion. This ensures a realistic look.
Begin by sketching basic lines. These will guide the spokes. Adjust them for even spacing. Now, let’s dive into the details.
Adding Depth To Each Spoke
Start by thickening each spoke. This adds depth and realism. Use light pencil strokes. Gradually darken as you go. Keep the lines clean and smooth. Avoid harsh angles. Round edges create a more authentic look.
Ensuring Symmetry And Balance
Check for symmetry. Each spoke should be evenly spaced. Use a ruler if needed. This helps maintain balance. Adjust any uneven lines. Symmetry enhances the overall design. Take your time with this step.
Adding Details For Realism
Add fine details to the spokes. Include texture and shading. This adds realism. Observe real steering wheels for reference. Notice the small details. Replicate them in your drawing.
Final Touches And Shading
Use shading to create depth. Highlight areas that catch light. Darken areas in shadow. This makes the spokes stand out. Blend the shades smoothly. This technique enhances the 3D effect.
Adding Texture And Shading
Enhance your steering wheel drawing by adding texture and shading. Lightly sketch shadowed areas for depth and realism. Use varied pencil strokes to create a smooth or rough surface, mimicking real-life materials.
Adding texture and shading to your steering wheel drawing can breathe life into your artwork. These elements create depth and realism, transforming a flat image into something that jumps off the page. Whether you’re a beginner or have some drawing experience, mastering texture and shading can take your skills to the next level.Understanding Texture
Texture in drawing refers to the surface quality of an object—how it feels or appears to feel. When drawing a steering wheel, think about the materials it’s made from. Is it leather, plastic, or metal? Each material has a unique texture that you can mimic using different techniques. Leather might have a smooth yet slightly grainy appearance. Use small, circular motions with your pencil to replicate this. For metal parts, keep your lines clean and straight to suggest a sleek surface. Always observe real-life examples to refine your technique.Shading Basics
Shading adds dimension to your drawing. It shows how light interacts with the object, creating highlights and shadows. Start by identifying the light source in your drawing. This will guide where the shadows and highlights fall on the steering wheel. Apply a softer pencil for shadows and a harder one for highlights. Press lightly at first; you can always add more pressure to darken areas. Remember, shadows should be consistent with the light source direction.Layering Techniques
Layering is crucial when adding texture and shading. Begin with a base layer of light shading. This sets the tone without overwhelming the details. Gradually add layers, building up the intensity and texture. Use cross-hatching or stippling for added depth. These techniques can create a realistic feel, especially for textured materials like leather or cloth. Experiment with different pencil strokes to see what works best for your drawing style.Using Blending Tools
Blending tools can soften harsh lines and create smooth transitions between light and shadow. A blending stump or your fingertip can be effective for this. Gently blend the shaded areas, but be careful not to overdo it. Blending can also help unify textures. If your steering wheel has a leather texture, blending can make it appear more natural. Practice on scrap paper to perfect your technique before applying it to your main drawing.Personal Experience
When I first started shading, my drawings looked flat and lifeless. But once I practiced with different textures, my artwork came alive. I found that observing real objects helped me understand how light and texture interact. Have you ever noticed how a steering wheel catches the light differently depending on its material? Next time you’re in a car, take a moment to observe. You’ll gain valuable insights to apply to your drawing. Adding texture and shading doesn’t just enhance your drawing; it changes how you see the world. What textures and shades will you experiment with next?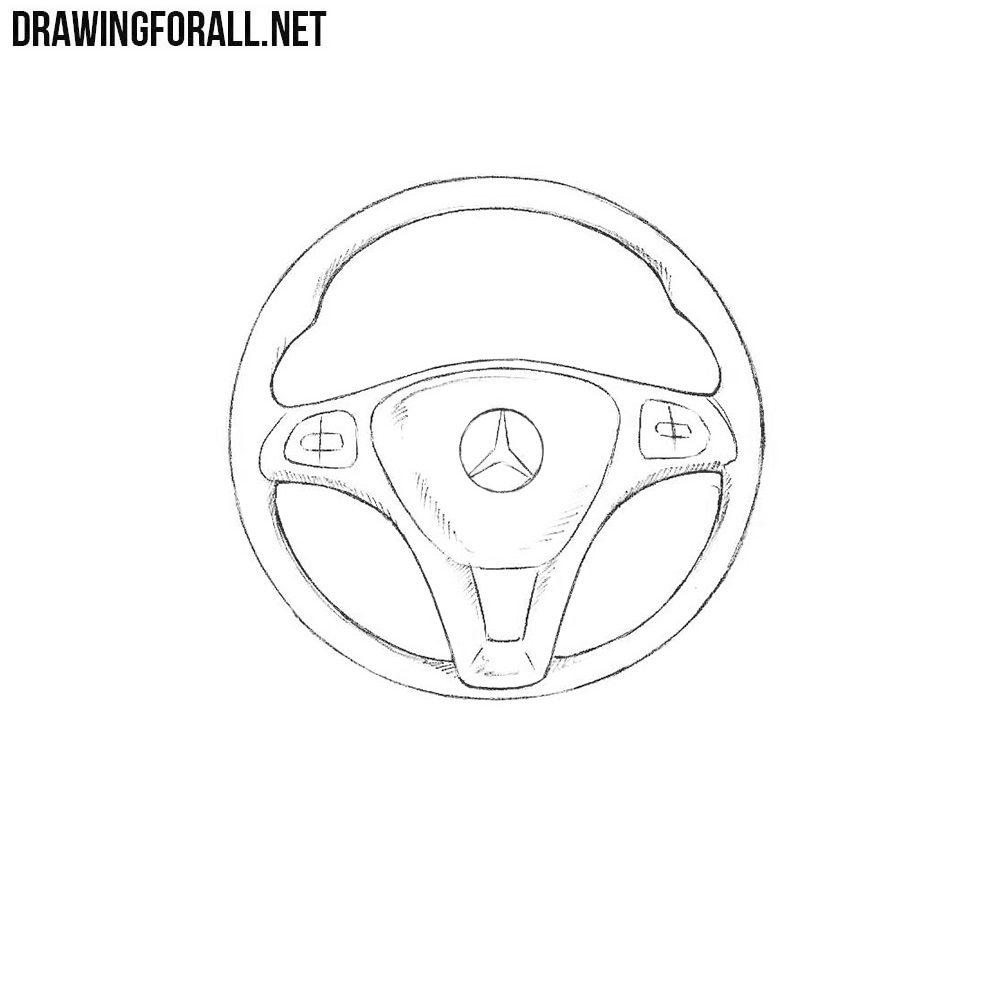
Credit: www.drawingforall.net
Final Touches
The final touches bring your steering wheel drawing to life. These subtle details make it appear realistic and complete. Focus on enhancing texture, shading, and highlights. This section guides you through these finishing steps.
Adding Texture
Texture gives your drawing depth. Consider the material of the steering wheel. Is it leather, rubber, or plastic? Each material has unique patterns. Use light strokes to mimic these textures. This adds realism and authenticity.
Refining Shading
Shading is crucial for dimension. Identify the light source in your scene. Shadows fall away from the light. Darken areas that are less exposed. Blend shading smoothly for a natural look. This creates a three-dimensional effect.
Highlighting Key Features
Highlights add shine and detail. Focus on areas that catch the light. Typically, the top and sides of the wheel. Use an eraser to create bright spots. This technique enhances the illusion of light reflection.
Perfecting Proportions
Check the proportions of your drawing. Ensure symmetry and balance. The wheel’s shape should be circular. Adjust any uneven lines. This ensures your steering wheel looks accurate and polished.
Final Review
Take a step back and review your drawing. Look for any missed details. Make final adjustments as needed. This last look ensures your artwork is complete. Your steering wheel should now be ready to impress.

Credit: helloartsy.com
Conclusion
Creating a steering wheel drawing is simple and fun. Start with basic shapes. Then add details like the grip and spokes. Practice often to improve. Use different pencils for shading. Experiment with styles and designs. Drawing helps relax the mind.
It boosts creativity and focus. Share your artwork with friends. Get feedback and learn more. Enjoy the process of drawing. Remember, art is about expressing yourself. Keep drawing and exploring new ideas. With time, your skills will grow. Enjoy your artistic journey.