Are you ready to enhance the look and functionality of your Jeep Wrangler? Installing side steps is a fantastic way to make your rugged vehicle even more accessible and stylish.
Whether you have a Jeep Wrangler JK or TJ, adding side steps can provide that extra boost you need to comfortably enter and exit your ride. Not to mention, they offer protection against road debris and rocky trails. Imagine cruising down the road with your Jeep looking tougher than ever.
That’s what the right side steps can do for you. Plus, the installation process is more straightforward than you might think. We’re here to guide you step by step, ensuring you get it done right the first time. Don’t miss out on making your Jeep Wrangler even more impressive. Dive into our detailed guide and transform your driving experience today.
Credit: www.extremeterrain.com
How To Install Side Steps On Jeep Wrangler Jk
Installing side steps on a Jeep Wrangler JK involves aligning the brackets, securing them with bolts, and attaching the steps. Carefully tighten all screws to ensure stability. This process enhances accessibility and adds a rugged look to your vehicle.
Installing side steps on a Jeep Wrangler JK can transform your off-road experience. Not only do they enhance the vehicle’s look, but they also offer practical benefits, such as easier access and added protection. Dive into the step-by-step process to ensure your installation is smooth and successful.
Tools Required Before starting the installation, gather all necessary tools. This ensures you have everything ready for a hassle-free process. Here’s what you’ll need: – Socket wrench set: Helps to tighten bolts securely. – Drill with bits: Necessary for drilling holes if required.
– Measuring tape: Ensures accurate alignment of the steps. – Safety goggles: Protects your eyes during drilling. – Gloves: Keeps your hands safe and clean. Preparing Your Jeep Wrangler JK Start by preparing your Jeep for the installation. Proper preparation ensures the steps align correctly and are secure.
Remove any existing side steps if present. This clears the space for new installation. Clean the area to remove dirt and debris. A clean surface ensures better adhesion and safety. Lay out all parts from the side step kit to check for completeness.
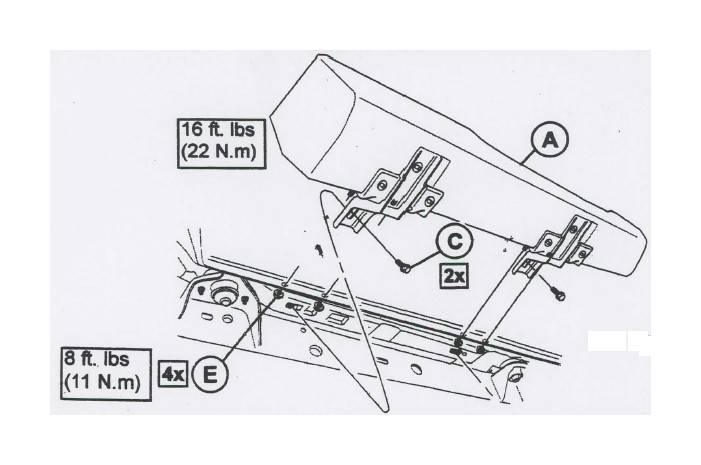
Installation Process Once prepared, move on to the installation. Follow these steps for a straightforward setup. Align the brackets with the vehicle’s frame. Ensure they fit snugly. Attach the side steps to the brackets securely. Use bolts from the kit.
Double-check all connections for stability. Ensure nothing is loose. Final Adjustments After installation, make final adjustments. This ensures optimal performance and safety. Test the steps by stepping on them. Check for any movement or instability. Tighten any loose bolts or connections.
Reassure everything is firm. Inspect the alignment visually to ensure symmetry. Adjust if necessary.
How To Install Side Steps On Jeep Wrangler Tj
Installing side steps on a Jeep Wrangler TJ enhances accessibility and style. Begin by gathering essential tools like a wrench and drill. Secure the side steps using provided brackets and bolts, ensuring a sturdy fit.
Installing side steps on a Jeep Wrangler TJ can elevate its accessibility and style. These steps make entry and exit simpler, especially for lifted models. Let’s dive into a straightforward guide to help you install these side steps yourself. Tools Needed Gathering the right tools is essential for a smooth installation process.
Here’s a quick list of what you’ll need: – Socket wrench set: For tightening bolts and nuts. – Drill: For creating necessary holes. – Measuring tape: Ensures proper alignment. – Screwdriver: For fastening screws securely. Preparing the Jeep Getting your Jeep ready is a crucial step before installation.
Follow these preparatory steps: – Park on a flat surface: Ensures stability during installation. – Clean the underside: Removes dirt for a better fit. – Check for existing holes: Identifies if drilling is necessary. Installing the Brackets Once prepared, you can begin attaching the brackets.
This step is crucial for side steps to remain secure. Secure the brackets using the socket wrench. Ensure they align with pre-drilled holes or newly drilled ones. Tighten each bolt carefully to prevent any wobbling. Attaching the Side Steps After brackets are in place, it’s time to fix the side steps.
Here’s how: – Position the side steps: Align them with the brackets. – Use screws: Attach the steps to the brackets. – Double-check tightness: Ensures steps are firmly mounted. Testing Stability Once installed, testing stability is vital. Make sure everything is safe and secure.
Step on each side step gently to check for movement. Tighten any loose screws or bolts as needed. Confirm the steps support weight without shifting.
Credit: wranglertjforum.com
Conclusion
Installing Jeep Wrangler side steps is simple and rewarding. Follow the steps carefully for a perfect fit. Always check your tools before starting. Secure all bolts and screws tightly. Safety first, so have a friend help if needed. Enjoy easier access to your Jeep with these side steps.
They add style and function to your vehicle. Keep the instructions handy for future reference. Happy driving with your newly installed side steps!