Are your vehicle’s leaf springs in need of a replacement? Whether you’re looking to boost your ride’s performance or simply restore its smooth feel, learning how to install leaf springs can make a world of difference.
This task may seem daunting at first, but with a bit of guidance, you’ll be surprised at how manageable it can be. Imagine the satisfaction of knowing you’ve personally improved your vehicle’s handling and comfort. In this guide, you’ll discover step-by-step instructions that simplify the process.
You’ll gain insights into the essential tools needed, and you’ll learn how to install leaf spring bushings like a pro. We’ll help you avoid common mistakes that can save you time and effort. By the end of this article, you’ll feel confident and ready to tackle the installation with precision and ease. Dive in and unlock the secrets to a smoother, more controlled driving experience.
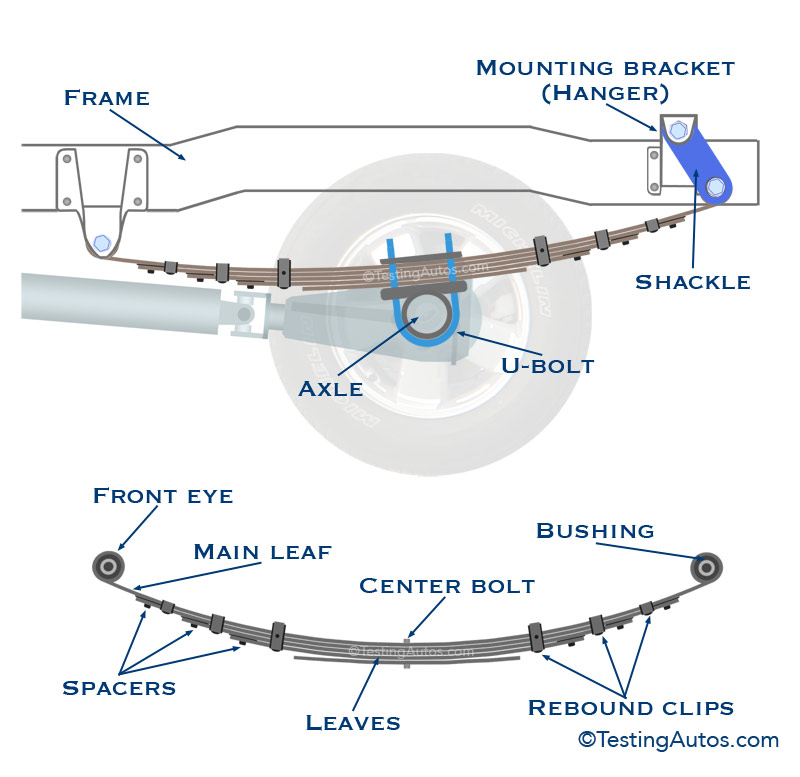
Credit: www.testingautos.com
How To Install Leaf Spring Bushings
Begin by lifting the vehicle and securing it properly. Remove the old leaf spring bushings using a bushing removal tool. Insert new bushings into the spring eyes, ensuring they fit snugly. Reattach the leaf springs to the vehicle, tightening bolts securely for safe operation.
Leaf spring bushings are small components, but they play a big role. They reduce friction between the spring and the vehicle’s frame. Installing them correctly ensures a smooth ride. Let’s delve into the steps to install these crucial parts with ease.
Gather Your Tools Before you begin, it’s essential to have the right tools at hand. Here’s a list to guide you: – Socket set: Useful for removing and tightening nuts and bolts. – Wrench: Needed for loosening and tightening various parts.
– Lubricant: Helps ease the bushing into place. – Jack and jack stands: Lift and secure the vehicle safely. – Hammer or mallet: Aids in fitting the bushings snugly. Remove the Old Bushings Taking out the old bushings is your first task.
Approach this with patience: – Secure the vehicle: Use the jack and stands for stability. – Locate the leaf spring: Find where the bushings sit. – Loosen the bolts: Use the socket set and wrench. – Extract the bushings: Gently tap them out with a hammer.
Prepare the New Bushings New bushings need some preparation before installation. Follow these steps for a seamless process: – Clean the area: Remove any dirt or debris. – Apply lubricant: Coat the bushing’s exterior for easy fitting. – Align the bushing: Ensure it matches the spring’s eye.
Install the New Bushings Now, it’s time to place the new bushings into the leaf spring. This step requires precision: – Position the bushing: Slide it into the spring’s eye. – Tap gently: Use a mallet to set it in place.
– Re-tighten bolts: Secure the bushing with the wrench. – Double-check: Ensure everything is snug and secure. Test for Proper Installation Once installed, testing is crucial. Confirm the bushings are working properly: – Lower the vehicle: Remove the jack and stands carefully.
– Inspect for movement: Ensure the bushings are firm. – Take a test drive: Listen for any unusual noises. With these steps, installing leaf spring bushings becomes a manageable task. Keep these guidelines handy for a smooth and efficient process.

Credit: www.wikihow.com
Conclusion
Installing leaf springs can seem challenging, but it’s manageable with the right steps. Start with the bushings. Ensure they fit snugly. Proper alignment is crucial. Tighten bolts securely to prevent any wobble. Double-check everything before lowering your vehicle. Your safety matters.
A well-installed leaf spring improves your ride’s stability. It also enhances load-bearing capacity. Take your time, follow instructions closely. Patience leads to success. Enjoy a smoother, safer ride. Your vehicle will thank you. Remember, practice makes perfect. Don’t rush the process.
With experience, installation becomes easier. You’ve got this!