Are you ready to transform your vehicle with a sleek new light bar? Whether you’re looking to enhance visibility on off-road adventures or add a stylish touch to your car, installing a light bar can be a game-changer.
Imagine cruising down the road with confidence, knowing your path is brilliantly illuminated. But let’s face it, installing a light bar might seem daunting at first. Fear not! With the right guidance, you can master the process and enjoy the benefits in no time.
This guide is tailored just for you, breaking down the steps to install a roof light bar or a tailgate light bar with ease. Get ready to shine a light on your journey—literally! Keep reading to discover how simple and rewarding this upgrade can be.
Credit: www.superbrightleds.com
How To Install A Roof Light Bar
Installing a roof light bar is straightforward. Begin by choosing the right bar for your vehicle’s roof. Secure it using brackets, ensuring a firm attachment to prevent movement during travel. Connect the wiring to your vehicle’s electrical system, verifying all connections are tight and safe before testing the light.
Installing a roof light bar on your vehicle can transform nighttime driving. It enhances visibility and safety, making off-road adventures more thrilling. Whether you’re a seasoned DIY enthusiast or just starting, this guide will make the installation straightforward and enjoyable.
Choosing the Right Light Bar Selecting a light bar is crucial. Here are some considerations: – Size: Ensure it fits your vehicle’s roof. – Brightness: Choose the right lumen for your needs. – Type: LED bars are energy-efficient and long-lasting.
– Waterproof Rating: Opt for a high IP rating for durability. – Beam Pattern: Spot, flood, or combination for varied visibility. Preparing Your Vehicle Preparation sets the foundation for a smooth installation process. – Clean the Roof: Remove dirt and debris for a firm attachment.
– Gather Tools: Wrench, drill, and measuring tape are essential. – Safety Gear: Use gloves and goggles for protection. – Plan Placement: Decide on the exact spot before starting. Mounting the Light Bar Mounting is the central step. Follow these instructions for a secure fit.
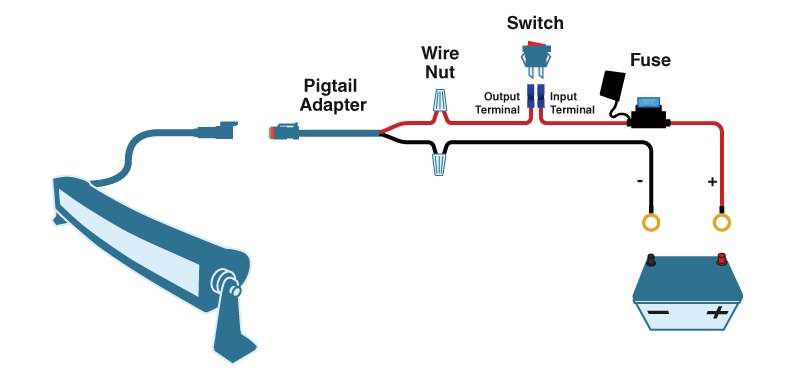
Position the light bar on the roof, aligning it properly. Use brackets and screws to attach it firmly. Ensure it’s tight to avoid vibrations. Double-check alignment for an even beam spread. Wiring the Light Bar Wiring connects the light bar to the vehicle’s electrical system.
Here’s how: – Disconnect Battery: Prevent accidental shorts during installation. – Run Wires: Route them through the firewall. – Connect to Switch: Use a relay for safe operation. – Test: Ensure functionality before securing wires. Final Adjustments Wrap up the installation with these finishing touches.
Secure any loose wires with zip ties. Adjust the light bar angle for optimal beam direction. Test the light bar at night to check brightness and coverage. Make any necessary tweaks for best performance.
How To Install Tailgate Light Bar
Installing a tailgate light bar is simple. Clean the area, then attach the bar with adhesive strips. Finally, connect the wires to your vehicle’s lighting system. Enjoy enhanced visibility and style with your new light bar.
Installing a tailgate light bar can enhance your vehicle’s visibility. It’s a practical addition for safety and style. Whether you’re a DIY enthusiast or a beginner, this guide will walk you through the steps. Gather Your Tools and Materials Before starting, ensure you have all the necessary tools.
Here’s a quick checklist: – Light bar: The main component for installation. – Screwdriver: For securing the light bar. – Wire connectors: To connect the light bar to your vehicle. – Cleaning cloth: To clean the installation area. – Measuring tape: To ensure proper alignment.
Locate the Installation Area First, identify where the light bar will sit on the tailgate. Most bars fit just above the bumper. This placement maximizes visibility without obstructing other lights. Ensure the surface is clean and dry for better adhesion.
Align the Light Bar Proper alignment is crucial. Measure the tailgate width and center the light bar. Use a measuring tape for accuracy. This step ensures the light bar is straight and looks professional. Connect the Wiring Connecting the wires is the next step.
Follow these simple steps: – Locate the vehicle’s wiring harness: This is usually near the rear lights. – Attach the wire connectors: Securely connect the light bar wires to the harness. – Test the connection: Ensure the lights work before finalizing.
Secure the Light Bar Finally, secure the light bar in place. Use a screwdriver to tighten any screws. Check that it’s firmly attached and won’t move while driving. Following these steps will help you install your tailgate light bar successfully.
Enjoy enhanced safety and a stylish vehicle look.

Credit: www.youtube.com
Conclusion
Installing a light bar doesn’t have to be difficult. Follow the steps provided, and you’ll light up your vehicle in no time. Remember to gather all necessary tools before starting. Carefully secure the light bar to avoid any damage. Connect the wiring correctly to ensure proper function.
Test the light bar once installed to check for any issues. Safety is key, so double-check all connections. With these simple steps, you’re ready to hit the road. Enjoy the enhanced visibility and style your new light bar provides. Happy driving!