Imagine transforming your vehicle into a beacon of adventure, ready to tackle any terrain with confidence. You’re not just adding light; you’re adding safety, style, and functionality.
But there’s a catch: you’ve got the perfect light bar, yet no wiring harness. Does that mean you should give up on the upgrade? Absolutely not! With the right approach, you can install a light bar without a wiring harness, saving time and possibly money, all while boosting your vehicle’s capabilities.
Think about how impressive your ride will look with a sleek light bar, casting vibrant illumination on dark roads or off-road trails. You deserve to harness this power—literally—without unnecessary complications. This guide will walk you through the process, ensuring that you get the most out of your light bar installation. Whether you’re a seasoned DIY enthusiast or a beginner eager to learn, you’ll find straightforward steps that make the installation process a breeze. Dive in, and discover how easy it can be to illuminate your path and enhance your driving experience, even without a wiring harness. You’re just a few steps away from turning your vehicle into a brilliantly lit masterpiece.
Tools And Materials Needed
Always have a screwdriverready. It helps tighten things. A drillis useful for making holes. Don’t forget a wrench. It tightens nuts and bolts. A tape measureensures correct distances. Keep a multimeterhandy for checking voltage. Safety is key, so wear glovesand goggles. A wire stripperhelps with cutting wires.
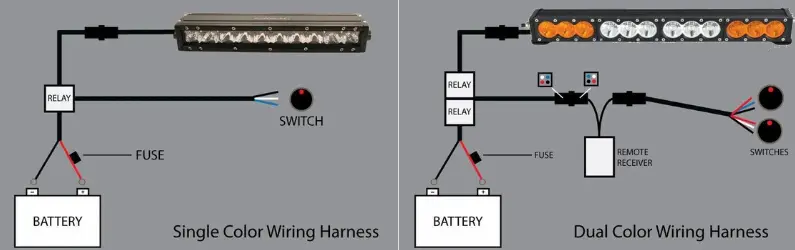
Get a light barfirst. It is the main part. You need wiresto connect everything. Electrical tapehelps keep wires safe. Connectorsjoin wires together. Clampshold the light bar in place. A fuseprotects from electrical surges. Use zip tiesto keep wires tidy.

Credit: www.toyota-4runner.org
Choosing The Right Light Bar
Installing a light bar without a wiring harness is straightforward. First, gather necessary tools like connectors and mounting brackets. Then, connect the light bar directly to the vehicle’s battery, ensuring proper insulation for safety.
Types Of Light Bars
Light bars come in different types. There are single-rowand double-rowbars. Single-row bars are sleek and thin. Double-row bars offer more light. Both types have their own benefits. Consider what you need.
Size And Power Considerations
Choose the size based on your vehicle. Bigger bars need more space. Smaller bars are easier to fit. Check the powerof the light bar. More power means brighter light. Consider the battery of your vehicle. Ensure the battery can support the light bar.
Preparing The Vehicle
Start by cleaning the area where the light bar goes. Dirt and dust can cause problems. Use a clean cloth and a bit of water. Make sure the spot is dry. A clean area helps the light bar stick better. This step is very important. Never skip it. It keeps your light bar safe and secure.
Look at the mounting points on the vehicle. Make sure they are strong. Check for any rust or damage. Weak points can make the light bar fall. Use a screwdriver to test the screws. They should be tight. Loose screws need fixing. Strong mounting points keep the light bar in place. Always check them before starting.
Mounting The Light Bar
Choose a spot on the vehicle to mount the light bar. Select a stable area on the bumper or roof. Ensure the surface is flat and clean. This helps the light bar stay in place. Make sure the light will not block the driver’s view. Check that the location is easy to access. This makes installation simpler.
Use brackets to attach the light bar firmly. Align the brackets with the chosen location. Drill holes if necessary, but be careful. Avoid damaging any part of the vehicle. Tighten the screws securely to keep the light bar stable. Double-check the alignment after securing. Make sure the light bar sits straight. This ensures even light distribution.
Powering The Light Bar
Connect the light bar to the car’s battery. Make sure the car is off. Find the positive and negative terminals on the battery. Attach the red wire to the positive terminal. Connect the black wire to the negative terminal. Use wire clamps for a secure hold. Check all connections to avoid loose wires.
Locate the fuse box in your car. Choose a fuse slot that turns off with the car. Insert the fuse tap into the slot. Connect the light bar wire to the fuse tap. Make sure it is tight and secure. This method keeps the light bar safe. It also prevents battery drain.
Testing The Installation
Turn on the vehicle’s ignition. The light bar should turn on too. If it does not, check the connectionsand fuses. Ensure they are secure. A multimeter can help test the power flow. If the light still does not work, revisit the wiring. Ensure all parts are linked correctly. It is important to ensure all connections are tight. This avoids loose ends that can stop the light from working.
Turn the light bar on. Shine it on a wall to see the beam. Adjust the screws on the sides of the light bar. Make sure the light is even. The beam should point straight ahead. Not too high or low. This helps you see better at night. Recheck to confirm the angle is right. Adjust again if needed. Proper angle keeps the road bright and safe.
Maintenance Tips
Installing a light bar without a wiring harness requires careful planning. First, gather necessary tools like connectors and a fuse. Then, carefully follow steps to ensure a secure connection.
Regular Cleaning
Cleaning the light bar is important. Dust and dirt can make it dull. Use a soft cloth. Wipe it gently. Avoid using harsh chemicals. They might damage the surface. Keep it shiny. Clean it often. Make it a habit.
Inspecting Connections
Check the connections regularly. Loose wires can cause problems. Tighten them if needed. Look for any damage. Broken wires can stop the light. Make sure everything is secure. Inspect all parts. It keeps the light working well.
Credit: extremeledlightbars.com

Credit: www.superbrightleds.com
Conclusion
Installing a light bar without a wiring harness is possible. It requires careful planning and the right tools. Always prioritize safety to prevent any mishaps. Double-check connections for stability and durability. This ensures the light bar functions well. Use quality materials for long-lasting results.
Patience and attention to detail make the process smoother. Following these steps, you can enhance your vehicle’s lighting. Enjoy a brighter path on your journeys. With practice, you’ll gain confidence in handling similar tasks. Remember, hands-on experience is valuable. Safe travels and happy installing!