Have you ever struggled to get in and out of your truck or SUV? Running boards might be the solution you need.
Not only do they add a sleek look to your vehicle, but they also provide a practical step for easier access. The thought of installing them might seem daunting, but don’t worry! You might be surprised to find out just how simple the process can be.
Imagine the convenience of stepping effortlessly into your vehicle, and the satisfaction of knowing you installed the running boards yourself. This guide will walk you through each step, ensuring you have all the information you need to complete the task with ease. Whether you’re a seasoned DIY enthusiast or a beginner, you’ll find the instructions straightforward and manageable. Ready to transform your vehicle’s accessibility and appearance? Let’s dive in and discover just how easy it is to install running boards on your own.
Credit: www.americantrucks.com
Are Running Boards Easy To Install
Installing running boards is a straightforward process for most vehicle owners. Basic tools and clear instructions make it manageable. Many find it a rewarding DIY project.
Installing running boards can be a satisfying DIY project. They not only enhance the look of your vehicle but also provide practical benefits like easier access. Are you wondering if running boards are easy to install? Let’s explore this topic.
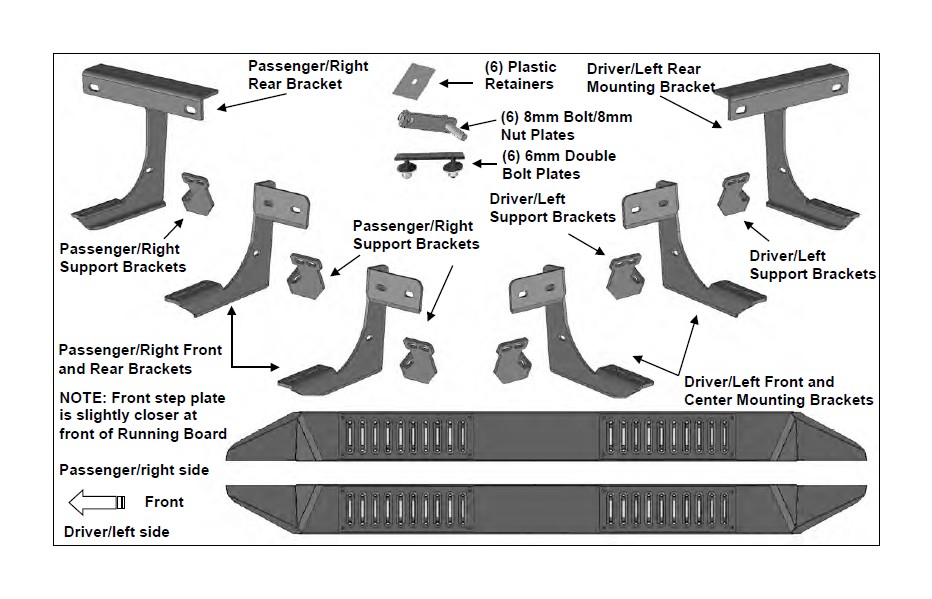
What Makes Running Boards Easy to Install? Running boards can be a straightforward task. Here are some reasons why: – Pre-drilled Holes: Most vehicles come with pre-drilled holes. This means less drilling for you. – Included Hardware: Kits usually include all necessary hardware.
No extra purchases needed. – Detailed Instructions: Manufacturers provide clear guides. Step-by-step instructions make the process easier. Tools You Might Need While the process is simple, having the right tools is crucial. Let’s look at some essentials: – Socket Wrench Set: Needed for tightening bolts.
Ensures a secure fit. – Measuring Tape: Helps in accurate placement. Avoids mistakes. – Safety Gear: Gloves and goggles protect you. Important for safe installation. Typical Steps Involved Many people find the installation process manageable. Here’s a general overview: – Vehicle Preparation: Clean the area first.
Dirt can affect installation. – Attach Brackets: Securely fasten brackets to the chassis. Follow the instructions. – Mount Running Boards: Position the boards on brackets. Ensure they are level. Common Challenges and Solutions Even with ease, challenges may arise. But don’t worry, solutions are often simple: – Misalignment Issues: Double-check measurements.
Adjust accordingly if needed. – Missing Parts: Check the package thoroughly. Contact the seller for replacements. – Tight Spaces: Use smaller tools. They fit better in confined areas. Running boards can be a rewarding project, enhancing both style and function.
With a bit of patience and the right tools, you’ll have them installed in no time.

Credit: www.youtube.com
Conclusion
Installing running boards is simple with the right steps. Begin by gathering your tools and materials. Follow the instructions included with your running boards. Secure them properly to ensure safety and durability. Remember, patience is key during installation. With each step, your vehicle becomes more accessible.
Running boards offer convenience and style to your ride. They enhance the look while providing functional benefits. After installation, enjoy the ease of getting in and out of your vehicle. With practice, installation becomes straightforward. Your vehicle will now be ready for adventures with added comfort.