Are you ready to give your truck or SUV a stylish upgrade while making it more functional? Installing side step bars, also known as nerf bars, is a fantastic way to enhance both the look and accessibility of your vehicle.
Imagine stepping into your ride with ease, or helping your passengers do the same, all while adding a touch of rugged elegance to your vehicle’s profile. You might be thinking, “Can I really do this myself? ” Absolutely! With the right guidance, you can confidently install side step bars at home.
This guide will walk you through the process step-by-step, ensuring you have the knowledge and tools needed to get the job done. Keep reading, and soon you’ll be enjoying the convenience and style that these bars bring to your ride.
Credit: accessories-instructions.landrover.com
How To Install Side Step Nerf Bars
Installing side step bars enhances vehicle accessibility. Begin by gathering necessary tools, like a wrench and socket set. Follow the instructions provided by the manufacturer for precise placement. Securely attach each bar to the vehicle’s pre-drilled holes, ensuring stability and safety.
Installing side step nerf bars can boost your vehicle’s accessibility and style. Many car owners find these bars helpful for making entry and exit easier. Let’s dive into the simple steps for installation. Gather Your Tools and Materials Before starting, ensure you have everything ready.
– Socket wrench set: Essential for tightening bolts securely. – Drill with bits: Needed for making precise holes. – Measuring tape: Ensures accurate placement of the bars. – Side step nerf bars: The main component you’ll install. – Hardware kit: Includes bolts and brackets for installation.
Prep Your Vehicle Start by preparing your vehicle for the installation process. Make sure the area where the bars will attach is clean. Dirt can affect the fit and security. Check the vehicle’s undercarriage for any obstructions. Clear any debris or items that might be in the way.
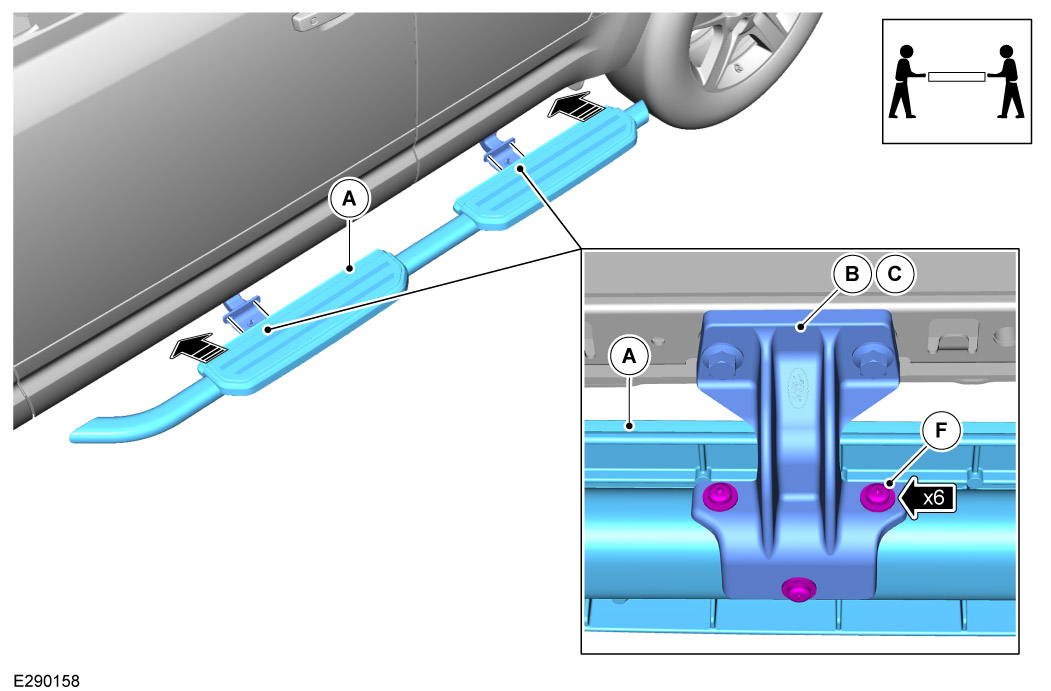
Position the Side Step Nerf Bars Careful positioning is crucial for a perfect fit. Align the bars with your vehicle’s pre-existing mounting holes. Ensure they are evenly spaced on both sides. This alignment helps achieve a balanced look and function.
Install the Mounting Brackets Once positioned, it’s time to secure the bars using brackets. – Attach the brackets: Connect the brackets to the vehicle’s frame using bolts. – Tighten bolts: Use the socket wrench to ensure bolts are secure. – Verify alignment: Check that the brackets hold the bars straight and firm.
Secure the Nerf Bars With brackets in place, secure the nerf bars. Use the provided hardware kit to attach the bars firmly. Double-check tightness to prevent any loosening over time. This ensures both safety and durability. Test the Installation Final checks ensure everything is set correctly.
Step onto each bar to test their sturdiness. Listen for any unusual noises indicating loose parts. Adjust if necessary for a snug, safe fit.

Credit: www.youtube.com
Conclusion
Installing side step bars boosts your vehicle’s accessibility. The process is simple and straightforward. Gather your tools and follow each step carefully. Ensure all bolts and brackets fit securely. This guarantees safety and durability. Regular checks can prevent loose fittings.
With patience, the job can be done efficiently. Soon, your vehicle will have a stylish, functional upgrade. Enjoy the added convenience and style. Happy installing!