Are you hearing strange noises when turning your steering wheel or noticing uneven tire wear? It might be time to check your tie rod ends.
These small yet crucial components play a key role in your car’s steering system, ensuring smooth and responsive control. Fortunately, installing tie rod ends doesn’t have to be a daunting task. With the right guidance, you can tackle this repair yourself and save on costly mechanic fees.
We’ll walk you through the step-by-step process of installing tie rod ends, empowering you with the knowledge to keep your vehicle in top shape. By the end, you’ll gain the confidence to handle this maintenance task like a pro. Ready to dive in? Let’s get started!
Credit: www.gmpartscenter.net
Tools And Materials Needed
Installing tie rod endsrequires specific tools and materials. A wrenchset is vital for loosening and tightening bolts. A jackand jack standswill lift the vehicle safely. You will also need a hammeror mallet for removing old tie rod ends. Don’t forget a grease gunfor lubrication. Keep a torque wrenchhandy to ensure proper tightness. For safety, wear protective glovesand goggles. Ensure you have new tie rod endsready. Lastly, a repair manualhelps guide the installation process. Using the right tools makes the job easier.
Safety Precautions
Working on cars can be fun, but safetyis important. Always wear gloves to protect your hands. Use safety glasses to guard your eyes. Keep the area clean to avoid accidents. Proper toolsare crucial; ensure they are in good shape. Jack the car securely before you start. Never work under a car without safety stands. Have a friend nearby when lifting heavy parts. An emergency kit is useful in case of accidents. Follow instructions carefully to avoid mistakes. Double-check all connections after installation.
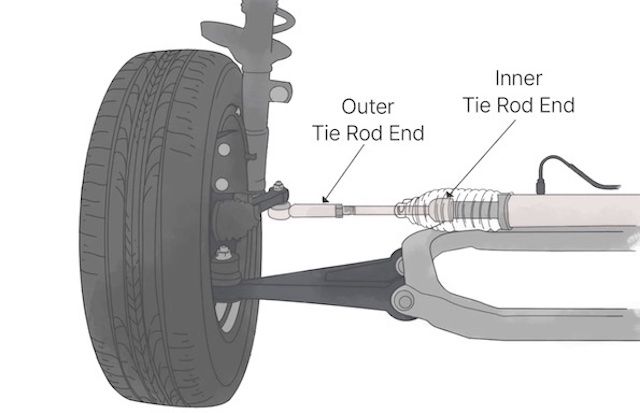
Locating The Tie Rod Ends
Finding the tie rod ends is easy. Look under the front of the car. They connect the steering rack to the wheels. These parts are vital for steering. Check near the wheel hub. The rod ends are usually small and round. They have a joint to help turn the wheels. Use a flashlightif it’s dark. You might see them better. Inspect for rustor damage. This can affect steering. If worn out, they need replacing. Be careful when checking them. Use a jack to lift the car. This makes it easier to see underneath. Always work on a flat surface. Safety is important.
Lifting The Vehicle
Begin by finding a safe spot for your car. Always use a flat surface. This keeps the car stable. Place wheel chocks behind the rear tires. These stop the car from moving. Use a jack to lift the car. Make sure the jack is strong enough. Check the weight limit on the jack. Slide the jack under the car. Look for the jacking points. These are the strong spots under the car. Raise the car slowly. Once lifted, place jack stands under the car. Jack stands hold the car up safely. Check that the car is stable before working. You can now start the tie rod job.
Removing The Old Tie Rod Ends
First, locate the jam nut on the tie rod. It’s usually near the end. Use a wrench to turn the jam nut. Turn it to the left to loosen. Remember, left is loose, right is tight. You might need some strength. If it’s stuck, try using a penetrating oil. Spray it on and wait a bit. This helps to loosen rust or dirt. Once loose, do not remove it fully yet. Leave it on for now.
Find the cotter pin on the tie rod end. It looks like a small pin. Use pliers to remove it. Then, locate the castle nut. Use your wrench to turn it left. This will unscrew it. Once the nut is off, gently tap the tie rod end. Use a hammer for this. Be careful not to hit too hard. The tie rod end will come off. Now, you can remove it fully.
Measuring For New Tie Rod Ends
First, measure the old tie rod. Use a ruler for this task. Make sure the car is off and safe. Record the length of the tie rod. This helps in getting the right size. Precise measurements ensure a good fit.
Write down all measurements on paper. Always double-check your numbers. A small mistake can cause big issues later. Accuracy is very important. Keep these notes safe. You will need them when buying new parts.
Now, get ready with the new tie rod ends. Compare them with the old ones. They should be of similar size. Clean all parts before installation. This removes dirt and grime. A clean part fits better. Gather all necessary tools. This helps in a smooth installation.
Installing The New Tie Rod Ends
Place the new tie rod end in its spot. Ensure it fits well. Use a wrench to tighten the bolt. Make sure it is snug but not too tight. Check if the tie rod end is steady. It should not wobble. This ensures the car drives straight.
Slide the jam nut onto the rod. Twist it by hand first. Use a wrench to make it tighter. The jam nut keeps the rod from moving. Make sure it is very tight. If it is loose, the car might steer wrong. Always double-check your work.

Credit: www.youtube.com
Aligning The Wheels
Always check the wheel alignment before installing new tie rod ends. Misaligned wheels can cause the car to drift. This makes driving unsafe. Use an alignment tool to check the current position. Look for uneven tire wear. This is a sign of bad alignment. Correct alignment helps the car to run smoothly.
If the wheels are not straight, adjustments are necessary. Loosen the tie rod lock nut. Turn the tie rod to adjust the angle. Check alignment again. Repeat until the wheels are perfectly aligned. Tighten the lock nut once done. Always ensure everything is secure. Proper alignment keeps your ride safe.
Final Checks
Ensure all bolts are tightened securely, and check for alignment. Test the steering to confirm smooth operation. Verify no parts are loose or misaligned for safe driving.
Inspecting Installation
Ensure all bolts are tight and secure. Check the tie rod ends for any signs of damage. Look at the alignment of the parts. They should be straight and even. Use a flashlight to inspect hidden areas. Ensure there are no visible gaps. Everything should fit snugly. Verify that the cotter pins are in place. They keep the nuts from loosening. Double-check your work to avoid problems.
Test Driving The Vehicle
Start the car and listen for strange noises. Drive at a slow speed first. Feel for any vibrations or shakes. Increase speed gradually. Make gentle turns left and right. The steering should feel smooth and steady. If the car pulls to one side, check the alignment. A successful test drive means everything is installed correctly. Return home safely, knowing your car is in good shape.
Maintenance Tips
Installing tie rod ends improves vehicle steering and safety. Begin by lifting the car securely with jack stands. Remove the wheel and loosen the tie rod nut. Use a puller to detach the old tie rod. Install the new tie rod, ensuring alignment.
Tighten all nuts firmly. Recheck alignment for a smooth drive.
Subheading
Keep your tie rod ends clean. Dirt can cause damage. Regular inspection is crucial. Look for wear and tear. Replace if damaged. Use high-quality grease to lubricate. This reduces friction. Check for loose connections. Tighten them if needed. Proper alignment is important. It prevents uneven tire wear. Routine checks save money on repairs. Follow your car’s manual. It gives the best advice. Pay attention to unusual sounds. They might indicate a problem. Timely maintenance extends the life of your tie rods.

Credit: www.wikihow.com
Conclusion
Installing tie rod ends is a straightforward process. Start by gathering your tools. Follow the steps carefully to avoid mistakes. Check your vehicle manual for specific guidance. Always ensure your safety while working. It’s crucial to inspect tie rod ends regularly.
They play a vital role in steering control. Proper installation helps maintain vehicle stability. Keep your workspace clean and organized. Ask a professional for help if needed. Remember, a well-maintained car ensures safer drives. With practice, installation becomes easier. Enjoy the satisfaction of a job well done.
Safe driving starts with good maintenance habits.