Installing Westin running boards can transform your vehicle’s functionality and style, making it easier for you and your passengers to hop in and out with ease. You might be wondering if this task is best left to the professionals, but here’s the good news: you can do it yourself!
Whether you’re a seasoned DIY enthusiast or just getting started, this guide is tailored for you. Imagine the satisfaction and confidence you’ll feel cruising down the road with your newly installed running boards, knowing you did it all on your own.
By the end of this article, you’ll have the knowledge and step-by-step instructions to tackle the installation effortlessly. Stick around, and let’s turn your vehicle into a head-turning masterpiece together.
Tools And Materials Needed
Installing Westin running boards is easier with the right tools. Before starting, gather all necessary materials. This ensures a smooth installation process.
Essential Tools
Basic tools are required for this task. A socket wrench is a must-have. It helps tighten bolts securely. A drill is also essential. It makes holes quickly.
Ensure you have a measuring tape. This helps with accurate placement. A level is useful too. It ensures the boards are straight.
Required Materials
Gather all materials before starting. You need the running boards kit. This includes brackets and hardware. Ensure all parts are present. Missing items can delay your work.
Have a cleaning cloth ready. Use it to wipe surfaces clean. This prevents dirt from affecting installation.
Safety Gear
Safety gear is crucial for this task. Wear gloves to protect your hands. Safety glasses are important too. They shield your eyes from debris.
A sturdy ladder may be needed. It helps reach higher areas safely. Ensure the ladder is stable before use.
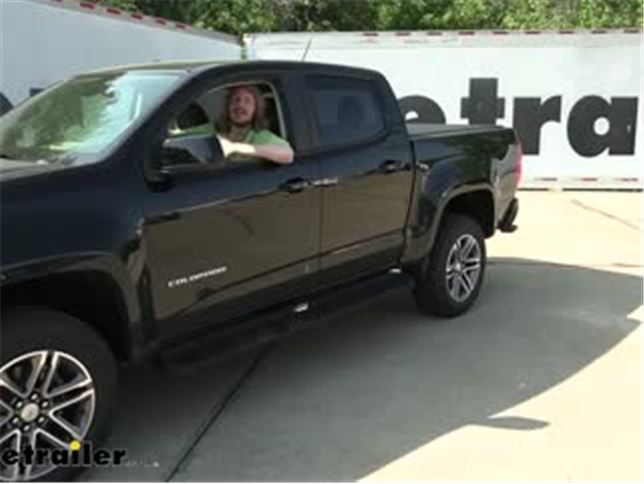
Credit: www.etrailer.com
Preparing Your Vehicle
Installing Westin Running Boards enhances your vehicle’s accessibility and style. Begin by gathering essential tools like a wrench and socket set. Follow the step-by-step instructions to ensure a secure fit, elevating both functionality and appearance.
Before diving into the installation process of Westin Running Boards, getting your vehicle ready is crucial. A little preparation can save time and prevent mistakes. Ensuring your vehicle is set up correctly will make the installation smoother and more efficient.Safety Precautions
Your safety should be a top priority. Before you begin, gather all the necessary tools and safety gear. Wearing gloves can prevent cuts, while safety goggles protect your eyes from debris. Make sure your vehicle is on a flat surface. This prevents unexpected movements. Use wheel chocks to keep your vehicle securely in place. Have you ever had a wrench slip because your car moved unexpectedly? It’s not fun. Read through the installation instructions provided with your running boards. Familiarity with the process helps in anticipating steps and challenges.Inspecting The Vehicle
Take a close look at your vehicle before starting the installation. Check for any existing damage to the mounting areas. Even minor dents or rust can affect how the running boards fit. Ensure that the mounting brackets included with your running boards are compatible with your vehicle’s model. This step can save you from the frustration of a misfit later. Do you have all the bolts and screws? Missing hardware can delay your project. Lay everything out and compare it to the parts list in the manual. By following these steps, you’ll prepare your vehicle effectively for the installation of Westin Running Boards. This preparation not only enhances your safety but also ensures a more seamless installation process. Are you ready to transform your vehicle with new running boards? Let’s get started!Unboxing The Running Boards
Discover the simple steps to install Westin Running Boards with ease. Follow this guide for a smooth installation process. Enhance your vehicle’s look and functionality today.
Unboxing the Westin Running Boards is an exciting step in the installation process. It’s the moment you finally get to see the product in its entirety and start imagining how your vehicle will look with these new additions. It’s crucial to approach this step with attention to detail, ensuring you have everything you need to proceed smoothly.Checking The Package Contents
The first thing you should do is thoroughly check the package contents. Lay everything out on a flat surface and make sure each component is included. This typically involves the running boards themselves, brackets, bolts, and any additional mounting hardware. Missing pieces can be a real setback, so it’s essential to verify each item is accounted for. If something is missing, contact customer service right away. This step is like the foundation of a house; without it, the entire process could crumble. Have you ever unboxed something only to find key pieces missing? It’s frustrating, but it’s preventable with careful inspection.Understanding The Instruction Manual
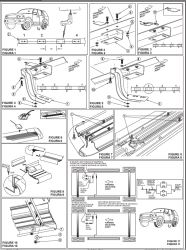
The instruction manual is your best friend here. Take a moment to read it thoroughly. It’s not just a piece of paper; it’s your guide to a successful installation. Make notes of important steps and diagrams. Highlight anything that seems unclear or complex. This manual is designed to simplify the process, so take advantage of it. Do you usually skim through instructions and hope for the best? That approach might work for simpler tasks, but installing running boards requires a bit more precision. Engage with the manual actively. It can save you time and energy by preventing mistakes before they happen.Pre-installation Setup
Get ready for a smooth installation by gathering the necessary tools and checking the parts. Ensure your workspace is clear and organized. Follow the manufacturer’s instructions closely for the best results.
Before you dive into installing your Westin running boards, it’s crucial to ensure everything is set up correctly. A well-prepared pre-installation setup will not only make the process smoother but also save you from potential headaches. Trust me, taking a few extra moments now will pay off in the long run.Positioning The Vehicle
Park your vehicle on a flat, stable surface. This ensures safety and accuracy during installation. If you have access to a garage, that’s ideal, but a driveway works just as well. Make sure the parking brake is engaged. This prevents any accidental rolling which can be both dangerous and disruptive. Consider using wheel chocks for added security. These simple tools can provide peace of mind, especially if you’ve had experiences with minor slips in the past.Gathering Necessary Tools
Collect all the tools you’ll need beforehand. Common tools might include a ratchet set, a drill, and a measuring tape. Having them at hand saves you from running back and forth. Check the installation manual for specific tool requirements. Sometimes, an uncommon tool might be necessary, and it’s better to know this upfront. Lay out your tools in an organized manner. It might sound trivial, but being able to see everything at a glance can make the installation process more efficient. Have you ever started a project only to realize halfway through that you’re missing something essential? Avoid this by double-checking your list now. This proactive step can drastically reduce frustration later. Remember, preparation is key. Do you have any tips or tricks for a seamless setup? Share your thoughts in the comments!Installing The Brackets
Installing the brackets for Westin Running Boards is a crucial step. It ensures a secure fit to your vehicle. This process might seem complex, but it can be simple. Follow these steps for a smooth installation. Let’s dive into finding the right mounting points and securing the brackets.
Locating Mounting Points
First, identify the mounting points under your vehicle. They are usually near the wheel wells. Check your vehicle’s manual for specific locations. Clean these areas to remove dirt. It helps the brackets fit better. Use a flashlight if visibility is low. This ensures you don’t miss any essential points.
Securing Brackets To Vehicle
Once you locate the mounting points, attach the brackets. Use the hardware provided with your running boards. Align each bracket with the holes. Insert bolts and tighten them with a wrench. Ensure they are secure but avoid overtightening. Repeat the process for each bracket. Double-check each one for stability.

Credit: www.youtube.com
Attaching The Running Boards
Attaching the running boards to your vehicle is a crucial step that demands precision and patience. Proper installation not only ensures safety but also enhances the look of your ride. Whether you’re installing Westin Running Boards for the first time or upgrading your existing ones, paying attention to alignment and fasteners is key. Let’s dive into the specifics of aligning and tightening the running boards.
Aligning The Boards
Before you start, think of your running boards as the perfect accessory that needs to fit just right. Begin by placing the running boards against the side of your vehicle, ensuring they line up with the pre-drilled holes.
Have you noticed a slight misalignment? Adjust the boards until they are perfectly parallel to your vehicle’s edge. This will not only look aesthetically pleasing but will also provide a sturdy step.
Use a measuring tape to double-check the distance on both sides. This little step can save you from a lopsided installation. Does your vehicle have any unique curves? Make sure the boards accommodate them without any awkward gaps.
Tightening The Fasteners
Once your boards are aligned, it’s time to secure them. Use the fasteners provided in your Westin Running Boards kit. Start by hand-tightening them to ensure they are gripping the board correctly.
Switch to a wrench or socket tool for a more secure fit. Remember, tight does not mean over-tightening. You want to avoid stripping the bolts or damaging the threads. Are all the bolts equally tight? Uneven tension can lead to problems down the road.
Double-check each bolt by giving the running board a gentle shake. This ensures everything is snug and ready for action. Imagine stepping onto the board with confidence, knowing it’s securely attached to your vehicle.
Attaching your running boards doesn’t have to be a daunting task. With a little patience and attention to detail, you’ll have them securely fastened and ready for use. What insights have you gained from your installation experience? Sharing your tips could make someone else’s installation smoother.
Final Adjustments
The final adjustments are crucial for a successful installation of Westin Running Boards. This step ensures your running boards are secure and ready for use. Proper alignment and stability are key elements during this phase. Let’s explore the essential tasks for making these final tweaks.
Ensuring Stability
Check the bolts and brackets for tightness. Use a wrench to tighten them securely. Loose bolts can cause instability when stepping onto the running boards. Make sure each bracket is firm against the vehicle’s side. This prevents wobbling and ensures a safe footing.
Inspect the running boards for any movement. Press down gently on different sections. If you notice any shifting, re-tighten the bolts. Stability is essential for safety and longevity. A stable setup enhances your driving experience and boosts confidence.
Checking For Gaps
Examine the spaces between the running boards and the vehicle. There should be no gaps between them. Gaps can trap debris or affect the board’s performance. Adjust the brackets to close any gaps. Ensure a snug fit against the vehicle’s body.
Evaluate the alignment visually. The boards should align evenly with the vehicle’s base. Misalignment can affect aesthetics and function. Make necessary adjustments to achieve a uniform appearance. A well-aligned board complements your vehicle’s design.
Credit: www.etrailer.com
Post-installation Tips
Ensure your Westin running boards are securely attached after installation. Check bolts for tightness to prevent any shifting. Regularly clean the running boards to maintain their appearance and functionality.
After successfully installing your Westin running boards, you might feel a sense of accomplishment. However, the journey doesn’t end there. Proper post-installation care is crucial to ensure longevity and optimal performance. With a few easy steps, you can keep your running boards in top condition and prevent common issues.Maintaining The Running Boards
Regular maintenance is the key to extending the life of your running boards. Wash them routinely to remove dirt and grime, especially after off-road adventures. A simple soap and water solution works wonders. Check for loose bolts periodically. Use a wrench to tighten any that might have loosened over time. This ensures safety and prevents rattling noises. Applying a protective spray can shield your running boards from rust. It’s a small task that can save you a lot of trouble down the line.Troubleshooting Common Issues
Even with proper care, you might face some challenges. What if your running boards start sagging? This could be due to loose brackets. Ensure all brackets are firmly secured to the vehicle’s chassis. Notice any unusual noises when driving? It might be an indication of a misalignment. Inspect the alignment and adjust as necessary to maintain smooth operation. Are the running boards not retracting properly, if they’re automatic? Check the wiring and sensors. Sometimes debris can block sensors, preventing proper function. Cleaning these areas can resolve the issue. In your experience, have you come across any unexpected running board issues? Share your insights and solutions in the comments section. Your tips might help others facing similar challenges. By following these practical post-installation tips, you can enjoy a seamless experience with your Westin running boards.Conclusion
Installing Westin running boards enhances your vehicle’s accessibility. It also adds style. With clear steps and patience, you can do it yourself. Gather the necessary tools before starting. Follow the instructions closely for a seamless experience. Check each bolt for tightness after installation.
This ensures safety and durability. Remember, the right alignment is crucial for proper fit. Enjoy the improved look and convenience. Now, your vehicle is ready for any adventure. Running boards make entering and exiting easy. Experience the benefits firsthand. Your vehicle is now more functional and stylish.