Imagine having a smooth, effortless experience every time you need to lift your car for maintenance. You don’t have to rely on expensive, bulky equipment to achieve this.
Instead, you can create your own low profile car ramps. Whether you’re a seasoned car enthusiast or a DIY newbie, this guide will show you how to make ramps that are not only effective but also cost-efficient. By the end of this article, you’ll have the confidence to build ramps tailored to your vehicle’s needs.
Let’s dive in and explore how you can take control of your car maintenance with ease.
Credit: www.civicx.com
Materials Needed
Crafting low profile car ramps requires specific materials. These materials ensure safety and durability. Choosing the right materials is crucial for effective ramp construction. In this section, we explore essential materials needed for building your own car ramps. Let’s dive into the key components that make your project successful.
Wood
Wood is a primary material for car ramps. It’s strong and easy to work with. Choose sturdy plywood or hardwood. Ensure the wood is thick enough to support your vehicle’s weight. Typically, 2×12 inches of lumber is recommended. This size provides ample support.
Bolts And Screws
Bolts and screws secure the ramp’s structure. Use heavy-duty bolts for connecting wood pieces. Screws help in fastening additional components. Opt for corrosion-resistant options to ensure longevity. Stainless steel screws are ideal for outdoor use.
Metal Brackets
Metal brackets offer extra reinforcement. They help stabilize the ramp under weight. Choose durable brackets that can handle stress. Galvanized steel brackets are a reliable choice. They resist rust and maintain strength.
Non-slip Tape
Non-slip tape prevents tires from sliding. It enhances safety during use. Apply the tape on the ramp’s surface. Ensure even coverage across the entire length. This tape is vital for wet conditions.
Paint Or Sealant
Paint or sealant protects the wood. It guards against moisture and damage. Use outdoor paint suitable for wood surfaces. Sealant adds an extra layer of protection. Both help extend the ramp’s lifespan.
Choosing The Right Dimensions
Selecting the correct dimensions for low profile car ramps ensures functionality and safety. Consider vehicle weight and ramp incline. Proper measurements prevent damage and ease car maintenance.
Choosing the right dimensions for your low profile car ramps is crucial. It can mean the difference between a smooth parking experience and a frustrating scrape. This step requires thoughtful consideration and precision.Understanding Your Vehicle’s Clearance
First, check your vehicle’s ground clearance. Measure the distance from the ground to the lowest part of your vehicle. This measurement will guide you in determining the ramp’s height. A friend of mine once realized his newly-built ramp was too steep, causing his sports car to scrape the underside. This mistake could have been avoided with accurate measurements.Determining Ramp Width
Your ramp needs to be wide enough to accommodate your tires comfortably. Measure the distance between the outer edges of your tires. Add a few extra inches to this width for a safety buffer. A wider ramp provides more stability and reduces the risk of your tires slipping off the edge.Calculating Ramp Length
A longer ramp creates a gentler slope, making it easier for your car to climb. Use a length that allows your vehicle to ascend without bottoming out. Think of it like a bridge—too short, and the ride gets bumpy. Too long, and it becomes cumbersome to store.Considering Weight Capacity
Consider the weight of your vehicle. Your ramp must be robust enough to support it. Look for materials and designs that can handle your car’s weight without bending or breaking. This ensures safety and durability.Adapting To Space Constraints
How much space do you have? Tailor your ramp dimensions to fit within your available space. If your garage is tight, prioritize a design that is compact yet effective. You don’t want to trip over your ramps every time you park.Testing For Comfort And Safety
Once built, test your ramps. Drive your vehicle up and down a few times. Check for any scraping or tilting. Adjust the dimensions if necessary for a smoother ride. Choosing the right dimensions is all about balance. It’s a blend of your vehicle’s needs and your space limitations. Have you ever faced any challenges while building ramps? Share your experiences in the comments!Cutting The Wood
Crafting low profile car ramps involves precise wood cutting for stability. Ensure each piece is measured accurately to support weight. Use a saw for clean edges and secure joining.
Cutting the wood is a crucial step in making low profile car ramps. Proper cuts ensure the ramps are sturdy and safe. This process requires attention to detail and precision. Begin by gathering all necessary materials and tools. Get ready to transform those wooden planks into functional ramps.Marking The Measurements
Accurate measurements are essential for safe car ramps. First, place the wood on a flat surface. Use a tape measure to mark the length and width. A pencil can help you draw clear lines on the wood. Double-check your measurements to avoid mistakes. This step ensures that each piece fits perfectly in the final assembly.Using The Saw
Choose the right saw for cutting wood. A circular saw is ideal for straight cuts. Put on safety goggles and gloves before starting. Align the saw blade with your marked lines. Hold the saw steady to ensure a clean cut. Follow the line slowly to maintain accuracy. After cutting, sand the edges to remove splinters. This makes the ramps smooth and safe to use.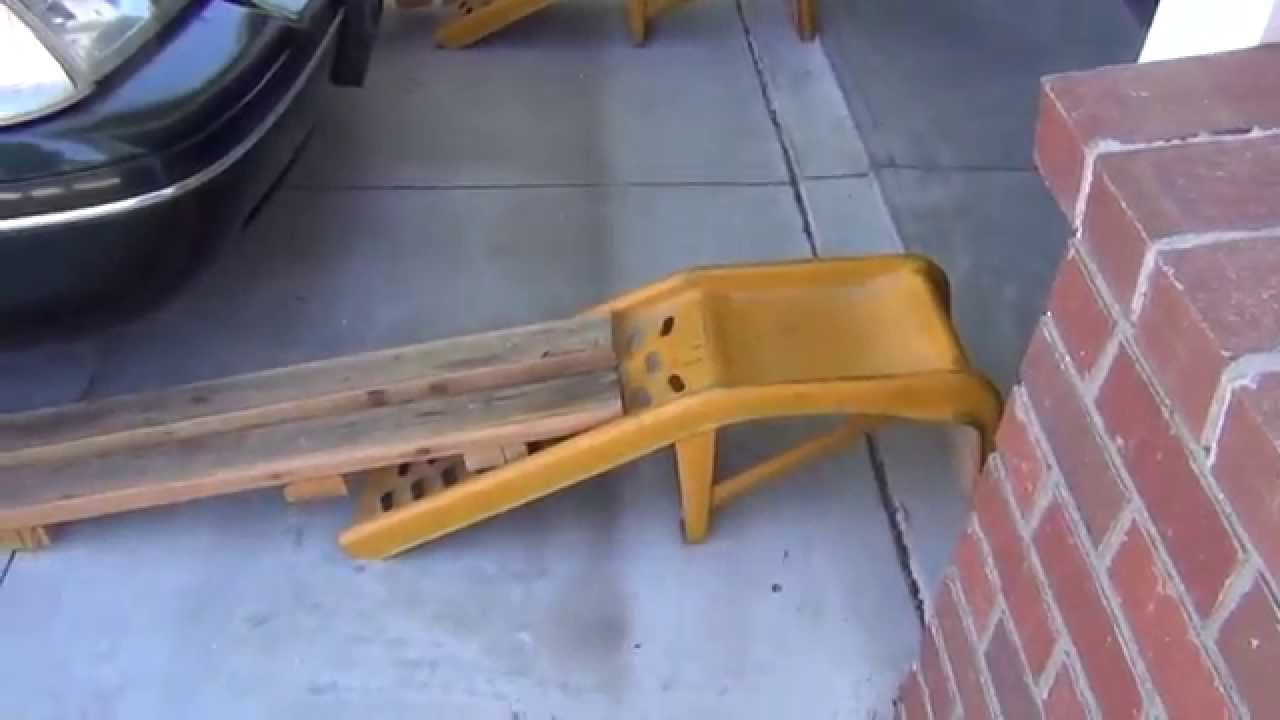
Credit: www.youtube.com
Assembling The Ramp
Building low profile car ramps involves careful assembly for stability and safety. Cut wood to required length and width. Secure pieces with screws, ensuring a smooth surface for easy car access.
Assembling the ramp is an exciting step in your DIY journey. You have gathered all the materials and cut them to the perfect dimensions. Now, it’s time to bring your low-profile car ramp to life. This process is crucial for ensuring that your ramp is sturdy and safe for use. Let’s dive into the steps of aligning the pieces and securing them with screws.Aligning The Pieces
Aligning the pieces is like putting together a puzzle. Start by laying out the cut pieces on a flat surface. You want them to fit snugly together to avoid any wobbling later. Check if the edges meet seamlessly. If not, a quick sanding can help smooth things out. The goal is for each piece to sit flush against its neighbor. Remember, precision is key. Misaligned pieces can lead to instability. Have you ever assembled furniture and found it wobbly? The same principle applies here. Double-check your alignment before moving on.Securing With Screws
Once aligned, it’s time to secure the pieces with screws. Use screws that are long enough to hold the pieces together firmly but not too long that they protrude on the other side. Grab your drill and start screwing the pieces together. Place screws at regular intervals to distribute weight evenly. This prevents any single area from bearing too much stress. Consider using a drill with adjustable torque settings. This can prevent over-tightening and damaging the wood. Have you ever stripped a screw head because of too much pressure? Adjusting torque can save you from that hassle. By aligning the pieces and securing them properly, you’re ensuring your ramp is ready for action. Do you feel the excitement of knowing your ramp will soon be supporting your car’s weight? It’s a rewarding experience.Adding Non-slip Surface
Adding a non-slip surface to low profile car ramps enhances safety. Use textured materials like rubber strips or anti-slip paint to prevent tire slippage. A secure grip provides peace of mind during vehicle maintenance.
Adding a non-slip surface to your car ramps is crucial. It ensures safety while using the ramps. Slippery ramps can lead to accidents and damage. By adding a non-slip surface, you can prevent these issues. This simple step can make a big difference in your ramp’s usability and safety.Selecting The Material
Choose the right material for the non-slip surface. Rubber is a popular choice. It provides excellent grip and durability. You can also consider using anti-slip tape. It is easy to apply and cost-effective. Another option is textured paint. It adds grip and is available in many colors. Evaluate each material for your specific needs.Applying To The Ramp
Start by cleaning the ramp surface thoroughly. Remove any dirt or debris. Ensure the surface is dry before applying the non-slip material. For rubber, cut the pieces to fit the ramp. Use strong adhesive to secure them. If using anti-slip tape, simply peel and stick. Make sure it adheres well to the ramp. For textured paint, follow the instructions on the can. Apply evenly for the best results. Allow the paint to dry completely before use.Finishing Touches
Creating low profile car ramps requires precision and attention to detail. Ensure the correct measurements are taken for optimal fit. Sand down rough edges for a smooth finish, enhancing usability and safety.
When crafting your low profile car ramps, the finishing touches can make all the difference. These final steps not only enhance the appearance but also extend the life of your ramps. They ensure your hard work pays off with a product that’s both functional and attractive. Let’s explore how to wrap up your project with finesse.Sanding The Edges
Smoothing out the edges of your ramps is crucial for safety and aesthetics. Rough edges can damage tires or cause splinters, so take the time to sand them down. Use medium-grit sandpaper for initial smoothing, then switch to fine-grit for a polished finish. Remember that attention to detail here can prevent future mishaps. A friend once overlooked this step and ended up scratching his car’s underbody. Learn from such experiences and ensure your ramps are smooth and safe.Painting Or Sealing
Decide whether you want to paint or seal your ramps. Painting adds a splash of color and can make your ramps stand out. Choose a durable outdoor paint to withstand the elements. Alternatively, sealing with a clear coat preserves the natural look of the wood while providing protection. A quality sealant will protect against moisture and prolong the life of your ramps. Think about the weather conditions your ramps will face. Will they be outside in the rain, or stored in a dry garage? Your environment should guide your choice between paint and sealant. In the end, these finishing touches reflect your style and ensure your ramps are built to last. What will you choose: a bold paint job or a sleek, sealed finish?Testing The Ramps
Crafting low profile car ramps involves precise measurements and sturdy materials. Testing the ramps ensures safety and functionality for vehicles. A simple design allows easy access to the underside of cars without hassle.
Testing your newly built low profile car ramps is crucial to ensure they are safe and effective for use. This step will help you identify any weaknesses or areas for improvement. As you test the ramps, keep safety at the forefront of your mind.Checking Stability
Stability is key when you’re dealing with car ramps. Place your ramps on a flat surface and press down firmly to check for any wobble. If they move, consider adding rubber grips underneath. Use a level to ensure the ramps are even. An uneven ramp can cause your car to tilt or slide. You want peace of mind that your car will stay put while on the ramps. Think about weight distribution. Will the ramps hold the weight of your car without bending or cracking? Test with something heavy before driving your car on them.Ensuring Safety
Safety checks are non-negotiable. Wear protective gear while testing the ramps. Gloves and goggles can protect you from splinters or unexpected mishaps. Inspect the ramps for any sharp edges or splinters. Sand these down to prevent injury or damage to your vehicle’s tires. Are the edges smooth enough to run your hand over without any snags? Consider a practice run with a smaller vehicle or object. This can help you assess how the ramps handle weight and if they shift or slide unexpectedly. Would you feel comfortable using these ramps with your own car after a trial run? Testing might seem tedious, but it’s an investment in your safety. Are you willing to skip this step and risk your car’s security?Storing The Ramps
Crafting low profile car ramps involves using sturdy materials to ensure safe vehicle access. Store these ramps in a dry, cool area to prevent damage. Regularly check for any signs of wear to maintain their reliability.
Storing your low profile car ramps properly can extend their lifespan and ensure they’re ready for action when needed. Imagine the frustration of discovering your ramps are unusable just when you need them most. Proper storage can prevent this scenario, keeping your garage or workshop clutter-free. Whether you’re tight on space or dealing with harsh weather conditions, there are smart ways to store your ramps efficiently and safely.Space-saving Tips
Making the most of your available space is crucial. One idea is to hang your ramps on the wall using heavy-duty hooks. This not only keeps them off the floor but also makes them easily accessible. Another space-saving option is to store them under a workbench. If you have limited floor space, consider stacking them vertically in a corner. Think about your garage layout. Could you rearrange a few items to create a dedicated storage nook for your ramps? Even small changes can have a big impact on your storage efficiency.Protection From Weather
Weather can be a significant factor in the lifespan of your ramps. If your storage area is exposed to the elements, consider investing in a weatherproof cover. This can protect your ramps from rain, snow, and even the sun’s harsh UV rays. Another option is to store your ramps inside a shed or garage. This provides natural protection from the weather. If indoor storage isn’t possible, placing a tarp over your ramps can offer an added layer of protection. Have you ever noticed how some materials degrade faster in certain climates? Think about your local weather conditions when deciding on storage solutions. Proper protection can mean the difference between needing new ramps every few years and having them last a lifetime. Taking the time to store your ramps correctly can save you money and hassle in the long run. What small changes can you make today to protect your investment?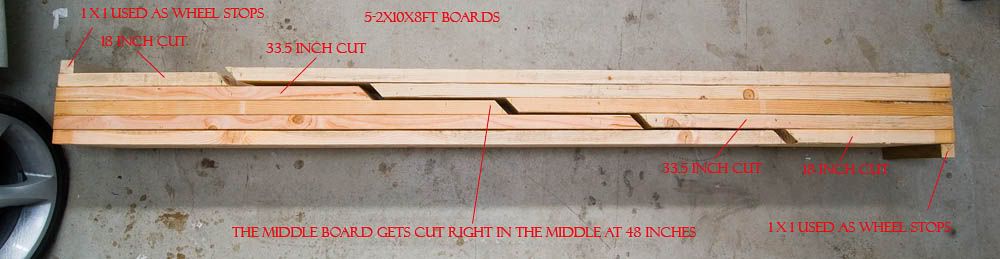
Credit: www.m3post.com
Conclusion
Building low profile car ramps is practical and rewarding. You save money and gain valuable skills. With basic materials and tools, the process is straightforward. Each step brings you closer to a functional ramp. Safety should always be your priority.
Double-check your work to ensure stability. Once completed, your ramps will serve many purposes. Whether for maintenance or car shows, they are useful. Enjoy the satisfaction of a job well done. Keep learning and improving your skills. Happy ramp building!