Have you ever found yourself staring at your vehicle’s wheels, wondering how to measure the lug nut pattern? You’re not alone.
Whether you’re upgrading your wheels, replacing worn-out ones, or simply curious about your car’s specifications, knowing how to measure the lug nut pattern is crucial. It might sound technical, but it’s easier than you think. By getting this right, you avoid costly mistakes and ensure your wheels fit perfectly, keeping your ride smooth and safe.
Stick around, and you’ll learn a straightforward method to get this done without any fuss. Ready to dive in? Let’s make your wheel worries disappear!
What Is A Lug Nut Pattern?
Understanding the lug nut pattern of your vehicle is essential. It helps ensure proper wheel fitment and safety. The lug nut pattern, also known as bolt pattern, refers to the arrangement of the holes on a wheel. These holes are where the lug nuts secure the wheel to the vehicle.
Each vehicle has a specific lug nut pattern. This pattern must match the wheel for proper installation. If the pattern doesn’t match, the wheel won’t fit. This can lead to dangerous situations. Knowing your vehicle’s lug nut pattern is crucial for wheel replacements or upgrades.
The lug nut pattern is a series of holes on a wheel. These holes align with the studs on the vehicle’s hub. The pattern is measured by counting the number of holes and the distance between them. For example, a 5×114.3 pattern means there are five holes. The distance between them is 114.3 millimeters. This measurement helps determine compatibility with other wheels.
How To Identify Your Lug Nut Pattern
To identify your lug nut pattern, first count the number of holes on your wheel. This is the first part of the pattern. Next, measure the distance between the holes. Use a ruler or measuring tape for accuracy. This distance is the second part of the pattern. Ensure measurements are in millimeters for consistency.
Common Lug Nut Patterns
Several lug nut patterns are common in vehicles. The 5×114.3 pattern is popular in many cars. The 4×100 pattern is often seen in compact cars. Larger vehicles might have a 6×139.7 pattern. Knowing these common patterns can help when purchasing new wheels. Always verify the pattern to avoid mismatches.
Tools Needed For Measurement
A ruler, tape measure, or caliper helps measure the lug nut pattern. Ensure precise alignment by counting the number of lugs. Accurately measuring the distance between them is crucial for correct fitting.
Understanding how to measure a lug nut pattern accurately is crucial for anyone looking to change wheels or buy new rims for their vehicle. Having the right tools can simplify this task and provide precise measurements. With a few basic tools, you’ll be on your way to mastering this essential car maintenance skill.1. Ruler Or Measuring Tape
A simple ruler or measuring tape is indispensable for measuring the distance between lug nuts. Choose a tool with both metric and imperial units to ensure versatility. Consider this: Wouldn’t it be frustrating to take measurements only to realize you’re using the wrong unit?2. Calipers
Calipers offer more precision than a ruler or tape. They can measure the diameter of the lug nuts and the distance between them with high accuracy. Have you ever wondered how professionals get their measurements so spot-on? Calipers are often their secret weapon.3. Paper And Pen
Don’t underestimate the power of jotting down your measurements. Having a record helps avoid mistakes and ensures you have the necessary information when shopping for wheels. How often do we think we’ll remember something, only to forget it moments later?4. Lug Nut Pattern Gauge
A lug nut pattern gauge is a specialized tool that simplifies the measurement process. It fits directly onto your lug nuts, providing an instant reading of the pattern. It’s a small investment that can save time and reduce errors.5. Smartphone Or Camera
Taking a photo of your lug nut setup can be incredibly helpful. Visual references are beneficial when you’re comparing patterns or consulting with a professional. Have you ever tried explaining something complex without a picture? It can be challenging. By equipping yourself with these tools, you’re setting the stage for accurate and efficient lug nut pattern measurements. What other tools have you found helpful in similar tasks? Share your insights and enhance your toolkit.Locating The Lug Nuts
Find the lug nuts by looking at your vehicle’s wheel. Measure the lug nut pattern by counting the bolts and measuring the distance between them. This helps in choosing the correct wheels and ensures safety while driving.
Finding the lug nuts on your vehicle is the first step in measuring the lug nut pattern. This task might seem simple, but it’s crucial for getting the measurements right. Whether you’re working on a car, truck, or SUV, knowing where to start can make the process smoother and more efficient.Understanding The Basics
Lug nuts are the fasteners that keep your wheel attached to the hub. They’re usually found at the center of the wheel. You’ll spot them easily because they’re often visible on the wheel’s face. If you’ve ever changed a tire, you’ve already encountered these critical components.Examining Your Wheel Type
Different vehicles have different wheel designs, and lug nuts can vary in appearance. Some wheels have a hubcap or wheel cover, which you might need to remove to access the lug nuts. Use a flathead screwdriver to gently pop off the cover if necessary. Always handle wheel covers carefully to avoid damage. Once the lug nuts are exposed, count them. Most vehicles typically have 4, 5, 6, or 8 lug nuts. Knowing the number helps determine your lug nut pattern. If you’re unsure, consider checking your vehicle’s manual for a quick confirmation.Cleaning The Area
Before measuring, ensure the lug nut area is clean. Dirt or debris can interfere with accurate measurements. Use a cloth to wipe the area and clear any obstructions. A clean surface ensures you get precise results.Asking Questions
Have you ever wondered why the number of lug nuts differs between vehicles? It’s all about balancing strength and weight. More lug nuts mean better stability for larger vehicles. Understanding this can guide you in choosing the right tools and techniques for your specific needs. Locating the lug nuts might seem like a small step, but it’s foundational to measuring the lug nut pattern effectively. Whether you’re a DIY enthusiast or just curious about your vehicle, starting with the basics ensures you’re on the right track.
Credit: www.speedwaymotors.com
Counting The Lug Nuts
Understanding the lug nut pattern is crucial for wheel compatibility. Each wheel has a set number of lug nuts that secure it to the hub. Knowing how to count these lug nuts will help in identifying the wheel’s bolt pattern. This step is simple but essential for ensuring your wheels fit correctly.
How Many Lug Nuts?
Most vehicles have either four, five, six, or eight lug nuts. Count each nut surrounding the wheel hub. This count gives you the first part of the bolt pattern.
Common Patterns
Four-lug patterns are common in smaller cars. Five-lug patterns are popular in sedans and light trucks. Six-lug patterns appear on larger trucks and SUVs. Eight-lug patterns are typical in heavy-duty vehicles.
Why Count Correctly?
Accurate counting avoids mismatches. Incorrect lug nut count can lead to unsafe driving. It is important for vehicle safety and performance. Always double-check your count for accuracy.
Tools For Counting
No special tools are needed. Simply look at the wheel hub. Count each lug nut visually. A flashlight can help in low light areas.
Next Steps
Once you have the count, proceed to measure the distance between the lug nuts. This helps in understanding the complete bolt pattern of your wheel.
Measuring The Lug Nut Diameter
Understanding the lug nut diameter is crucial for wheel replacement. Knowing the exact diameter ensures compatibility with the wheel hub. Incorrect measurements can lead to unsafe driving conditions.
There are simple tools to help you measure accurately. Two of the most common methods include using a ruler and a caliper.
Measuring With A Ruler
Place the ruler over the center of the lug nut. Ensure the zero mark aligns with one edge. Read the measurement at the opposite edge. Note the diameter in millimeters or inches. This method is quick and straightforward.
Using A Caliper
Calipers offer precise measurements. Place the caliper jaws over the lug nut. Adjust them until they fit snugly. Read the measurement from the caliper’s scale. Digital calipers display the result instantly. This method provides more accuracy.
Determining The Bolt Pattern
Measuring the lug nut pattern is crucial for wheel compatibility. The bolt pattern consists of two numbers. First, the number of lug holes on the wheel. Second, the distance between these holes. Knowing this helps in selecting the right wheels for your vehicle.
The bolt pattern is usually described as 4×100 or 5×114.3. The first number indicates the number of lug holes. The second number shows the diameter of the circle formed by these holes.
Four-lug Patterns
Four-lug patterns are common in compact cars. To measure, use a ruler or measuring tape. Measure the center-to-center distance between two opposite holes. Ensure your measurement is accurate for a proper fit.
Five-lug Patterns
Five-lug patterns are often found in sedans and SUVs. Measuring is slightly tricky. Measure from the center of one lug to the far edge of the opposite lug. This gives the bolt circle diameter.
Six-lug Patterns
Six-lug patterns usually fit larger vehicles like trucks. Measure from the center of one lug to the center of the opposite lug. Ensure you record the measurement accurately.
Understanding these patterns is essential for safe and secure wheel installation.
Confirming Your Measurements
Measuring the lug nut pattern involves identifying the number of lugs and the diameter of the circle they form. Use a ruler or caliper for accuracy. Ensuring correct measurements is essential for wheel compatibility and safety.
Measuring a lug nut pattern might seem straightforward, but ensuring you’ve measured accurately is crucial for the safety and performance of your vehicle. Incorrect measurements can lead to purchasing the wrong wheels, which can cause alignment issues or even accidents. With just a few simple steps, you can confirm your measurements and be sure of your vehicle’s compatibility with the wheels you choose.Understanding The Basics
Before you confirm your measurements, make sure you understand the basics of lug nut patterns. They are usually expressed in a two-number format, such as 5×114.3. The first number represents the number of lug holes, while the second indicates the diameter of the circle formed by these lugs, measured in millimeters.Tools You Need
Gather a few essential tools to ensure your measurements are precise. A ruler or measuring tape will suffice for most, but a bolt pattern gauge is a handy investment. Keep a notepad handy to record your measurements as you go.Double-check Each Measurement
After you take the initial measurement, measure again. This time, do it slowly and carefully, ensuring that the ruler is properly aligned with the lug holes. Repeating the measurement will help catch any errors.Cross-reference Your Findings
Consult your vehicle’s manual or the manufacturer’s website to confirm the lug nut pattern. Manufacturers often provide precise specifications, which can help validate your measurements. Matching your findings with these specifications adds an extra layer of assurance.Seek A Second Opinion
If you’re unsure about your measurements, don’t hesitate to ask a friend or a professional for help. Sometimes, a fresh pair of eyes can spot something you might have missed. This can save you from making costly mistakes.Consider The Importance Of Accuracy
Why is confirming your measurements so important? Accuracy ensures your wheels fit snugly and securely, maintaining the integrity of your vehicle’s performance. Misalignments can lead to uneven tire wear and compromise your safety.Reflect On Your Experience
Have you ever made an error in measurement that led to unexpected consequences? Reflecting on past experiences can remind you of the importance of precision. This reflection might prevent future missteps. Confirming your measurements is not just a mundane task; it is an essential step in ensuring your vehicle’s safety and performance. With these practical steps, you can be confident in your lug nut pattern measurements, leading to a smoother ride and peace of mind.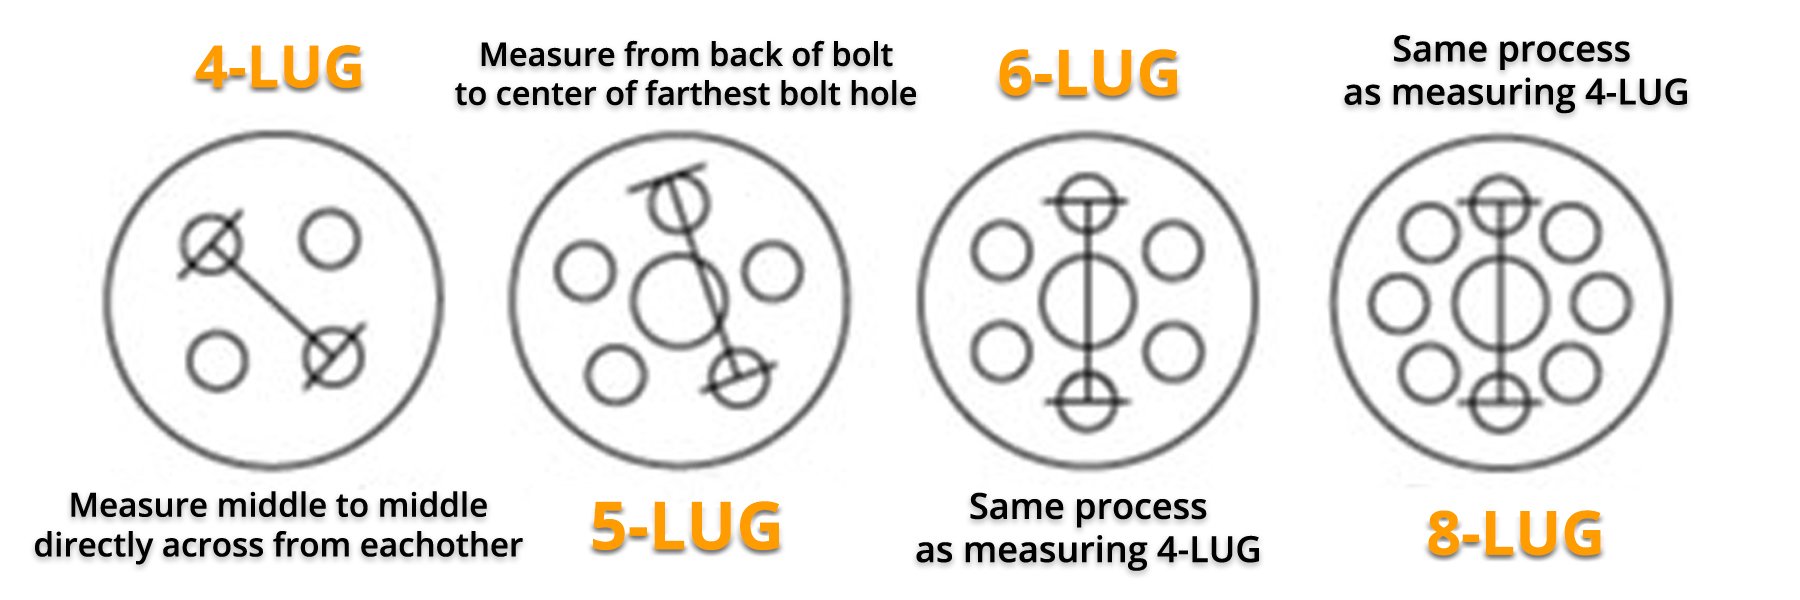
Credit: factoryreproductions.com
Common Mistakes To Avoid
Measuring lug nut patterns can be tricky. Mistakes often lead to mismatched wheels and poor fit. Avoid common errors to ensure accuracy and safety.
Miscounting The Lug Holes
Many people miscount lug holes. They often overlook the extra one. Ensure to count all holes before measuring.
Ignoring The Center Hole
The center hole is crucial. Many ignore its size. Measure its diameter for proper fit.
Using Incorrect Tools
Proper tools are essential. Some use makeshift items. Always use a ruler or caliper for precision.
Incorrect Angle Measurement
Angles matter in patterns. Wrong angle leads to errors. Use a protractor to check angles.
Misjudging Bolt Circle Diameter
Bolt circle diameter is key. Misjudging it affects pattern accuracy. Measure from center of one hole to opposite.
Failing To Verify Fit
Verification is crucial. Many skip this step. Always test fit with actual lug nuts before finalizing.
Tips For Accurate Measurement
Accurate measurement of lug nut patterns is crucial for vehicle safety. Incorrect measurements can lead to improper wheel fitting, affecting vehicle performance. Here are some practical tips to ensure your measurements are precise and reliable.
Use The Right Tools
Always have a ruler or measuring tape handy. A caliper can be useful too. These tools help in taking precise measurements without guesswork. Ensure the tools are in good condition and provide accurate readings.
Understand The Lug Nut Pattern
Familiarize yourself with the pattern type on your vehicle. Common patterns include 4-lug, 5-lug, and 6-lug designs. Knowing the pattern helps in taking accurate measurements.
Measure Across The Studs
For even numbers, measure from center to center of two opposite studs. For odd numbers, measure from the center of one stud to the outer edge of another. This method ensures you capture the correct diameter.
Document Your Measurements
Record your measurements immediately. Keep a notebook or digital record. Having a reference prevents errors in future checks or replacements.
Double-check Your Work
Re-measure to confirm accuracy. Small errors can lead to significant issues. Double-checking ensures the reliability of your initial measurement.
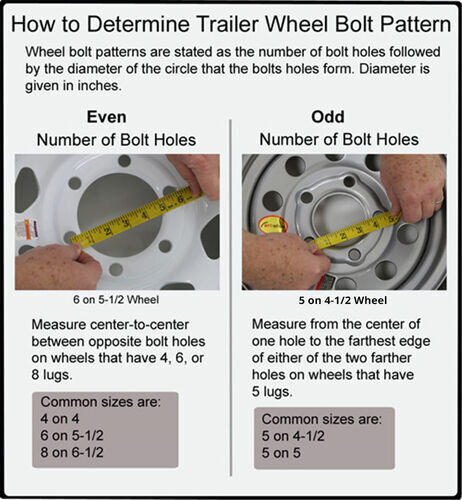
Credit: www.etrailer.com
Conclusion
Measuring lug nut patterns is straightforward with the right approach. Just count the bolts. Measure the distance between them. Make sure you check carefully. Different vehicles have different patterns. This ensures safe installation of new wheels. Accurate measurements prevent mismatches.
Use the right tools for the job. Double-check your measurements for accuracy. Understanding this process helps avoid costly mistakes. Now you can confidently match wheels. Remember, precision is key. Happy measuring and safe driving!