Installing a ball joint into a knuckle is a process that involves securing the ball joint in place to ensure proper functioning of the suspension system. Here is a general guide on how to install a ball joint into a knuckle:
Tools and Materials Needed:
- New ball joint
- Jack and jack stands
- Lug wrench
- Socket and ratchet set
- Torque wrench
- Ball joint press tool or ball joint installation adapter kit
- Grease gun and grease
How to Put Ball Joint into Knuckle:
-
Safety First:
- Ensure the vehicle is safely lifted and supported on jack stands.
- Remove the wheel using a lug wrench to expose the suspension components.
-
Locate the Ball Joint:
- Identify the ball joint on the knuckle. It’s a pivot point connecting the control arm to the knuckle.
-
Remove Old Ball Joint (if applicable):
- If you are replacing an old ball joint, use a socket and ratchet set to remove the bolts or nuts securing it to the control arm and knuckle.
- Use a ball joint press tool to press out the old ball joint. Follow the tool manufacturer’s instructions.
-
Prepare the New Ball Joint:
- Ensure that the new ball joint is the correct one for your vehicle.
- Apply a thin layer of grease to the new ball joint to ensure smooth movement.
-
Position the Ball Joint:
- Insert the ball joint into the knuckle. It should fit snugly.
-
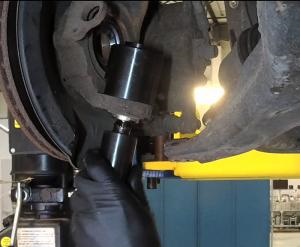
Use a Ball Joint Press Tool:
- If you’re using a ball joint press tool, follow the tool’s instructions to press the new ball joint into place.
- The tool typically consists of various cups and adapters to fit around the ball joint and press it into the knuckle.
-
Secure the Ball Joint:
- Once the ball joint is pressed in, secure it using the provided hardware. Tighten the bolts or nuts to the manufacturer’s specifications.
-
Torque to Specifications:
- Use a torque wrench to torque the bolts or nuts to the specified torque values. Refer to the vehicle’s service manual for the correct torque specifications.
-
Check for Proper Installation:
- Ensure that the ball joint is securely in place and seated properly. There should be no play or movement.
-
Reassemble:
- Reassemble the remaining components, such as the control arm, and tighten all bolts to the specified torque values.
-
Grease the Ball Joint:
- If the ball joint has a grease fitting, use a grease gun to add grease. This helps in maintaining proper lubrication.
-
Repeat for Other Side (if necessary):
- If you are replacing both ball joints, repeat the process on the other side.
-
Install the Wheel:
- Put the wheel back on the vehicle and tighten the lug nuts.
-
Lower the Vehicle:
- Lower the vehicle from the jack stands carefully.
Always refer to your vehicle’s service manual for specific instructions and torque specifications. If you are not comfortable or experienced with this type of work, it’s advisable to seek professional help.
Conclusion
Putting a ball joint into the knuckle requires precision and careful handling. By following the steps outlined in this guide, you can ensure a successful installation process, leading to improved vehicle performance and safety.
With the right tools and techniques, anyone can confidently tackle this job and keep their vehicle running smoothly.
Credit: www.delphiautoparts.com
Installing a ball joint into a knuckle is a process that involves securing the ball joint in place to ensure proper functioning of the suspension system. Here is a general guide on how to install a ball joint into a knuckle:
Tools and Materials Needed:
- New ball joint
- Jack and jack stands
- Lug wrench
- Socket and ratchet set
- Torque wrench
- Ball joint press tool or ball joint installation adapter kit
- Grease gun and grease
How to Put Ball Joint into Knuckle:
-
Safety First:
- Ensure the vehicle is safely lifted and supported on jack stands.
- Remove the wheel using a lug wrench to expose the suspension components.
-
Locate the Ball Joint:
- Identify the ball joint on the knuckle. It’s a pivot point connecting the control arm to the knuckle.
-
Remove Old Ball Joint (if applicable):
- If you are replacing an old ball joint, use a socket and ratchet set to remove the bolts or nuts securing it to the control arm and knuckle.
- Use a ball joint press tool to press out the old ball joint. Follow the tool manufacturer’s instructions.
-
Prepare the New Ball Joint:
- Ensure that the new ball joint is the correct one for your vehicle.
- Apply a thin layer of grease to the new ball joint to ensure smooth movement.
-
Position the Ball Joint:
- Insert the ball joint into the knuckle. It should fit snugly.
-
Use a Ball Joint Press Tool:
- If you’re using a ball joint press tool, follow the tool’s instructions to press the new ball joint into place.
- The tool typically consists of various cups and adapters to fit around the ball joint and press it into the knuckle.
-
Secure the Ball Joint:
- Once the ball joint is pressed in, secure it using the provided hardware. Tighten the bolts or nuts to the manufacturer’s specifications.
-
Torque to Specifications:
- Use a torque wrench to torque the bolts or nuts to the specified torque values. Refer to the vehicle’s service manual for the correct torque specifications.
-
Check for Proper Installation:
- Ensure that the ball joint is securely in place and seated properly. There should be no play or movement.
-
Reassemble:
- Reassemble the remaining components, such as the control arm, and tighten all bolts to the specified torque values.
-
Grease the Ball Joint:
- If the ball joint has a grease fitting, use a grease gun to add grease. This helps in maintaining proper lubrication.
-
Repeat for Other Side (if necessary):
- If you are replacing both ball joints, repeat the process on the other side.
-
Install the Wheel:
- Put the wheel back on the vehicle and tighten the lug nuts.
-
Lower the Vehicle:
- Lower the vehicle from the jack stands carefully.
Always refer to your vehicle’s service manual for specific instructions and torque specifications. If you are not comfortable or experienced with this type of work, it’s advisable to seek professional help.
Conclusion
Putting a ball joint into the knuckle requires precision and careful handling. By following the steps outlined in this guide, you can ensure a successful installation process, leading to improved vehicle performance and safety.
With the right tools and techniques, anyone can confidently tackle this job and keep their vehicle running smoothly.
When performing this task, it’s important to take caution and follow proper procedures. Using the correct tools and techniques will ensure that the ball joint is securely and safely installed, preventing future issues with the suspension system.
Proper installation of the ball joint into the knuckle is crucial for the overall performance and safety of the vehicle.
We will discuss the step-by-step process of putting a ball joint into a knuckle, as well as important considerations for a successful installation. Understanding the correct procedure will help you maintain the integrity of your vehicle’s suspension system, leading to optimal driving experience and safety.
Credit: www.delphiautoparts.com
Installing a ball joint into a knuckle is a process that involves securing the ball joint in place to ensure proper functioning of the suspension system. Here is a general guide on how to install a ball joint into a knuckle:
Tools and Materials Needed:
- New ball joint
- Jack and jack stands
- Lug wrench
- Socket and ratchet set
- Torque wrench
- Ball joint press tool or ball joint installation adapter kit
- Grease gun and grease
How to Put Ball Joint into Knuckle:
-
Safety First:
- Ensure the vehicle is safely lifted and supported on jack stands.
- Remove the wheel using a lug wrench to expose the suspension components.
-
Locate the Ball Joint:
- Identify the ball joint on the knuckle. It’s a pivot point connecting the control arm to the knuckle.
-
Remove Old Ball Joint (if applicable):
- If you are replacing an old ball joint, use a socket and ratchet set to remove the bolts or nuts securing it to the control arm and knuckle.
- Use a ball joint press tool to press out the old ball joint. Follow the tool manufacturer’s instructions.
-
Prepare the New Ball Joint:
- Ensure that the new ball joint is the correct one for your vehicle.
- Apply a thin layer of grease to the new ball joint to ensure smooth movement.
-
Position the Ball Joint:
- Insert the ball joint into the knuckle. It should fit snugly.
-
Use a Ball Joint Press Tool:
- If you’re using a ball joint press tool, follow the tool’s instructions to press the new ball joint into place.
- The tool typically consists of various cups and adapters to fit around the ball joint and press it into the knuckle.
-
Secure the Ball Joint:
- Once the ball joint is pressed in, secure it using the provided hardware. Tighten the bolts or nuts to the manufacturer’s specifications.
-
Torque to Specifications:
- Use a torque wrench to torque the bolts or nuts to the specified torque values. Refer to the vehicle’s service manual for the correct torque specifications.
-
Check for Proper Installation:
- Ensure that the ball joint is securely in place and seated properly. There should be no play or movement.
-
Reassemble:
- Reassemble the remaining components, such as the control arm, and tighten all bolts to the specified torque values.
-
Grease the Ball Joint:
- If the ball joint has a grease fitting, use a grease gun to add grease. This helps in maintaining proper lubrication.
-
Repeat for Other Side (if necessary):
- If you are replacing both ball joints, repeat the process on the other side.
-
Install the Wheel:
- Put the wheel back on the vehicle and tighten the lug nuts.
-
Lower the Vehicle:
- Lower the vehicle from the jack stands carefully.
Always refer to your vehicle’s service manual for specific instructions and torque specifications. If you are not comfortable or experienced with this type of work, it’s advisable to seek professional help.
Conclusion
Putting a ball joint into the knuckle requires precision and careful handling. By following the steps outlined in this guide, you can ensure a successful installation process, leading to improved vehicle performance and safety.
With the right tools and techniques, anyone can confidently tackle this job and keep their vehicle running smoothly.