Have you ever found yourself staring at your car’s steering wheel, wondering what it would take to remove it? Whether you’re looking to upgrade, replace a damaged wheel, or simply satisfy your curiosity, removing a steering wheel can seem daunting.
But here’s the secret: it’s easier than you might think. Imagine the satisfaction of accomplishing this task yourself. You’ll gain confidence, save money, and have the chance to personalize your car in ways you never thought possible. Intrigued? Read on to discover how you can safely and efficiently remove a steering wheel, transforming your driving experience and unlocking new automotive possibilities.
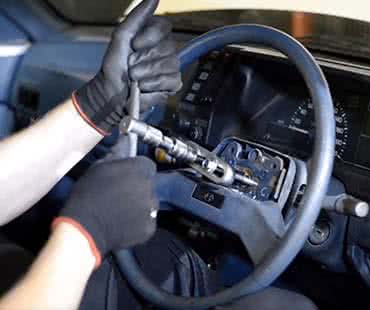
Credit: www.supercheapauto.com.au
Preparing For Removal
Ensuring safety before steering wheel removal is crucial. Disconnect the battery to prevent airbag deployment. Use proper tools to loosen bolts, and carefully detach the wheel without damaging the components.
Removing a steering wheel might seem daunting, but with the right preparation, you can tackle this task efficiently. Before you dive into the process, it’s crucial to lay the groundwork for a smooth removal. This preparation not only saves you time but also ensures your safety and the proper functioning of your vehicle post-removal. Let’s break down the essential steps for preparing to remove your steering wheel.Gather Necessary Tools
First things first, gather all the tools you’ll need. You might be surprised how a missing tool can halt your progress completely. Make sure you have a wrench set, a screwdriver, and a steering wheel puller. A steering wheel puller is a must-have. It might not be something you use every day, but it will prevent damage to your steering column. You can rent one if you don’t own it. Also, keep some protective gloves handy. They can save your hands from unexpected sharp edges and provide a better grip on tools.Ensure Safety Precautions
Safety is not just about avoiding physical harm—it’s about ensuring your car remains functional. Disconnect the battery before starting. This prevents accidental airbag deployment, which could cause injury and further complicate the removal process. Consider this: have you ever attempted a DIY project and realized halfway through that you missed a crucial safety step? Avoid this mistake by checking that your vehicle is parked on a flat surface. Engage the parking brake and ensure there’s no risk of the car rolling. This simple precaution can prevent a lot of potential accidents. Now, you’re ready to proceed with confidence. By preparing thoroughly, you set yourself up for success and safeguard your vehicle’s integrity. Have you ever thought about how preparation in daily tasks can lead to unexpected ease and efficiency?
Credit: www.youtube.com
Disconnecting The Battery
Disconnecting the battery is crucial before removing a steering wheel. It ensures safety by cutting off electrical power. This step prevents unexpected airbag deployment. It also protects you from electrical shocks. Handling the battery carefully is important. Follow the steps outlined to ensure a safe process.
Preventing Electrical Hazards
Always wear protective gloves before touching the battery. This reduces the risk of electrical shocks. Locate the negative terminal on the battery. It usually has a black cable. Use a wrench to loosen the nut on the negative terminal. Remove the cable and keep it aside. This disconnects the battery safely.
Ensure the cable does not touch any metal parts. This prevents electrical circuits from forming. After disconnecting, wait for a few minutes. This allows any stored electrical charge to dissipate. The risk of accidental airbag deployment is now minimized.
Removing The Airbag
Removing the airbag is a crucial step in steering wheel removal. It’s essential to handle the airbag with care to avoid accidents. This guide will walk you through the process safely and efficiently.
Locating Airbag Fasteners
Start by locating the airbag fasteners. These are usually hidden behind the steering wheel. Check the sides and the back of the wheel for small holes or covers. Use a flashlight to see clearly. The fasteners are often Torx screws or bolts. Refer to your car’s manual for specifics.
Safely Detaching The Airbag
Before detaching the airbag, disconnect the battery. This prevents accidental deployment. Wait 15 minutes after disconnecting the battery. Use the appropriate tool to unscrew the fasteners. Gently pull the airbag towards you. Be cautious to avoid damaging the wires behind it.
Carefully unplug the connectors attached to the airbag. These might include the horn and the airbag itself. Keep the airbag facing away from you. Place it on a flat surface, away from heat sources. Now you’re ready to proceed with steering wheel removal.
Detaching Steering Wheel Components
Detaching steering wheel components requires attention to detail. Each step is crucial for safe removal. Start by gathering essential tools. A screwdriver and socket wrench are often needed. Safety is the top priority. Disconnect the car battery first to avoid shocks. Once ready, you can begin with the first component.
Removing Trim Pieces
Trim pieces cover various parts of the steering wheel. Carefully pry them off using a flathead screwdriver. Be gentle to avoid breaking the plastic. Note where each piece belongs for reassembly. Keep screws and clips in a small container. This prevents losing them during the process.
Disconnecting Electrical Connections
Steering wheels often have electrical connections. These control buttons and airbags. Find and disconnect the airbag connector first. It’s usually marked with bright colors. Use a small tool to gently release the clip. Proceed to disconnect the horn and control buttons. Check for any remaining wires. Ensure all connections are safely detached. This step prevents accidental damage.
Loosening The Steering Wheel Nut
Loosening the steering wheel nut is a crucial step in removing a steering wheel. Use a wrench to carefully turn the nut counterclockwise. Ensure the steering wheel is locked in place before starting.
Loosening the steering wheel nut is a crucial step in removing a steering wheel. It’s the gateway to accessing the rest of the steering assembly. Done correctly, it sets the stage for a smooth removal process. Whether you’re upgrading your steering wheel or fixing an issue, mastering this step can save you time and frustration. Have you ever tried loosening a nut and found it nearly impossible to budge? Let’s dive into how you can make this task straightforward and hassle-free. ###Choosing The Right Tools
The right tools make all the difference. A socket wrench set is essential, with the most common size for steering wheel nuts being 19mm or 21mm. Check your vehicle’s manual for specifics. Consider investing in a breaker bar if the nut is stubborn. It provides extra leverage without much extra effort. Avoid using adjustable wrenches; they can slip and damage the nut. Keep a steering wheel puller handy, as some wheels are tightly secured. It’s a small investment with a big payoff. ###Proper Technique For Loosening
Position yourself comfortably before you start. Stand in a way that lets you apply steady pressure without straining. Make sure your vehicle is parked on a flat surface and the ignition is off. Attach the correct socket to your wrench and fit it securely over the nut. Apply pressure slowly and steadily. Jerky movements can strip the nut or damage the threads. If the nut is tight, use the breaker bar for extra leverage. Keep a firm grip on the wheel to stabilize it. Once the nut is loose, remove it completely and set it aside in a safe place. Have you ever lost a critical part mid-project? Avoid it by keeping small containers handy to store nuts and bolts. Loosening a steering wheel nut is often straightforward, but preparation and technique are key. By choosing the right tools and applying the proper technique, you can ensure a smooth process without any hitches.Extracting The Steering Wheel
Removing a steering wheel can seem complex. But with the right tools, it’s straightforward. Proper removal is crucial for safety and vehicle function. This guide breaks down the process into simple steps. We focus on two main methods: using a puller tool and the manual removal method. Each approach offers a clear path to removing the wheel effectively.
Using A Puller Tool
A puller tool simplifies steering wheel removal. First, ensure the car is off. Disconnect the battery. This step prevents accidental airbag deployment. Next, remove the steering wheel cover and any visible screws. Attach the puller tool to the wheel hub. Follow the tool’s instructions. Turn the tool slowly. The wheel will loosen from the column. This method minimizes damage to the steering column. Always follow safety guidelines.
Manual Removal Method
The manual method requires more strength. Begin by disconnecting the car battery. Remove any screws holding the wheel cover. Tug gently on the wheel. This loosens it from the column. Rock the wheel side to side while pulling. This increases leverage. Be cautious of airbags. Use this method if you lack a puller tool. It’s effective but requires care and patience.
Inspecting The Steering Column
Start by inspecting the steering column before removing the steering wheel. Safety is crucial, so disconnect the battery. Loosen the screws and bolts holding the wheel, then gently pull it off.
Inspecting the steering column is a crucial step when removing a steering wheel. It ensures that you address any underlying issues that might affect your car’s steering system. Before you dive into the nuts and bolts, take a moment to understand the importance of this inspection. It’s not just about the mechanics; it’s about safety and performance too. Imagine being on the road, feeling confident that your steering wheel is securely attached and functioning properly. That’s the peace of mind a thorough inspection can offer.Checking For Damage
Look closely at the steering column for any visible signs of damage. Scratches, dents, or bends can indicate trouble. Ask yourself: Have you ever noticed unusual noises while steering? These could be linked to physical damage on the column. A damaged column can lead to steering problems, affecting your control on the road.Cleaning And Maintenance Tips
Regular cleaning of your steering column can prevent dirt buildup. Use a clean cloth and mild cleaner to wipe away dust and grime. Maintenance doesn’t stop at cleaning. Check for loose connections and tighten them if needed. How often do you clean your steering column? A little upkeep goes a long way in maintaining its functionality. Inspecting the steering column might seem like a small task, but it’s a pivotal part of ensuring your vehicle’s steering system is in top shape. With these tips, you’ll not only master removing a steering wheel but also gain valuable insights into maintaining your car’s performance.
Credit: delicate-leather.com
Installing A New Steering Wheel
Installing a new steering wheel can enhance your driving experience. It may seem challenging but can be simple with the right steps. This process requires attention to detail and care. Let’s explore the key steps to ensure your new wheel is installed correctly.
Aligning The New Wheel
Start by aligning the new steering wheel with the hub. Ensure the wheel is centered. The top of the wheel should point straight ahead. This alignment ensures smooth driving. Check that the splines on the wheel match those on the hub. Proper alignment prevents uneven steering and improves safety.
Securing The Steering Wheel Nut
After alignment, secure the steering wheel nut. Place the nut onto the steering shaft. Use a socket wrench to tighten it firmly. Ensure the nut is snug but not overtightened. This step is crucial for safety. A loose nut can lead to steering issues. Double-check for tightness to ensure secure installation.
Reconnecting The Airbag
Reconnecting the airbag is a crucial step after removing a steering wheel. Ensuring the airbag is properly reconnected enhances vehicle safety. This process requires careful attention and precision. Follow the steps below to ensure a safe reconnection.
Proper Airbag Attachment
First, align the airbag connectors with their corresponding slots. Ensure each connector clicks securely in place. Use gentle pressure to avoid damage. Double-check the connections for stability. Loose connections can lead to malfunctions.
Next, position the airbag unit on the steering wheel. Align the mounting points accurately. Tighten the mounting screws using the correct torque. This ensures the airbag is firmly attached.
Testing The Airbag Functionality
After attachment, start the vehicle. Observe the dashboard for any warning lights. The airbag light should turn off after a few seconds. This indicates proper functionality.
If the airbag light stays on, recheck the connections. Ensure no wires are pinched or damaged. Consult the vehicle manual if needed. Testing ensures your safety in case of an emergency.
Reconnecting The Battery
Reconnect the battery after removing the steering wheel to ensure all electrical systems function properly. This step completes the process and restores power to the car. Be cautious to avoid any electrical issues.
Reconnecting the battery is a crucial step in restoring your vehicle’s functionality after removing the steering wheel. Without reconnecting the battery, your car’s electrical system remains inactive, affecting everything from the lights to the radio. This process needs precision and care to ensure safety and prevent damage to your vehicle’s systems.Restoring Power Safely
To restore power safely, you must first ensure that the battery terminals are clean. Dirt or corrosion can impede the connection, leading to erratic electrical behavior. Use a wire brush to gently clean the terminals if needed. Next, reconnect the positive terminal first. This is crucial because connecting the negative terminal first can cause a spark, posing a safety risk. Ensure the connection is tight and secure to prevent any loose wiring, which might lead to power issues later. After securing the positive terminal, connect the negative terminal. This step completes the circuit, allowing your vehicle’s electrical systems to power up. Have you ever noticed that your car struggles to start after reconnecting the battery? This is often due to a loose connection. Once both terminals are connected, check all electrical functions, including headlights and dashboard lights. If something seems off, it might be worth revisiting the connection points. It’s surprising how often a simple oversight can lead to bigger electrical problems. Consider the time you reconnected the battery without checking the terminals thoroughly, and later faced a radio malfunction. Your personal experiences are invaluable lessons, highlighting the importance of taking each step meticulously. You might wonder why it’s crucial to follow these steps carefully. The answer is simple: safety and efficiency. A well-connected battery ensures your vehicle runs smoothly without unexpected electrical issues. So, take your time and pay attention to details when restoring power safely.Final Safety Checks
Removing a steering wheel is a task that requires precision. After installation, conducting final safety checks is crucial. These checks ensure your steering wheel functions correctly. Proper checks prevent potential accidents. They give peace of mind while driving. Let’s explore key areas for these checks.
Ensuring Proper Installation
Ensure the steering wheel is tightly secured. There should be no loose bolts. Test the wheel for any wobbling. A tight fit is essential for safe steering. Double-check the alignment with the dashboard. Proper alignment ensures smooth driving.
Verifying Electrical Connections
Check all electrical connections are secure. This includes wires for the horn and airbags. Loose connections can lead to malfunctions. Test the horn to ensure it works. Verify the airbag light does not indicate issues. A working system is vital for safety.
Conclusion
Successfully removing a steering wheel is within your reach. Follow each step carefully. Gather the right tools before starting. Ensure your vehicle is parked safely. Disconnect the battery to prevent shocks. Loosen screws and bolts methodically. Gently pull the wheel off its column.
Remember, patience is key throughout the process. If unsure, consult a professional. Safety should always come first. Practice makes perfect, so don’t rush. With practice, it becomes easier. Share your experiences and tips with others. Happy steering wheel removal!