Have you ever looked at your vehicle’s running boards and wondered how to give them a fresh look? Removing step pads from running boards might seem like a daunting task, but it’s easier than you think.
Whether you’re looking to replace worn-out pads or simply want to clean them thoroughly, understanding the removal process can save you time and money. In this guide, you’ll discover straightforward steps to safely detach those step pads without causing any damage to your vehicle.
Stick around, because by the end of this article, you’ll be equipped with the knowledge to tackle this task with confidence, ensuring your running boards look as good as new. Let’s dive in and transform your vehicle’s appearance with ease!

Credit: www.youtube.com
Tools And Materials Needed
Removing step pads from running boards might seem like a daunting task if you’re not equipped with the right tools and materials. Having the correct items at hand can make the process smoother and prevent any damage to your vehicle. You don’t need a professional mechanic’s toolbox, but a few basic tools can make the task simpler and more efficient.
Essential Tools
First, gather the tools you’ll need. A basic set of screwdrivers, both Phillips and flathead, are crucial. Often, step pads are secured with screws that require precise handling. A wrench set can also be helpful if there are bolts involved. Have you ever tried to remove a pad only to realize you’re missing the right screwdriver? It’s frustrating and can lead to a stalled project.
If you’re facing stubborn screws or bolts, a penetrating oil can be a lifesaver. It helps loosen rusted or tight fittings without damaging them. Don’t forget a pair of pliers; they can assist when screws are stubborn or have worn heads. Consider using a power drill if you want to speed things up, but ensure you have the right bits to avoid stripping the screws.
Safety Equipment
Safety should be your priority. Wear gloves to protect your hands from sharp edges and tools. Eye protection is essential when dealing with metal parts or using power tools. Have you ever had metal filings fly into your eye? It’s painful and could lead to serious injury.
Use a sturdy workbench or table to keep your tools organized and within reach. This minimizes the risk of accidents and ensures you have everything you need at your fingertips. Having a clean and organized workspace can make all the difference in executing the task efficiently.
Materials Needed
Along with tools, gather the necessary materials. A cleaning solution can help you prepare the running board surface before reinstallation. Use a soft cloth or sponge to avoid scratches. Have you thought about the grit and grime that accumulates on the boards over time? Cleaning them can reveal hidden screws and make removal easier.
If you’re planning to reinstall new step pads, ensure they match the specifications of your running boards. Keep some adhesive ready if the new pads require it. Imagine spending time removing the old pads only to find the new ones don’t fit; it’s a hassle you can avoid with proper preparation.
Now, take a moment to consider: Are you fully prepared with the right tools and materials? This simple step can make your task more enjoyable and less stressful.
Credit: www.gm-trucks.com
Safety Precautions
Removing step pads from running boards needs careful attention to safety. The process might seem simple, but ensuring safety is crucial. Ignoring safety measures can lead to accidents or injuries.
Before starting, gather all necessary tools. Ensure your workspace is organized. A clutter-free area reduces risks and boosts efficiency. Wear appropriate gear to protect yourself. Safety glasses and gloves are essential. They shield you from sharp edges and debris.
Use The Right Tools
Using the correct tools is vital for safety. Ensure all tools are in good condition. Damaged tools can cause accidents. Verify that you have the right size and type for each task. This ensures a smooth and safe process.
Secure The Vehicle
Ensure the vehicle is stable before working. Use wheel chocks to prevent movement. A moving vehicle can lead to injuries. Double-check stability before beginning any work.
Work In A Well-lit Area
A well-lit area helps you see clearly. Proper lighting reduces mistakes. It also helps in spotting potential hazards. Ensure your workspace has enough light for safety.
Stay Alert
Always stay focused and alert. Distractions increase the risk of accidents. Keep your phone away to maintain concentration. Regular breaks help maintain focus and reduce fatigue.
Follow Manufacturer Instructions
Read the manufacturer instructions carefully. Follow each step as outlined. This ensures safety and prevents damage to the vehicle. Manufacturer guidelines are designed to guide you safely.
Keep Children And Pets Away
Ensure children and pets are not in the work area. They can cause distractions or get injured. A clear workspace ensures everyone’s safety.
Taking these precautions ensures a safe and successful removal process.
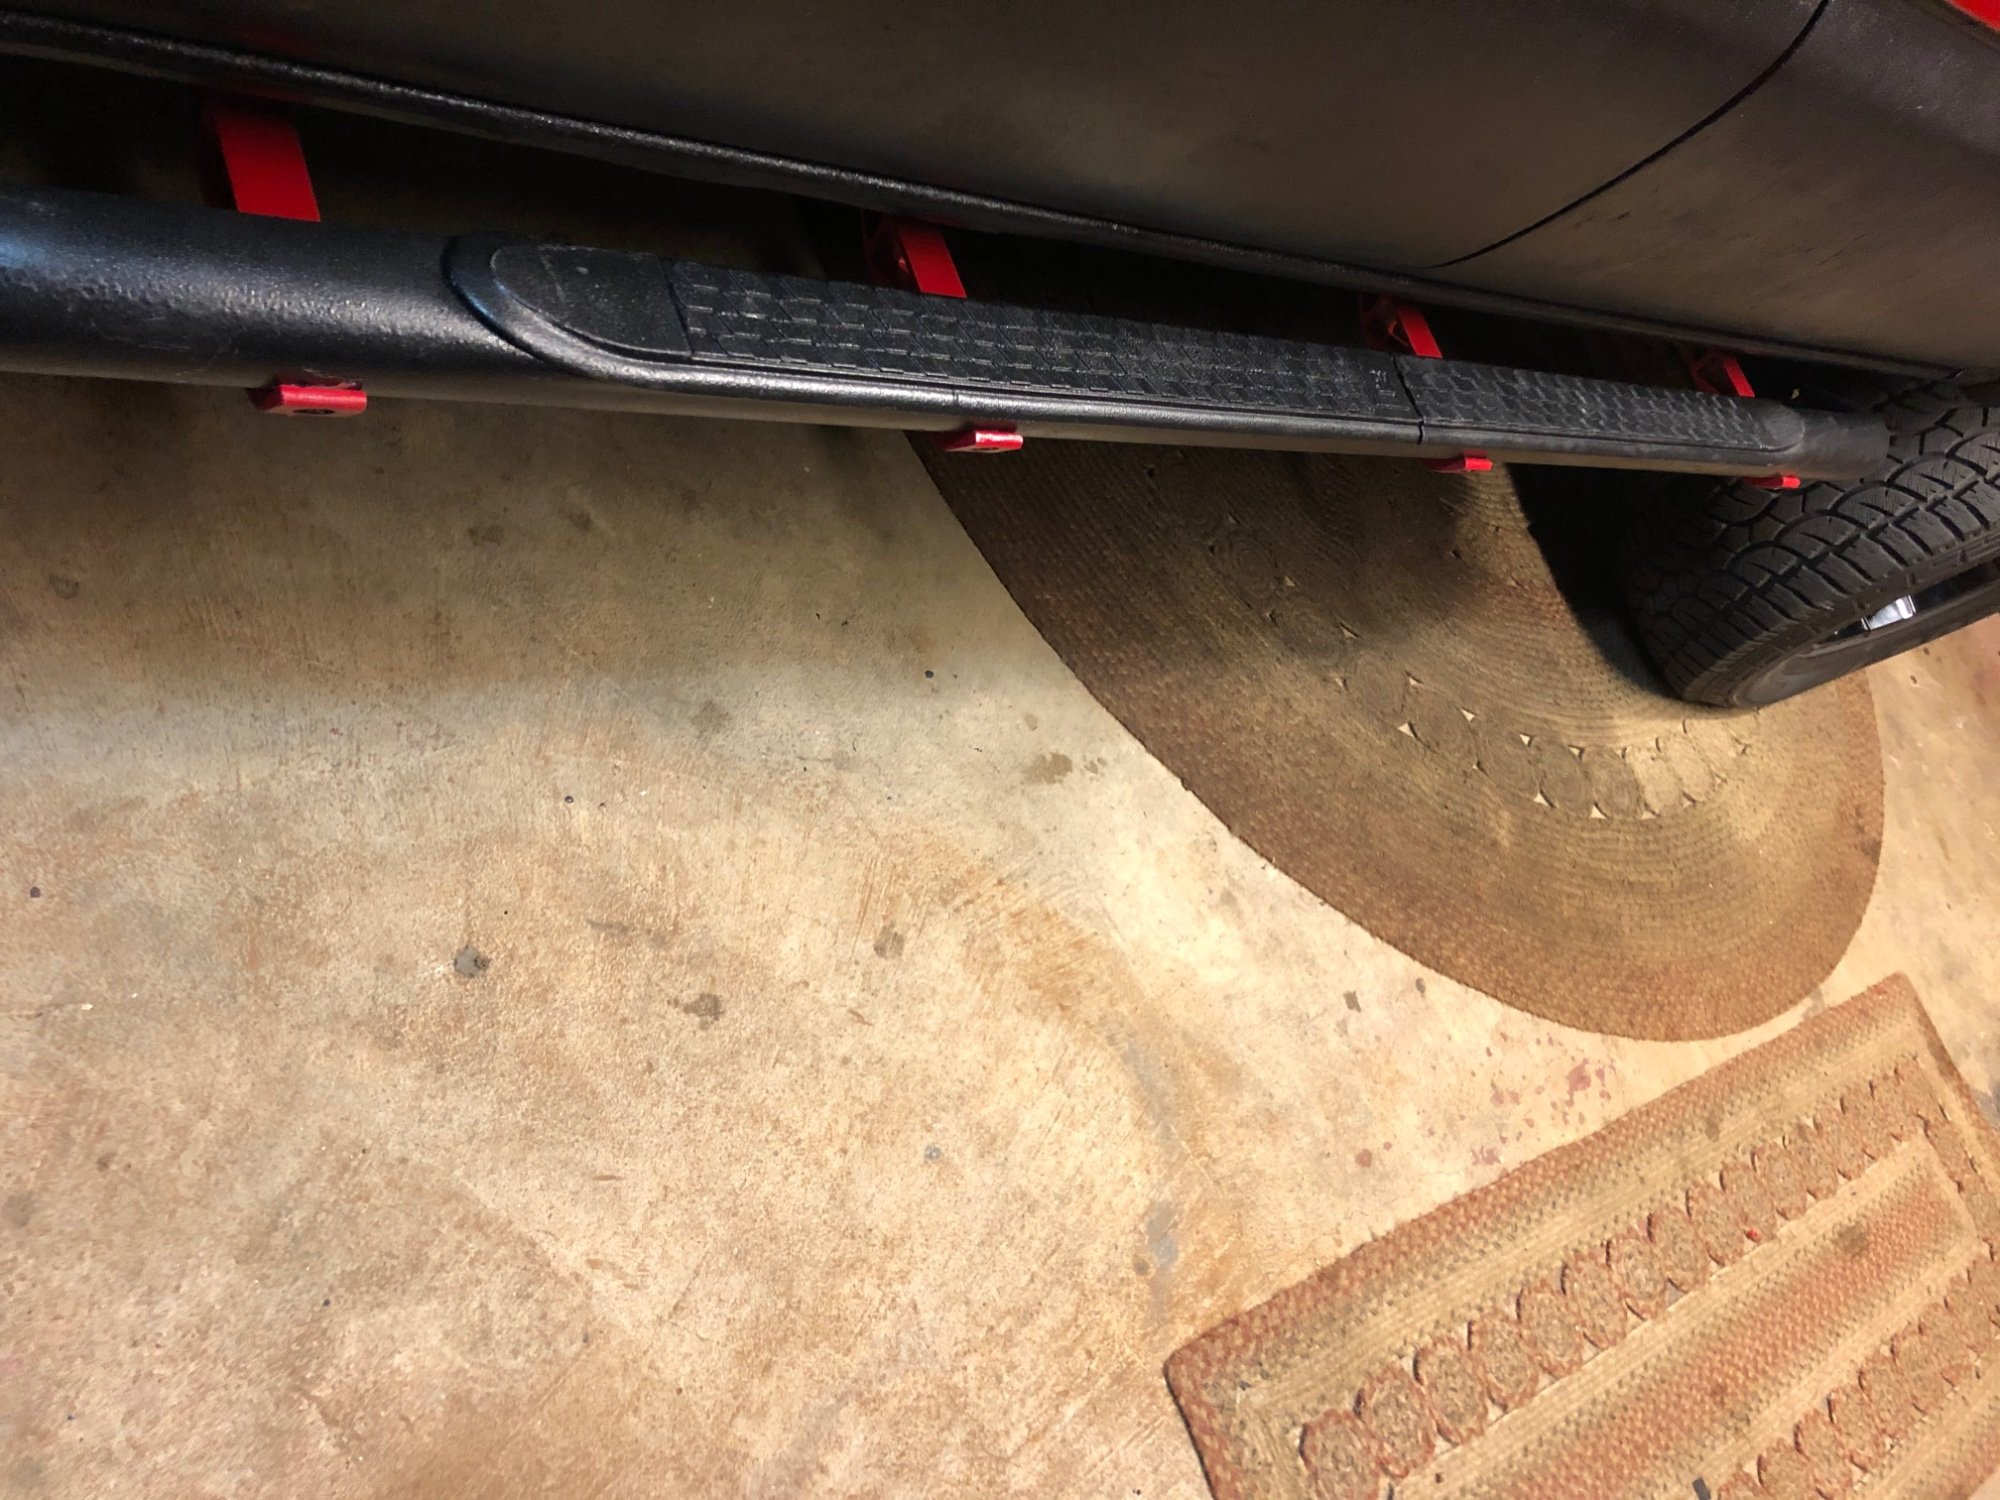
Locating Step Pads
Step pads on running boards are crucial for both safety and convenience. They provide a sturdy grip, reducing slip risks when entering or exiting a vehicle. Sometimes, these pads wear out and need replacement or removal. Before starting the process, it’s essential to identify the step pads’ exact location. This ensures a smooth removal process without damaging other parts of the running board.
First, inspect the running board carefully. Look for areas with visible wear and tear. These spots often indicate where step pads are located. Running boards usually have grooves or outlines that highlight the step pads. These outlines are key to identifying their position.
Identifying Fastening Points
Once you find the step pads, check for fastening points. These are usually screws or clips holding the pads in place. Feel around the edges of the pads for any protrusions. These protrusions are likely the fastening points.
Checking For Hidden Fasteners
Sometimes, fasteners are hidden beneath the pads. To find these, gently lift the edges of the step pads. If you spot screws or clips underneath, note their position. This helps in the removal process.
Using A Flashlight For Better Visibility
If the running board is in a shaded area, use a flashlight. Shine the light to get a better view of the step pads and fasteners. Better visibility ensures no fasteners are missed.
Consulting The Vehicle Manual
Your vehicle manual can be a helpful guide. It often includes diagrams showing the step pad locations. This can save time and prevent mistakes during removal.
Removing Fasteners
To remove step pads from running boards, start by loosening the fasteners underneath. Use a screwdriver or wrench to carefully detach them. Be gentle to avoid damaging the board or pad.
Removing fasteners from running boards can seem daunting, but with the right tools and knowledge, it’s a straightforward task. Whether you’re sprucing up your vehicle or replacing worn-out parts, understanding how to effectively remove fasteners is key. Get ready to roll up your sleeves and dive into the world of fasteners.Types Of Fasteners
There are several types of fasteners you might encounter on running boards. Common ones include bolts, screws, and clips. Bolts are usually more robust and require a wrench or socket to remove. Screws can often be taken out with a screwdriver. Clips, however, might need a little more finesse. Each type requires a different approach, so knowing what you’re dealing with is crucial.Using The Right Tools
The right tools make all the difference. A socket set is invaluable for bolts, while a sturdy screwdriver works wonders on screws. Clips might require a special clip removal tool, which is worth having if you frequently work on your vehicle. I remember once struggling with a stubborn bolt for nearly an hour before realizing I needed a deeper socket. Lesson learned: having the right tools saves time and frustration. Consider what tools you already have. Do you need to invest in a new set, or can you borrow from a friend or neighbor? Proper preparation can prevent unnecessary headaches. Have you ever wondered how much easier your task could be with the right tools at your disposal? It’s a game changer, and your vehicle will thank you for it.Detaching Step Pads
Detaching step pads from running boards can seem tricky. But with the right steps, it’s manageable. Whether adhesive or screwed, removing them yourself is possible. This guide breaks down how to handle each type.
Handling Adhesive Pads
Adhesive pads stick firmly to running boards. They are common and provide a sleek look. To remove them, start by softening the adhesive. Use a hairdryer or heat gun. Aim the heat directly at the pad for a few minutes. This loosens the adhesive.
Once warm, use a plastic scraper. Gently lift the pad’s edge. Slowly peel it away. Don’t rush. This avoids damaging the running board. Any leftover adhesive needs removal too. Apply adhesive remover and wipe clean with a cloth.
Removing Screwed Pads
Screwed pads secure with bolts or screws. They are durable and sturdy. To detach these, gather the right tools. A screwdriver or wrench is essential. Locate all screws holding the pad. Carefully unscrew each one.
Keep the screws safe for future use. Once all screws are out, lift the pad gently. Check for any hidden screws or clips. Clean the area thoroughly. This prevents rust or residue build-up. Reinstall new pads or leave the area bare.
Credit: deckedoutfactory.com
Cleaning Running Boards
Cleaning running boards is essential for maintaining their appearance. Removing step pads can leave behind grime and adhesive residue. A thorough cleaning will ensure the boards look pristine. It’s crucial for preparing them for reinstallation. Follow these easy steps for clean running boards.
Removing Adhesive Residue
Start by scraping off any sticky residue. Use a plastic scraper to avoid scratches. Apply adhesive remover to stubborn spots. Let it sit for a few minutes. Wipe away the loosened residue with a cloth. Repeat if needed until clean.
Preparing For Reinstallation
Ensure the surface is completely dry. Any moisture can affect adhesive strength. Inspect the running boards for any damage. Repair any cracks or dents. Sand the surface lightly for better grip. Finally, wipe with a clean cloth to remove dust.
Inspecting For Damage
Inspecting your running boards for damage is crucial. It ensures the longevity of your vehicle’s accessories. Before removing step pads, check for any signs of wear or tear. This step prevents further issues and keeps your running boards in top condition.
Check For Cracks And Splits
Examine the step pads closely. Look for cracks or splits on the surface. These can weaken the pads and affect their grip. Even small cracks can grow over time. Address them before they become bigger problems.
Assess The Fasteners
Inspect the fasteners that hold the step pads. Ensure they are secure and not rusty. Loose or damaged fasteners can cause the pads to shift. This might lead to accidents. Confirm they are in good shape before proceeding.
Examine For Wear Patterns
Notice any unusual wear patterns. Uneven wear suggests a problem with installation or usage. This could affect the stability of the step pads. Properly worn pads should show consistent wear. If not, consider adjusting their placement.
Look For Signs Of Corrosion
Check for corrosion on metal parts. Rust can weaken the structure of the running boards. Corrosion often appears near the fasteners. Treat any rust spots immediately. This will prevent further damage and ensure safety.
Observe The Overall Condition
Take a step back and observe the overall condition. Are the pads looking worn out or faded? Faded pads might indicate material deterioration. This affects the functionality and appearance. Consider replacing them if they look too worn.
Reattaching Or Replacing Step Pads
Reattaching or replacing step pads on running boards can improve vehicle appearance and safety. Over time, step pads may wear out or become damaged. Knowing how to reattach or replace them ensures your running boards stay functional and look great. This process involves selecting new pads and securing them properly.
Choosing Replacement Pads
Selecting the right step pads is crucial for a secure fit. Check the size and shape of your old pads. Measure carefully to find pads with matching dimensions. Consider the material. Rubber pads offer good grip, while metal ones are durable. Look for pads compatible with your vehicle model. Read reviews to ensure quality and long-lasting performance.
Securing New Step Pads
Ensure pads are securely attached to avoid slips or falls. Start by cleaning the running board surface. Remove any dirt or residue. Use adhesive or screws as recommended by the manufacturer. Align the new pads with existing holes or markings. Press firmly to ensure a snug fit. Test the pads by stepping on them. Confirm they are stable and secure. Regularly check for loose areas and tighten as needed.
Conclusion
Removing step pads from running boards is simpler than you think. Gather your tools first. Loosen bolts carefully and remove them. Check for any stuck parts. Clean the running board thoroughly. Doing this ensures safety and better appearance. Regular maintenance can extend your running board’s life.
Avoid rushing the process. Take your time and work patiently. Always follow safety measures. Have a friend assist for challenging parts. Enjoy a more polished look for your vehicle. Keep learning and improving your car skills.