Imagine you’re driving down the road, and suddenly, your vehicle starts to sway or make unsettling noises. These could be signs that your leaf spring shackle needs replacing.
While this may sound intimidating, replacing a leaf spring shackle is a task you can tackle on your own, saving you both time and money. You might be wondering how to get started or what tools you need. Fear not, because this guide will walk you through each step in simple, easy-to-follow instructions.
By the end of this article, you’ll feel empowered to take action and get back to smooth, worry-free driving. So, let’s dive in and give your vehicle the care it deserves!

Credit: shop.advanceautoparts.com
Tools And Materials Required
Leaf spring shackles are important for vehicle suspension. For this task, gather essential tools. Start with a wrench set. It helps in loosening bolts. Socket sets are also necessary. They fit different sizes. A jack lifts the vehicle safely. Safety stands ensure no accidents. They hold the vehicle steady. Hammer is useful for stubborn bolts. Lubricant aids in smooth removal. It reduces friction.
Don’t forget gloves. They protect your hands. Safety goggles shield your eyes. New shackles are crucial too. They replace old ones. Keep a torque wrench nearby. It measures force. Very important. Replacement bolts may be needed. Old ones might break. Double-check all materials. Ensure safe and smooth work.
Safety Precautions
Working with car parts can be dangerous. Always wear safety gogglesto protect your eyes. Gloves are important too. They keep your hands safe from cuts. Make sure you have a safe workspace. No clutter around your work area. Never work under a car without a jack stand. Using a jack stand is a must. It keeps the car stable. Also, check your tools. Are they in good shape? Broken tools can hurt you.
Let someone know you are working on your car. It’s safer when someone is nearby. If you feel unsure, ask for help. An experienced friend can guide you. Safety firstis always the rule.
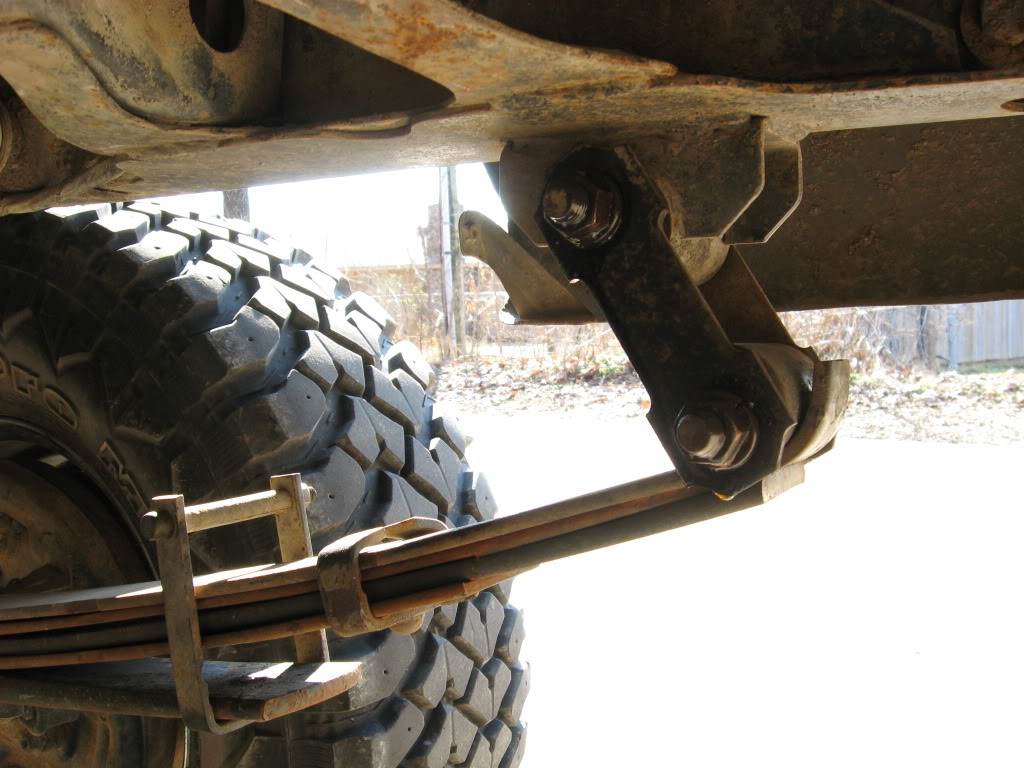
Locating The Leaf Spring Shackle
The leaf spring shackle is behind the rear wheel. You will find it near the axle. Check both sides of the vehicle. The shackle connects the spring to the frame. Ensure the vehicle is on a flat surface. Secure the vehicle with wheel chocks. This prevents any movement.
Look for any rust or damage. The shackle should not have cracks. Inspect the bolts and nuts. They should be tight. Use a flashlight if needed. Clear any dirt around the shackle. This helps you see better. Take your time and be careful.
Credit: www.yotatech.com
Lifting And Securing The Vehicle
First, find a flat and safe spot to work. Turn off the vehicle and put it in park. Place wheel chocks behind the tires to stop movement. Use a jack to lift the vehicle. Make sure it is high enough to work under it. Always use jack stands for safety. They hold the vehicle up if the jack fails.
Double-check that everything is stable. Give the vehicle a gentle push to test. If it moves, adjust your setup. Safety first! Wear safety gear like gloves and goggles. Check tools are nearby. You are now ready to replace the leaf spring shackle.
Removing The Old Shackle
Replacing a leaf spring shackle can enhance your vehicle’s suspension. First, safely lift the vehicle with a jack. Next, remove the old shackle using a wrench. Finally, install the new shackle, ensuring it is securely tightened. This process can restore stability and improve your driving experience.
Loosening The Bolts
Start by securing the vehicle with strong jack stands. Make sure the car will not move. Use a wrench to turn the bolts. It may take some strength. Spray a lubricant if the bolts are stuck. Let it sit for a few minutes. Try again to loosen the bolts. Keep turning until they come off easily.
Detaching The Shackle
Once the bolts are out, it’s time to remove the shackle. Hold the shackle firmly. Gently pull it away from the spring. Be careful not to hurt your fingers. The shackle might be heavy. Ask someone to help if needed. Now, the old shackle is free. Get ready to install the new one.
Inspecting The Leaf Spring And Bushings
Start by examining the leaf spring for any signs of damage. Look for cracks or rust. It’s important. These can cause problems if not fixed. Bushings also need a close look. They sit inside the shackle. If they look worn, they must be replaced. Compare them with new ones if unsure. Feel the difference in texture. Old bushings feel rough. New ones feel smooth.
Check if the leaf spring sits correctly. Misalignment is a red flag. Use a ruler to measure the distance. Both sides should match. If not, something is wrong. Take note of any unusual noises. Creaking sounds mean wear. These checks help ensure safety. Never skip them. It’s vital for your vehicle’s health.
Installing The New Shackle
First, align the new shacklewith the leaf spring. Ensure the holes are lined up. You might need to adjust the leaf spring. Use a jack if needed. This helps in getting the perfect fit. Once aligned, insert the bolts through the holes. Secure them in place.
Next, it’s time to tighten the bolts. Use a wrench or socket. Turn the bolts clockwise. Ensure they are snug but not too tight. Over-tightening can cause problems. Check that the shackle moves freely. This ensures smooth operation.
Always double-check your work. Safety is important. A secure shackle means a safer ride. Keep your tools handy. You might need them again.
Checking Alignment And Stability
Ensuring proper alignment is crucial. Misalignment can cause wear and tear. It makes the ride bumpy. To check alignment, look at the leaf spring. It should sit straight. If it looks bent, there’s a problem.
Stability is vital for a smooth drive. A loose shackle can make the vehicle shake. Tighten the bolts to fix this. Always use the right tools. A socket wrench is handy. It helps in tightening nuts and bolts.
Test the vehicle after adjustments. Drive slowly first. Listen for unusual sounds. If noises continue, recheck the alignment. Repeat until everything feels stable. Correct alignment and stability ensure a safe journey.
Lowering The Vehicle
Lowering the vehicle is a crucial step in replacing the leaf spring shackle. First, make sure the car is on a flat surface. This ensures safety while working. Use a sturdy jack to lift the car. Place jack stands under the car for support. Double-check that the car is stable on the stands. This prevents accidents and ensures your safety. Next, lower the car gently onto the jack stands. Ensure the entire weight rests on them. This keeps the car stable while you work. Safety should be your top priority. Never skip using jack stands. They provide the necessary support.
Final Inspection And Testing
Check if the shackle is tight. Ensure there are no loose parts. Look for any unusual sounds. Strange noises can mean something is wrong. Make sure the shackle is not bent. Bent shackles can cause problems. Inspect the leaf spring carefully. It should be straight and strong.
Test the vehicle on a smooth road. Listen for any clunking sounds. The ride should be smooth. Test the brakes to see if they work well. Brakes should not feel soft. If everything is fine, your job is done. Safety is important. Always double-check your work.

Credit: www.youtube.com
Conclusion
Replacing a leaf spring shackle can be straightforward. First, gather the right tools. Safety is key, so wear protective gear. Remove the old shackle carefully. Inspect parts for any damage. Install the new shackle securely. Check alignment and tightness. Test your work by driving slowly.
Feel for smooth suspension. Regular checks keep your vehicle safe. With practice, this task becomes easier. Remember, patience leads to success. Always consult a manual or expert if unsure. Your vehicle will thank you with better performance. Stay safe and enjoy the journey ahead!