Imagine you’re about to hit the road when you notice something off—a broken lug nut stud on your car. Frustration sets in, right?
But don’t worry. You’re not alone, and this problem is more common than you think. Knowing how to replace a broken lug nut stud can save you both time and money. Plus, it’s a skill that every car owner should have in their toolkit.
You might think this task is complicated, but with the right guidance, you’ll find it’s simpler than you expect. Stick with me, and you’ll soon feel confident tackling this issue yourself, avoiding the hefty mechanic fees and the inconvenience of leaving your car in the shop. Ready to dive in and take control of your car’s health? Let’s get started!
Tools And Materials Needed
Replacing a broken lug nut stud requires specific tools and materials. This task can be straightforward with the right equipment on hand. Proper tools ensure safety and efficiency during the repair process.
1. Socket Set
A socket set is essential. It helps in removing the wheel and broken stud. Ensure the set includes the correct sizes for your vehicle.
2. Hammer
A hammer is useful for tapping out the broken stud. It should have a comfortable grip for better control.
3. Lug Wrench
A lug wrench is necessary to loosen and remove lug nuts. Make sure it’s compatible with your vehicle’s lug nut size.
4. Replacement Studs
Purchase replacement studs matching your vehicle’s specifications. Quality studs ensure durability and safety.
5. Torque Wrench
A torque wrench ensures proper tightening of the new studs. Correct torque prevents damage and ensures secure fitting.
6. Safety Gear
Safety gear includes gloves and goggles. Protect yourself from debris and sharp edges during the repair.
7. Wheel Chocks
Wheel chocks prevent the vehicle from moving. They provide added safety during the repair process.
8. Jack And Jack Stands
A jack and stands lift and support the vehicle securely. They ensure stability while working on the wheel.
Credit: www.familyhandyman.com
Safety Precautions
Safety measures are essential when replacing a broken lug nut stud. Wear gloves and eye protection to prevent injuries. Ensure the vehicle is securely elevated and stable before beginning the replacement process.
When replacing a broken lug nut stud, ensuring your safety should be the top priority. Working with vehicles can be hazardous if proper precautions are not taken. So, how do you make sure you’re staying safe while handling this task? Let’s explore some essential safety measures that can keep you out of harm’s way.Wear Appropriate Safety Gear
Always wear safety goggles to protect your eyes from flying debris. Gloves can prevent cuts and scrapes, and sturdy footwear will protect your feet from heavy objects. Have you ever thought about how much damage a falling wrench could do to your toes? It’s not worth the risk.Ensure The Vehicle Is Secure
Before you start, make sure your vehicle is parked on a flat surface. Use wheel chocks to prevent the vehicle from rolling. Have you ever seen a car roll away unexpectedly? It’s a heart-stopping moment you’d want to avoid.Use The Right Tools
Using improper tools can lead to accidents. Ensure your tools are in good condition and suitable for the task. A stripped bolt or a snapped tool can cause injuries, not to mention frustration. Would you trust a rusty old wrench to hold steady under pressure?Avoid Working Alone
Having someone nearby can be crucial in case of an emergency. They can assist with tasks and call for help if needed. Would you want to be stranded under a car with no one around to lend a hand?Keep Your Workspace Organized
A cluttered workspace can lead to accidents. Ensure all tools and parts are within easy reach but not scattered around. Have you ever tripped over a rogue tool left on the floor?Stay Alert And Focused
Fatigue can lead to mistakes. Make sure you are well-rested and focused before starting the job. Have you ever made a simple error just because you were tired or distracted? By following these safety precautions, you can ensure a smoother and safer experience when replacing a broken lug nut stud. After all, your safety is worth the extra time and effort. What steps will you take to prioritize your safety during this task?Preparation Steps
Replacing a broken lug nut stud requires careful preparation. Ensuring safety and efficiency is key. Follow these steps to get started. Each step is crucial for a smooth process. Gather your tools and let’s dive into the preparation steps.
Loosen Lug Nuts
Start by loosening the lug nuts on the wheel. Use a lug wrench for this task. Turn the wrench counterclockwise to loosen. Do not remove the nuts completely yet. This step makes it easier once the vehicle is lifted.
Jack Up The Vehicle
Locate the jack points under your vehicle. Place the jack securely under the car. Slowly lift the car until the wheel is off the ground. Ensure the vehicle is stable before proceeding. Use jack stands for added safety.
Remove The Wheel
Once the vehicle is secure, remove the loosened lug nuts. Set them aside carefully. Gently pull the wheel off the hub. Store the wheel in a safe spot. Keep the area organized for a seamless workflow.

Credit: shop.advanceautoparts.com
Remove The Broken Stud
Replacing a broken lug nut stud requires careful steps. First, you must remove the damaged stud. This process involves accessing the brake components and removing the stud from its position. Let’s break down these steps for easy understanding.
Access The Brake Drum Or Rotor
To begin, ensure your vehicle is secure and elevated. Use a jack to lift the car and secure it with jack stands. Once elevated, remove the wheel to access the brake drum or rotor. Look for any coverings that may hide the drum or rotor. Remove any bolts or fasteners holding these covers in place. With the covers off, you can now see the stud and prepare for its removal.
Hammer Out The Broken Stud
Once the brake components are exposed, locate the broken stud. Use a hammer to carefully tap the stud from its socket. Ensure you strike gently to avoid damaging surrounding parts. The stud will eventually loosen and fall out. Be sure to catch it as it exits to prevent it from causing damage. If the stud is stubborn, apply penetrating oil to ease its removal. Repeat the tapping process until the stud is free.
Install The New Stud
Replacing a broken lug nut stud doesn’t have to be intimidating. Once you’ve removed the old, damaged stud, installing the new one is straightforward. Follow these steps carefully to ensure the new stud is secure and safe.
Insert The New Stud
First, align the new stud with the hole in the wheel hub. Ensure it fits snugly to avoid any movement. Gently tap the stud into the hole using a hammer. Be cautious to not damage the threads.
Push the stud through until the base is flush with the hub surface. You might need to use a few more taps to ensure it’s fully seated. Check for any gaps between the stud base and the hub.
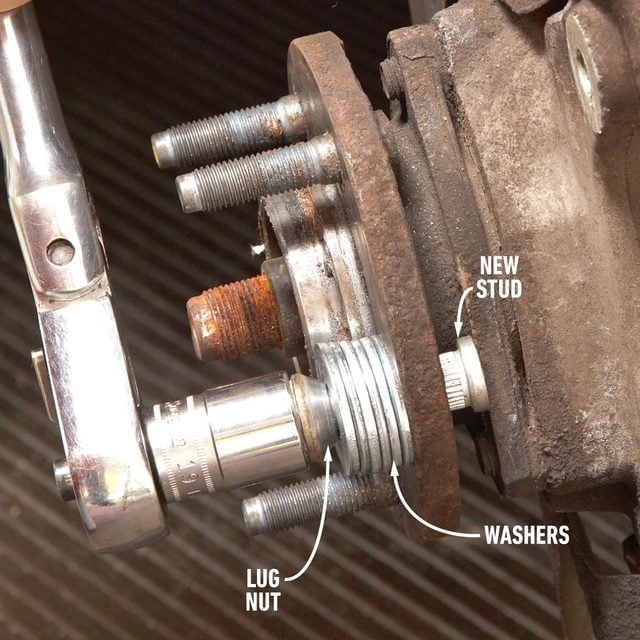
Secure The Stud With Lug Nut
Place a few washers over the new stud. This will protect the hub and threads while securing the stud. Thread a lug nut onto the new stud by hand. Make sure it’s hand-tightened before using tools.
Use a wrench to tighten the lug nut, pulling the stud through the hub. Ensure it’s pulled all the way through, seated securely against the hub. Once tight, remove the lug nut and washers.
Check the stud for stability. Ensure it doesn’t wobble or feel loose. If it does, repeat the tightening process. A secure stud ensures a safe and reliable wheel connection.

Credit: www.youtube.com
Reassemble The Wheel
Replacing a broken lug nut stud involves several steps to ensure your vehicle’s safety. Start by removing the wheel and brake components. Next, tap out the damaged stud and insert a new one. Finally, reassemble the wheel, ensuring everything is securely fastened.
Proper maintenance enhances vehicle performance.
Reassembling the wheel is a crucial step after replacing a broken lug nut stud. It ensures your vehicle is ready for the road. This task is straightforward with careful attention to detail. Follow these steps to ensure a safe and secure reassembly.Place The Wheel Back
Start by lifting the wheel carefully. Align it with the lug bolts. Make sure all holes line up perfectly. This alignment is essential for smooth reattachment. Gently slide the wheel onto the hub. Maintain a steady grip to avoid dropping it. Once in place, give it a gentle push. This helps the wheel settle into position.Tighten The Lug Nuts
Begin by hand-threading each lug nut onto the bolts. Hand tightening ensures proper alignment. Use a cross pattern for even distribution. This pattern prevents imbalance when tightening. Use a wrench to secure each lug nut. Turn them clockwise for a firm fit. Avoid overtightening to prevent damage. Check each nut for a snug fit. A secure fit ensures safety while driving.Final Checks
Check alignment and tightness of lug nuts after replacing the broken stud. Ensure they are secure and correctly fitted. This prevents future issues and ensures safe driving.
When you’ve successfully replaced a broken lug nut stud, you must conduct final checks to ensure safety and durability. Many overlook this crucial step, which can lead to problems down the road. Even if the repair seems complete, these checks can save you from unexpected issues.Lower The Vehicle
Once you’ve secured the new lug nut stud, gently lower your vehicle. Use a jack to do this carefully. Keep an eye on how the vehicle settles. Does it seem balanced? If it tilts or shifts unexpectedly, you might need to recheck your work. Sometimes, the anticipation of finishing the job can cause you to rush. Take a moment to observe the vehicle as it lowers. Are there any odd noises? Any unusual movements? Your observations can be as valuable as any tool.Verify Lug Nut Tightness
After lowering the vehicle, confirming the tightness of the lug nuts is crucial. Use a torque wrench to ensure each nut is secure. Aim for the manufacturer’s recommended torque specifications. You might be tempted to use your hand or a regular wrench, but a torque wrench offers precision. This tool helps prevent the nuts from being too loose or overly tight, which can lead to wheel issues. Have you ever wondered what would happen if a lug nut isn’t tight enough? Imagine the wheel wobbling as you drive. Checking the tightness now prevents such risks and ensures a smoother ride. Final checks are not just a step in the process; they are a commitment to safety and reliability. So, pause and ensure everything is as it should be before hitting the road. Your vehicle—and your peace of mind—will thank you.Conclusion
Replacing a broken lug nut stud is simple. The right tools help the process. Safety is crucial; always wear protective gear. Follow each step carefully. Check your vehicle’s manual for specifics. Practice patience. It’s rewarding to fix car issues yourself.
Saves money and boosts confidence. Regular maintenance prevents future problems. Keep tools organized for easy access. Share tips with fellow car enthusiasts. Encourage others to try DIY repairs. They might discover they enjoy it. Always inspect your work thoroughly. Ensure everything is secure.
A well-maintained car runs better. Enjoy the peace of mind it brings.