Have you ever found yourself staring at a broken or cracked car side mirror, wondering how it got there and what on earth to do next? Whether it was a minor parking mishap or a mysterious act of vandalism, a damaged side mirror can be both frustrating and dangerous.
Luckily, replacing your car’s side mirror doesn’t have to be a complex task. Imagine the satisfaction of fixing it yourself and saving money on repair costs. This guide will walk you through the simple steps to replace your car side mirror efficiently, empowering you with the confidence to tackle this task head-on.
Ready to restore your car’s functionality and get back on the road safely? Let’s dive into the process together.

Credit: www.wikihow.com
Removing The Damaged Mirror
Replacing a car’s side mirror involves removing the damaged mirror first. Begin by detaching the mirror cover and unscrewing the mounting bolts. Carefully disconnect any electrical connections before removing the mirror assembly. This ensures a smooth replacement process.
Replacing a damaged car side mirror may seem daunting, but breaking the task into manageable steps can simplify the process. The first step in this DIY project is removing the damaged mirror. This step is crucial as it lays the groundwork for a successful replacement. Let’s walk through the essential stages, ensuring you feel confident and ready to tackle the task.Accessing The Mirror Housing
Begin by examining how the mirror is attached to your car. Typically, you’ll find a plastic panel or cover inside the door, opposite the mirror. Carefully pry this cover off using a flathead screwdriver. It’s important to be gentle to avoid breaking the clips that hold the panel in place. Once removed, you’ll have a clear view of the screws and electrical connectors inside the mirror housing.Detaching Electrical Connectors
Before you proceed, ensure your car’s ignition is off to prevent any electrical mishaps. Look for the electrical connectors attached to the mirror. These connectors power features like heating or remote adjustment. Carefully disconnect these by pressing the tabs or gently pulling them apart. Remember, a steady hand is your friend here; yanking them could damage the wires. If you’ve ever assembled a complex puzzle, you know the satisfaction of seeing each piece come together. This step is much like that—methodical and rewarding.Unscrewing The Mirror
Now that you have clear access, locate the screws that secure the mirror to the car. Use a suitable screwdriver to remove these screws. Keep a firm grip to avoid dropping them into the door panel abyss. Once unscrewed, gently pull the mirror away from the car. You might feel a sense of accomplishment here—halfway through your mission! Place the mirror aside, and prepare for the next exciting step: installing the new mirror. How do you feel about tackling this project? With these steps, you’re not just fixing a car; you’re enhancing your DIY skills. As you go through each stage, remember, patience and attention to detail are your allies.Preparing The New Mirror
Before installing a new car side mirror, prepare it properly. This ensures a smooth replacement process. Proper preparation reduces the chance of errors. Ensure all tools and materials are ready.
Inspecting The New Mirror
First, inspect the new mirror for any damage. Look for cracks or scratches on the glass. Check the housing for any dents or breaks. Make sure all components are intact. Verify the mirror matches the car’s make and model.
Aligning Mounting Points
Next, align the mirror’s mounting points. Compare them with the car’s attachment areas. Ensure they match perfectly. Misalignment can cause problems during installation. Check each mounting point for compatibility.
Aligning ensures the mirror fits securely. It prevents issues while driving. Use a measuring tape for accuracy. Proper alignment is crucial for safety. Double-check everything before proceeding.
Installing The New Mirror
Replacing a car side mirror involves removing screws and disconnecting wires. Attach the new mirror carefully. Ensure it’s secure and aligned properly.
Installing a new car side mirror might seem daunting, but it’s a task you can tackle with some patience and the right tools. It’s about taking things step by step, ensuring each part fits perfectly. Once the old mirror is out, it’s time to get the new one in place. This part requires a bit of finesse as you connect wires, secure the mirror, and test its functionality. Let’s dive into the details to make sure you get it right.Connecting Electrical Wires
Start by carefully aligning the electrical connectors of your new mirror with those in your car’s door. You should hear a click when they fit snugly, signaling a secure connection. This step is crucial, especially if your mirror has features like heating or electronic adjustments. Always double-check the wiring. A loose wire can lead to malfunctioning features. If wires are tangled, it might be a sign to recheck your connections. Make sure there’s no tension on the wires, ensuring they don’t snap or disconnect when adjusting the mirror.Securing The Mirror
Once the wires are connected, it’s time to secure the mirror in place. Align the mirror with the mounting holes on the door. Insert the screws and tighten them with a screwdriver, but be gentle. Over-tightening can crack the mirror or the mount. Ensure the mirror is stable by giving it a slight wiggle. It should feel firm and not move around. A well-secured mirror will withstand vibrations from driving, keeping your view steady.Testing Mirror Functionality
Before you call the job done, test the mirror’s functionality. Adjust the mirror using the car’s control panel, checking if it moves smoothly. If it’s a heated mirror, turn on the heating feature to see if it warms up. Consider asking yourself: does the mirror provide a clear view of your blind spots? If not, you might need to adjust its angle. A properly functioning mirror ensures safer driving and peace of mind on the road. Installing a new mirror is more than just a technical task; it’s about ensuring safety and comfort. With these steps, you’re well on your way to achieving both.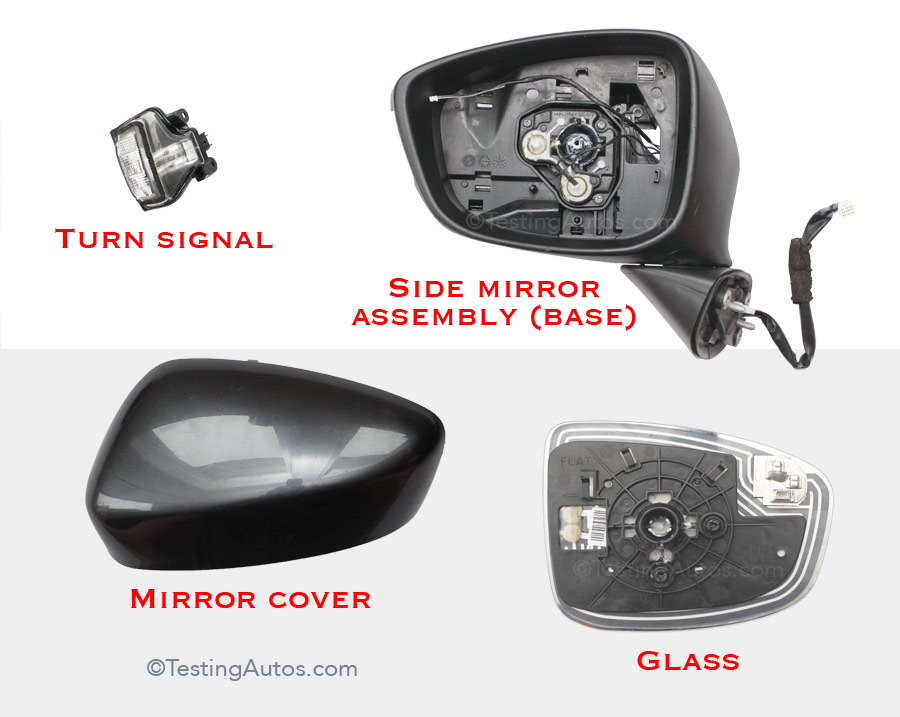
Credit: www.testingautos.com
Final Adjustments
Replacing a car side mirror is a straightforward task, but final adjustments are crucial. These adjustments ensure the mirror functions properly and provides clear visibility. Proper alignment and stability are essential.
Aligning The Mirror
Start by sitting in the driver’s seat. Adjust the mirror so you can see the road behind. Make sure the view covers the blind spots on the sides. Tilt the mirror horizontally and vertically until you have a clear view. The goal is to maximize visibility.
Ensuring Stability
Check that the mirror is firmly attached. Lightly shake the mirror to test its stability. If it wobbles, tighten the screws. This prevents vibrations while driving. Ensure no parts are loose or damaged. A stable mirror provides a steady view while driving.
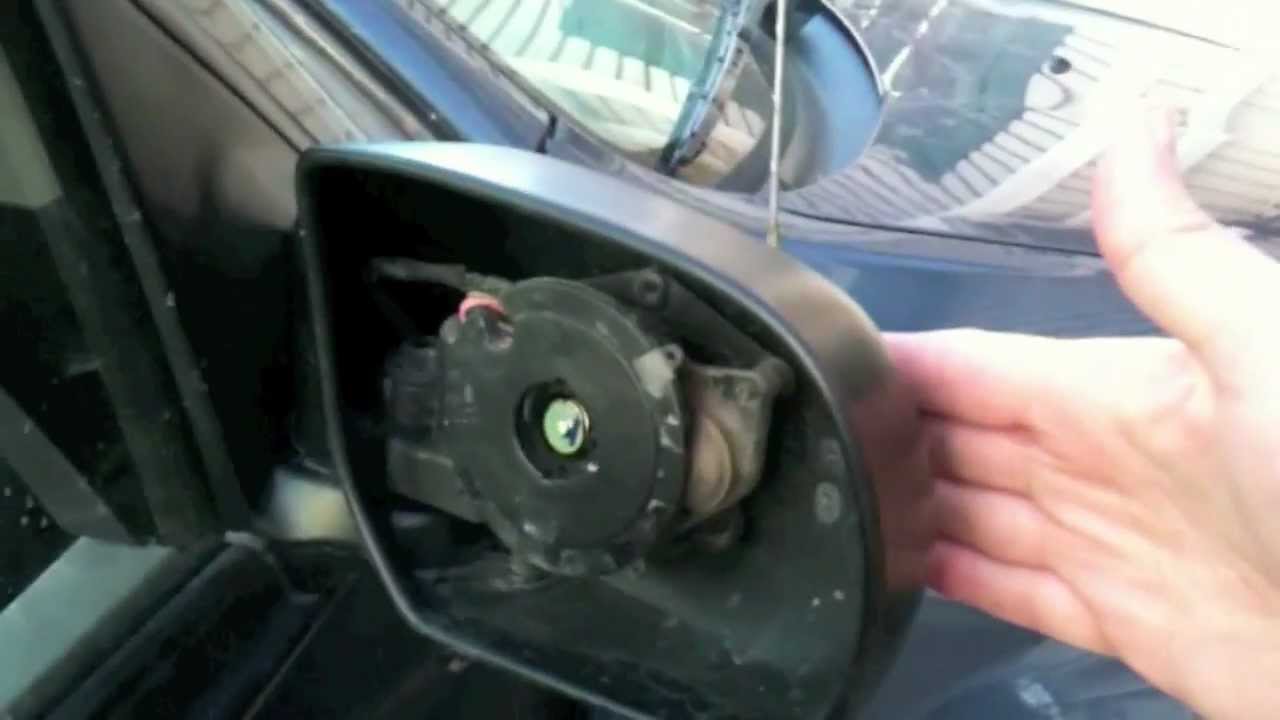
Credit: www.youtube.com
Conclusion
Replacing a car side mirror is easier than you think. With basic tools, you can do it yourself. Save time and money by following simple steps. First, gather necessary tools and materials. Next, remove the broken mirror carefully. Install the new mirror securely in place.
Check for proper alignment and functionality. Regular checks can prevent future damage. Remember, safety comes first during any car repair. Practice caution and patience. Happy fixing!