Your vehicle’s performance and reliability depend heavily on its fuel delivery system, with the fuel pump relay playing a crucial role. When it’s not functioning properly, you could be stranded or face costly repairs.
But don’t worry—testing a fuel pump relay with a test light is a straightforward process you can do yourself, saving you time and money. Imagine the sense of empowerment and satisfaction you’ll feel as you confidently diagnose and resolve issues that once seemed daunting.
You’ll no longer be at the mercy of mechanics, gaining control over your vehicle’s health. This guide will walk you through each step, ensuring you can tackle this task with ease. By the end of this article, you’ll have the skills needed to test your fuel pump relay effectively. Let’s dive in and get you back on the road with peace of mind.
Tools Needed
A test light is the main tool for this task. Safety gloves keep your hands safe from dirt and electric shock. A multimeter can help check for electrical flow. Wire connectors are needed to connect your test light. Pliers can be useful for gripping and cutting wires. Screwdrivers are essential to open and close components. Flashlight helps you see clearly in dark areas. User manual gives guidance on relay locations.
Locating The Fuel Pump Relay
First, open the car’s hood. Find the fuse box. It usually sits near the engine. Check the car’s manual for help. The manual shows the exact location. Inside the fuse box, look for the relay. The relay is small and square. It might have a diagram on the cover. This diagram helps you identify the relay. Relays can look similar, so double-check the diagram. A simple mistake here can cause problems. Once found, move to the next step. Use a test light to check its function.
Always be careful around the engine. Safety is very important. Wear gloves to protect your hands. Ensure the car is off before starting. This prevents any accidents. Once ready, you can begin the test.
Safety Precautions
Testing a fuel pump relay needs care. Safety is important. Always wear gloves and safety glasses. Protect your eyes and skin from harm. Disconnect the battery before starting. This stops electric shocks. Work in a well-lit area. See clearly what you are doing.
Keep a fire extinguisher nearby. Fires can happen. Make sure the area is ventilated. Smell fuel? Move away quickly. Do not smoke near the car. Fuel fumes are dangerous. Follow instructions carefully. Use the right tools. Test light helps check the relay. Stay alert and focused. Keep children and pets away. Safety first, always.

Credit: www.wikihow.com
Preparing The Test Light
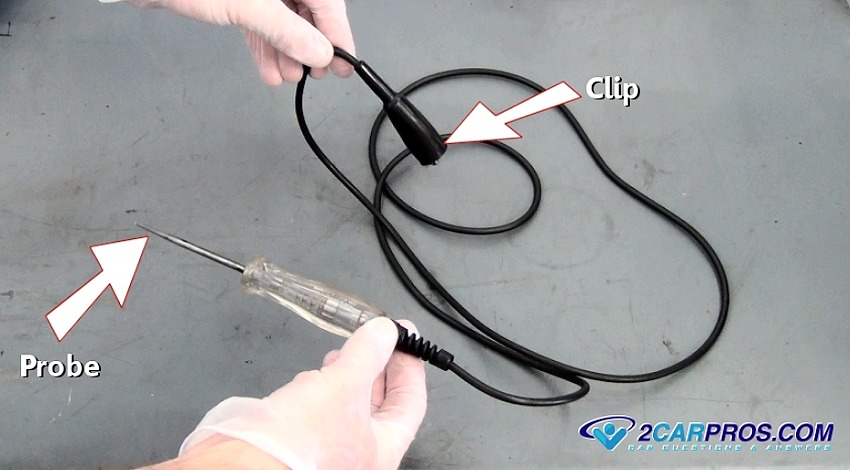
Start by gathering your tools. You need a test lightand a fuel pump relay. The test light should be in good condition. Check the bulb. It must be bright. If the bulb is dim, replace it. Make sure the test light has a good battery. A weak battery can give wrong results. Connect the test light to the car battery. The clip should be secure. This is important. A loose clip can cause errors. Test the light by touching it to the battery terminal. If the light turns on, it is ready for use.
Testing The Relay Connections
First, find the relay terminals. They are often marked on the relay. Common symbols are 85, 86, 30, and 87. Use a diagram if needed. This will help you understand the layout. Knowing these numbers is very important.
Use a test light. Connect it to the battery’s positive terminal. Now, touch the probe to the relay’s power terminal. If the light shines, power is good. If not, the power supply may have a problem. Always make sure the battery is charged.
Connect the test light to the battery’s negative terminal. Touch the probe to the relay’s ground terminal. A shining light means a good ground. No light means a ground problem. Check the ground wire for any issues.
Analyzing Test Results
Testing a fuel pump relay with a test light involves simple steps. Connect the test light to the relay circuit. Observe the light response to check relay functionality. Ensure all connections are secure for accurate results.
Interpreting Light Signals
The test light shows important signals. A bright lightmeans good relay power. If the light is dim, there might be a problem. No light means the relay might be bad.
Check the connections first. Loose wires can cause issues. Make sure all wires are tight. A steady light shows a working relay. If the light flickers, check for damaged wires.
Common Issues
- Faulty relay: Can cause the pump not to work.
- Weak battery: May lead to dim light signals.
- Loose connections: Can disrupt signal flow.
- Corroded wires: Might affect the relay’s function.
These issues need quick attention. Always use a test light to check. It helps find problems fast.
Troubleshooting Tips
Testing a fuel pump relaywith a test light is easy. Follow simple steps. First, find the relay. It is usually in the fuse box. Check your car manual. Then, connect your test light to the battery. The light will show if power flows through. If the light glows, the relay gets power. If not, there might be a problem.
Next, check the relay’s ground. Connect the test light to the ground terminal. If the light glows, the ground is good. If the light does not glow, check the ground wire. It might need fixing. A bad relay stops the car from getting fuel. Replace it if needed.

Credit: www.youtube.com
Replacing A Faulty Relay
A faulty relay can cause car trouble. Replacing it is sometimes needed. First, locate the relay box. It’s often under the hood. Use the car manual for help. Disconnect the car battery to stay safe. Next, find the fuel pump relay. Use the test light to check it. If the light does not glow, the relay is faulty. Replace the faulty relay with a new one. Ensure the new relay matches the old one. Attach it in the same spot. Reconnect the car battery. Now, start the car. It should run smoothly if the relay was the problem. Always keep an extra relay handy. It can save time in the future.
Credit: www.2carpros.com
Conclusion
Testing a fuel pump relay with a test light is simple. Follow the steps carefully. Ensure your safety by wearing gloves and goggles. Disconnect the battery before starting. Use the test light to check connections. A good relay will light up the test light.
No light means a faulty relay. Replace it if necessary. Regular checks can prevent car issues. Keep your vehicle running smoothly. Save on unexpected repair costs. Understanding these basics helps you maintain your car better. Now you’re ready to handle this task confidently.