Imagine cruising down a dark road and transforming night into day with the flick of a switch. That’s the power of an LED light bar.
But before you can enjoy this bright adventure, you need to know how to wire your LED light bar correctly. You might feel a bit daunted at first, but don’t worry—this guide is designed to make the process simple and straightforward.
With easy-to-follow steps, you’ll be able to illuminate your path in no time. As you read on, you’ll discover tips and tricks to ensure your wiring is safe and efficient. Unlock the full potential of your LED light bar and enhance your driving experience. Ready to shed some light on the subject? Let’s dive in!
Credit: www.wdelectronics.com
Tools And Materials Needed
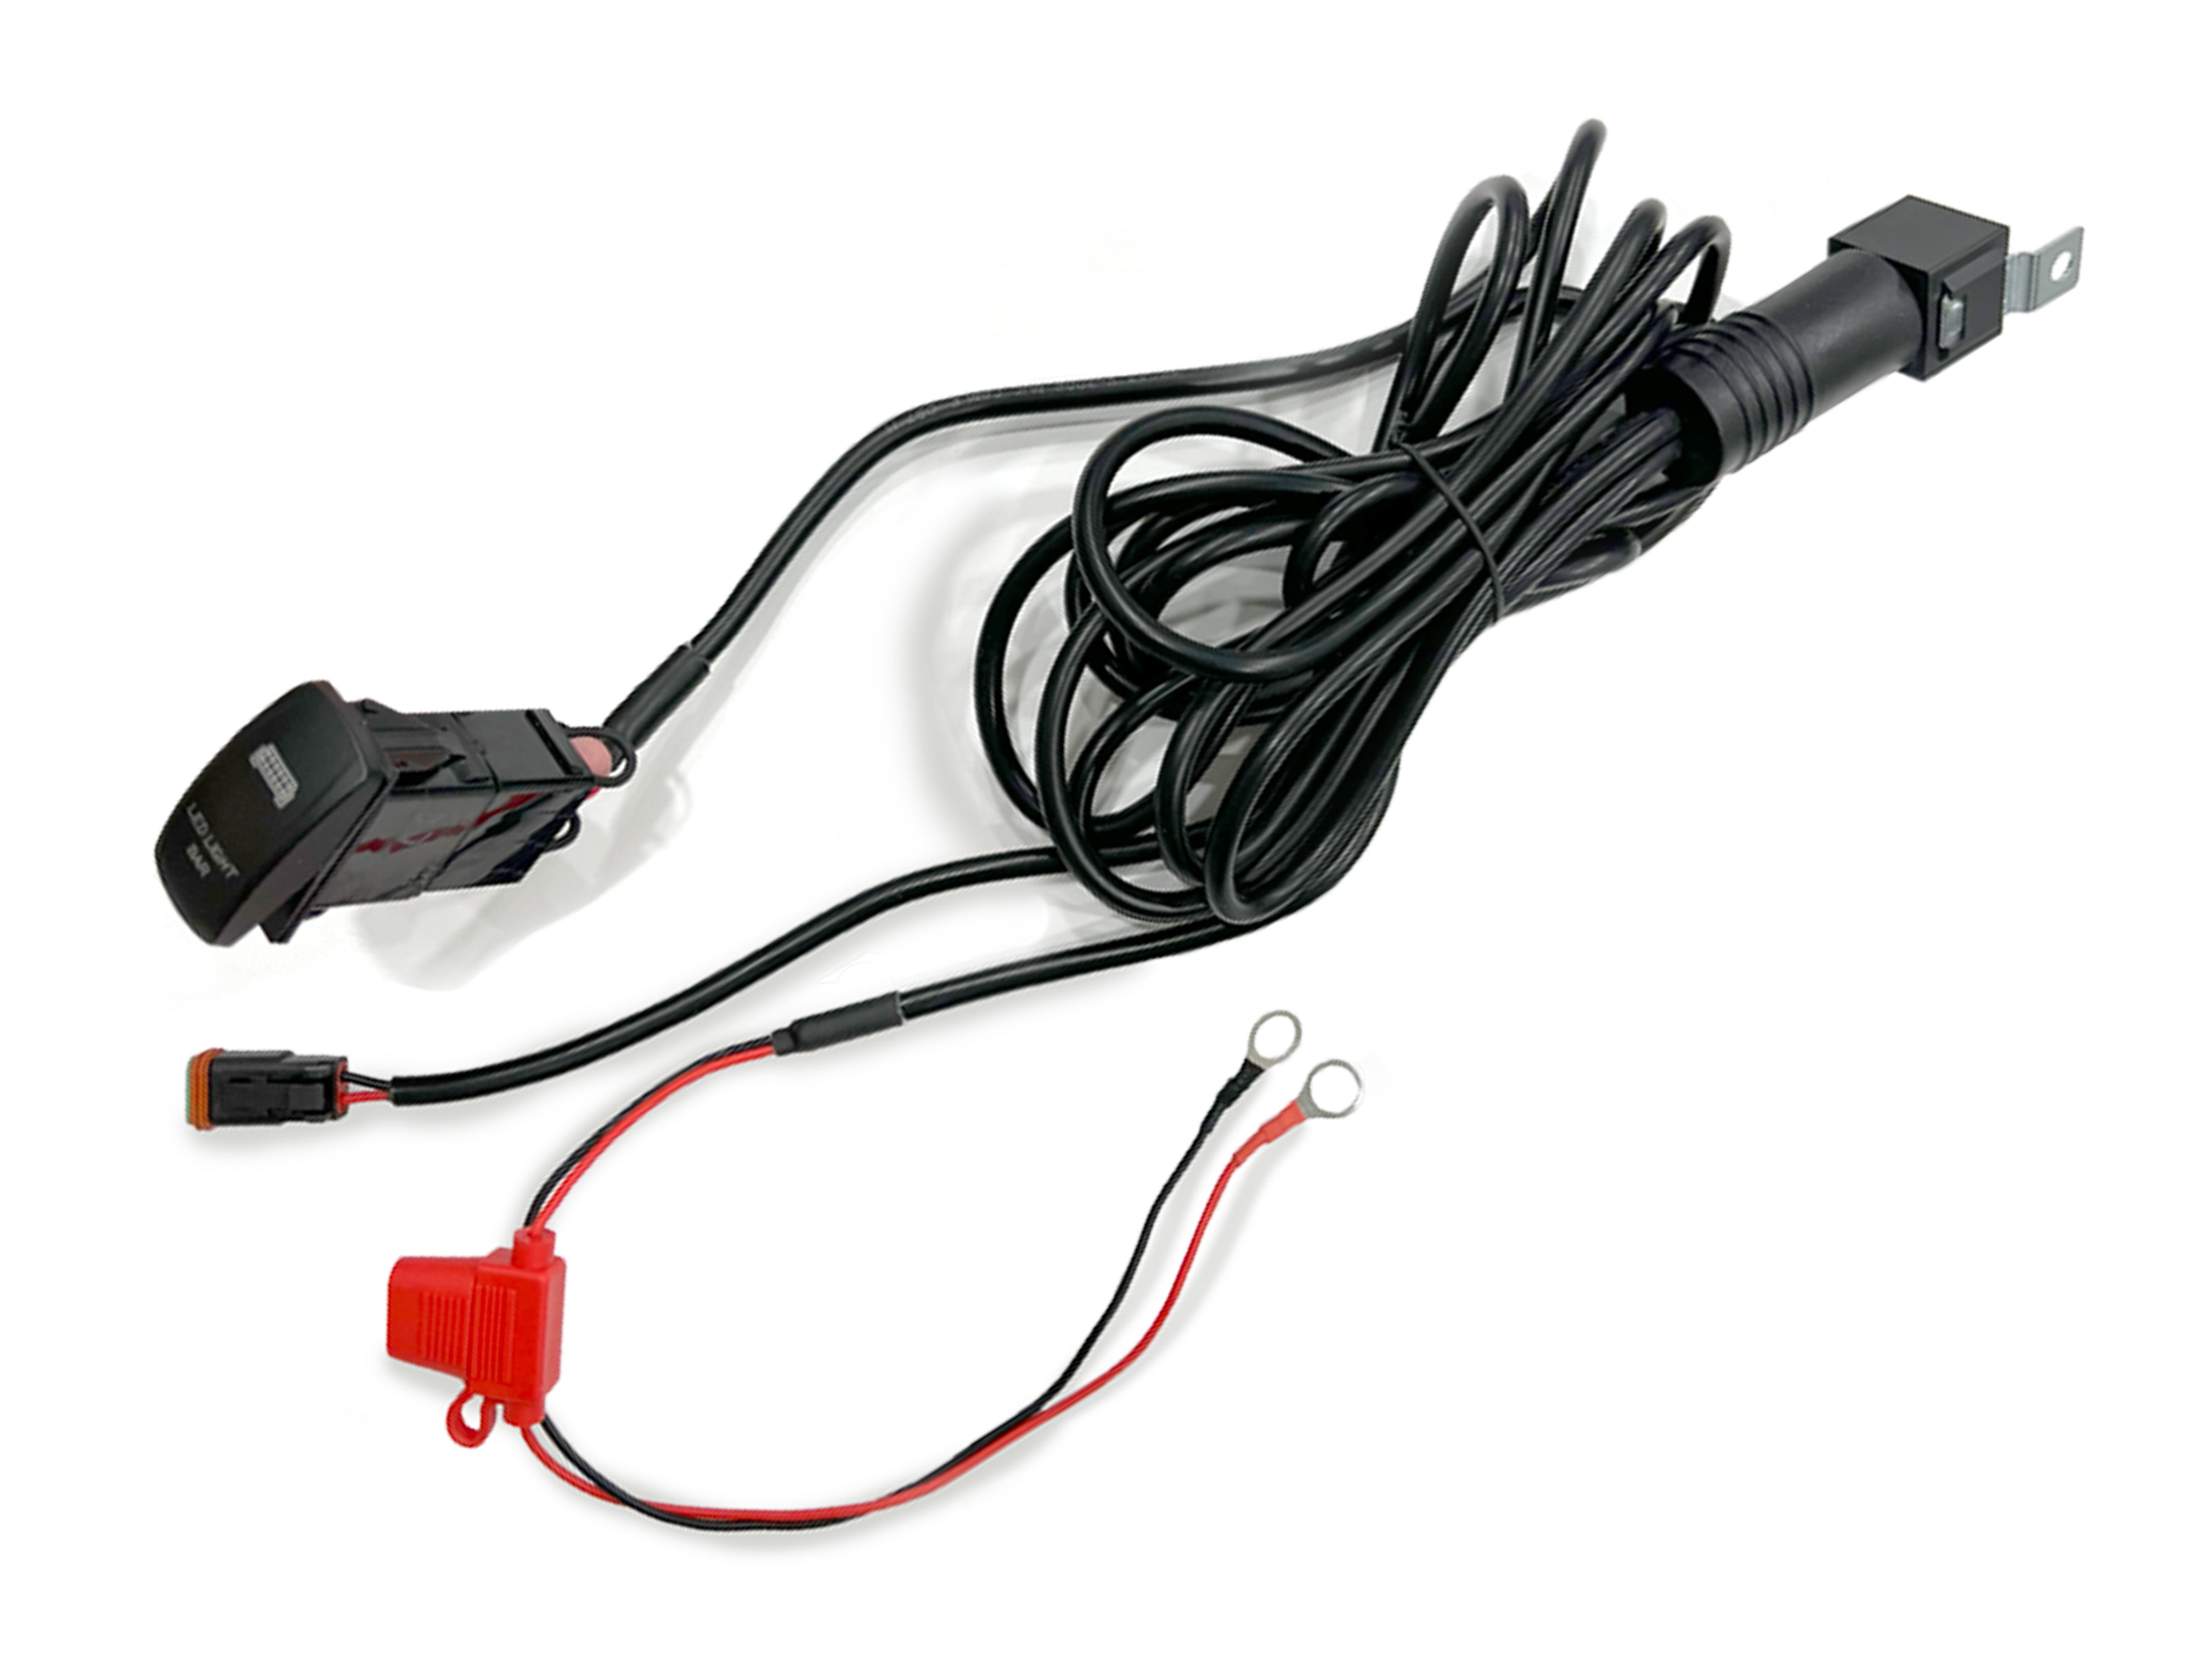
Gather all the tools and materials first. You will need a screwdriver and wire cutters. A voltage tester is important to check connections. Don’t forget electrical tape for safety. You will also need a drill to make holes. Wire strippers will help remove insulation. A wiring harness is needed to connect the light bar. Ensure you have the LED light bar ready. Mounting brackets are necessary for fixing the light bar. Screws and bolts will secure everything in place.
Keep a fuse to prevent electrical issues. A relay switch will help control the lights. You might need zip ties to tidy up wires. Safety goggles protect your eyes while working. Use a multimeter to check current flow. Having all these items will make the task easier. Follow safety rules while handling tools.
Credit: www.superbrightleds.com
Safety Precautions
Always wear safety gloves to protect your hands. Goggles are important to shield your eyes. Make sure the car is off before starting. Disconnect the battery to prevent shocks. Keep tools organized on a table. This helps avoid accidents. Read all instructions before starting the work. Double-check all connections. Proper connections prevent short circuits. Children and pets should stay away from the work area.
Use insulated tools for safety. These tools prevent electric shocks. Ensure all wires are in good condition. Damaged wires can be dangerous. Keep a fire extinguisher nearby. It’s a safety measure for any fire risks. Work in a well-lit area to see clearly. Proper lighting reduces mistakes. Stay calm and take breaks when needed.
Choosing The Right Led Light Bar
Picking the perfect LED light bar is crucial. Size matters. Bigger bars give more light. Brightness is key. Look for high lumens. Durability is vital. Ensure it’s waterproof and dustproof. Compatibility with your vehicle is important. Check the voltage. Ease of installation saves time. Some bars come with easy wiring kits. Safety should never be ignored. Choose bars with good heat dissipation. Cost can vary. Compare prices for best deals.
Color options are available. White light is standard. Beam patterns differ. Spot beams focus light far. Flood beams spread light wide. Brand reputation matters. Read reviews and testimonials. Warranty is a safety net. Longer warranties offer peace of mind. Energy efficiency saves battery life. Look for bars with low power consumption.
Preparing The Vehicle
Find a strong spot to fix the light bar. The front bumper is a good place. Make sure it is safe and easy to reach. The light should face the road. Check the space for wires and connections. Avoid blocking the radiator or other parts.
Clean the area with a damp cloth. Remove all dirt and dust. The surface should be smooth and dry. Use a mild cleaner if needed. This helps the light bar stick well. A clean surface is very important. It makes the job easier and safer.
Mounting The Led Light Bar
Begin by choosing the correct mounting locationfor your light bar. Find a flat surface to work on. Use a drillto make holes for the mounting brackets. Ensure the holes are in the right spot. Align the bracketswith the holes. Use screws to fix them in place. The brackets should be tight and secure. Check the brackets’ strength by giving them a gentle tug.
Place the light bar onto the mounted brackets. Make sure it fits well. Use the provided boltsto fasten the light bar. Tighten the bolts so the light bar does not move. Check the alignment of the light bar. Adjust if necessary to ensure it points correctly. The light bar should be stable and ready to use.
Wiring The Led Light Bar
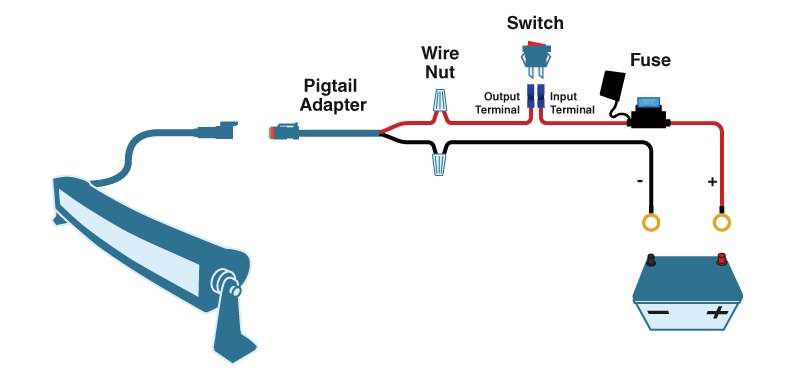
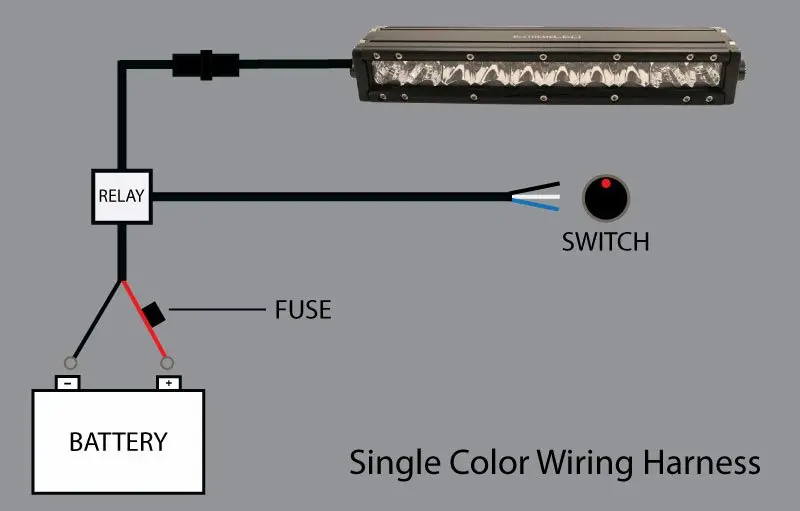
Wiring diagrams are like maps for electrical setups. They show how wires should connect. Reading these diagrams is very important. Look for symbols and lines. Symbols show parts like batteries or switches. Lines show how wires connect parts. Follow the lines carefully. This helps in wiring your LED light bar right.
First, find the power source. This can be a car battery. Connect the red wire to the positive terminal. The black wire goes to the negative terminal. Use a fuse in the circuit. This helps protect the light bar. Always check connections. Ensure they are tight. Loose connections can cause problems. Keep wires neat and tidy. This makes the setup look good.
Testing The Connection
Checking electrical connectionsis crucial for safety. Ensure all wires are connected tightly. Loose wires can cause problems. Use a multimeter to test the circuit. The multimeter shows if electricity flows properly. Check for any damaged wires. Broken wires can stop the light from working. Look for signs of wear on wires. Replace any faulty wires immediately.
Assessing light performanceensures the light bar works well. Turn on the light bar and observe its brightness. The light should be even and bright. If the light flickers, there might be a problem. Check all bulbs in the light bar. A broken bulb can affect performance. Ensure the light bar shines evenly across all areas. This ensures it provides good visibility.
Credit: www.blackoakled.com
Troubleshooting Common Issues
Flickering lights can be very annoying. Check the power source first. Is it stable? If not, your lights might flicker. Inspect the wiring. Are any wires damaged? Damaged wires cause flickers. Look at the battery. Is it dying? A weak battery can make lights flicker. Replace it if needed. Consider the environment. Are the lights exposed to extreme conditions? Extreme heat or cold can impact performance. Check the connections. Loose connections might be the culprit.
Loose connections can cause issues. Inspect the connections carefully. Are they tight? Loose wires can cause problems. Use a screwdriver to tighten screws. Make sure everything fits well. Check the harness. Is it secure? A loose harness can cause trouble. Consider using clips or ties. They help keep wires in place. Re-test the lights after fixing connections. Ensure everything works properly.
Maintenance Tips
Keep the light bar clean for better performance. Use a soft cloth with mild soap. Avoid using harsh chemicals. They can damage the surface. Rinse the cloth in clean water. Wipe the light bar gently. Ensure no soap remains. Dry it with another cloth. Regular cleaning helps maintain brightness.
Check the wires for damage often. Look for any frayed or loose wires. Tighten loose connections with a screwdriver. Replace any damaged wires quickly. This prevents accidents and keeps the light working well. Routine inspection is important. It ensures the light bar functions properly.
Conclusion
Wiring an LED light bar can be straightforward with the right steps. Gather your tools before starting. Ensure you follow the wiring diagram closely. Connect wires securely to avoid future issues. Test your light bar once installed. This ensures everything works perfectly.
Remember to prioritize safety during the process. Double-check connections to prevent electrical problems. With patience and attention, your LED light bar will shine brightly. Enjoy the enhanced visibility and style it brings to your vehicle. Happy driving with your newly installed lights!