Imagine driving down a dark road with full visibility, confidently knowing your path is illuminated by your powerful light bar. You’re here because you want to make that vision a reality.
Wiring a light bar might seem daunting, but with the right guidance, you can do it yourself and enjoy the thrill of a perfectly lit journey. Whether you want to wire a light bar to a toggle switch for ease, connect it to your high beam for synchronized lighting, or go relay-free for simplicity, this guide will provide you with step-by-step instructions tailored for your needs.
Let’s dive in and brighten your path with ease. Your adventure starts now.
Credit: www.blackoakled.com
How To Wire A Light Bar To A Toggle Switch
Wiring a light bar to a toggle switch is a simple process. Connect the light bar’s positive wire to the switch, then link the switch to the battery. Ensure all connections are secure. This setup allows easy control of your light bar.
Wiring a light bar to a toggle switch can seem daunting. But with the right guide, it’s straightforward. A toggle switch offers control over the light bar. Follow this guide to get started. Gather Necessary Tools and Materials Before diving in, ensure you have all items ready: – Toggle switch: Essential for controlling the light bar.
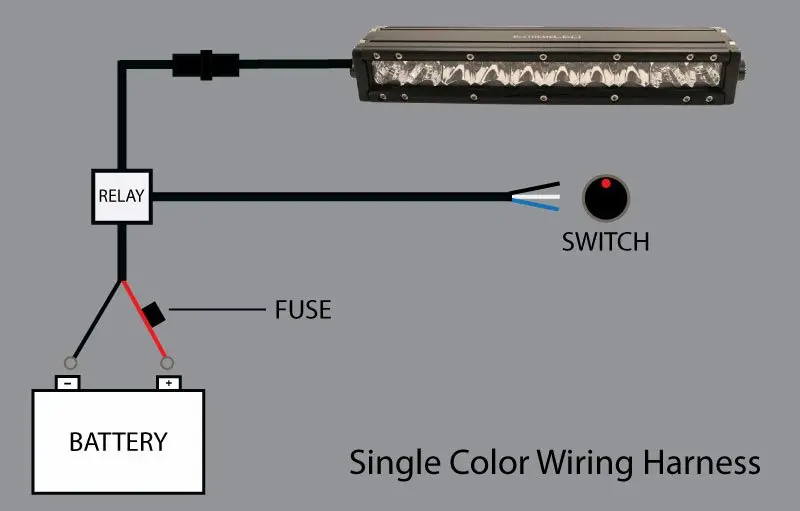
– Light bar: The main component to illuminate your path. – Wiring harness: Connects and organizes the wires efficiently. – Screwdrivers: Needed for securing components. – Wire connectors: Safely join wires together. – Electrical tape: Insulates and protects connections. Understanding the Wiring Diagram It’s crucial to grasp the wiring diagram.
This blueprint shows how components connect. It outlines the path from the battery to the switch and light. A clear diagram ensures you avoid errors. Disconnect the Battery Safety is key. Always start by disconnecting the battery. This prevents any accidental short circuits.
It also protects you from electric shocks. Connect the Toggle Switch Here’s how to attach the toggle switch: – Identify the switch terminals: Usually labeled as power, accessory, and ground. – Connect the power wire: Run a wire from the battery to the power terminal.
– Attach the accessory wire: Connect this from the switch to the light bar. – Secure the ground wire: This goes from the switch to a suitable ground point. Test the Light Bar Finally, it’s time to test your work.
Reconnect the battery. Flip the toggle switch to the “on” position. Ensure the light bar illuminates. If it doesn’t, double-check your connections. By following these steps, you can successfully wire a light bar to a toggle switch.
How To Wire A Light Bar To High Beam
Connecting a light bar to your high beam involves a few simple steps. First, locate your high beam’s wiring. Next, use a relay and switch to safely integrate the light bar. Ensure all connections are secure, and test the system to confirm proper operation.
Wiring a light bar to your vehicle’s high beam is a smart move. It ensures the bar lights up whenever you switch to high beam. This setup is useful for off-road adventures and low visibility conditions. Understanding the Basics You need to know some basics before starting.
Here’s a brief overview: – Light bar function: Offers extra illumination for your vehicle. – High beam purpose: Provides maximum light for night driving. – Wiring importance: Connects electrical systems safely and effectively. Tools You Will Need Gathering the right tools ensures a smooth process.
Here’s what you’ll need: – Wire strippers: To cleanly strip insulation from wires. – Electrical tape: For securing connections. – Screwdrivers: To tighten any loose screws. – Relay and fuse: To protect against electrical overloads. Steps to Wire a Light Bar to High Beam Follow these simple steps to connect your light bar with the high beam: – Locate high beam wire: Find the wire connected to your high beam.
– Connect relay: Attach a relay to the high beam wire. – Wire the light bar: Connect the light bar to the relay. – Check connections: Ensure everything is secure and tight. Testing the Setup Once wired, testing is crucial.
Ensure everything works properly: – Turn on the high beams: Check if the light bar illuminates. – Inspect connections: Look for any loose or disconnected wires. – Evaluate performance: Ensure the light bar enhances visibility. Safety Tips Safety is paramount when working with electrical systems.
Consider these tips: – Disconnect battery: Prevents accidental electrical shocks. – Use proper tools: Reduces risk of damaging components. – Follow instructions: Ensures correct and safe wiring. – Avoid exposed wires: Prevents short circuits and fires.
How To Wire A Light Bar Without A Relay
Wiring a light bar without a relay involves connecting it directly to the power source. Use appropriate gauge wire and ensure secure connections. Add an inline fuse for safety.
Wiring a light bar without a relay might seem daunting. Fortunately, it’s quite straightforward. Light bars enhance visibility, perfect for off-road adventures. Knowing the right steps saves time and ensures safety. Understanding the Need for a Relay Relays control high-current applications.
They safeguard your circuit. But sometimes, simpler setups are preferred. – Direct wiring: Connects light bar straight to the battery. – Relay-free setup: Avoids complexity, but isn’t ideal for high-power lights. Materials Required Gathering the right tools is crucial. You’ll need several items to ensure a seamless installation.
– Light bar: Your primary lighting unit. – Wiring harness: Essential for connecting your light bar. – Switch: Allows easy control of your light bar. – Fuse: Protects the wiring from overloads. – Electrical tape: Insulates connections and prevents shorts.
Steps to Wire Without a Relay Follow these steps closely for a successful installation. This method suits lower power light bars. 1. Position the Light Bar: Find a spot where it’s most effective. 2. Connect the Wiring Harness: Attach it to the light bar.
3. Install the Switch: Mount it in a convenient location. 4. Wire to Battery: Connect the harness directly to the battery. 5. Secure with Fuse: Protect the circuit by adding a fuse. 6. Test the Setup: Ensure the light bar functions correctly.
Safety Considerations Safety is paramount. Keep these points in mind to avoid hazards. – Check wiring: Ensure connections are secure. – Avoid overloading: Match the light bar’s power draw to your system. – Regular inspection: Periodically check for wear and tear.
Wiring a light bar without a relay requires some care. But with these guidelines, the process is manageable.

Credit: www.superbrightleds.com
Conclusion
Wiring a light bar can seem tricky at first. But with patience, you can do it yourself. Connecting to a toggle switch offers easy control. Wiring to high beams provides automatic lighting. Going without a relay? It’s possible, but not always recommended.
Always double-check connections for safety. Use quality materials for a reliable setup. Follow the steps carefully for the best results. Your vehicle will have enhanced visibility with the new light bar. Enjoy safer night drives. Happy wiring!