Are you looking to enhance your vehicle’s lighting with a new light bar but worried about the wiring process? You’re in the right place.
Wiring a light bar to an existing switch might seem daunting, but it’s easier than you think. Imagine driving at night with the confidence that you can see every curve and obstacle on the road. This guide will help you achieve that by simplifying the wiring process, ensuring you have a seamless experience.
With clear instructions and practical tips, you’ll soon find that adding a light bar can be a straightforward DIY project. Keep reading to discover how you can illuminate your path with ease and make your nighttime adventures safer and more enjoyable.
Tools And Materials Needed
Wiring a light bar needs some tools. A screwdriveris important for fixing screws. Keep a wire stripperhandy. It helps in removing the wire cover. A multimeterchecks the current flow. Gather some wires. They should be long enough. Use electrical tapeto cover connections. A drillmakes holes in surfaces. Keep connectorsready. They join wires together. A fuseprotects from short circuits. Be sure to have a relay. It helps in controlling power. Have a light barready. It is the main part.
Find a switchthat fits. It should be easy to use. Gather all these tools. Make sure everything is nearby. This will make wiring easy. Having everything ready saves time. It also prevents mistakes.
Safety Precautions
Safety is very important. First, turn off the power. This stops electricity flow. Use a voltage tester. Check if the power is truly off. Wear rubber gloves. They protect your hands. Use goggles to shield your eyes. You need a safe workspace. Avoid wet areas. Wet areas are dangerous.
Keep tools away from water. Water can cause shocks. Work with one hand. Keep the other hand in your pocket. This reduces risk. Be aware of your surroundings. Watch where you step. Stay focused on the task. No distractions allowed. Double-check connections. Loose wires can cause fires.
Assessing The Electrical System
Check your car’s electrical system first. Look for the battery and fuse box. Ensure they are in good shape. Identify the existing switch for lights. This helps in connecting the light bar properly.
Find the wiring path. It goes from the switch to the lights. Trace it carefully. Look for loose wires or damaged parts. Fix them before starting.
Test the switch. Make sure it works. Turn it on and off. Listen for clicks. A working switch ensures power flow.
Check the voltage rating. The light bar should match. This prevents overload or damage. Use a multimeter for accurate readings. Safety is important.
Preparing The Light Bar
First, gather all necessary tools and materials. You will need a light bar, wires, and a screwdriver. Make sure your light bar is the correct size for your vehicle. Check that all parts are in good condition.
Next, find a safe place to work. The area should be well-lit and clear. This helps you see everything clearly. Safety is important. Wear gloves to protect your hands. Use a step ladder if needed.
Now, locate the mounting points on the vehicle. These are where the light bar will attach. Ensure the points are clean. This helps the light bar fit securely. Double-check the measurements to avoid mistakes.
Connecting The Wires
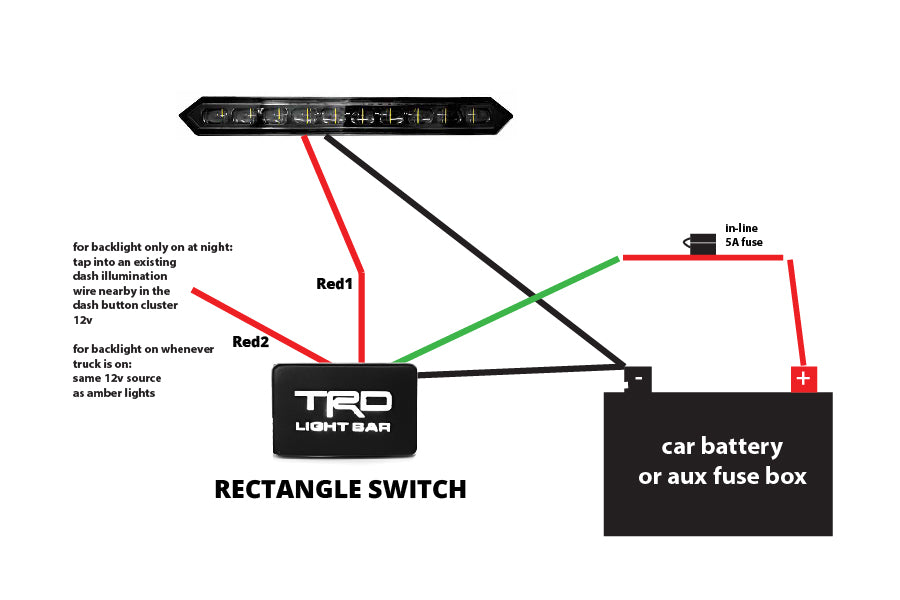
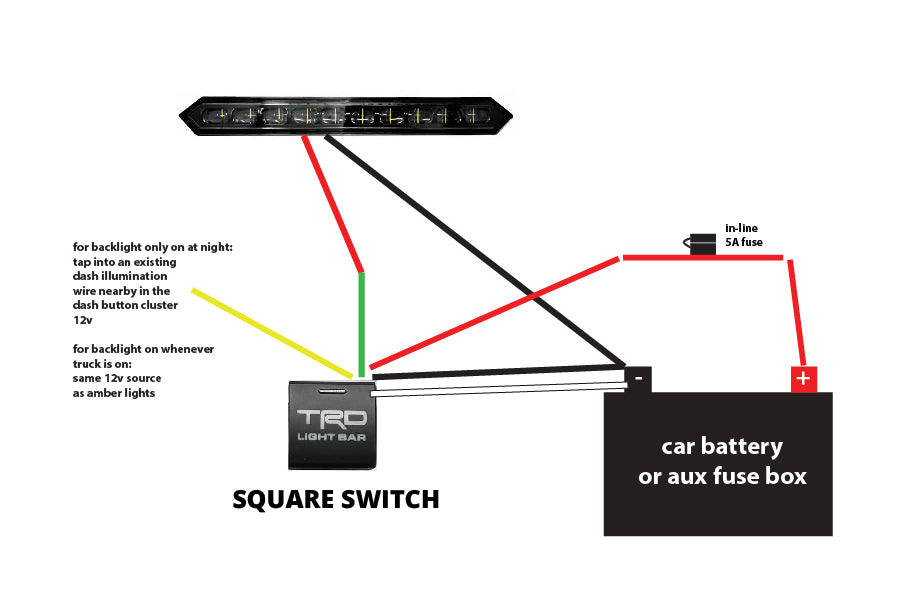
Connecting a light bar to an existing switch can enhance vehicle functionality. Begin by identifying the switch’s wires and locate positive and negative terminals. Securely attach the light bar wires to these terminals, ensuring correct polarity for optimal performance and safety.
Identifying Wire Types
It’s important to know the right wires. Usually, the red wire is for power. The black wire is the ground. Sometimes, there is a white wire. This is often neutral. Check your manual to be sure. Use a wire stripper to remove the plastic cover. Be careful not to damage the wires. Make sure you have enough wire length to connect.
Using Connectors
Connectors help join wires. They keep connections safe and tight. Twist the exposed wires together. Then, cover them with a wire connector. Turn the connector clockwise until it is secure. Make sure no bare wire is visible. This prevents short circuits. It’s important to check the connection. Pull gently to ensure it’s firm. If it comes apart, redo it. Use electrical tape for extra safety. Wrap the tape around the connector and wire.
Credit: raveoffroad.com
Testing The Connection
Make sure the light bar is connected well. Flip the switch on. Check if the light turns on. If not, check the wires again. Ensure they are tight and secure. Use a multimeter to test the voltage. It should show proper numbers. If not, there might be a problem. Look at the fuse too. It could be blown. Replace it if needed. Always be careful with electricity. Safety is important. Wear gloves when working. Keep your hands dry.
Once the light works, test it at night. See how bright it is. Adjust if necessary. Make sure it points in the right direction. The light should cover the area you want. Avoid pointing it directly at others. This ensures safety for everyone. Happy testing!
Troubleshooting Common Issues
Wiring a light bar to an existing switch can be tricky. Start by identifying the switch’s current capacity. Ensure all connections are secure to avoid electrical issues.
Checking Connections
Ensure all wires are connected tightly. Loose connections can cause problems. Check each wire carefully. Look for any signs of damage. Damaged wires can stop power flow. Use a screwdriver to tighten loose screws. Secure them well to prevent issues.
Verify the light bar’s ground wire is connected. Ground wires help complete the circuit. Without it, the light bar won’t work. Inspect connectors for rust. Rusty connectors can block electricity. Clean them with a brush for better contact.
Addressing Power Issues
Confirm the switch is in the right position. It should be on to allow power. Test the switch by turning it off and on. Check the power source. Make sure it’s supplying enough voltage. Low voltage can cause the light bar to flicker.
Inspect the fuse box for blown fuses. Blown fuses interrupt power flow. Replace any blown fuses with new ones. Use the correct type and size for safety. Look at the battery connections. Loose battery connections can cause power loss. Tighten them securely to fix the problem.

Credit: www.youtube.com
Maintaining Your Light Bar
Keep your light bar working wellwith regular checks. Look for loose wires and tighten them. Check the switch to make sure it works. Regular checks help find problems early. Fix small issues to avoid bigger ones.
Clean your light bar to keep it bright. Use a soft cloth and gentle cleaner. Dirt can make the light dim. Cleaning keeps your light bar clear and shiny. Always turn off the power before cleaning.
Some parts may wear out. Replace old parts to keep your light bar safe. Use the right parts for your light bar model. Replacing parts can make your light bar last longer.
Credit: raveoffroad.com
Conclusion
Wiring a light bar to an existing switch is simple. Follow these steps for success. First, gather your tools and materials. Then, ensure safety by disconnecting power. Next, connect wires carefully. Use the correct terminals. Test the light bar to confirm it works.
If unsure, consult a professional. Remember, practice makes perfect. With patience and attention, you’ll achieve great results. Your vehicle will shine brighter. Enjoy the added visibility at night. Safe travels!