Are you ready to enhance your vehicle’s lighting setup? Wiring a light bar to your headlight switch can significantly boost your nighttime visibility, making every drive safer and more enjoyable.
Imagine effortlessly navigating through dark roads or off-road trails with the confidence of superior illumination. This guide will walk you through the process, ensuring you feel empowered to tackle the task yourself. Whether you’re a seasoned car enthusiast or a DIY beginner, you’ll find easy-to-follow steps, valuable tips, and expert advice right here.
By the end, you’ll not only have a brighter road ahead but also the satisfaction of mastering a new skill. Keep reading to discover how you can transform your driving experience with just a few simple connections.
Tools And Materials Needed
A light bar is a bright light. It helps you see better at night. To wire a light bar, you need some important tools.
First, gather a wrench set. This helps tighten bolts. Next, get a screwdriver. You need this for screws.
A wire stripperis also needed. It helps remove plastic from wires. Don’t forget the electrical tape. It covers and protects wires.
You also need a relay and switch. These control the light. Finally, have a multimeter. It checks if the wires have power.
Make sure you have all these tools. They make the job easier.

Credit: www.amazon.com
Safety Precautions
Safety is the most important part of any project. Always wear gloves and goggles. These keep your hands and eyes safe. Disconnect the battery before you start. This prevents electric shocks. Make sure you have all tools ready. It saves time and effort. Read the light bar manual. This helps you understand better. Check all wires and connections. Look for damage or wear. Use correct wire sizes. It ensures proper function and safety. Be careful with sharp tools. They can cause injuries. Keep kids and pets away. It avoids accidents. Follow instructions step by step. This ensures a smooth process.
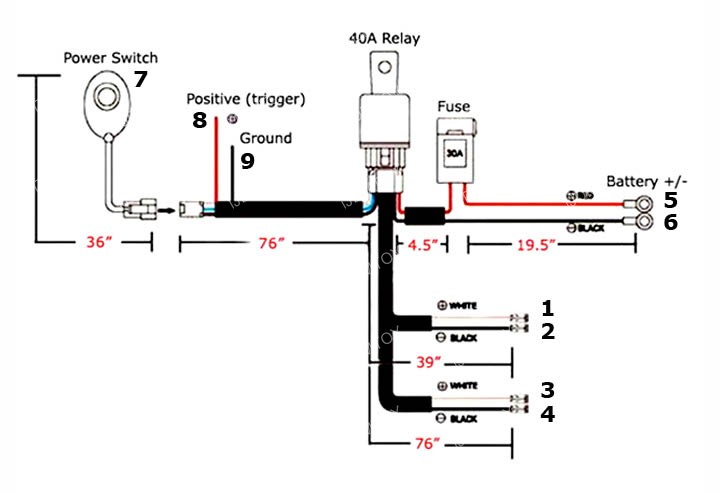
Understanding Your Vehicle’s Wiring System
Knowing your vehicle’s wiring is very important. Wires connect parts like lights and switches. Battery gives power to the system. Fuses protect wires from damage. Relays help control electrical flow. Each part must work well. A problem in one can cause problems in others.
Find the battery first. It powers everything. Look for fuses near the battery. They protect wires. Relays are small boxes. They control the power flow. Switches are inside the car. They turn things on and off. Wires connect all these parts. Check each part carefully.
Wiring diagrams are like maps. They show how wires connect parts. Look for lines and symbols in the diagram. Lines are wires. Symbols show parts like battery or fuse. Diagrams help you understand the system. Study them well to wire correctly.
Credit: www.coloradofans.com
Choosing The Right Light Bar
Light bars come in various shapesand sizes. Some are long and thin, while others are short and wide. Each type has its own benefits. A straight light bar covers a wide area. Curved light bars provide more coverage on the sides.
The beam pattern is also important. Spot beamsfocus light in one direction. Flood beams spread light over a large area. Combo beams do both. Choose based on where you drive.
Not all light bars fit every vehicle. Check the mounting pointson your car. Ensure the light bar’s size matches them. Also, check the wattage. It should be compatible with your vehicle’s power system.
Consider the voltagetoo. Most vehicles use 12 volts. Ensure the light bar is designed for this. Proper compatibility ensures safe and efficient operation.
Preparing The Headlight Switch
First, turn off your car’s engine. Safety is important. Next, locate the headlight switch. It’s usually near the steering wheel. Use a screwdriver to remove the switch cover. Be careful not to break it. Once open, you can see the switch’s wires. Note their colors and positions. This helps in wiring later.
Check each wire for damage. Broken wires can’t carry power. Look for loose connections. Tighten any that are loose. Ensure all wires are secure. Use a flashlight if it’s dark. Good lighting helps in spotting issues. Correct any faults before proceeding. Safe connections are key to success.
Credit: store.ijdmtoy.com
Mounting The Light Bar
Choose a spot where the light bar fits well. Ensure the location is safe and secure. The light bar should not block your view while driving. Find a flat surface for better stability. Avoid locations that are too high or too low. Consider the best angle for maximum light spread. Test the light bar position before drilling. Ensure the light does not blind other drivers.
Use strong brackets to secure the light bar. Make sure all screws are tight. Loose screws can cause the light bar to move. Double-check the alignment of the light bar. Proper alignment ensures the best lighting performance. Avoid over-tightening as it may damage the light bar. Use a level tool to ensure straight alignment.
Connecting The Light Bar To The Switch
Gather all the needed tools. Find the right wiring path from the light bar to the switch. Ensure wires are long enough to reach the switch without stretching. Keep the wires organized and safe from sharp edges. Use clips or zip ties to hold wires in place. Check for any obstructions or hot areas that might damage the wiring.
Connect the wires securely. Make sure each wire is in the correct spot. Twist wires together if needed. Cover them with electrical tape or use connectors. This keeps them safe from moisture and breaks. Test the switch to see if the light bar turns on. If it doesn’t work, double-check all connections.
Testing The Installation
Turn on the light bar using the headlight switch. Check if the light bar lights up. Ensure the brightness is consistent. Listen for any unusual sounds. Feel for any vibrations. Test the switch multiple times. Make sure it works smoothly. Observe the light pattern. Check if it meets your needs. Confirm all wires are secure. Inspect for any loose connections. Everything should be tight.
If the light bar doesn’t turn on, check the fuse first. A blown fuse is common. Replace it if needed. Check all wire connections. Ensure no wires are loose. Inspect the switch. It should click into place. Look for any burnt smells. This might signal a wiring problem. Ensure the battery is charged. A weak battery might not power the lights.
Maintenance Tips
Inspecting your light bar is very important. Check for loose wires often. Tighten any loose connections. Look for any signs of wear or damage. This helps in keeping the light bar working well. Ensure all bolts and screws are tight. This prevents any issues while driving.
Keep the light bar clean. Dirt and grime can reduce its brightness. Use a soft cloth for cleaning. Avoid harsh chemicals. They can damage the light. Check for dust on the lens. A clean lens allows better light output. Regular cleaning ensures longer life for your light bar.
Conclusion
Wiring a light bar to a headlight switch isn’t difficult. Follow the steps. Ensure safety by disconnecting the battery first. Use proper tools to avoid damage. Check connections thoroughly. Secure wires to prevent loose ends. Test the setup before finalizing.
This ensures everything works well. Remember, patience is key. Take your time and double-check each step. A correctly wired light bar enhances visibility. It also adds style to your vehicle. Stay safe and enjoy your improved lighting. Always refer to your vehicle’s manual for specific instructions.
Happy wiring!