Have you ever driven over a bump and felt like your car was about to bounce off the road? It’s not just uncomfortable; it might be a sign that it’s time to change your shocks and struts.
These essential components help keep your ride smooth and your vehicle stable. But you might be wondering, “Can I do this myself? ” Absolutely! With the right guidance, you can save money and learn more about your car by changing them yourself.
You’ll discover clear, step-by-step instructions to make this task less daunting. Plus, you’ll gain the satisfaction of knowing you’ve taken control of your car’s performance and safety. Ready to roll up your sleeves and get started? Let’s dive in!
Tools And Materials Needed
Gather essential tools like a socket set, jack, and wrench. Stock up on materials such as new shocks and struts, safety gloves, and a torque wrench. Ensure your workspace is safe and well-organized for a smooth replacement process.
If you’ve decided to tackle changing your vehicle’s shocks and struts yourself, it’s essential to gather the right tools and materials before diving in. The right equipment can make the difference between a smooth job and one that becomes a frustrating ordeal. Ensuring you have everything ready not only saves time but also enhances your safety during the process.Essential Tools
First, let’s talk about the tools you’ll need. A jack and jack stands are non-negotiable for this task. They safely elevate your car, providing the necessary clearance to access the shocks and struts. A socket set, ideally a metric one, is crucial for removing the nuts and bolts that hold these components in place. Do you have a torque wrench? Using one ensures that when you reassemble parts, everything is tightened to the manufacturer’s specifications, preventing potential mishaps down the road. A breaker bar is another tool that can be a lifesaver, helping you deal with stubborn bolts that refuse to budge.Specialized Equipment
Sometimes, standard tools aren’t enough, and you might need to borrow or rent specialized equipment. A spring compressor is necessary when dealing with struts, as it safely compresses the coil spring, allowing you to remove and install the strut assembly without risking injury. Consider a pry bar for those particularly tricky parts that need some extra persuasion to come loose. While not always needed, it can be incredibly useful in certain situations.Materials You Can’t Forget
Beyond tools, you’ll need some materials. New shocks and struts, of course, are at the top of the list. Additionally, having some penetrating oil on hand can make removing rusty or stuck bolts much easier. Don’t forget about safety equipment like gloves and safety glasses. Protecting yourself should always be a priority, especially when dealing with components under tension like springs.Preparation Pays Off
Before you start, double-check that you have everything you need. Have you ever started a project only to realize halfway through that you’re missing something crucial? Avoid this hassle by laying out all your tools and materials in advance. This small step can save you time and keep your stress levels in check. Are you prepared to tackle this project? With the right tools and materials, you’re well on your way to successfully changing your shocks and struts. So, gather your gear and get ready to give your vehicle the smooth ride it deserves.
Credit: www.youtube.com
Preparation Steps
Start by gathering necessary tools like a jack, wrench, and new shocks or struts. Ensure your car is on a flat surface. Use wheel chocks for safety. Familiarize yourself with the car’s manual and steps required. It’s crucial to disconnect the battery to prevent electrical issues.
Changing shocks and struts can significantly improve your vehicle’s performance and comfort. Before you dive into this DIY project, it’s crucial to prepare adequately. Proper preparation ensures a smoother process and keeps you safe. Let’s explore the essential preparation steps to set you up for success.Safety Precautions
Safety should always be your top priority. Start by wearing appropriate safety gear, such as gloves and safety goggles. They protect you from sharp edges and debris. Ensure your workspace is well-lit and organized. This minimizes the risk of tripping over tools or parts. Have a fire extinguisher nearby, just in case. Read the vehicle’s manual before starting. It offers valuable insights specific to your car model. Knowing these details can prevent unexpected surprises.Vehicle Stabilization
Stabilizing your vehicle is a crucial step before removing any parts. First, park your vehicle on a level surface. Uneven ground can lead to accidents. Use wheel chocks to prevent the car from rolling. They provide additional security by locking the wheels in place. You wouldn’t want your vehicle to move unexpectedly. Jack stands are vital for supporting the vehicle’s weight. Never rely on just a jack; it can fail without warning. Place the stands under the designated points mentioned in your manual. Is your vehicle stabilized securely? Give it a gentle shake to test its stability. If it wobbles, recheck your setup before proceeding. By ensuring these preparation steps, you’re on the right path to changing your shocks and struts safely and effectively. Have you ever skipped a step and learned the hard way? Share your experiences in the comments!Removing Old Shocks And Struts
Changing shocks and struts can enhance your vehicle’s performance. Removing old shocks and struts is an essential step. It requires patience and precision. This part of the process involves accessing, detaching, and removing these components.
Accessing The Components
Begin by lifting your vehicle with a jack. Ensure stability with jack stands. Locate the shocks and struts in the wheel wells. You may need to remove the tires for better access. Check for any debris or rust around these parts. This will make removal easier.
Detaching The Shocks
Start by unscrewing the bolts securing the shocks. Use a socket wrench for this task. Gently pull the shock away from its mount. Be cautious to avoid damaging nearby parts. Inspect the shock for signs of wear or damage. This helps diagnose any underlying issues.
Removing The Struts
Locate the strut’s mounting bolts at the top. These are typically under the hood. Use a wrench to loosen and remove them. Lower the strut assembly carefully from the wheel well. Avoid forcing it out as it can cause damage. Once removed, inspect the strut for any wear. This aids in choosing the right replacement.
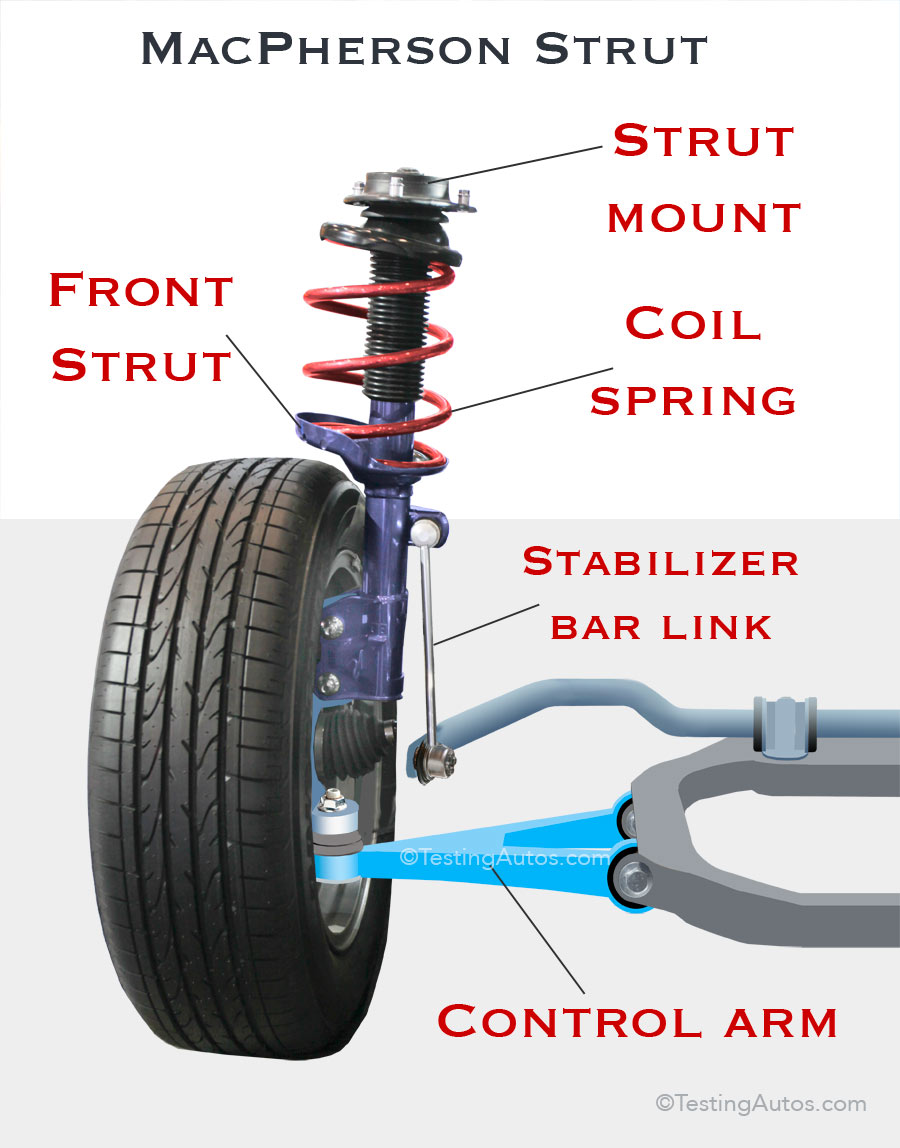
Credit: www.testingautos.com
Installing New Shocks And Struts
Installing new shocks and struts is crucial for a smooth ride. It enhances your vehicle’s handling and stability. This process requires precision and patience. Below, we break down each step to ensure success. Follow along as we guide you through installing new shocks and struts.
Positioning The New Shocks
Start by aligning the new shocks with the mounting holes. Ensure they fit snugly into place. This alignment prevents future wear and tear. Use a jack to support the vehicle’s weight. It helps you position the shocks properly. Double-check the alignment before proceeding to the next step.
Securing The New Struts
Place the struts in their designated position. They should fit securely in the strut tower. Use bolts to fasten them tightly. Torque each bolt to the manufacturer’s specifications. This ensures the struts stay in place during operation. Finally, inspect each strut for proper installation.
Final Checks And Adjustments
Ensure proper alignment and secure installation after changing shocks and struts. Tighten bolts firmly and check for leaks. Test drive to confirm smooth handling and stability.
Changing shocks and struts is a rewarding DIY project that can significantly improve your vehicle’s ride quality. As you approach the end of this task, it’s crucial to ensure everything is perfectly aligned and securely fastened. Skipping these final checks might lead to poor performance or even safety risks. Let’s dive into the final steps that will help you finish this project successfully.Tightening Bolts
After installing the new shocks and struts, it’s essential to ensure all bolts are tightened to the manufacturer’s specifications. Use a torque wrench for precision. This tool will help you apply the right amount of force to each bolt, preventing over-tightening or leaving them too loose. During a personal repair job, I once overlooked a slightly loose bolt. It resulted in an annoying rattle that took ages to diagnose. Don’t let this happen to you. Double-check each bolt, and you’ll thank yourself later.Test Driving
Once you’ve tightened everything, it’s time for a test drive. This step will reveal if your installation was successful. Pay attention to how the vehicle handles; it should feel smoother and more stable. Listen for any unusual noises that might suggest a problem. Imagine driving down the road, and your car feels like it’s gliding. That’s the result you want. If anything seems off, you might need to revisit the installation. Is the ride quality improved? Are there any unexpected noises? These questions will guide your final assessment. Taking the time to perform these final checks and adjustments ensures your hard work pays off. So, before you wrap up, ask yourself: is my car truly ready for the road?Common Mistakes To Avoid
Changing shocks and struts can seem straightforward. Yet, many people make avoidable mistakes. These errors can lead to costly repairs. Understanding common mistakes helps prevent them.
Improper Lifting Techniques
Lifting your vehicle is crucial. Incorrect lifting poses risks. Always use jack stands for safety. Avoid relying on jacks alone. Secure the vehicle before starting work.
Using Incorrect Tools
Many underestimate the importance of tools. Wrong tools can damage components. Invest in quality wrenches and sockets. Avoid using pliers or adjustable wrenches. They may strip bolts or nuts.
Not Inspecting Parts Thoroughly
Inspection is key before installation. Check for wear or damage. Replace worn parts immediately. Ignoring this step might lead to failure. Ensuring parts are in good condition is essential.
Ignoring Torque Specifications
Torque specifications matter. Over-tightening can cause damage. Under-tightening might lead to loose parts. Always follow the manufacturer’s guidelines. Using a torque wrench helps achieve correct tension.
Skipping Alignment Checks
After changing shocks and struts, alignment is crucial. Ignoring this step can affect handling. Misalignment leads to uneven tire wear. Schedule an alignment check post-installation. Ensure your vehicle runs smoothly.
Rushing The Process
Haste can lead to errors. Allocate enough time for the task. Rushing might mean missing steps. Patience ensures accuracy and safety. Take breaks if needed to maintain focus.
Maintenance Tips
Regular maintenance of your vehicle’s shocks and struts is vital. It ensures a smooth and safe driving experience. Keeping these components in top shape prolongs your car’s life. It also enhances your vehicle’s performance and safety.
Let’s delve into some essential maintenance tips. These will help you keep your shocks and struts in excellent condition.
Check For Leaks
Inspect your shocks and struts for any fluid leaks. Leaking oil signals a failing shock or strut. Replace them immediately to maintain optimal performance.
Inspect Tire Wear
Uneven tire wear can indicate shock or strut problems. Regularly check your tires for abnormal wear patterns. Address issues promptly to ensure even wear and longer tire life.
Listen For Unusual Noises
Strange noises while driving may point to shock or strut issues. Listen for clunking or rattling sounds. These noises often indicate worn or damaged components.
Test Vehicle Stability
Gently push down on your car’s hood and release. The car should quickly stabilize. Excessive bouncing suggests worn shocks or struts. Consider replacement if this occurs.
Monitor Vehicle Handling
Notice changes in your car’s handling or stability. Difficulty steering or increased body roll requires attention. These signs often indicate issues with your shocks or struts.
Regular Professional Inspections
Have a professional inspect your shocks and struts regularly. They can identify problems early, preventing costly repairs. Regular checks ensure your vehicle remains safe on the road.
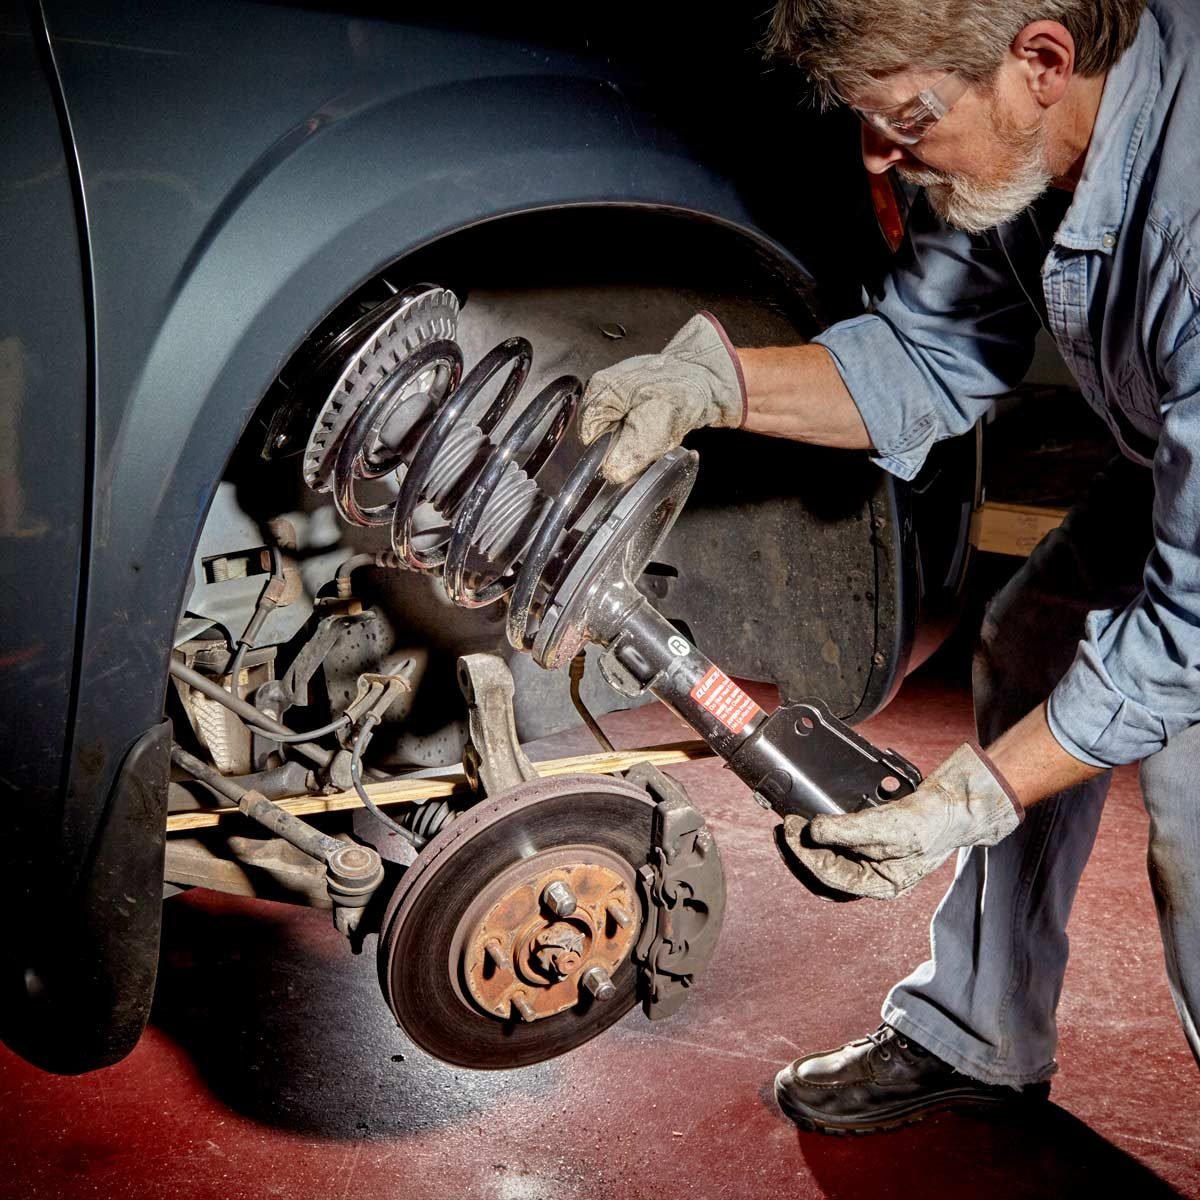
Credit: www.familyhandyman.com
Conclusion
Changing shocks and struts keeps your ride smooth and safe. These steps make it easier. Start by gathering tools and parts. Follow each step carefully. Double-check your work to avoid mistakes. Proper installation prevents future problems. Regular checks ensure parts work well.
Save money and time by doing it yourself. Boost your vehicle’s performance with new shocks and struts. Enjoy a comfortable drive. Remember, safety first. Ensure everything is tight and secure. With patience, anyone can do it. Keep learning and improving your skills.
Happy driving!