Imagine cruising down a dark road with confidence, knowing your path is illuminated by a powerful light bar mounted on your vehicle’s bull bar. This guide will show you how to install a light bar on a bull bar, making it easy for you to transform your nighttime driving experience.
With clear instructions and helpful tips, you’ll be equipped to tackle this project head-on. You won’t just enhance your vehicle’s look; you’ll also boost your safety and visibility. Ready to light up your driving adventures? Keep reading to discover how you can effortlessly achieve this upgrade.
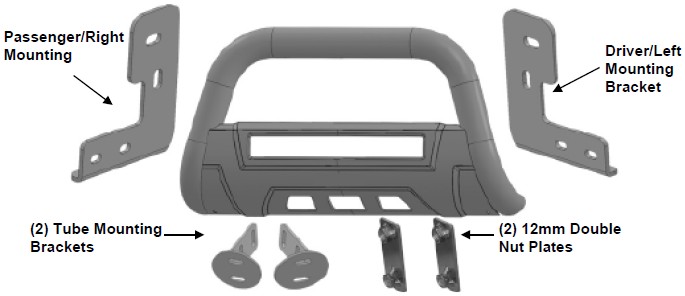
Credit: www.extremeterrain.com
Tools And Materials Needed
You need several tools to install a light bar. A wrench set is important for tightening bolts. A drill is useful for making holes. Screwdrivers help in fixing screws. You also need a measuring tape. This helps in placing the light bar correctly.
Gather materials before you start. You need mounting brackets to hold the light bar. Bolts and nuts are important for securing it. Wire connectors help in attaching wires. Make sure to have a power source. This can be a battery or your vehicle’s power system.
Choosing The Right Light Bar
Picking the best light bar is important. First, check the size of your bull bar. Measure it carefully. Light bars come in many sizes. Next, think about brightness. Some light bars are brighter than others. Bright lights help you see better at night. Consider the type of light bar too. Spotlights shine far. Floodlights cover more area. Combo lights do both. Durability matters as well. Look for strong materials. Water and dust can damage lights. Check for waterproof features. A good light bar lasts longer. Finally, think about price. Set a budget. Find a light bar that fits your needs and wallet.
Preparing The Bull Bar
Start by washing the bull bar. Use soap and water. Scrub off dirt and grime. A clean surface helps. It ensures the light bar sticks well. Dry it completely. Use a clean cloth or towel. Make sure there is no moisture left. Check the bull bar thoroughly. Clean spots will improve installation quality.
Find the best place for the light bar. Use a measuring tape. Measure twice to be sure. Mark the drill points with a pen. Keep marks clear and visible. Spacing is important. Ensure the marks are evenly spaced. This will help in fitting the light bar correctly. Double-check the marks. Accuracy is key for a successful installation.
Mounting The Light Bar
First, find the right spot on the bull bar. This is where you will drill. The spot should be strong and flat. Use a marker to mark the drilling points. This helps you keep the drill steady. Always wear safety glasses. Drill slowly to avoid mistakes. Make sure the holes are the right size for the screws. Check the holes for any rough edges. Smooth them with a file if needed.
Place the brackets over the drilled holes. Insert screws through the brackets. Use a wrench to tighten them. Ensure they are firm and do not move. The brackets hold the light bar. So they must be secure. Double-check each screw. Tighten them if needed. Check the alignment of the brackets. They should be straight and level.
Wiring The Light Bar
First, find a safe path for the wires. They must not touch hot parts. Now, use a wire harness for easy connections. It’s like a small bridge for wires. Connect the red wireto the positive side of the battery. Then, attach the black wireto a metal part on the car. This is the ground connection. Make sure all connections are tight and safe.
Connecting To Power Source
Now, connect the switch. Place it inside the car, near the driver. Link the switch to the battery and the light bar. This lets you turn the light on and off. Ensure the wires are neat. Use clips or ties to hold them in place. Keep them away from moving parts.
Testing The Connection
Turn on the switch to test the light. It should glow bright and steady. If not, check all connections again. Ensure the battery is charged. Double-check the wiring paths. Fix any loose wires. Safety is important, so take your time.

Credit: www.ebay.com
Adjusting The Light Bar
Make sure the light bar is straight. Use a level tool. This helps to keep the beam even. Check the light’s aim. Point it at the right angle. This ensures you see better at night. Adjust the beam direction slowly. Double-check the alignment once finished.
Tighten the screws firmly. Use a wrench for this task. Check if the light bar is steady. Shake it gently to confirm. Ensure all bolts are tight. Loose bolts can cause problems. Inspect the setup again. Make sure everything is in place. A strong hold is key for safety.
Maintenance Tips
Installing a light bar on a bull bar enhances visibility and style. Begin by securely mounting the light bar bracket. Ensure wiring is neatly connected to the vehicle’s electrical system for optimal performance.
Regular Checks
Keep an eye on the light bar regularly. Look for any loose screws. Check the wiring connections. Make sure everything is tight and secure. Inspect the light bar for any damage. It helps avoid bigger problems later. Regular checks keep the light bar working well.
Cleaning And Care
Cleaning the light bar is important. Dust and dirt can block light. Use a soft cloth to wipe it clean. Avoid using harsh chemicals. They can damage the surface. Clean the bull bar too. It keeps the vehicle looking nice. Proper care extends the life of your light bar.

Credit: www.youtube.com
Conclusion
Installing a light bar on your bull bar is straightforward. Follow the steps carefully for a secure fit. Gather all necessary tools before starting. Ensure your light bar is compatible with the bull bar. Tighten all bolts and check connections.
Safety comes first, so double-check your work. A well-installed light bar enhances visibility. It also adds a sleek look to your vehicle. Now, you’re ready for safer night drives. Enjoy the improved lighting on your adventures. Remember to maintain your light bar regularly.
Happy driving!