Imagine cruising through rugged trails in your Polaris Ranger, the thrill of adventure coursing through you, but as dusk settles, visibility becomes a challenge. That’s where installing a light bar can transform your experience.
Picture illuminating the path ahead, enhancing safety, and adding a touch of style to your ride. This guide is crafted for you—someone who seeks not just functionality but also the joy of a well-lit journey. We’ll walk you through each step, ensuring you can handle the installation with confidence.
So, if you’re ready to enhance your Polaris Ranger and make nighttime adventures as exciting as daytime rides, keep reading to discover how simple and rewarding this upgrade can be. Your next adventure awaits, and it starts here.

Credit: www.youtube.com
Tools And Materials Needed
Installing a light bar on a Polaris Ranger requires specific tools. You need a socket wrench set for tightening bolts. Screwdrivers are also essential for screws. A drill might be necessary if you need to create new holes. Measuring tape ensures accurate placement. Wire cutters help trim wires to size. Don’t forget electrical tape for securing connections. A multimeter checks the electrical flow. Zip ties help organize wires neatly. Safety goggles protect your eyes during work. Gloves keep your hands safe from sharp edges. Gather all these tools before starting.
Materials include a light bar and mounting brackets. Wiring harness is crucial for connecting the light bar. Fuses and relay switch ensure safe operation. Bolts and nuts are needed for securing the light bar. Instruction manual guides the installation process. Proper preparation makes the task easier.
Choosing The Right Light Bar
There are different kinds of light bars. The most popular are LED light bars. They are bright and use little energy. Another type is halogen light bars. They are older but still useful. HID light barsare also an option. They are very bright but can be costly.
Each type has its own benefits. Choose one that fits your needs. Think about where you will use it. Some work better in rain or fog. Others shine best on clear nights.
Before buying, check the sizeof the light bar. Make sure it fits your vehicle. Look at the brightness level. How bright do you need it to be? Check the waterproof rating. You don’t want it to break in the rain.
Also, see how easy it is to install. Some need special tools. Others are simpler. Finally, think about the price. Stay within your budget.
Pre-installation Preparations
Wear safety gear like gloves and goggles. Protect your hands and eyes. Work in a clean area. Avoid slippery spots. Keep tools organized. Ensure proper lighting. Have a helper nearby. They can assist if needed. Follow instructions carefully. Stay focused and calm. Safety is a top priority.
Check the Polaris Ranger for damage. Look at tires and brakes. Examine wiring closely. Ensure all parts are secure. Inspect the battery. It should be fully charged. Clean the surface where the light bar will go. Remove dirt and debris. Check the mounting points. They must be stable. Confirm everything is ready for installation.

Credit: www.rangerforums.net
Mounting The Light Bar
Installing a light bar on a Polaris Ranger enhances visibility for night rides. Begin by securing the mounting brackets to the vehicle’s roof or bumper. Ensure the light bar is firmly attached and connected to the electrical system for reliable performance.
Positioning The Light Bar
First, find the best spot for the light bar. It should be at the top front of the Polaris Ranger. This spot gives the best light spread. Make sure the light points straight ahead. Adjust it so it covers a wide area. Keep it away from any moving parts. It must stay clear of the windshield wipers. Check for any obstructions. Ensure the light bar does not block your view.
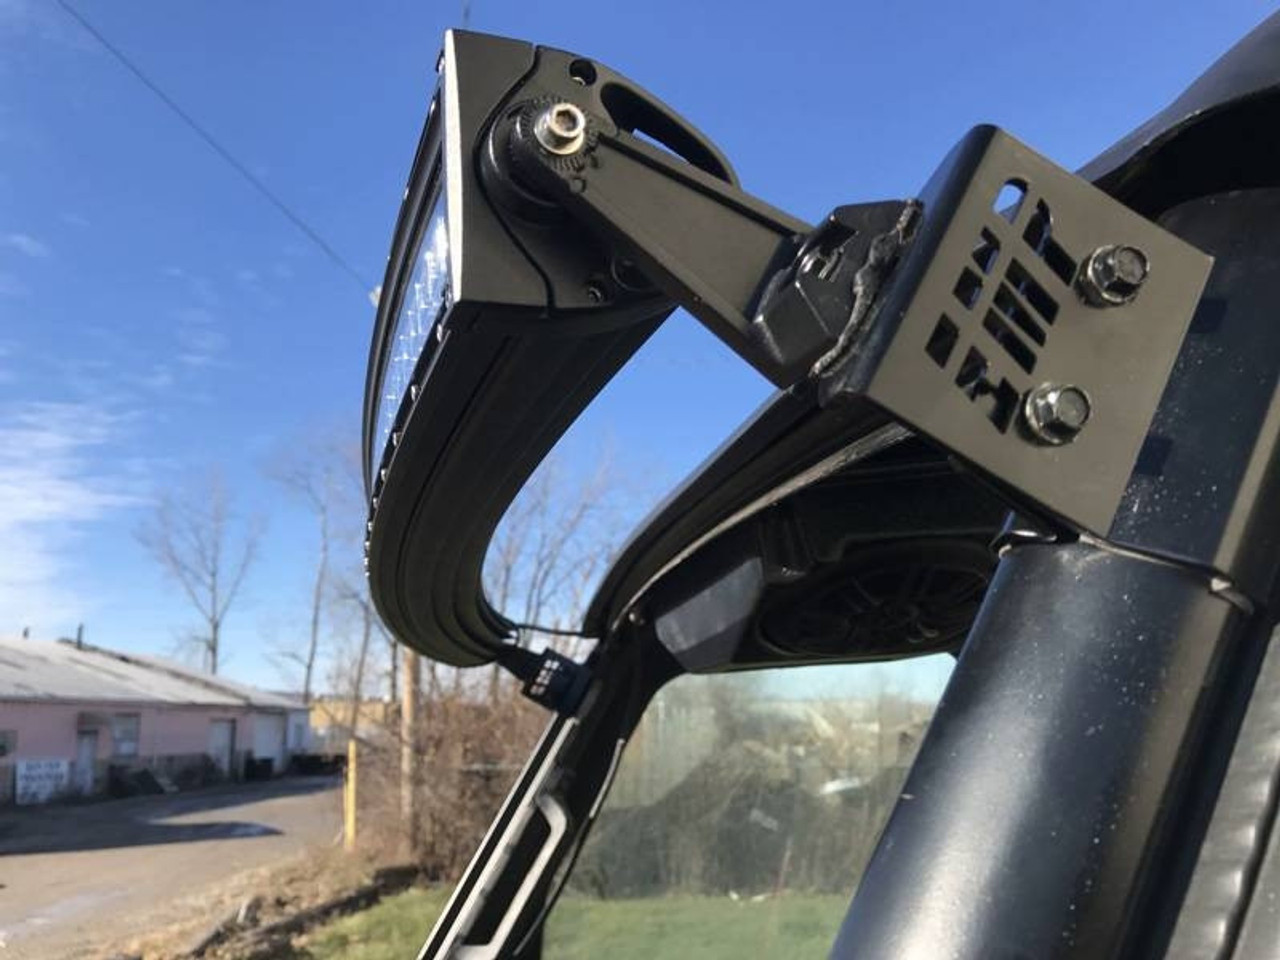
Securing The Brackets
Get the brackets ready. The brackets hold the light bar in place. Use a wrench to tighten the bolts. Make sure they are snug. But not too tight. Tightening too much might damage the frame. The brackets should hold the light steady. Check if the light bar wobbles. If it does, adjust the brackets. The light should stay firm even on bumpy roads.
Wiring The Light Bar
Connecting to Power Sourceis an important step. First, find the battery. It’s under the seat or hood. Use the red wire for power. Attach it to the battery’s positive terminal. Secure the black wire. It goes to the negative terminal. This helps the light bar work properly. Always ensure connections are tight. Loose wires can cause problems.
Routing the Wiresis like making a path. Keep wires away from hot parts. This prevents damage. Use zip ties to hold wires in place. They keep wires neat. Follow the vehicle’s frame for guidance. Make sure wires do not hang loose. Check for sharp edges. They can cut wires. A safe path keeps the lights bright.
Testing The Installation
Check the light bar installation by turning it on and verifying proper illumination. Ensure all connections are secure and no wires are exposed. Test the light in different conditions to confirm it functions correctly on your Polaris Ranger.
Checking Connections
Start by inspecting the connections. Ensure all wires are secure. Loose wires can cause problems. Check the battery connection. Make sure it’s tight. Examine the switch. It should be firm. Test the light bar. Turn it on. Look for any flickering. Flickering means a bad connection. Inspect the fuses. Replace any blown fuses. Use a multimeter. Check for voltage. Low voltage may mean a faulty wire.
Adjusting The Beam
Position the light bar correctly. It should not blind others. Aim it slightly downward. Check the beam pattern. Ensure it covers the needed area. Adjust the angle if necessary. Use the mounting brackets. Tighten the bolts firmly. Avoid over-tightening. Over-tightening can cause damage. Test the beam at night. Make sure it lights the path. Adjust if the beam is too high or low.
Maintenance Tips
Installing a light bar on your Polaris Ranger enhances visibility during nighttime rides. Begin by selecting a compatible light bar and gather necessary tools. Securely mount the light bar onto the roof or bumper, connecting it to the electrical system.
Ensure all connections are tight to prevent vibrations.
Regular Inspections
Check the light bar often. Look for loose wires or screws. Make sure the lights are bright. If a light is dim, it might need fixing. Inspect for dirt and rust. Both can harm the light bar. Fix any issues quickly. This keeps the light bar working well. Regular checks make sure it lasts longer.
Cleaning The Light Bar
Clean the light bar gently. Use a soft cloth. Avoid harsh cleaners. They might damage the light. Wipe away dirt and dust. This keeps the light bar shiny. Also, check the lens for scratches. Fix them to keep the light clear. Clean often for best results. Regular cleaning helps the light shine bright.
Credit: www.everythingpolarisranger.com
Conclusion
Installing a light bar on your Polaris Ranger is easy. Follow the steps carefully. First, gather all necessary tools and materials. Then, mount the light bar securely. Make sure it’s aligned properly. Connect the wiring harness. Ensure all connections are tight.
Test the light bar to confirm it works. Adjust the beam angle if needed. This upgrade improves visibility and safety. It’s perfect for night rides or dark trails. Enjoy enhanced lighting on your adventures. Now, you’re ready to explore with confidence.
Happy riding!