Removing a ball joint from a vehicle is essential for maintaining proper suspension and steering function.
By following the correct procedure, you can ensure the safety and performance of your vehicle on the road.
It’s important to use the right tools and techniques to remove and replace a ball joint, so let’s explore the process in more detail to help you accomplish this task efficiently and effectively.
How To Remove A Upper Ball Joint
When it comes to removing an upper ball joint, there are several important steps to follow to ensure a successful process.
Here’s a straightforward guide to help you remove an upper ball joint effectively.
Steps For Removing An Upper Ball Joint:
- Loosen the Ball Joint Nut: Start by using a wrench to loosen the ball joint nut. Make sure to apply steady pressure while turning the nut counterclockwise until it is completely removed.
- Separate the Ball Joint from the Control Arm: Use a ball joint separator or a pickle fork to separate the ball joint from the control arm. Insert the separator between the ball joint and control arm and apply force to separate the two components.
- Remove the Ball Joint Assembly: After successfully separating the ball joint from the control arm, carefully remove the ball joint assembly by pulling it out of its housing.
- Inspect and Clean the Mounting Surface: Before installing the new ball joint, thoroughly inspect and clean the mounting surface to ensure that the new ball joint will fit securely in place.
- Install the New Ball Joint: Carefully align the new ball joint with the mounting surface and insert it into position. Then, fasten the ball joint nut securely in place using a wrench.
By following these steps, you can successfully remove an upper ball joint and prepare for the installation of a new one.
How To Remove A Lower Ball Joint
Removing a lower ball joint can be a challenging task, but with the right tools and techniques, it can be done efficiently.
Here, we’ll guide you through the process of removing a lower ball joint step by step.
Tools And Equipment Required:
- Floor jack: To lift the vehicle securely.
- Jack stands: For extra safety and support.
- Wrench set: To remove various fasteners.
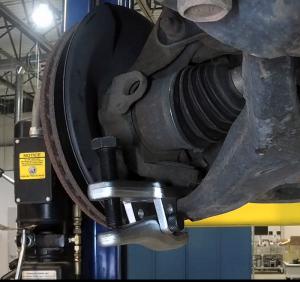
- Ball joint separator tool: Essential for separating the ball joint from the control arm.
- Ball joint press tool: Needed to press out the old ball joint.
- Hammer: For tapping and loosening stubborn components.
Step-by-step Guide:
- Lift the vehicle: Use the floor jack to raise the vehicle and support it securely with jack stands.
- Remove the wheel: Loosen the lug nuts, lift the vehicle, and remove the wheel.
- Disconnect the ball joint: Use the ball joint separator tool to disconnect the ball joint from the control arm.
- Support the control arm: Secure the control arm with a jack or jack stand to prevent it from dropping suddenly.
- Remove the fasteners: Use the appropriate wrench to remove any fasteners securing the ball joint to the control arm or steering knuckle.
- Press out the ball joint: Utilize the ball joint press tool to press out the old ball joint from its mounting location.
- Clean the mounting location: Clean the mounting area thoroughly to prepare for the installation of the new ball joint.
- Install the new ball joint: Press the new ball joint into place using the ball joint press tool.
- Reassemble and test: Reassemble all components in the reverse order of removal and ensure the ball joint is secure.
By following these steps and using the necessary tools, you can safely and effectively remove a lower ball joint from your vehicle.
Remember, proper maintenance and installation are essential for smooth and safe operation of your vehicle.
How To Remove Ball Joint Without Tool
- Use a large hammer: By striking the control arm near the ball joint, you can dislodge the joint from its mount.
- Apply heat: Using a torch to heat the area around the ball joint can help loosen it and make removal easier.
- Utilize a pickle fork: Inserting the fork between the control arm and the ball joint can provide leverage for removal.
- Use a sturdy lever: By placing a long, sturdy lever underneath the joint and applying pressure, you may be able to pop it out.
Methods For Removing A Ball Joint Without A Tool
When it’s necessary to remove a ball joint without a specialized tool, there are a few alternative methods that can be effective.
- Start by assessing the condition of the ball joint and control arm to determine the best approach for removal.
- If the joint is stuck, try using a large hammer to dislodge it from its mount or apply heat to the surrounding area to loosen the joint.
- Another option is to use a pickle fork to create leverage between the control arm and the ball joint and force the joint out of its housing.
- Alternatively, a sturdy lever placed underneath the joint and applying pressure can also assist in popping it out.
Remember, patience and caution are key when attempting to remove a ball joint without a specialized tool.
How To Remove Ball Joint From Control Arm
Removing a ball joint from a control arm is a crucial step in many automotive repair and maintenance tasks.
Here, we’ll explore the process of removing a ball joint from a control arm, providing you with clear and actionable steps to ensure a smooth and effective removal.
Step-by-step Guide For Removing Ball Joint From Control Arm
- Safety Precautions:
- Before beginning the removal process, ensure the vehicle is securely supported on jack stands, and the wheels are chocked to prevent any movement.
- Removing the Control Arm from the Vehicle:
- Start by removing the fasteners securing the control arm to the vehicle’s frame and suspension components.
- Gently lower the arm and detach any additional connections, such as the sway bar link or the tie rod end.
- Extracting the Ball Joint from the Control Arm:
- Utilize a ball joint separator tool to disconnect the ball joint from the control arm, providing gentle force to release the joint.
- If required, employ a suitable press tool to press out the ball joint from the control arm.
- Cleaning and Inspection:
- Thoroughly clean the control arm and inspect it for any signs of wear, damage, or corrosion.
- Check the ball joint for excessive play, worn-out components, or signs of failure.
By carefully following these steps, you can safely and efficiently remove a ball joint from a control arm, facilitating the replacement or maintenance required. Always exercise caution when working on automotive components and consult the vehicle’s service manual for specific instructions.
Tips For A Smooth Removal Process
- Apply penetrating oil to the ball joint and control arm connection to help loosen any rust or debris.
- Utilize appropriate safety equipment, including eye protection and gloves, during the removal process to prevent injury.
- Take time to inspect the control arm and other related components for any additional signs of wear or damage.
Equipped with these insights, you can confidently embark on the removal of a ball joint from a control arm, ensuring a successful and seamless process that upholds safety and precision.
Credit: www.delphiautoparts.com
Conclusion
Removing a ball joint requires patience, the right tools, and attention to detail. A careful step-by-step approach is essential to ensure the job is done correctly.
By following the tips and methods outlined in this guide, you can efficiently remove a ball joint and maintain the safety and integrity of your vehicle.