
A leaking power steering hose can make steering feel stiff and dangerous. If you notice fluid pooling under your car or a whining pump, you’re probably wondering how to replace a power steering hose. In our research, a cracked hose often fails after 60,000 mi, and SAE J189 requires a pressure rating of 1,500 psi.
Let’s walk through the safest way to fix it yourself.
The pressure hose must handle up to 1,500 psi and temperatures from, 40 °C to +120 °C, so using the correct replacement is critical. Per manufacturer specs, torque the hose clamps to 8, 10 Nm to avoid re‑leaks. If you follow these steps, you’ll restore steering feel and avoid costly pump replacement as of 2026.
How to Replace a Power Steering Hose
Replace the hose by relieving system pressure, disconnecting the old hose, installing the new one, and bleeding air from the steering. Use a wrench to loosen clamps, then secure the new hose with the specified torque. Check for leaks after refilling with the correct fluid.
Problem & When to Replace a Power Steering Hose
How to spot a failing hose
Look for fluid stains on the engine bay floor, a hissing sound near the pump, or a steering wheel that feels heavy at low speeds. If the reservoir level drops repeatedly, the hose is likely the source. A visual crack or bulge in the rubber is a clear sign to replace it now.
Why a leak is a safety issue
A loss of power assist can make steering require full driver effort, increasing stopping distance in emergencies. According to NHTSA steering safety, a sudden loss of assist has been linked to higher crash risk. Replacing the hose promptly restores the hydraulic assist and keeps the vehicle safe.
Core Explanation & What You’re Dealing With
How the power steering system basics
The system uses a pump driven by the engine to push fluid through a high‑pressure hose to the steering gear, then returns through a low‑pressure hose. The pressure hose carries fluid at up to 1,500 psi, while the return hose handles cooler, lower‑pressure fluid. Understanding this flow helps you locate the hose and avoid mixing them up.
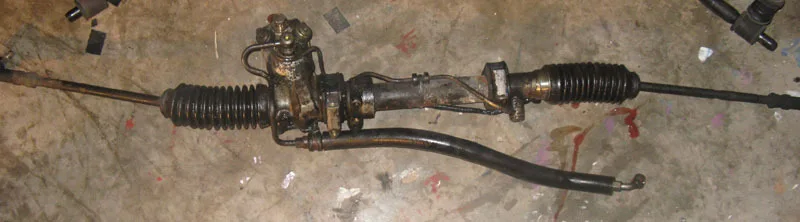
Image source: Wikimedia Commons / l0lnix (CC BY)
Hose specifications you need to know
| Specification | Typical Value | Why it matters |
|---|---|---|
| Pressure rating | 1,500 psi (SAE J189) | Prevents bursting under load |
| Temperature range | –40 °C to +120 °C | Ensures durability in all climates |
| Inner diameter | 0.75 in (19 mm) | Matches pump and gear ports |
| Torque for clamps | 8–10 Nm | Secures hose without crushing |
Choosing a hose that meets these specs ensures reliable operation. If you pick a low‑pressure return hose for the high‑pressure line, the pump will work harder and may fail quickly. Always verify the part number against your vehicle’s service manual.
Step-by-Step Process: Replace the Hose Safely
Safety prep and pressure relief
Park on a level surface, engage the parking brake, and disconnect the battery to avoid electrical shorts. Turn the steering wheel lock‑to‑lock with the engine off to relieve hydraulic pressure. Place a catch pan under the reservoir to collect fluid.
| Tool / Material | Typical Source |
|---|---|
| 8 mm socket or wrench | Any auto parts store |
| New power steering hose (OEM or high‑pressure aftermarket) | Dealer or online retailer |
| Power steering fluid (ATF Dexron III) | How To Add Transmission Fluid To A 2014 Ford Focus |
| Torque wrench (8–10 Nm) | Home garage kit |
| Safety glasses, gloves | Personal protective equipment |
Remove the old hose
Loosen the clamp at the pump outlet with an 8 mm socket, then pull the hose straight off to avoid damaging the barb. Do the same at the steering gear connection. Inspect the fittings for wear; if they’re corroded, replace them before installing the new hose.
Install the new hose
Slide the new hose onto the pump outlet, align the banjo bolt or barb, and hand‑tighten the clamp. Repeat at the steering gear. Using a torque wrench, tighten each clamp to the manufacturer’s 8, 10 Nm spec.
Double‑check that the hose routing matches the original, avoid sharp bends that could kink the hose.
Bleed the system and verify
Start the engine and turn the steering wheel slowly left and right to push air out of the system. Watch the reservoir; add fluid as needed to keep it at the “cold” level. After a few minutes, check all connections for drips.
If the steering feels smooth and no leaks appear, you’re done.
Common Mistakes & How to Avoid Them
Over‑tightening clamps
If you use a pipe wrench instead of a torque wrench, the clamp can crush the hose, causing a new leak. Always use the specified torque and a calibrated tool.
Using the wrong fluid
Mixing ATF Dexron III with the wrong type can degrade seals and pump components. Stick to the fluid recommended in your service manual for best longevity.
Skipping the pressure‑relief step
Failing to turn the steering wheel lock‑to‑lock can leave high pressure in the hose, making removal dangerous and possibly spraying fluid. Always relieve pressure before disconnecting any hose.
Forgetting to bleed air
Air in the steering system can cause a spongy feel and uneven assist. After installation, run the engine and steer back and forth to purge air completely.
Frequently Asked Questions
Do I need special tools?
A basic 8 mm socket and a torque wrench are enough for most cars. If your vehicle uses a banjo bolt, a socket set with a swivel will help.
Can I repair a cracked hose?
No. A cracked hose cannot be safely repaired; the pressure will find the weak spot again. Replace the hose with a new one that meets SAE J189.
How often should I inspect the hoses?
Check the hoses every 60,000 mi or at least once a year. Look for cracks, bulges, and loose clamps during routine maintenance.
What fluid should I use after replacement?
Use the fluid specified in your owner’s manual, typically ATF Dexron III. If you’re unsure, consult the service manual or a dealer for the exact type.
