
Replacing an EGR valve restores engine smoothness and keeps emissions in check. If you're wondering how to replace an EGR valve, this guide walks you through the process step by step. We'll cover diagnosis, part selection, and the exact procedure you need.
Per SAE J1349, the valve should be torqued to 8 to 10 Nm to avoid intake manifold damage. As of 2026 most manufacturers specify this range for both vacuum and electric designs. Below is the concise answer to that exact question.
How to Replace an EGR Valve
Disconnect the battery and locate the EGR valve on the intake manifold.
Remove the vacuum line, unbolt the valve, and clean the mating surface.
Install the new valve with the correct gasket and torque bolts to 8 to 10 Nm.
Clear OBD II codes, start the engine, and verify smooth operation.
Problem & When to Replace an EGR Valve
The EGR valve controls exhaust gas recirculation to lower NOx emissions and keep the engine running smoothly. When it fails, you’ll notice rough idle, reduced fuel economy, and a check engine light.
Symptoms & Diagnostic Codes (P0401/P0402)
- Rough idle or stalling at low RPM
- Decreased fuel efficiency
- Illuminated check engine light
- Failed emissions test (P0401 or P0402)
Use an OBD scanner to confirm the exact code before proceeding. For a step‑by‑step on clearing codes, check our guide on buying an OBD scanner.
How Carbon Buildup Affects Performance
Carbon deposits can stick the valve open or closed, preventing proper flow. An open valve causes excess recirculation, leading to rough running and higher exhaust temperatures. A closed valve eliminates recirculation, raising NOx output and often triggering codes.
Regular cleaning every 30,000 miles can extend valve life.
When DIY vs Professional Service Makes Sense
- You have basic hand tools and a torque wrench
- The vehicle’s service manual is available
- You’re comfortable working under the hood
- Otherwise, a shop can handle the job in under an hour
If you’re unsure, a professional can complete the job in under an hour.
Choosing the Right EGR Valve (OEM vs Aftermarket)
Selecting the correct EGR valve ensures proper function and avoids repeat failures. OEM parts match the original design, while aftermarket units offer cost savings and often comparable quality.
Valve Types & Compatibility (vacuum, electric)
- Vacuum‑operated: uses engine vacuum, common on older models
- Electric: controlled by ECU, found on newer direct‑injection engines
- Combined: some vehicles use both, depending on operating conditions
Check the service manual for the exact configuration on your model.
Part Numbers, Torque Specs, and Gasket Materials
- Use the OEM part number from the service manual for exact fit
- Torque bolts to 8 to 10 Nm as specified by the manufacturer
- Install a new rubber gasket; avoid reusing the old one
Using the wrong torque can crack the intake manifold.
| Feature | OEM | Aftermarket |
|---|---|---|
| Valve type | Matches original (vacuum/electric) | Often universal vacuum or electric |
| Part number example | 5R3 9D475 AA (Ford) | Denso 234 5678 |
| Torque spec | 8 to 10 Nm | 8 to 10 Nm |
| Warranty | 12 months | 24 months |
| Price range | 80 to 150 dollars | 30 to 80 dollars |
If you need a scan tool, see our guide on choosing an OBD scanner for a reliable read‑out. Always verify the part number matches your VIN before ordering.
Step-by-Step Replacement Process
Follow these steps to replace the EGR valve safely and correctly. The process takes about 30 to 60 minutes for most passenger cars.
Safety Prep & Battery Disconnect
- Park on a level surface, engage the parking brake
- Disconnect the negative battery terminal to prevent electrical shorts
- Gather tools: socket set, torque wrench, hose clamp pliers, scraper
Keep the work area tidy to avoid dropping bolts into the engine.
Removing the Old Valve & Cleaning the Intake
- Loosen and remove the vacuum line; use pliers for the clamp
- Unbolt the EGR valve using the specified socket
- Remove the old gasket and scrape away carbon deposits
- Inspect the intake manifold for damage; clean with brake cleaner
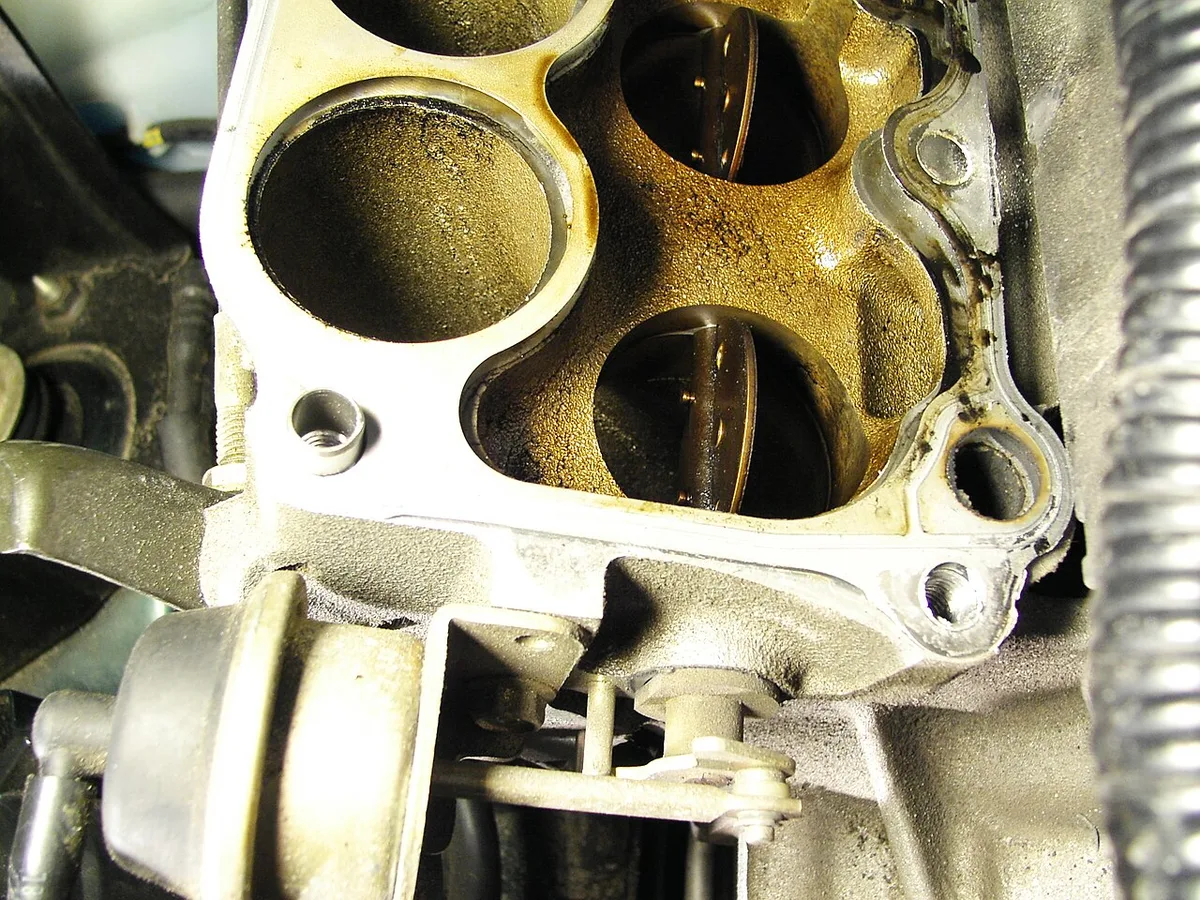
Image source: Wikimedia Commons / epinkert (CC BY)
Take a photo of the original setup for reference during reinstall.
Installing the New Valve & Verifying Seals
- Place a new rubber gasket on the manifold surface
- Position the new valve, insert bolts, and hand‑tighten
- Torque bolts sequentially to 8 to 10 Nm using a calibrated wrench
- Reconnect the vacuum line and ensure the clamp is snug
Double‑check that the vacuum line is routed the same way as before.
Post‑Install Checks, OBD‑II Clear, Test Drive
- Reconnect the negative battery terminal
- Start the engine and listen for smooth idle
- Use an OBD scanner to clear any stored codes
- Take a short drive to confirm no check engine light returns
- Verify emissions are within limits; refer to EPA emissions standards for your region
If the check engine light returns, revisit the torque and gasket seal.
If you later need to service the transmission, the process mirrors changing an automatic transmission fluid filter.
FAQs & Final Decision Guide
How much does an EGR valve replacement cost?
Parts typically range from 30 to 80 dollars for aftermarket and 80 to 150 dollars for OEM. Labor at a shop adds 100 to 150 dollars, while a DIY job costs mainly the price of the valve and a few tools. Budget around 150 to 250 dollars total for a professional service.
Can I clean the EGR valve instead of replacing it?
Cleaning works only when carbon buildup is light and the valve moves freely. SAE J1349 recommends replacement when flow is below 150 cc/min or the valve shows wear. If the valve is stuck or the gasket is damaged, replace it.
What happens if I skip EGR service?
Skipping service can raise NOx emissions, cause the catalytic converter to overheat, and lead to a failed emissions test. The check engine light will likely stay on, and fuel efficiency may drop. Address the issue promptly to avoid costly repairs.
Quick checklist before I start the job?
- Battery disconnected
- Torque wrench calibrated to 8 to 10 Nm
- New gasket on hand
- Clean intake manifold surface
- Scan tool ready to clear codes
Make sure you have a scan tool ready to clear codes. For a reliable read‑out, see our guide on buying an OBD scanner.
Final Decision: Replace or Clean?
- If the valve is stuck, the gasket is damaged, or flow is below 150 cc/min, replace it.
- If the valve moves freely and deposits are light, cleaning may restore function.
- Use the manufacturer torque spec and verify with a calibrated wrench.
- Clear OBD codes after work to confirm the system operates correctly.
Quick decision guide
- Check valve movement: if it’s rigid, replace.
- Inspect gasket for cracks: replace if damaged.
- Measure flow if possible: below 150 cc/min means replace.
- For detailed torque values, check the lug nut torque guide.
If you decide to clean, use a soft brush and brake cleaner. Avoid abrasive tools that can damage the valve seat. If you need a scan tool, read the OBD scanner buying guide.
When cleaning stubborn deposits, refer to the starter fluid article. The process mirrors changing transmission fluid. See the Ford Focus guide for similar steps.
Always keep hands off the steering wheel while working. Follow the safety tips.
Final recommendation
Replace the EGR valve when you see persistent codes or physical damage. Clean only when the valve is free and deposits are minimal. Follow the steps, clear codes, and test drive to confirm.
This approach ensures emissions compliance and engine performance.
