Replacing a taillight bulb is a simple task you can do yourself. It saves time and money.
When your taillight bulb burns out, it’s not just a nuisance; it can also be a safety hazard. Driving with a faulty taillight can lead to accidents or traffic tickets. Fortunately, you don’t need to visit a mechanic for this minor fix.
With a few basic tools and a little know-how, you can replace your taillight bulb in minutes. This guide will walk you through the process step-by-step, ensuring you get back on the road safely and legally. Let’s get started!
Tools And Materials Needed
Changing a taillight bulb requires a new bulb, screwdrivers, and gloves. A flashlight helps in low-light conditions.
Essential Tools
First, gather a screwdriver. This tool is important for removing screws. Next, get a wrench. A wrench helps in loosening bolts. Don’t forget a flashlight to see clearly. It’s useful in dark areas. Also, have a pair of gloves. They protect your hands from dirt and scratches.
Recommended Materials
Have a new taillight bulb ready. Check the car manual for the right type. Also, get some cleaning cloths. These help in cleaning the area around the bulb. You might need a small amount of lubricant. It helps in loosening tight screws or bolts. Keeping these materials handy makes the job easier.
Credit: haynes.com
Safety Precautions
Ensure the car is parked and the engine is off before starting. Use gloves to protect your hands. Avoid touching the new bulb with bare fingers.
Preparing Your Vehicle
Ensure the car is parked on a flat surface. Turn off the engine. Engage the parking brake. Check that all lights are off. This step prevents any electrical issues.
Personal Safety Tips
Wear gloves to protect your hands. Use safety glasses to guard your eyes. Avoid wet surfaces to prevent slipping. Make sure you have a clean workspace. A clutter-free area is safe.
Locate The Taillight Assembly
Find the taillight assembly at the rear of your vehicle. It is usually located in the corner of the car. Once located, you can begin the process of replacing the taillight bulb.
Referencing The Vehicle Manual
Start by checking the vehicle manual. It shows the exact location of the taillight. Manuals often have diagrams. These diagrams make it easier to find the taillight assembly. Always follow the instructions given in the manual. This helps avoid mistakes.
Identifying The Taillight Housing
Look at the back of your car. Find the taillight housing. It is usually near the rear bumper. The taillight housing is often covered by screws or bolts. Use a screwdriver or wrench to remove them. Be careful not to damage the housing.
Remove The Taillight Housing
Open the trunk or tailgate. Look for the screws around the taillight. These are usually under a cover. Use a screwdriver to remove the cover. Now you can see the screws holding the taillight. Take care not to lose the screws.
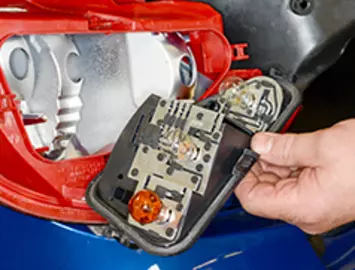
Hold the taillight firmly. Gently pull it out. Wires may still be attached. Disconnect the wires carefully. The housing should come off easily. Now you are ready to replace the bulb.
Replace The Bulb
First, find out your car’s bulb type. Check the car manual. Look for the bulb model number. You need to buy the correct one. Visit an auto parts store. Ask for help if unsure. A wrong bulb won’t fit. It may also not work properly. Be careful to get the right bulb.
Turn off the car. Open the trunk. Find the taillight assembly. Remove the screws or clips. Pull out the old bulb. Hold the new bulb by its base. Don’t touch the glass. Place it into the socket. Secure it in place. Reattach the screws or clips. Test the new bulb. Make sure it works.
Reassemble The Taillight
Secure the new bulb in the socket. Ensure the bulb fits snugly. Then, carefully reassemble the taillight assembly.
Securing The Housing
Align the taillight housing with the car body. Make sure the holes match up. Insert the screws back into their places. Tighten them with a screwdriver. Be careful not to overtighten. This can crack the plastic. Check that the housing is snug. No gaps should be visible. This keeps water out. It also ensures the taillight stays secure.
Testing The New Bulb
Start by turning on your car. Switch on the taillights. Walk to the back of the car. Check if the new bulb lights up. If it does, you’re good to go. If it doesn’t, recheck the connections. Make sure the bulb is installed correctly. Try again. Double-check all steps if needed. A working taillight is important for safety.
Common Issues And Troubleshooting
Sometimes the taillight bulb stops working. First, check if the bulb is burned out. Replace it if it is. If the new bulb doesn’t work, check the fuse box. A blown fuse can cause this issue. If the fuse is fine, check the wiring. Loose or broken wires might be the problem. Lastly, ensure the bulb socket is not corroded.
Sometimes the taillight housing does not fit well. Make sure all screws and clips are in place. If the housing is still loose, check for any broken parts. Sometimes the rubber seal can be worn out. Replace it if necessary. Ensure the housing is aligned correctly.

Credit: www.tiktok.com

Credit: www.wikihow.com
Conclusion
Replacing a taillight bulb is simple with the right steps. Follow the guide, and you’ll save time and money. Always ensure safety by turning off your car before starting. Check the new bulb works properly before driving. Keep a spare bulb in your car for emergencies.
Regular maintenance helps prevent future issues. Now, you’re ready to handle taillight bulb changes confidently. Safe driving!