Have you ever wanted to upgrade your vehicle with a light bar but felt overwhelmed by the wiring process? You’re not alone.
Many enthusiasts find themselves eager to enhance their ride but uncertain about how to connect the light bar to a toggle switch safely and efficiently. Imagine cruising down a dark road with confidence, knowing that your light bar is perfectly wired and ready to illuminate the path ahead.
That’s the power of mastering this skill. In this guide, you’ll discover a simple, step-by-step approach to wiring your light bar to a toggle switch, saving you time and preventing any costly mistakes. By the end of this article, you’ll not only have a clear understanding of the process but also the satisfaction of having done it yourself. Ready to take control of your lighting setup? Let’s dive in!
Credit: www.wolverineforums.com
Tools And Materials Needed
First, gather all the tools. You will need a toggle switch. A light bar is necessary too. Don’t forget the wiring harness. This keeps everything connected. Wire strippers are very important. They help to remove wire coverings. Electrical tape is needed for safety. It prevents wires from touching. A drill might be needed for holes. Screws will secure the light bar. Having pliers is also helpful. They help grip wires tightly. Finally, always have a multimeter. It checks if the wires are live.
Make sure all tools are in good shape. Check them before starting. This makes the job easier. It also keeps you safe. Always be careful with tools.
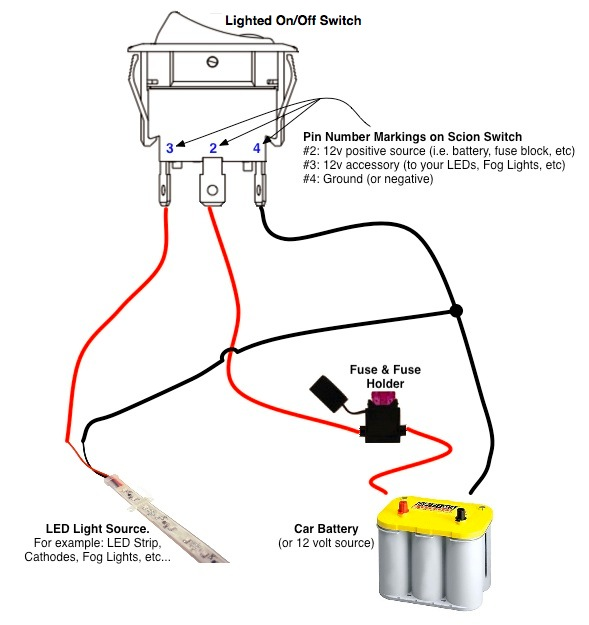
Credit: www.oznium.com
Safety Precautions
Safety is the first step in any work with electricity. Always turn off the power before starting. This prevents shocks and injuries. Wear rubber gloves for protection. They keep your hands safe. Goggles protect your eyes from sparks. Use tools with insulated handles. This prevents electric shocks. Keep the working area dry. Water and electricity are dangerous together. Check all wires and connections. Make sure they are not damaged. If unsure, ask an adult or expert for help. Safety is important for everyone.
Preparation Steps
Disconnecting the battery is crucial for safety. This prevents short circuits. Begin by locating the battery. Use a wrench to loosen the terminal. Remove the negative cable first. This prevents electrical shocks. Ensure all lights are off before starting. Keep the cables away from metal. This avoids accidental connections. Safety first. Always wear gloves. This protects your hands from electric shock.
Identifying wiring points is key. Find the light bar wires. Locate the toggle switch wires. Check the wiring diagram. This helps match the wires correctly. Use a multimeter to test connections. Ensure wires are not damaged. Look for exposed wires. Cover them with electrical tape. Keep wires organized. Use wire ties if necessary. This prevents tangling. Follow color codes for easy identification.
Installing The Toggle Switch
Select a spot where it’s easy to reach. Ensure the place is safe and away from water. Safety is very important. Check the space behind the panel. Make sure there are no wires. The spot should be clear and easy to access. This helps in easy operation of the switch.
Drill a hole for the switch. The hole should fit the switch snugly. Insert the switch into the hole. Secure it with screws or nuts. Ensure it’s tight and won’t move. Check if it works by toggling it on and off. Everything should feel firm and stable.
Wiring The Light Bar
Start by finding the right wires. Use a red wire for power. Connect it to the positive terminal on the switch. Ensure the wire is tight. Loose wires can cause problems. Next, take the black wire. Connect it to the negative terminal. This wire is essential. It helps the light work properly.
The ground wire is very important. It keeps things safe. Find the green wire. Attach it to the ground terminal on the switch. Make sure it is tight. A loose ground wire can be dangerous. Check all wires again. Ensure they are secure and in place.
Testing The Setup
Connecting a light bar to a toggle switch requires careful attention to wiring details. Begin by securing the necessary tools and materials. Follow straightforward steps to ensure a safe, functional setup. Properly test the configuration to confirm successful operation.
Reconnecting The Battery
First, connect the battery. Ensure all connections are tight. Loose connections can cause problems. Check the wires. They should not be frayed or broken. Make sure the toggle switch is off. This prevents any accidental power surge. After connecting, look for any sparks. Sparks mean a connection issue. Fix it immediately.
Ensuring Proper Functionality
Now, turn on the toggle switch. The light bar should light up. If it doesn’t, check the connections again. Ensure the switch is working. Flip it on and off. The light should respond each time. If the light flickers, there might be a loose wire. Secure all connections. Proper functionality is essential for safety. Always double-check your setup.
Troubleshooting Common Issues
Wiring a light bar to a toggle switch often faces issues like loose connections or incorrect wiring. Ensure secure connections and follow wiring diagrams for effective troubleshooting. Proper grounding is essential for safe operation.
Addressing Wiring Errors
Wiring mistakes can make lights flicker or not work. Check all connections first. Ensure wires are tight and secure. Use a multimeter to test connections. Look for loose or broken wires. If wires are damaged, replace them. Correct wiring is key to prevent errors. Make sure positive and negative wires are not mixed.
Switch Malfunction Solutions
If a toggle switch fails, first check the switch connections. Ensure they are tight. A multimeter can help test the switch. If the switch is faulty, replace it. Sometimes dirt can block the switch. Clean it gently. Check if the switch clicks properly. The switch must click when pressed. If it does not, it might be broken. Ensure the switch is the right type for the light bar.

Credit: www.silveradosierra.com
Conclusion
Wiring a light bar to a toggle switch is simple. Follow each step carefully. Ensure your tools are ready and safe to use. Double-check connections for reliability. Secure everything tightly to avoid loose wires. This process enhances your vehicle’s lighting.
It increases safety during night driving. Always test your setup before hitting the road. If unsure, seek professional help. Practice makes perfect, so don’t rush. Enjoy your newly installed light bar. Your vehicle is now ready for adventure. With patience, you’ll achieve great results.
Happy and safe driving!