
When your car’s AC stops blowing cold air, the expansion valve is often the culprit. A stuck or leaking valve changes refrigerant flow, and the symptoms are easy to spot if you know what to look for. In our research, the most common sign is low‑side pressure below 20 psi on a 75 °F day.
Per EPA Section 609 testing, a properly calibrated valve should hold superheat between 5 °F and 15 °F. If you see the evaporator icing over or the compressor cycling constantly, the valve may be stuck closed. Ignoring these signs can lead to compressor wear and higher repair bills.
5 Signs Your AC Expansion Valve Is Failing
Symptoms of a Bad Ac Expansion Valve
A bad expansion valve causes low refrigerant flow. Expect low‑side pressure under 20 psi and high superheat. Evaporator may ice, and compressor may overheat.
Replace or clean the valve to restore cooling.
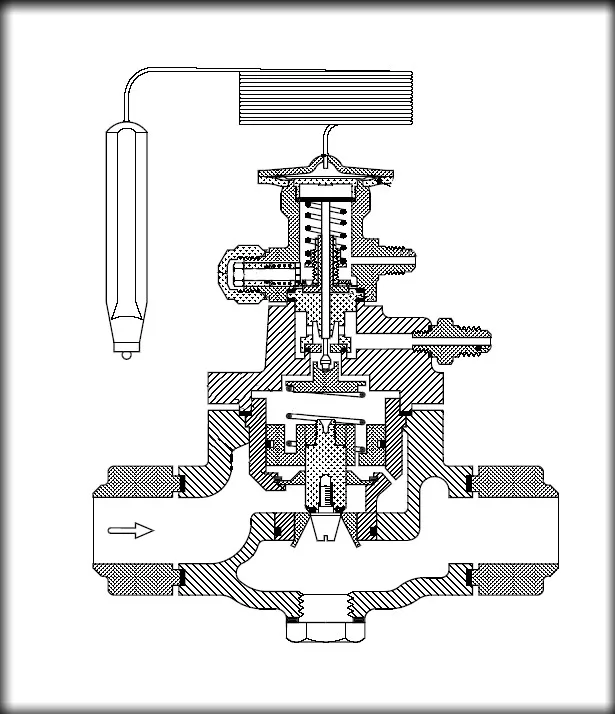
What a bad expansion valve looks like
Visual clues include corrosion on the valve body and debris in the orifice. The external equalizer port may be clogged. A cracked bulb indicates internal failure.
Use a flashlight and a mirror to inspect.
Why it matters for cooling performance
The valve controls refrigerant entering the evaporator. Too little flow raises cabin temperature. Too much flow causes pressure spikes and compressor strain.
Correct flow keeps the system efficient and protects the compressor.
Decision Tree Workflow: Symptom → Test → Action
Use this flow to match what you see to the right repair step.
1. Low‑side pressure too low
If pressure reads below 20 psi, check for leaks first. Then verify superheat; if superheat is low, the valve may be stuck open. Replace the valve or clean the orifice.
2. High superheat / evaporator icing
High superheat means the valve is restricting flow. Look for ice on the evaporator coil. Clean the valve seat or replace the valve.
Verify refrigerant level before proceeding.
3. Valve stuck open or closed
A stuck‑open valve shows excess flow and low pressure drop. A stuck‑closed valve shows no flow and high pressure on the low side. Test with a manifold gauge set.
Replace the valve if cleaning doesn’t restore normal operation.
4. Choose repair or replace
If the valve is dirty but not damaged, cleaning may work. If the seat is worn or the bulb is cracked, replace it. OEM valves often cost $30‑$80; aftermarket options are cheaper but may lack warranty.
Step‑by‑Step Diagnostic & Repair Guide
Follow these steps in order. Keep a checklist handy.
1. Gather tools and safety gear
You’ll need a manifold gauge set, digital multimeter, safety glasses, gloves, and a refrigerant recovery machine. A tightening lug nuts safely can help remove the compressor bolts. Have EPA Section 609 certification before handling refrigerant.
2. Check pressures and superheat
Connect the gauge set to the low‑side port. Record pressure and temperature. Calculate superheat by subtracting evaporator temperature from refrigerant temperature.
Compare to the 5‑15 °F target.
3. Inspect valve and system for debris
Remove the valve from the evaporator inlet. Look for metal shavings, oil, or moisture. Clean the orifice with a dedicated valve cleaning kit.
If debris is extensive, replace the valve.
4. Clean or replace the valve
For cleaning, use a solvent approved for refrigerant components. Rinse with compressed air. Reinstall the valve and torque to manufacturer spec.
If the valve is stuck or damaged, install a new one.
5. Evacuate, recharge, and verify
Evacuate the system to 29 inHg vacuum for 30 minutes. Recharge with the correct refrigerant type, R‑134a or R‑1234yf. Run the AC for 10 minutes and recheck pressures.
Adjust charge if needed.
| Item | Purpose | Typical Specs |
|---|---|---|
| Manifold gauge set | Pressure reading | 0‑300 psi range |
| Digital multimeter | Temperature & voltage | ±0.1 °F accuracy |
| Valve cleaning kit | Orifice cleaning | Solvent‑safe, 0.5‑mm brush |
| Refrigerant recovery machine | Safe removal | EPA‑approved, 95 % efficiency |
Common Mistakes & Safety Warnings
Avoiding these pitfalls keeps you safe and the repair effective.
Skipping pressure checks
If you skip pressure readings, you may misdiagnose the valve. Always record both high‑ and low‑side pressures before proceeding.
Using wrong refrigerant
Mixing R‑134a with R‑1234yf can damage the valve and compressor. Verify the vehicle’s refrigerant type in the service manual.
Ignoring EPA certification requirements
Handling refrigerant without EPA Section 609 certification is illegal and unsafe. EPA Section 609 certification is required for recovery and recharge.
Frequently Asked Questions
How do I know if the valve is stuck open versus closed?
A stuck‑open valve shows high flow and low pressure drop; a stuck‑closed valve shows no flow and high low‑side pressure. Use a manifold gauge to differentiate.
Can a bad expansion valve cause compressor damage?
Yes. Restricting flow forces the compressor to work harder, leading to overheating and premature wear. Replace the valve promptly if you suspect failure.
What’s the cost to replace a TXV in a car?
Parts typically cost $30‑$80. Labor adds 1‑2 hours at shop rates, so total expense ranges from $80 to $150 for most vehicles.
Do I need a professional, or can a DIYer handle it?
If you have EPA certification, the right tools, and comfort with refrigerant work, you can replace the valve yourself. Otherwise, a certified technician is safer and often faster.
