Imagine driving down a dark road, the night surrounding you, and the only thing guiding your way is the dim glow of your headlights. It’s not the safest situation, right?
That’s where installing a light bar behind your grille comes in. This upgrade not only enhances your vehicle’s aesthetic appeal but also significantly boosts your nighttime visibility. Curious about how you can easily install a light bar behind your grille?
You’re in the right place. This guide will walk you through the process step-by-step, ensuring you get it right the first time. Whether you’re a seasoned DIY enthusiast or a beginner looking to add a touch of flair to your vehicle, you’ll find this guide straightforward and helpful. So, why wait? Your safer, more stylish ride is just a few steps away. Dive in and discover how you can transform your driving experience today!
Credit: store.ijdmtoy.com
Tools And Materials Needed
Gather all the tools and materials before starting. A screwdriver is essential. You also need a wrench and some pliers. These tools help in loosening bolts. Keep a drill ready. It helps in making holes. Wire cutters are necessary for cutting wires. Use electrical tape to wrap wires. Ensure you have mounting brackets. They hold the light bar in place. Zip ties help in organizing wires. Gloves protect your hands. Safety goggles protect your eyes.

Credit: www.youtube.com
Choosing The Right Light Bar
Picking the best light baris important. Check the size first. It should fit behind the grille. Some light bars are too big. Measure the space before buying. Think about brightness. A bright light bar helps at night. Look at the lumensrating. Higher lumens mean brighter lights. Consider the material. Light bars made of metal last longer. Plastic ones might break.
Waterproof light bars are good. They work in rain. Check the IP rating. IP68 is very good. It means strong water resistance. Look for easy installation. Some light bars come with all needed parts. Others need extra tools. Read reviews from other people. They can help pick the best light bar.
Preparing The Vehicle
First, make sure the car is off and safe. Use a screwdriver to unscrew the grille. Keep all screws in a safe place. Gently pull the grille away from the car. Be careful not to break any clips. Handle with care to avoid damage. Once removed, set the grille aside. This makes it easy to work behind.
Clean the area behind the grille well. Use a damp cloth to wipe away dust. Remove all dirt and grease from the surface. This helps the light bar stick better. A clean surface makes the job easier. Ensure the area is dry before moving on. A clean space is key for a good install.
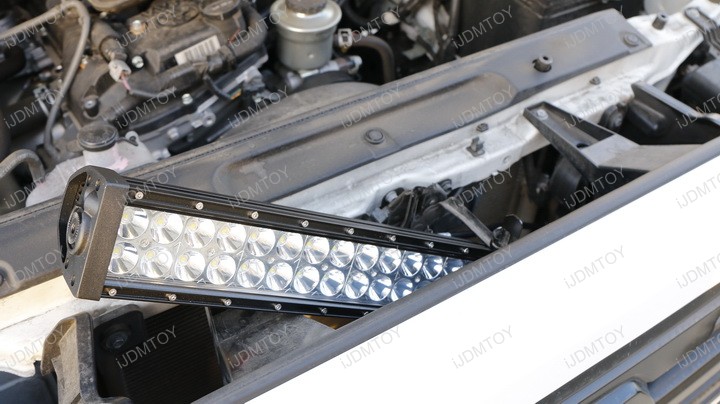
Mounting The Light Bar
Positioning the Light Baris very important. Choose a place behind the grille. Make sure it is centered. This helps light spread evenly. Avoid blocking any important car parts. Check the area for wires and pipes. They should not touch the light bar. Use a marker to note the place.
Securing the Light Baris the next step. Use brackets or screws. These hold the light bar firmly. Tighten them well. Loose screws can make the bar move. This affects light direction. Double-check the screws. Test the light bar. It should stay steady. Safety first!
Wiring The Light Bar
First, find the batteryin your car. The light bar needs power. Attach the red wireto the positive terminal. Connect the black wireto the negative terminal. This helps the light bar work. Use a fusefor safety. It protects the light bar from damage. Check all connections. Make sure they are tight and secure.
Route the wires carefully. Find a path from the battery to the grille. Avoid hot parts and moving parts. This keeps the wires safe. Use zip ties to secure them. Zip ties help wires stay in place. Check that wires are not loose. Make sure they are safe and tidy. This helps your car look neat.
Credit: store.ijdmtoy.com
Testing The Installation
Checking Light Functionality:Turn on the light bar. Check if it lights up well. Look for any flickers or dim spots. Adjust connections if needed. Ensure all wires are secure. Test the light from different angles. Make sure the brightness is even.
Ensuring Stability:Gently shake the light bar. Ensure it doesn’t move much. Tighten screws if loose. Check brackets for any shifts. Feel the stability with your hands. Make sure nothing rattles when driving. Confirm that the light bar stays firm.
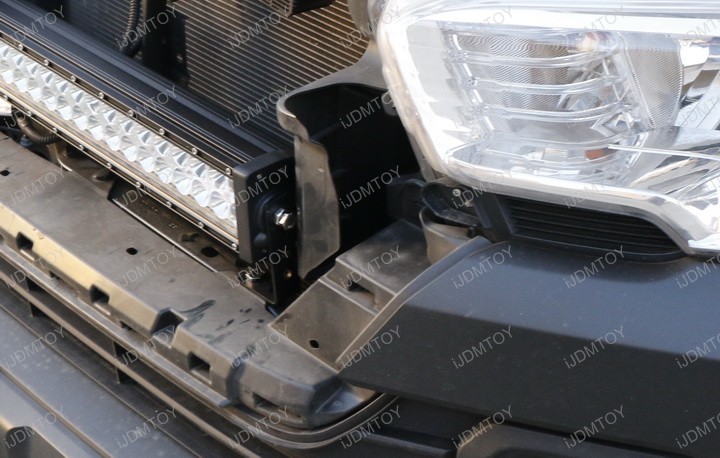
Reattaching The Grille
First, grab the grille gently and line it up with the mounting points. Make sure the holes align correctly with the screws. It’s important to keep the grille steady. Use a screwdriver to tighten the screws slowly. Check if the grille is secure and not wobbling. If it moves, adjust the screws again. Avoid overtightening, as this can cause damage. Once the grille feels firm, inspect the edges for any gaps. If gaps are present, push the grille slightly to close them. Cleaning the area before reattaching the grille helps a lot. Dust and dirt can affect the fit. Remember, a tight fit ensures the grille stays in place. A secure grille keeps the light bar protected from bumps.
Maintenance Tips
Regular inspectionkeeps your light bar safe. Check it every month. Look for loose screws and wires. Tighten them quickly if needed. Ensure the light still works. Replace broken bulbs fast.
Cleaning advicehelps your light bar shine. Dirt can block the light. Clean the light bar often. Use a soft cloth and mild soap. Avoid harsh chemicals. They can damage the cover. Rinse with clean water. Dry it with a soft towel.
Conclusion
Installing a light bar behind your grille is simpler than it seems. With the right tools, you can achieve a sleek look. Follow each step carefully to ensure safety and precision. Always double-check your connections for a secure fit. This project not only enhances your vehicle’s appearance but also boosts visibility.
Remember, patience is key to success. Gather your tools, follow the guide, and transform your ride. Enjoy the improved lighting during your drives. Stay safe and enjoy your new vehicle upgrade. Happy driving!