
That clunk over the speed bump has a name, and it's usually a tired sway bar end link. Learning how to replace sway bar end links is one of the better first suspension jobs you can take on. The parts are cheap, the tools are basic, and most cars leave you plenty of room to work.
The catch is that this job splits into two very different days depending on rust. Manufacturer service data puts link-to-bar torque somewhere in the 35 to 85 Nm range (roughly 26 to 63 lb-ft), yet corrosion decides whether you're done in 20 minutes or stuck for three hours. Here's how to work out which version of the job is waiting for you.
How to Replace Sway Bar End Links
Here's how to replace sway bar end links in five steps. Crack the nuts loose with the car on the ground. Raise it on jack stands, then pull the wheel.
Hold the ball stud with a hex bit and spin the nut off. Fit the new link with a fresh lock nut and torque to spec. Lower the car and road test it.
First, Confirm the Clunk Is Actually the End Link
A worn end link rattles. It rarely roars. You'll hear it over driveway aprons, speed bumps, and patchy pavement at low speed, and it often goes quiet once you're cruising.
Reproduce it first. Find a quiet street with a rough patch and roll over it at 10 to 15 mph with the windows down. A light, tinny knock from one corner points at the link.
A heavy thud that shakes the floor pan usually means something bigger.
Then run the shake test. With the car sitting on the ground, reach behind the wheel and grab the link body. Shake it hard, side to side and up and down.
Any click, slop, or visible movement at the ball socket is a fail.
Four other parts get blamed for the same noise:
- Worn sway bar bushings, which clunk in pairs over bumps
- Strut mount bearings, which creak when you turn the wheel
- Tie rod ends, which add steering vagueness along with noise
- CV joints, which click in tight, slow turns
If the link feels tight and the noise is still there, keep looking. Throwing parts at a clunk gets expensive fast, and pricier suspension parts only pay off once you've found the real fault. A failed link won't usually cause a crash, but it does change how the car behaves in a sudden lane change, which is why the defect data on suspension complaints is worth a look before a long trip.
The Four Conditions That Decide How Long This Job Takes
Two identical-looking cars can turn this into a 20-minute swap or an all-day fight. Four things decide which one you get.
Rust belt or sun belt
Cars from salted roads in the Midwest, the Northeast, Canada, the UK, and Northern Europe rarely give up their nuts without a soak. Dry-climate cars often come apart with a 17 mm wrench and zero drama.
A ball stud that spins in its socket
If the stud turns along with the nut, the joint is finished. You need a hex bit, a Torx socket, or a pass-through socket to hold it still while the nut comes off.
A hex recess that's already stripped
Rounded out before you touched it? Skip the polite approach. Reach for a nut splitter or a cutoff wheel and accept that the old link is scrap.
Suspension hanging or loaded
Most stock links install fine with the car in the air and the suspension at full droop. Poly-bushed and preloaded links often need the car sitting at ride height before the final torque. Get this wrong and the bar sits twisted at rest, which feels like a pull and wears the bushings.
If you're unsure which camp you're in, soak the hardware the night before. It costs nothing and it buys you options.
Parts, Tools, and What to Buy Before You Start
Buy both sides. A link that failed at 90,000 miles has a twin on the other corner with the same mileage. Replacing one now usually means doing the second within a year.
Three link styles cover almost everything:
- OEM-style sealed ball socket: quiet, cheap, no upkeep, the default choice
- Polyurethane-bushed: firmer, greasable, better for track use
- Spherical rod end: motorsport only, noisy on the street
Fixed-length links bolt straight in and need no alignment afterward. Adjustable links exist for lowered and corner-weighted cars, where stock lengths preload the bar.
Match the new part to the old one before anything goes back together. Check center-to-center length, thread pitch (M10×1.25 and M12×1.25 are the common sizes), and left versus right side.
| Tool | Why you need it |
|---|---|
| 6-point sockets, 14 to 19 mm | Rounded nuts start with 12-point sockets |
| Hex bit or Torx socket set | Holds the ball stud still |
| Torque wrench | 35 to 85 Nm covers most cars |
| Nut splitter or cutoff wheel | For the ones that won't move |
| Penetrating oil | Apply the night before, not five minutes before |
A pass-through socket set is the quiet hero here. It lets a wrench reach the nut while an Allen key passes through the center of the socket.
Budget matters less than you'd expect. The gap between budget and brand-name joints tends to show up around year five, not month five. And what fasteners actually cost rarely breaks anyone.
Jack stands are non-negotiable. Building your own ramps works for loaded-suspension checks, but the rules on supporting a raised vehicle are blunt for good reason.
Step-by-Step: The Straightforward Swap on a Clean Car
This is the version where everything cooperates. Budget 30 to 45 minutes per side.
- Crack the nuts loose on the ground. Wheel on, car parked, parking brake set. Breaking torque is easier with the weight of the car holding things still.
- Lift and support. Jack stands under the frame or pinch welds, chocks on the opposite axle, then pull the wheel.
- Soak and wait. A shot of penetrating oil on both nuts, then give it ten minutes to work.
- Hold the stud, turn the nut. Hex bit or Torx socket on the stud end, wrench on the nut. Steady pressure beats a jerk every time.
- Push the link free. It may need a light pry once the nuts are off. Watch the brake hose and the ABS wire.
- Clean the eyes. Wire brush the mounting holes and check for elongation or cracks.
- Fit the new link. Fresh lock nut, thread locker if the manual calls for it, stud held straight.
- Torque to spec, at ride height if the procedure says so.
- Lower the car, bounce the suspension, then road test.
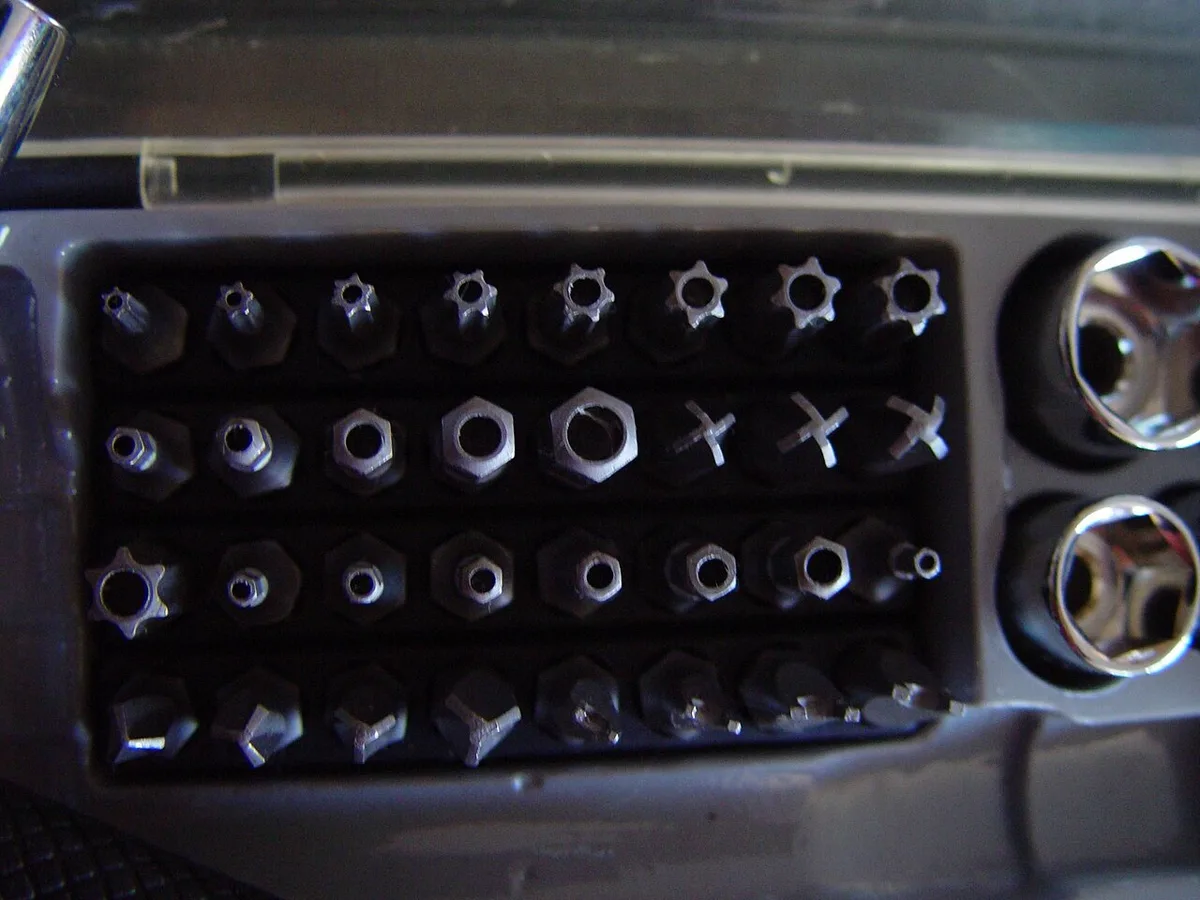
Image source: Wikimedia Commons / Leon Brooks
That recess in the stud end is the whole trick. It's a 5 or 6 mm hex on most cars, sometimes a T40 or T45 Torx. If it's packed with rust, clean it out with a pick before you push the bit in.
Recheck torque after 50 to 100 miles. New joints settle, and a nut that felt perfect in the driveway can loosen on the road.
When It Fights Back: Seized Nuts, Spinning Studs, and Stripped Hex Keys
The nut won't budge
Heat wins, not leverage. A propane torch on the nut for 20 to 30 seconds breaks the corrosion bond. Keep the flame clear of brake hoses, CV boots, fuel lines, and undercoating.
No torch on hand? A nut splitter cracks the nut off in seconds. A cutoff wheel through the stud, between the nut and the bar, works too.
You're replacing the link anyway, so destruction is a valid strategy.
The stud spins in its socket
Clamp the stud shoulder with locking pliers if the hex is gone. Better still, use a pass-through socket so the Allen key reaches the stud while the socket turns the nut. If neither trick holds, cut it off.
The hex recess is rounded out
Hammer a slightly larger Torx bit into the hole for grip. If that fails, cut the nut. Don't burn an hour fighting a cheap fastener.
The new link won't line up
Something is loaded. If the bar is bound up, raise or lower the suspension until the eyes line up. Never force the stud in at an angle, because you'll tear the boot before the nut even starts.
Power tools earn their keep on the easy ones. Just keep them off the new studs, since spinning fasteners with power tools can cook a fresh grease seal before the car ever leaves the driveway.
Torque, Ride Height, and the Mistakes That Break New Parts
Almost every new link that fails early dies from installer error. These four mistakes cover most of it.
- Overtightening the stud. The torque figure applies to the nut, and the stud just needs holding. Hex bit in the recess, torque wrench on the nut, stop at spec. Most passenger cars land between 35 and 85 Nm, which is 26 to 63 lb-ft. Confirm yours in the factory manual, because guessing here snaps studs.
- Reusing the old lock nut. A nylon-insert nut holds once. The insert deforms on first use, so a second run can back off under vibration. New links usually ship with fresh nuts. If yours didn't, buy a pair.
- Torquing at the wrong ride height. Stock rubber-bushed links are forgiving either way. Poly and preloaded links want the car sitting on its wheels, because tightening at full droop locks the bushing in a twist.
- Preloading an adjustable link. Set the length with the car at ride height, then tighten the jam nuts. A link that's too short or too long pulls on the bar at rest, and you'll feel it as a wander or a steady pull.
Safety stays simple. Jack stands under the frame, chocks on the opposite axle, glasses on when you cut or split a nut. Heat travels further than you think, so keep a torch clear of brake hoses and CV boots.
The bar also stores energy, so don't let it snap back at your knuckles when that second nut lets go.
What It Costs, DIY vs Shop, and When to Replace Both Sides
Prices move by region, but the gap between doing it yourself and paying someone stays wide.
| Route | Typical cost per axle |
|---|---|
| Two links, DIY | $30 to $120 in parts |
| Independent shop | $150 to $250 with labor |
| Dealer | $250 to $350 with labor |
As of 2026, parts pricing hasn't shifted much: $15 to $60 per link, with greasable and poly versions at the top. Labor bills at roughly 0.5 to 1.5 hours per side, and salt-belt cars always land at the top of that range.
Do both sides. The second link has the same mileage, the same salt exposure, and the same fatigue cycles. A pair costs less than a second teardown later, and dealer counters tend to mark up small parts far harder than online sellers do.
Add the bar bushings while you're under there if they're original and past 100,000 miles. They run $15 to $40 a pair, take ten minutes with the bar unloaded, and make a noise that's nearly identical to a failing link.
Skip the alignment on fixed-length links. Nothing in the geometry changes, because the link doesn't set camber, caster, or toe. Adjustable links are the exception: any length change moves the bar and can shift corner weights, so get the car measured afterward.
Frequently Asked Questions
Do I have to replace both sides at once?
No, but it's the smarter move. Both links see the same road salt, the same potholes, and the same mileage. The second one is usually close behind the first, and a pair costs barely more than a single link plus a second round of labor.
Can I drive with a broken sway bar link?
Usually yes, carefully. The car won't fall apart, but body roll increases and the front end feels vague in quick direction changes. Treat it as a short-term fix.
Some state inspection programs and the UK MOT will fail a car with a broken or heavily worn link.
How do I know if it's the links or the bar bushings?
Shake the bar itself where it passes through its bracket. Movement or knocking there means bushings, not links. Links tend to knock on one corner over bumps, while worn bushings often clunk on both sides at once and sound louder over slow, uneven ground.
Why did my new link start clunking a month later?
Most likely a loose nut or a torn boot. Recheck torque at both ends, look for grease weeping out of the socket, and confirm the link was the actual source of the noise. A strut mount bearing or a tie rod end can mimic a link perfectly and survive the repair untouched.
