
Most people ask how to check a timing belt only after something already feels off. Maybe the car cranks and won't fire, maybe a shop used the word "cambelt," or maybe you bought a used car with a folder full of nothing. Whatever brought you here, the inspection itself is the easy part.
The hard part is knowing which engine you're actually standing in front of.
Manufacturer schedules commonly put the first belt service somewhere between 60,000 and 105,000 miles, or 5 to 10 years, whichever lands first. That spread tells you plenty. There's no universal number, and belt suppliers point out that rubber ages from heat, ozone, and oil exposure, not just mileage.
So before you look at any belt, you need to know whether your engine even has one.
How to Check a Timing Belt
To check a timing belt, first confirm your engine actually uses one. Then locate the timing cover and any inspection access panel. Look for cracks, glazing, frayed edges, or missing teeth.
Check the tensioner for play and watch for oil or coolant leaks. If the belt is past its interval, replace it rather than inspect it.
Why a Timing Belt Check Starts With Your Engine, Not the Belt
Plenty of people go looking for a timing belt and end up staring at a serpentine belt instead. It's an honest mistake. The serpentine belt is right there on the front of the engine, easy to see, easy to touch, and it drives the alternator, power steering pump, and air conditioning compressor.
The timing belt lives behind a cover. It drives the camshaft, and on many engines it also spins the water pump. If it's there at all, it's the part holding your valves in sync with your pistons.
That's the whole reason the check matters.
Pull up the maintenance schedule in your owner's manual before you touch anything. The schedule tells you three things at once: whether you have a belt, roughly when it's due, and whether the manufacturer treats your driving as normal or severe service. Those three facts decide everything that follows.
Here's the fork in the road, laid out plainly.
| Engine setup | What drives the camshaft | Typical inspection access | What "checking" really means |
|---|---|---|---|
| Dry timing belt | Toothed rubber belt behind a cover | None, or a small access plug | Cover off, or partial disassembly |
| Timing chain | Steel chain fed by engine oil | None | Oil changes and listening, not visual |
| Wet timing belt | Toothed belt running in engine oil | None | Oil condition checks and interval discipline |
Now the if/then logic that follows from it.
- If your manual says "timing chain," stop hunting for a belt. Your job becomes oil changes on time and listening for a cold-start rattle.
- If it says "timing belt" and gives an interval, you have a service item with a deadline and a real failure cost.
- If it says "wet belt," "belt in oil," or "belt drive in oil," your check is mostly about oil quality and interval discipline, not the belt face.
- If the manual is missing or vague, decode the engine first. Guessing here is expensive.
One more thing worth separating early. A timing belt check is not a no-start diagnosis. If the engine spins freely and never fires, that's a different path, and a crank with no fire usually points at spark, fuel, or compression before it points at the belt.
A snapped belt does cause a no-start, but so do a dozen cheaper things. Confirm the basics before you start pulling covers.
Belt, Chain, or Wet Belt: Identifying What's Actually Under the Cover
This is the step most guides skip, and it's the one that saves you money. Three engines can look nearly identical from above and need three completely different approaches.
Reading your VIN, engine code, and owner's manual
Start with the manual's maintenance section, not the engine bay. Manufacturers list the camshaft drive type right next to the service interval, and many print a separate severe-service column for people who idle a lot or tow.
If the manual is gone, work through these in order.
- Owner's manual or online owner portal. Most brands publish the maintenance schedule digitally now, and several let you pull it by VIN.
- VIN decode. The 17-character VIN identifies year, make, model, and often the engine family. The NHTSA VIN lookup is free and also surfaces open safety recalls, which matters because some belt and wet-belt defects have been handled as recalls or extended warranties.
- Engine code. Stamped or stickered on the block, the timing cover, or the emissions label under the hood. This is the number a parts counter needs, and it's the number that tells you which belt, tensioner, and kit fit.
- Dealer parts desk. Give them the VIN and ask two questions: does this engine use a belt, and is the belt driven in oil? They answer this daily.
- Technical service bulletins. Manufacturers publish TSBs for belt noise, wet-belt degradation, and revised intervals. These are worth checking before you trust a decade-old forum post.
One caution on VIN decoding. The VIN tells you the engine family, not always the exact build variation. When a model year ran two different engines, confirm with the engine code or the dealer.
Signs you have a chain instead (and can stop worrying about a belt interval)
Chain engines don't have a belt interval, so the whole inspection question changes. Here's what points to a chain.
- No belt replacement line anywhere in the maintenance schedule, even at high mileage.
- A sealed metal front cover rather than a plastic belt cover with visible fasteners.
- A cold-start rattle that fades after a few seconds. That's chain and tensioner noise, not belt noise.
- The engine family is widely documented as chain-driven in factory service literature.
A scan tool won't tell you what drives the cam, but pulling the stored fault codes is still useful. Cam and crank correlation codes, misfire codes, and variable valve timing faults can all point at a stretched chain or a belt that's jumped a tooth.
Here's how the three setups compare in practical terms.
| Property | Dry timing belt | Timing chain | Wet timing belt |
|---|---|---|---|
| Typical first service | 60,000 to 105,000 miles or 5 to 10 years | No scheduled replacement | Often 100,000 to 150,000 miles or 10 years |
| Noise signature | Quiet until it fails | Rattle on cold start when worn | Quiet |
| What kills it | Age, heat, oil contamination, tensioner wear | Sludge, infrequent oil changes, tensioner wear | Degraded oil, fiber shedding, sludge |
| Failure mode | Snaps or strips teeth | Stretches, jumps timing, or breaks guides | Delaminates and sheds material into the oil |
| Inspection without disassembly | Limited to none | None | None |
That last row is the honest part. In most modern engine bays, a true visual check requires removing something. We'll get to exactly how much.
Interference vs. Free-Running: The One Fact That Sets Your Stakes
An interference engine has valves and pistons that occupy the same space at different times. The belt keeps them from meeting. If the belt lets go while the engine is running, pistons hit valves, and the repair bill jumps from maintenance money to engine money.
A free-running, or non-interference, engine has enough clearance that a snapped belt usually just leaves you stranded. You buy a belt, a tow, and some lost time. No bent valves.
| Engine type | What happens if the belt fails | Typical outcome | Emotional cost |
|---|---|---|---|
| Interference | Valves contact pistons | Bent valves, damaged head, sometimes piston damage | Cheap job becomes engine job |
| Free-running | Cam stops, valves park clear | Engine quits and coasts to a stop | Inconvenience and a tow |
| Unknown | Assume interference | Treat as urgent | Anxiety until confirmed |
Treat an unknown engine as interference until a factory source says otherwise. That's not paranoia. Most overhead-cam belt engines built in the last three decades are interference designs, because the same tight combustion chamber geometry that helps efficiency and emissions also removes valve clearance.
How do you confirm yours? Use factory-grade sources, in this order.
- The OEM service manual, which usually states valve-to-piston clearance or flags the engine as interference.
- Manufacturer TSBs and dealer service information systems.
- Belt manufacturer catalogs, which often list interference status alongside the application.
- The dealer parts or service desk, asked directly.
Forum "interference engine lists" are the weakest link in that chain. They're often years out of date, they mix up engine codes, and they rarely cite anything. Aggregate owner reports are useful for symptoms.
They're not useful for a fact that decides whether you gamble an engine.
SAE International publishes technical standards covering belt drive systems and their testing, which is where a lot of the durability language in factory manuals originates. That's the level of source you want behind a claim this consequential.
Finding Your Real Interval: Mileage, Years, and Severe Service
Your interval is printed somewhere with your VIN attached to it. It is not a universal number, and it is not the number your neighbor quotes from a car he sold in 2011.
Published ranges cluster like this.
| Era or engine type | Commonly published first interval | Notes |
|---|---|---|
| 1990s and early 2000s belt engines | 60,000 to 90,000 miles | Shorter by modern standards, often no year limit stated |
| Mid-2000s onward belt engines | 90,000 to 105,000 miles | Many add a 6 to 10 year limit |
| Wet belts | Roughly 100,000 to 150,000 miles or 10 years | Strongly oil-change dependent, some brands have revised these downward |
| Severe service use | Subtract roughly 20 to 30 percent | Idling, short trips, heat, and towing all count |
Two rules sit above that table. Whichever comes first, mileage or time, is your deadline. And severe service shortens it, sometimes dramatically.
So what counts as severe service? Most owners assume they drive normally. Manufacturer definitions are stricter than people expect.
- Trips under about 10 miles, especially in cold weather.
- Long idle periods, including delivery, taxi, and heavy commuter use.
- Frequent trailer towing or hauling.
- Sustained high heat and dust.
- Repeated short cold starts with the engine never fully warming.
Why a low-mileage belt can still be a dead belt
This is the part that catches garage-kept cars. A 12-year-old vehicle with 48,000 miles can have a belt that's already past its safe life.
Rubber degrades from the calendar as much as the odometer. Heat cycles, ozone in the air, and any oil or coolant seepage all attack the compound. The reinforcing cords lose flexibility.
Cracks start at the tooth roots where you can't easily see them.
In our research, the pattern shows up constantly in owner reports. The car that fails is often the low-mileage weekend driver that never got a belt because "it hasn't hit the number yet." As of 2026, most manufacturers still print both a mileage and a time limit, and the time limit is the one people ignore.
If your belt is past either limit, stop reading and book the job. Inspection only makes sense while you're inside the window and have a reason to look.
Can You Even See It? Covers, Inspection Access, and What's Realistic
Straight answer: on most engines, no. Not without removing something. That's the uncomfortable fact that separates a real timing belt check from a YouTube-shaped fantasy.
Timing covers come in a few designs, and each one changes what you can honestly judge.
| Cover design | Typical access | What you can actually judge |
|---|---|---|
| Full plastic cover, no port | Cover removal only | Nothing useful from outside |
| Cover with inspection plug | Small window, one spot on the belt | Local cracks and contamination at that spot |
| Upper cover only, lower exposed | Better view of the upper run | Belt edge condition, tension, oil residue |
| Open belt drive (rare, older designs) | Full view | Full loop, tensioner, and marks |
If your engine has an inspection plug, use it properly. Pull the plug with the engine cold and off. Shine a light along the belt, not straight at it, so surface texture shows.
Then rotate the engine by hand to bring a different section into view. A belt that looks perfect in one window can be cracked two teeth over.
Getting access usually means getting under the car or leaning over a high engine bay. If you need height and don't own stands, building your own raising the front end solution is a legitimate option, provided the wood is sound and the load rating is honest. Never work under a car held only by a jack.
Here's what you can reasonably conclude without disassembly.
- Frayed or fuzzy edges. The belt is rubbing something or has started to break down. Replace it.
- Glossy, hard-looking surface. Heat and age have hardened the compound. Replace it.
- Oil or coolant residue. Something is leaking onto the belt. Fix the leak and replace the belt.
- Missing chunks or exposed cords. Stop driving it. That belt is done.
- Clean, matte, dry surface within interval. Keep monitoring at each oil change.
And here's what you cannot conclude. You can't judge tooth root cracking through a narrow window. You can't verify tensioner bearing condition by looking.
You can't check the water pump seal from above. Those need hands on parts, which means cover removal.
One warning before you get ambitious. Never run the engine with a timing cover off, and never crank it with the belt exposed. Loose sleeves, dangling cords, and fingers have no business near a rotating belt drive.
If a cover is off, the engine stays off and you rotate it by hand only.
If your plan involves pulling the crank pulley to get the lower cover off, know what you're getting into. That bolt is often torqued well past what a 1/2-inch ratchet will break loose, and a stubborn crank bolt is a job for the right tool and the right technique, not brute force on a breaker bar with the car on ramps.
There's a final honesty check worth making here. If your inspection turns up oil in places it shouldn't be, like oil fouling the plugs or residue around the cam cover, treat the leak as the real problem. A new belt over an unresolved leak is a short-lived belt.
The Serpentine Belt Check People Confuse With the Real Job
Nine times out of ten, the belt someone calls a timing belt is the accessory drive belt. It's the wide, ribbed one snaking around the front of the engine. Pop the hood and you can see it without removing anything.
That belt drives the alternator, the A/C compressor, the power steering pump, and often the water pump. It does not control valve timing. It has no relationship with the camshaft at all.
So what happens when it lets go? You lose charging, steering assist, and often coolant circulation. The engine dies or overheats, and you coast to the shoulder.
It's a bad day, not a bent-valve day.
The confusion costs people real money. Owners replace a perfectly good serpentine belt thinking they've handled their timing belt service. Then the actual timing belt fails at 110,000 miles, and the bill is ten times bigger.
Here's the two-belt comparison in plain terms.
| Feature | Serpentine belt | Timing belt |
|---|---|---|
| What it drives | Accessories (alternator, A/C, steering, sometimes water pump) | Camshaft, and often the water pump |
| Visible from above | Yes, usually | No, it sits behind a cover |
| Surface | Flat with multiple ribs | Toothed, with cogs on one side |
| Typical failure result | Dead battery, no steering, overheating | Bent valves on interference engines |
| Typical replacement cost | Low, often a DIY job | Several hundred to over a thousand dollars |
| Inspection difficulty | Easy | Cover removal on most engines |
Why does a squealing belt rarely mean the timing belt?
Timing belts don't squeal. They're toothed, they run dry behind a cover, and when they fail they fail quietly. A squeal almost always comes from the accessory belt, an idler pulley bearing, or a tensioner.
That's useful logic. If you hear a squeal on cold start that fades after thirty seconds, you're chasing a serpentine issue, not a timing belt issue. If your engine runs fine and just makes noise, the timing belt is probably not your problem yet.
A ticking or whirring from behind the timing cover is different. That's a sound worth chasing, especially if it changes with engine speed.
What to check on the accessory belt while you're already there
This takes two minutes and it genuinely matters. A shredded serpentine belt can wrap around the crank pulley on some engines. From there, strands can work under the timing cover and derail the timing belt.
That's not a theory. It shows up in manufacturer service bulletins on certain engine families. So a serpentine belt that's falling apart is a timing belt risk too.
Run through this list with the engine off and cold.
- Cracks across the ribs. Belt makers commonly publish a rule of thumb: three or more cracks within an inch of rib length means replace it.
- Glazing. A hard, shiny surface means the belt has been slipping or cooking. Grip is gone.
- Frayed edges. The belt is misaligned or rubbing. Find the cause, not just the symptom.
- Missing rib chunks. Replace immediately. This belt is about to fail.
- Rubber dust. Black powder around the pulleys means material is coming off somewhere.
- Tensioner movement. With the engine off, watch the tensioner while a helper cranks briefly. Excess bounce means a weak tensioner or a bad bearing.
- Pulley alignment. Lay a straightedge across the pulleys. Any obvious offset causes edge wear.
Now the if/then decisions that follow.
- If the serpentine belt is cracked, glazed, or frayed, replace it. It's cheap insurance and often a fifteen-minute job.
- If the serpentine belt is fine but you don't know the timing belt's history, keep reading. You still have work to do.
- If the serpentine belt has thrown ribs or wrapped around the crank, do not just fit a new belt. Pull the timing cover and check the timing belt for damage and timing position.
- If a pulley bearing is screaming, fix the bearing. A new belt on a seized idler dies fast.
One practical note on cost. Serpentine belts and their tensioners are cheap compared to timing components, which is exactly why people mistakenly assume they've done the expensive service. Keep the two jobs separate in your head and your service records.
Step-by-Step: Reading the Belt Face for Cracks, Glazing, Fraying, and Missing Teeth
This is the core of the inspection, and it's where most people look too fast. You're not checking whether the belt is black and intact. You're checking the surface texture, both edges, and the tooth roots.
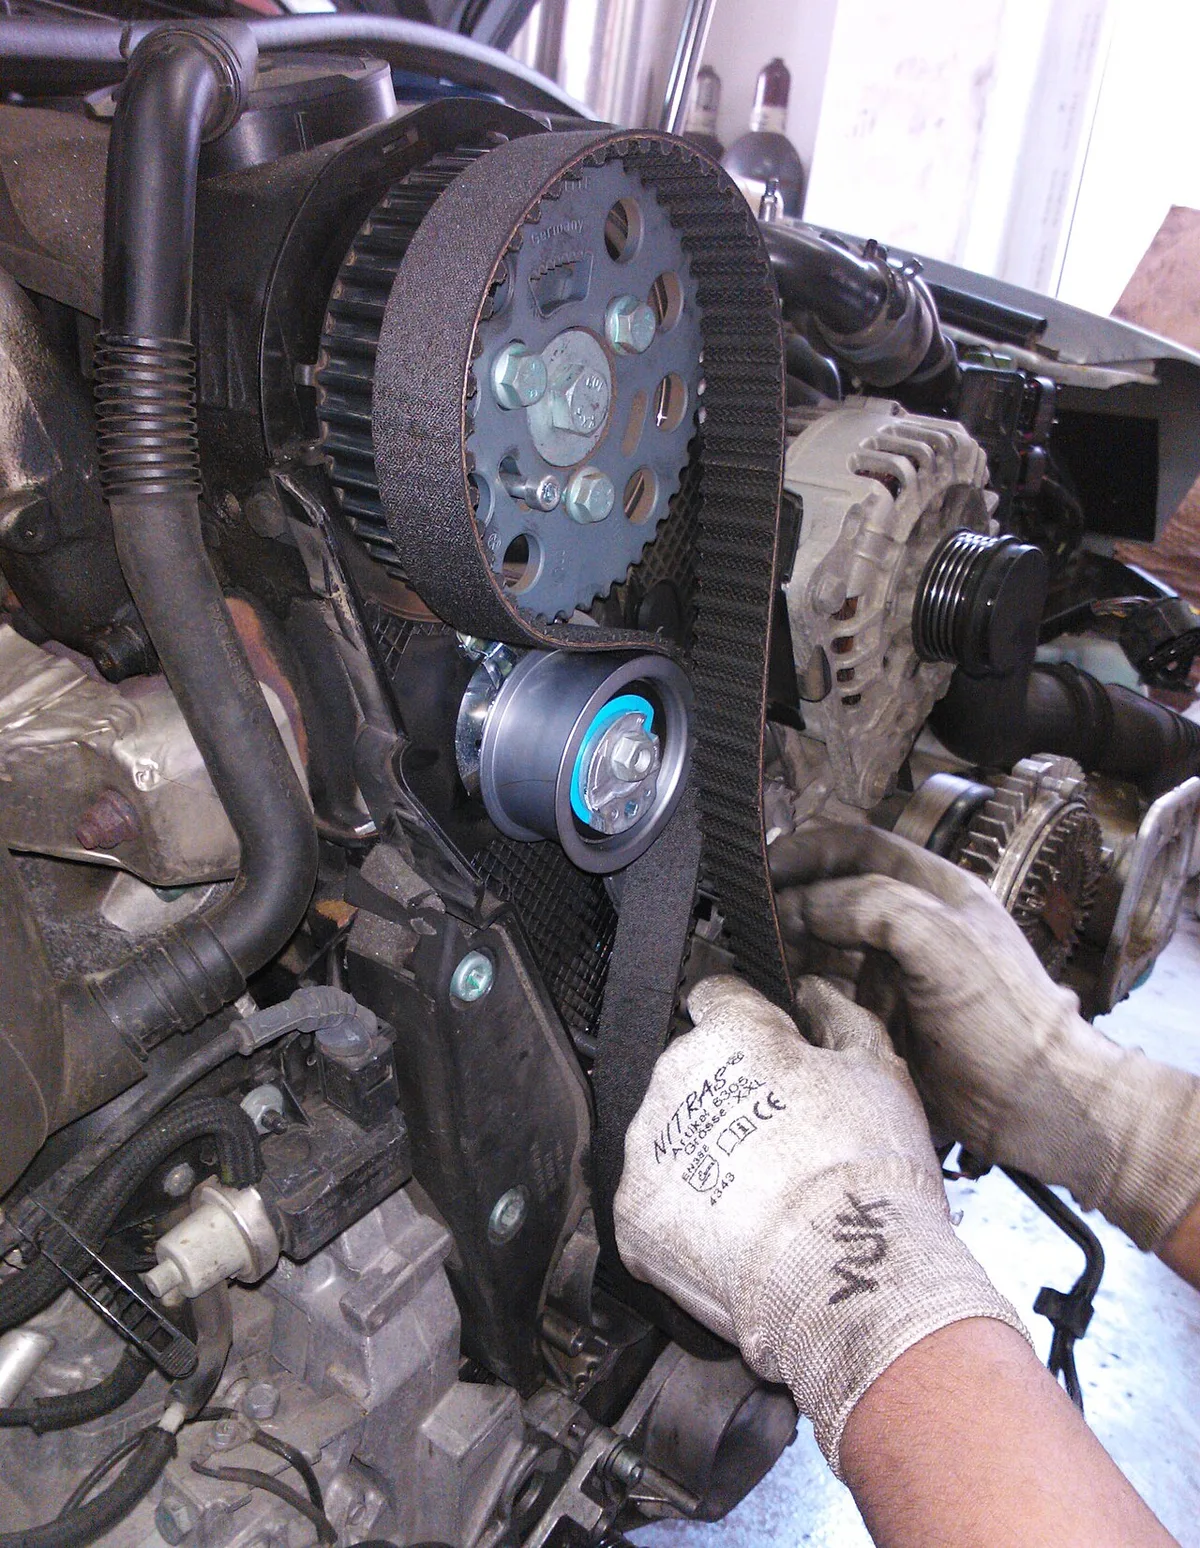
Image source: Wikimedia Commons / Petar Milošević (CC BY-SA)
Set yourself up properly before you look at anything.
| Tool or item | Why you need it | Notes |
|---|---|---|
| Bright LED penlight | Surface cracks vanish under weak light | A raking angle shows texture better than direct light |
| Phone with macro mode | Records what you saw | Useful for a second opinion or a shop quote |
| Mirror on a stick | Sees the back side and lower runs | Cheap and genuinely useful |
| Chalk or paint pen | Marks the belt so you know what you've seen | Essential for the full loop |
| Clean rag | Wipes oil residue for a clear look | Never use solvent on the belt |
| Nitrile gloves | Keeps oil off the belt and your hands clean | Skin oils are not the belt's friend |
Now the inspection itself, in order.
- Engine cold, ignition off. A warm engine means hot surfaces and a fan that can start without warning.
- Get access. Remove the inspection plug if you have one, or the upper cover if that's what your engine allows.
- Light at a low angle. Shine across the belt surface, not straight into it. Cracks show up as thin dark lines that disappear under direct light.
- Check the smooth back side. That's where glazing and heat cracking usually appear first.
- Check the tooth side. Look at the roots between the cogs, not just the cog tips. Tooth root cracking is the failure that matters most.
- Check both edges. Fraying or a polished edge means the belt is running against something or the pulleys are misaligned.
- Look for contamination. Oil sheen, coolant crust, or a wet-looking belt is a stop sign.
- Mark what you've seen and rotate. Chalk a line, turn the engine, and inspect the next section. Repeat until you're back to your mark.
Surface crazing vs. deep splits
Crazing looks like a fine network of shallow lines on the back of the belt. It's the early stage of rubber aging. It's common on a belt that's five or six years old with moderate mileage.
Deep splits are different. They open up when you flex the belt slightly, and they run into the body of the material. If you can see cord, it's past the point of debate.
Here's how to weigh the two.
- Light crazing, no cord visible, belt inside its interval: note it, check again at the next oil change, plan the replacement.
- Crazing plus a hard, glossy surface: replace it. The compound has aged out.
- Any split that opens when flexed: replace it now.
- Cracks at the tooth roots: replace it now, regardless of mileage.
- Exposed fiberglass or nylon cords: stop driving the car.
What glazing, chunking, and tooth loss actually tell you
Each of these has a cause, and the cause usually outlives the belt.
- Glazing (hard, shiny, slick surface). Heat and age have hardened the rubber, or the belt has been slipping. Check tension and check for a dragging accessory.
- Chunking (missing pieces of rib or tooth). Often contamination or a worn sprocket. A rough sprocket will chew through a new belt too.
- Tooth loss or stripped teeth. On an interference engine, this is the failure that bends valves. It's usually preceded by tooth root cracking you could have seen earlier.
- Frayed edges. Misalignment, a worn idler flange, or a bent cover rubbing the belt.
- Fuzz on the back side. The belt is rubbing the cover. Find the contact point.
Here's the verdict table we use when reading an inspection result.
| What you see | What it means | What to do |
|---|---|---|
| Matte, dry, no cracks, inside interval | Healthy belt | Recheck at each oil change |
| Light crazing only | Early aging | Plan replacement, monitor |
| Glazing or hardening | Heat or age degradation | Replace |
| Frayed edges | Misalignment or rubbing | Replace and fix the cause |
| Oil or coolant on the belt | Seal or gasket failure | Fix the leak, replace the belt |
| Missing teeth or exposed cord | Imminent or existing failure | Do not drive it, replace now |
Two things you cannot judge from a visual check, no matter how good the light is. You can't measure cord fatigue. You can't measure rubber hardness.
That's why interval matters more than appearance. A belt that looks acceptable at 95,000 miles on a 100,000-mile schedule is a belt you replace, not a belt you admire.
Rolling the Engine Over by Hand to See the Whole Loop
A timing belt is roughly three feet long. An inspection window shows you two inches. Do the math.
If you don't rotate the engine, you've inspected about five percent of the part.
Rotating by hand is simple, and it's the step people skip because it requires a socket and a bit of patience.
Do it like this.
- Kill the ignition. Key out of the ignition, or the fob well away from the car if it's a push-button setup. On some push-button ignition setups, a helper bumping the button while you're under the hood is a real risk.
- Disconnect the battery if you're going anywhere near the crank pulley or the starter circuit.
- Find the crank bolt and fit the correct socket. Use a breaker bar or a long ratchet handle for leverage, not for force.
- Turn clockwise only. Counterclockwise rotation on a tensioned belt can slacken it against the tensioner and let it jump a tooth. Some engines are more sensitive to this than others.
- Go slowly and watch the belt as it feeds around the sprockets. Watch both edges. Watch for the belt walking forward or backward on the cam sprocket.
- Chalk a reference line across the belt and a fixed point. Rotate a quarter turn, inspect, repeat.
- Turn through two full revolutions to bring every section past your eyes at least once, ideally twice.
- Feel for drag as you turn. A belt that binds or a pulley that grinds will show up in your hand before it shows up in your eyes.
If the engine is hard to turn by hand, that's normal on a high-compression engine. Removing the spark plugs makes it dramatically easier and removes the compression resistance.
Never use the tensioner bolt or a cam bolt to turn the engine. Those fasteners are not designed as turning points, and you can loosen or break something expensive.
Practical safety here matters more than people think. Rotating machinery and loose clothing are a bad combination even at hand-turning speeds, which is why OSHA's machine guarding guidance exists in the first place. Tuck in sleeves, tie back hair, and keep the area around the belt clear.
What does it mean if the belt walks on the sprocket?
It means the belt isn't tracking straight. Watch the belt edge relative to the sprocket flange as it comes around. A belt that creeps toward one flange and stays there is telling you something.
Common causes include a worn tensioner, a collapsed idler bearing, a bent sprocket flange, or a misaligned cover rubbing the belt. None of those get fixed by installing a new belt.
If the belt walks and the edge is already frayed, you've found your root cause. That's the difference between doing the job once and doing it three times.
One more check while you're turning. Listen. A dry bearing chirps, a failing tensioner clicks, and a water pump bearing rumbles.
These sounds are much easier to localize at hand-turning speed than at idle with the engine running.
Tensioner, Idlers, and Water Pump: The Parts That Take the Belt With Them
Here's the hard truth about timing belt failures. A large share of them aren't the belt's fault. The belt fails because a tensioner seized, an idler bearing collapsed, or a water pump locked up and took the belt with it.
That's why the kit exists. Belt, tensioner, idlers, and often the water pump, sold together as one job.
Understanding the parts makes the decision easier.
| Component | Job | Typical failure symptom | Usually replaced with the belt |
|---|---|---|---|
| Tensioner (spring or hydraulic) | Holds steady tension on the belt | Rattle, belt slack, tension loss | Yes |
| Idler pulley | Routes the belt around the drive path | Whine, chirp, bearing play | Yes |
| Water pump | Circulates coolant, often belt driven | Weep hole leak, coolant crust, bearing noise | Yes, if belt driven |
| Cam and crank seals | Keep oil inside the engine | Oil residue behind the sprockets | Yes, if leaking |
Checking pulley play, bearing noise, and the weep hole
This is hands-on work. You can't do it from above with a flashlight.
- Spin test. With the belt off, spin each idler and the tensioner pulley by hand. It should turn smoothly with a faint, even sound. Any grinding, roughness, or dry whine means replacement.
- Play test. Rock the pulley side to side and in and out. Any perceptible movement means the bearing is worn.
- Seal check. Look behind the tensioner and idlers for oil trails. Cam and crank seals leak onto the belt path, and oil destroys rubber.
- Weep hole check. The water pump has a small drain hole on its underside. Coolant crust, a dried drip trail, or wetness there means the seal is failing.
- Coolant loss. If you're topping up coolant with no visible external leak, suspect the water pump.
- Sprocket condition. Run a finger along the tooth valleys on the cam and crank sprockets. Sharp edges or hooked teeth mean worn sprockets, and they'll eat a new belt.
The weep hole is the single most overlooked item in the whole job. It's small, it's underneath, and it's usually hidden behind a pulley. That's precisely why it gets missed.
Should you replace the water pump with the belt?
Usually yes, if the belt drives it. The reasoning is pure economics. The pump is often a $60 to $150 part sitting behind the same covers you've already paid to remove.
If it fails in 20,000 miles, you pay the labor again to reach the same place. That's the false economy that turns a $700 job into a $1,400 job.
There's a fair counterargument. If your engine is high mileage and you're selling it, or if the budget is genuinely tight, a belt-only job is better than no job at all. But you should know you're rolling the dice on the pump.
The same logic applies to part quality. Cheap bearings inside an idler pulley fail early, and the labor is identical whether the part cost $18 or $60. It's the same pricier components that last argument people make about suspension parts, and it applies double here because access is the expensive part.
One more component worth mentioning. On engines where the timing belt drives the oil pump, a failing pump or a worn drive is a separate risk. Ask specifically about it at the parts counter when you order the kit.
Timing Marks and Wet Belts: Where Inspections Go Wrong
Two things trip up even experienced DIYers at this stage. Timing marks, because they're easy to misread. And wet belts, because the usual visual inspection logic doesn't apply at all.
Start with the marks. Every engine has a specific procedure for setting cylinder one to top dead center, and the marks only mean something when that procedure is followed. You'll find painted dots, notches, arrows, and stamped lines on the crank sprocket, the cam sprocket, and sometimes the oil pump housing or the rear cover.
Three things go wrong constantly.
- The engine isn't actually at top dead center. Marks line up relative to a specific crank position. Anywhere else, they tell you nothing.
- The wrong marks are being read. Many engines have several marks on the same sprocket for different configurations or tool fittings.
- The belt has already jumped. If the marks don't line up, the belt may have skipped a tooth. That's a finding, not a fluke.
If the marks don't line up, don't guess. Confirm the procedure in the factory service manual, count teeth between marks if the manual specifies it, and check for a cam crank correlation code with a scan tool before you pull anything apart.
Now the wet belt. On these engines the belt runs inside the engine, bathed in oil. Ford, PSA and Stellantis, and several other manufacturers have used this design on small petrol and diesel engines.
The design works when the oil is right and the interval is respected. It fails badly when either slips.
| Failure mechanism | What happens | What you'd notice |
|---|---|---|
| Oil degradation | Belt compound breaks down from wrong or old oil | Belt sheds fibers, oil turns sludgy |
| Fiber shedding | Belt material clogs the oil pickup screen | Low oil pressure, warning light, then engine damage |
| Belt delamination | Belt loses teeth or width | Rough running, then sudden failure |
| Interval overrun | Degraded belt reaches a point it can't recover from | No warning at all in some cases |
So how do you "check" a wet belt? You mostly don't, visually. You check the oil.
- Oil condition. Black, sludgy oil with a gritty texture is a red flag. So is a strong fuel smell.
- Oil cap and filler neck. Grey sludge or fibrous debris under the cap points to belt breakdown.
- Oil pressure warnings. A flickering pressure light is a stop-now event, not a monitor-it event.
- Service history. Verify the correct oil spec was used, not just that the oil was changed.
- Interval bulletins. Several manufacturers have revised wet belt intervals downward and issued service campaigns. Check your VIN against open campaigns rather than trusting an old schedule.
- Filter and pickup inspection. On high-mileage wet belt engines, checking the pickup screen is worth the effort.
If you own a wet belt engine and the interval is near, don't gamble. The repair is an engine-out or at least a major disassembly job on some models, and it dwarfs a scheduled replacement.
One last inspection trap, and it applies to dry belts. A belt can look perfect and be one oil leak away from failure. Any trace of oil, coolant, or power steering fluid on the belt path means the leak gets fixed at the same time.
A new belt over an unrepaired leak is a short-lived belt.
Mark alignment, contamination, and component condition are the three things that separate a real inspection from a look. Get those right and you're making an informed decision instead of a hopeful one.
Oil and Coolant Contamination: Fix the Cause, Not Just the Belt
Oil and rubber were never meant to share a space. A timing belt soaked in engine oil swells first, then softens, then hardens as the additives that keep it flexible get leached out. By the time it looks bad, the cord underneath has already lost strength.
Coolant is slower but just as destructive. It leaves a crust that works into the tooth roots and attacks the reinforcing cord. Neither fluid washes off with a rag in any meaningful way.
So here's the rule that saves engines. If you find contamination on the belt, the belt is done. You don't clean it.
You replace it and you fix whatever is leaking.
The leak is the real diagnosis. Anyone can sell you a belt.
| Fluid found | Likely source | What it looks like on the belt |
|---|---|---|
| Engine oil | Camshaft front seal, crankshaft front seal, cam cover gasket | Dark sheen, soft swollen rubber, gritty dust |
| Coolant | Water pump weep hole, thermostat housing, coolant pipe | White, pink, or orange crust, wet streaks |
| Power steering fluid | Reservoir or line routed near the cover | Thin oily film with a distinct smell |
| Grease | Over-greased idler or tensioner bearing | Thick paste, often flung outward |
Cam and crank seals are the usual suspects, and they're cheap parts. A front crank seal often costs less than a tank of fuel. The labor is what costs money, and the labor is nearly free while the belt is already off.
Some engines seal through the tensioner stud or an oil pump housing o-ring. Those leak in exactly the same way and get missed because nobody looks behind the tensioner.
Why a seal can leak when the seal is fine
Crankcase pressure pushes oil past seals that would otherwise hold. A clogged PCV valve, a blocked breather hose, or worn piston rings all raise internal pressure. Fix the seal and ignore the cause, and the new seal leaks too.
Overfilling the oil does the same thing. Excess oil foams, the crank whips it into mist, and that mist finds every weak sealing point in the front cover area. Check the dipstick level before you blame the seal.
A blocked PCV system is a five-dollar part and a five-minute check on most engines. It's worth doing before you commit to a belt job.
The clean and recheck method
You can't always tell where a leak starts when the whole area is coated. Clean it properly and let the engine tell you.
- Degrease the front cover area with the belt still on, or after removal if you're already in there.
- Dry everything with compressed air.
- Drive for a week, or run the engine through several heat cycles.
- Recheck with a bright light and a mirror.
- Add UV dye to the oil if the trail is still unclear. It shows up under a blacklight with no guesswork.
If you're pulling the belt anyway, replace every seal you can reach while the covers are off. Cam seal, crank seal, and the cam cover gasket if it's weeping. Doing them later means paying the same disassembly labor twice.
One more contamination path people forget. A failed water pump seal doesn't always dump coolant on the ground. It often drips straight onto the belt path, and the belt cooks from the inside out.
Monitor, Replace the Belt, or Do the Full Kit: Making the Call
You've checked the interval, confirmed the engine type, looked at the belt, and turned it over by hand. Now you're at the decision point, and there are really only three doors.
Monitoring is a real option, not a cop-out. It means checking the belt at every oil change, noting any new noise, and writing down what you saw. It only applies when the belt is inside its interval on both mileage and time, the surface is dry and matte, and the tensioner checks out.
Replacing the belt alone suits a narrow case. The belt is clearly worn or contaminated, but the tensioner, idlers, and water pump are verified good, and the car is heading to a new owner soon. That's a short list of conditions.
The full kit is the default for a reason. Belt, tensioner, idlers, and the water pump when the belt drives it. It's the only option that doesn't leave a 100,000-mile bearing sitting next to a brand new belt.
| Your situation | The call | Why it wins |
|---|---|---|
| Interference engine, unknown service history | Full kit now | One skipped tooth ends the engine |
| Belt inside interval, dry, matte, quiet | Monitor at each oil change | Nothing to gain by spending yet |
| Mileage under limit but time limit exceeded | Replace | Rubber ages on the calendar, not the odometer |
| Belt looks fine, tensioner rattles or pulley has play | Full kit | The bearing fails before the belt |
| Oil or coolant on the belt | Fix the leak, replace belt and seals | Contamination is terminal |
| Wet belt near its interval | Replace, don't monitor | There's nothing useful to look at |
| Free-running engine, inside interval, tight budget | Monitoring is defensible | Failure cost is a tow, not an engine |
Cost shapes that decision, so here's the honest spread. These are typical US independent-shop ranges as of 2026, and dealer pricing often runs higher.
| Job | Typical parts | Typical shop total |
|---|---|---|
| Inspection only | None | $0 DIY, often bundled if a shop is already in there |
| Belt only | $40 to $120 | $400 to $800 |
| Full kit (belt, tensioner, idlers) | $120 to $300 | $600 to $1,100 |
| Kit plus water pump and seals | $200 to $450 | $700 to $1,500 |
| Failure repair on an interference engine | $400 to $1,500 | $2,000 to $4,000+ |
Labor rates drive most of that spread. Independent shops commonly bill $100 to $180 an hour, and a timing belt job books three to six hours depending on access.
Belt-only vs. full kit, in plain terms
The belt is the part you can see. The tensioner and idlers are the parts that kill it. In our review of failure reports, bearing and tensioner failures show up constantly on belts that were replaced on schedule but without their hardware.
Think about what you're actually paying for. Most of the bill is labor to get to the belt. The tensioner and idlers are a small slice of the parts cost sitting behind that same labor wall.
That's the same logic people apply to suspension and steering parts, where a pricier component that lasts usually beats a cheap one that fails early. Access is the expensive part, and it's identical either way.
There's one more item on the parts list that gets skipped. On many engines the crank pulley bolt is a torque-to-yield fastener, meaning it stretches once and gets replaced, not reused. Reusing it risks the pulley coming loose, and that failure is catastrophic in its own right.
What Failure Actually Costs and the Mistakes That Cause It
A snapped belt is not one bill. It's a sliding scale, and where you land depends on engine design, engine speed at failure, and how quickly you shut it down.
| Outcome | What's damaged | Typical cost |
|---|---|---|
| Belt fails on a free-running engine | Belt, maybe a tow | $400 to $1,000 |
| Belt fails at idle on an interference engine | A few valves, gaskets | $1,200 to $2,200 |
| Belt fails at speed on an interference engine | Valves, guides, head machine work | $2,000 to $4,000 |
| Valve heads break off | Pistons, cylinder walls, possibly the block | $4,000 to $7,000 |
| Block damage beyond repair | Used or rebuilt engine | $3,000 to $8,000 |
Valve damage gets expensive fast because of what surrounds it. A head gasket set, head bolts, machine work, coolant, oil, and a timing kit all land at once. On some engines the head can't be resurfaced past a certain limit, and a replacement head changes the math again.
Here's the mistake list, ranked roughly by how often it shows up.
- Checking the serpentine belt and calling it done. The single most common error, and it feels like progress the whole time.
- Trusting mileage and ignoring the calendar. A 12-year-old belt with 45,000 miles is still a 12-year-old belt.
- Replacing the belt without the tensioner. A worn tensioner on a new belt is a failure waiting for a date.
- Skipping the water pump. The part is cheap, the labor to reach it isn't.
- Reusing the crank bolt. Torque-to-yield fasteners don't get a second life.
- Prying on the belt with a screwdriver. You'll damage cords you can't see, and the belt fails later in a way nobody connects back to the pry bar.
- Turning the engine backwards. Slack can form on the tensioner side and the belt can jump a tooth.
- Not using cam locking tools where the manual requires them. Some engines will move the cams the moment the belt goes slack.
- Running the wrong oil in a wet belt engine. These designs are oil-sensitive, which is why the API oil categories matter more here than on a dry belt engine. The wrong spec accelerates belt breakdown and fiber shedding.
- Ignoring a small coolant weep. Coolant on a belt is a slow execution.
Every item on that list is cheaper than the failure it prevents. That's the whole argument for doing the job properly once.
If a shop quotes you a belt-only price on a 120,000-mile interference engine, ask what happens to the tensioner. If the answer is vague, get another quote.
When to Hand It to a Shop Instead of Checking It Yourself
Some inspections are genuinely DIY. Others aren't, and knowing which is which keeps you out of trouble. Here's the honest split.
Hand it over if any of these are true.
- The timing belt is a wet belt. There's nothing useful to inspect, and the diagnosis runs through oil analysis and service history.
- The engine needs cam locking tools. Many modern engines do, and the tools are engine-specific.
- The crank bolt won't move with what you own. A seized pulley bolt on a car on ramps is a bad place to learn about leverage.
- You don't own a torque wrench that covers the spec. Crank pulley bolts often land in the 90 to 200 Nm range plus a torque angle, and guessing is not an option.
- The car is under warranty or a service contract. DIY work can complicate a claim.
- You have no level ground or no covered space. This isn't a job for a sloped driveway in the rain.
- The belt may have already jumped. If the marks don't line up and the engine runs badly, you're diagnosing timing, not inspecting a belt.
A good quote looks a specific way. It itemizes the belt, tensioner, idlers, water pump if applicable, crank bolt, seals, and coolant. It states the labor hours and the warranty.
It mentions whether the parts are OEM or OE-quality.
A weak quote says "timing belt, $450" and nothing else. Push for the part list. If they can't produce one, they're probably planning to reuse your old tensioner.
After the job, do three things.
- Check the coolant level cold after a week, especially if the water pump was replaced.
- Watch for oil drips under the front of the engine for the first few hundred miles.
- Keep the receipt with the part numbers. It matters at resale and it matters if a bearing starts whining at 20,000 miles.
DIY remains a fair choice for a dry belt with an inspection plug or an exposed upper cover. You're using a light and a mirror, not removing a crank pulley. That version is a twenty-minute check, and it's worth doing at every oil change.
Frequently Asked Questions
How do I know if my car has a timing belt or a chain?
Check the maintenance schedule in your owner's manual first. Chain engines list no belt replacement interval at any mileage. If the manual is gone, decode the VIN through the NHTSA lookup or read the engine code on the block.
A dealer parts desk will confirm it from your VIN in a minute.
Can you check a timing belt without removing the cover?
Only on engines with an inspection plug or an exposed upper cover. Even then you see a small window, so you'll need to rotate the engine by hand to view the full loop. On most modern engines the belt sits behind a sealed cover and a real inspection means partial disassembly.
How long do timing belts really last?
Published intervals usually land between 60,000 and 105,000 miles, or 5 to 10 years, whichever comes first. Severe service shortens that by roughly 20 to 30 percent. Wet belts often run 100,000 to 150,000 miles, and several manufacturers have revised those numbers downward.
Time matters as much as mileage.
What happens if a timing belt snaps on an interference engine?
Pistons and valves collide. Valves bend, valve guides crack, and sometimes valve heads break off and score the pistons and cylinder walls. Repair commonly runs $2,000 to $4,000, and worse damage pushes it higher.
A free-running engine usually just stalls and coasts to a stop.
Is a squealing noise the timing belt or the serpentine belt?
Almost always the serpentine belt, an idler pulley, or a tensioner bearing. Timing belts are toothed, run dry behind a cover, and fail quietly rather than squealing. A chirp or squeal on cold start points at the accessory drive.
A ticking from behind the timing cover is the sound worth chasing.
Should I replace the water pump with the belt?
Yes, when the timing belt drives the water pump. The pump is a cheap part sitting behind the same covers you're already paying to remove. If it fails 20,000 miles later, you pay the labor twice.
The exception is a car you're selling shortly, and even then you should know the risk.
