
Oil on the outside of a shock absorber ruins your afternoon fast. You jack the car up, and learning how to fix a leaking shock jumps to the top of the list. There's a dark wet streak running down the damper body and no obvious place it came from.
The first honest question isn't which part to buy. It's what kind of leak you're actually looking at.
One number explains most of what follows. Manufacturer specifications for gas-charged dampers list nitrogen charge pressures of roughly 100 to 300 psi, and that pressure is what holds the oil behind the shaft seal. Lose the seal and you lose the gas with it.
Here's the short version before we dig into the branches.
How to Fix a Leaking Shock
Clean the damper and drive for a week. Check whether the wet patch returns. A light oil film is normal misting.
A steady drip means the shaft seal has failed. Sealed shocks get replaced, not repaired. Rebuildable units take a new seal kit and a nitrogen recharge.
Is It Actually Leaking? How to Tell Damper Oil From Everything Else
Shock absorbers live in a dirty neighborhood. Brake fluid, CV grease, coolant, and power steering fluid all end up in the same wheel arch. Before you order anything, prove the wet patch is damper oil.
Here's the test that works. Degrease the damper body and the area around it. Drive normally for a week, then look again.
If the film returns in the same spot, the damper is the source. If it doesn't, you were chasing somebody else's leak.
A light dusting of talcum powder or foot spray helps too. It leaves a clear trail on a chrome shaft, and it shows you how far down the rod the oil is travelling.
If you find engine oil in odd places instead, look higher up. A valve cover gasket or a rear main seal can blow oil backward onto the suspension and fool you completely.
Don't forget the other ends of the damper. Some units leak at the body crimp, the reservoir hose fitting, or the bleed screw rather than the shaft. Wipe everything dry and watch which point gets wet first.
The Three Questions That Decide Your Repair Path
Two leaking shocks can need completely different answers. Three questions sort out which one you're dealing with.
Image source: Wikimedia Commons / Will Eisner
Sealed or rebuildable?
A crimped, one-piece body is sealed, and sealed means it cannot be rebuilt. There's no seal head to open and no gas port to recharge. Rebuildable units have a threaded body, a serviceable seal head, and a nitrogen valve, so a kit, fresh oil, and a recharge bring them back.
If you're not sure which you have, check the manufacturer's parts diagram. Bilstein, Koni, Öhlins, and Fox all publish which of their units are serviceable.
Shock or load-bearing strut?
A plain shock bolts in and out with hand tools. A MacPherson strut carries the spring, which means it's storing serious energy. If your leaking part has a coil wrapped around it, stop and get a rated spring compressor.
This is also the point to set up a set of wooden ramps or proper stands, because you'll be under there longer than you think.
Where exactly is it coming from?
The shaft seal is the usual suspect, but the cheap spots deserve a look first. A loose fitting, a tired Schrader valve core, or a weeping bleed screw costs almost nothing to fix.
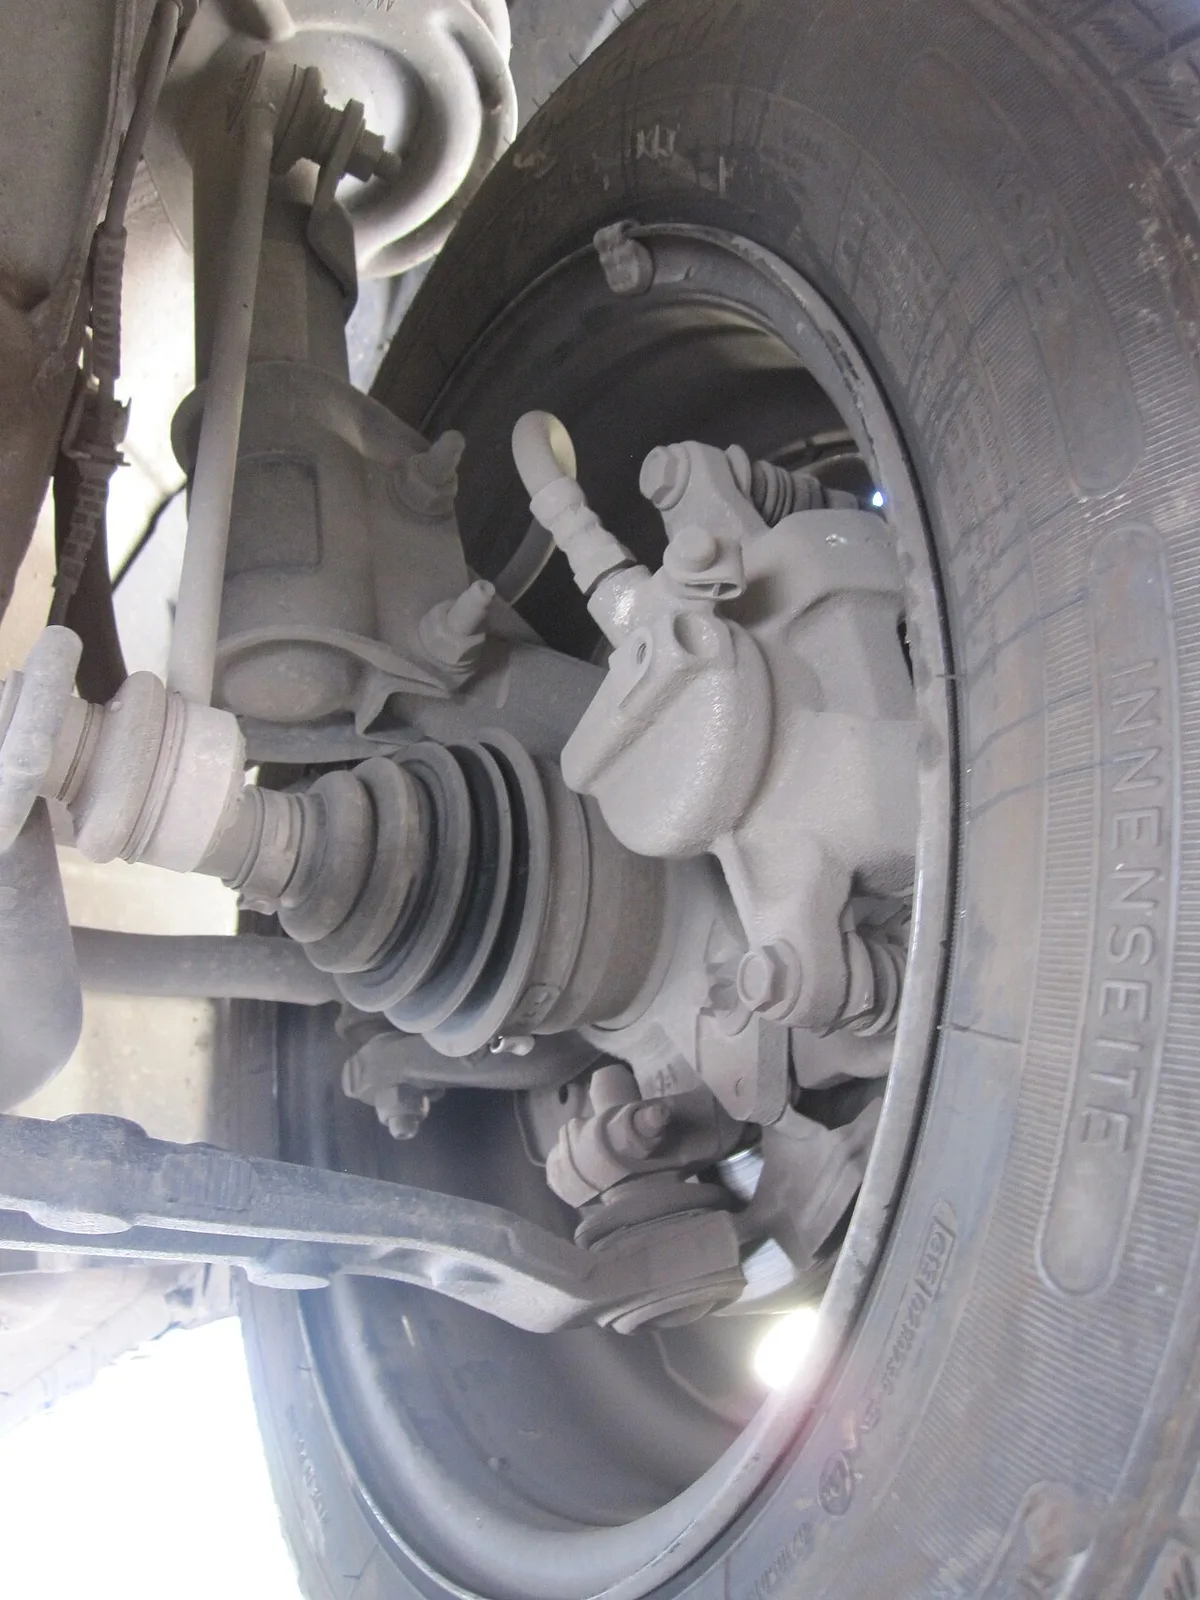
Image source: Wikimedia Commons / Pava (CC BY-SA)
Adaptive and air dampers add a step to all of this. Air struts often leak at the line fitting or the compressor, not the strut itself. Electronic dampers can log a suspension fault, and a fault-code reader tells you which corner the module is complaining about.
Leak Severity: What's Normal Misting and What's a Dead Damper
Misting is not a failure. Gas-charged dampers push a thin film of oil past the wiper seal over tens of thousands of miles, and a light sheen with dust stuck to it is normal. A drip is different.
Once oil runs, the seal has given up.
Image source: Wikimedia Commons / Will Eisner
| What you see | Likely meaning | What to do |
|---|---|---|
| Faint oil film, no drips | Normal misting on gas-charged units | Clean it and recheck at the next service |
| Damp dust ring around the shaft | Early seepage | Monitor it, recheck in 3 to 6 months |
| Wet oil, no drips yet | Active seal weep | Plan a rebuild or replacement |
| Drips running down the body | Failed seal | Replace or rebuild now |
| Oil pooling, bouncy ride | Damper is effectively dead | Replace the pair |
The bounce test is crude but useful. Push down hard on one corner and let go. If the body keeps rocking more than once or twice, that damper isn't controlling the spring anymore.
Look at the tires as well. Cupping and scalloping on the inner or outer shoulder is what a worn damper does to rubber over time. It's an expensive clue that most people notice too late.
Worth checking before you spend anything: whether your vehicle has an open safety recall on suspension parts. The NHTSA recall lookup covers that in a couple of minutes.
Rebuild It, Replace the Unit, or Swap the Whole Assembly
Three routes, and the right one depends on what you found in the first two sections.
| Factor | Rebuild with a seal kit | Replace the bare unit | Fit a loaded assembly |
|---|---|---|---|
| Parts cost | Lowest | Moderate | Highest |
| Labour | High, bench work | Bolt-on | Bolt-on, fastest |
| Needs specialty tools | Yes, seal tools and a nitrogen source | No | No |
| Keeps original valving | Yes | Only with an OEM match | Only with an OEM match |
| Works on sealed shocks | No | Yes | Yes |
If the unit is serviceable and the body is sound, rebuild it. You keep the original valving, which matters on performance cars and classics where nothing off the shelf matches.
If the shock is sealed, replace it. That's the whole decision. Don't waste money on seal conditioner, because no additive reforms a torn wiper lip.
If the strut is rusted, the spring is tired, and the top mount clunks, buy the loaded assembly. You're already paying for the labour, and pricier front-end parts rarely hurt as much as doing the job twice.
One rule that saves handling headaches: replace dampers in pairs on the same axle. Mixed damping makes a car feel unpredictable in the wet.
Rebuilding a Serviceable Shock: The Bench Work That Actually Matters
This is where most rebuilds go wrong, and it's rarely the assembly. It's the shaft and the fill.
- Drain the old oil into a sealed container. Hydraulic oil is hazardous waste, so take it to a licensed recycler.
- Disassemble on a clean bench and lay the shim stack out in order. One stray shim changes the damping curve.
- Inspect the chrome shaft under good light. Pitting, scoring, or flaking chrome means new seals will fail within weeks.
- Check shaft runout. A bent rod wipes out a fresh seal no matter how careful you are.
- Fit a new seal head, wiper, and O-rings. Lubricate them with damper oil, never grease.
- Refill to the exact volume in the manual. Overfilling causes hydraulic lock and blows the new seal.
- Bleed the unit properly to remove trapped air, then charge nitrogen to spec.
- Ideally, run it on a shock dyno. SAE publishes the test methods used to characterise damper force, and a baseline SAE style comparison catches a bad rebuild before it goes back on the car.
Torque specs and fastener condition matter as much as the internals. A snapped mount bolt turns a two-hour job into a drilled-out nightmare, and replacement fastener prices are the least of it.
Step-by-Step: Removing and Refitting a Leaking Shock or Strut Safely
You've picked the route. Now it's sequence, because the order protects both you and the parts.
- Crack the wheel bolts loose while the car is still on the ground. Spinning wheels are how people strip studs.
- Chock the rear wheels. Raise the front on rated stands or a set of sturdy timber ramps. Never work under a jack alone.
- Support the hub with a strap or a trolley jack before you disconnect anything. An unsupported hub can over-extend and wreck a CV joint.
- Soak the sway bar link, clevis bolt, and pinch bolt in penetrating oil the night before. Rusted fasteners set the pace of this job.
- Undo the sway bar link, then the lower mount, then the pinch bolt, then the top mount nuts. Keep one hand on the assembly the whole time on a strut.
- Move the dust boot, bump stop, upper mount, and bearing plate across before the new unit goes in.
- Lower the car until the suspension sits at ride height, then torque the rubber-bushed fasteners. Tightening at full droop pre-loads the bushings and shortens their life.
- Fit new torque-to-yield bolts wherever the manual specifies them. Then book an alignment.
An impact driver makes short work of the wheel nuts, though you should still break the final torque by hand.
Common Mistakes That Turn a Cheap Fix Into a Front-End Rebuild
None of these cost much to avoid, and every one of them costs plenty to fix later.
- Replacing a single damper. Matched damping matters across an axle. One new shock beside a tired one makes a car feel vague in the wet.
- Torquing rubber bushings at full droop. They can't twist freely once the car is down. Tighten at ride height or they tear.
- Reusing stretch bolts. They're single-use by design. Compare that against the cost of new hardware and it's not close.
- Skipping the alignment. Camber and toe shift the moment a strut comes out. Cupped tires follow a few thousand miles later.
- Hanging the caliper by its brake hose. Wire it to the spring instead. A stretched hose is a safety failure, not an inconvenience.
- Ignoring the top mount and bearing plate. A clunk that outlives the new shock is usually a dead mount, not a bad damper.
- Bin the dust boot. Grit on a chrome shaft chews a fresh wiper seal in months.
The most expensive habit of all is guessing. Confirm the leak source before you buy anything.
Costs, Intervals, and What You Should Realistically Budget
As of 2026, the damper itself is rarely the expensive part of this job. Labour and collateral damage are.
| Item | Typical US range | Notes |
|---|---|---|
| Seal and O-ring kit | $30 to $120 per unit | Rebuildable shocks only |
| Bare damper | $60 to $250 each | Daily-driver spec |
| Loaded strut assembly | $150 to $450 per corner | Spring, mount, and boot included |
| Air strut | $400 to $1,200 per corner | Diagnose the compressor too |
| Shop labour | $100 to $200 per hour | 1.5 to 3 hours per corner |
| Four-wheel alignment | $90 to $200 | Always after strut work |
Dampers usually need attention somewhere between 50,000 and 100,000 miles. Rough roads, heavy loads, and a shaft seal that's already weeping all pull that number down.
The rebuild math flips with labour rates. A seal kit is cheap, but if you're paying a shop for bench time and a nitrogen recharge, a new unit often wins. Rebuild only when the original valving is genuinely irreplaceable.
If the job creeps into worn front-end components while you're in there, budget for them properly rather than buying the cheapest set on the shelf.
Safety, Inspection Rules, and When to Hand It to a Shop
Two things on a damper can hurt you: stored spring energy and pressurised nitrogen. Never heat, cut, or weld a gas-charged body. Never open a strut without a rated spring compressor seated correctly on clean coils.
Inspection rules vary more than people expect. The DVSA MOT manual treats a light weep as an advisory and active dripping as a defect. Most US states run no suspension check at all, which means nobody will tell you your damper is dead.
Air and adaptive systems deserve their own warning. Deflate air suspension to procedure before lifting, and on electronically controlled dampers a capable fault code reader points you at the right corner.
Hand the job to a shop when any of these are true:
- The fasteners are seized solid or already rounded.
- You don't own or won't rent a spring compressor.
- The car runs air suspension or adaptive dampers.
- You can't find a torque spec for the mounts.
- This vehicle is your only transport and it's a strut job.
Frequently Asked Questions: Leaking Shocks Answered Straight
Is it safe to drive with a leaking shock?
A light weep is fine for a while. A dripping damper is not. You lose damping, stopping distances stretch, and the car gets skittish in the wet.
Drive gently and get it sorted within weeks, not months.
Can I just top up the oil?
No. A damper is a sealed, pressurised system. There's no fill port on a sealed unit, and topping up a rebuildable one without bleeding and recharging leaves it worse than before.
Once oil escapes, gas is escaping too.
Do I have to replace both sides?
On the same axle, yes, if the pair has covered serious mileage. A fresh damper beside a worn one gives mismatched damping and odd handling. If the other side is genuinely new, say under 10,000 miles, replacing the failed unit alone is reasonable.
Will a seal conditioner stop the leak?
No. Additives swell rubber O-rings slightly, which is why people believe they work. A torn wiper lip or a scored shaft doesn't heal.
You'll spend money, delay the real repair, and still be replacing the damper later.
How long can I leave a weeping shock before it fails?
Months, not years. A weep typically turns into a drip somewhere between 5,000 and 15,000 miles. Watch your tire wear in the meantime, because a dying damper cups the tread long before it lets go completely.
