
If you're wondering how to install a radar detector, you're in the right place. A properly wired unit can alert you to police radar up to 800 m away. This guide walks you through the steps, tools, and safety checks you need.
We'll keep it simple and legal.
Per SAE J1292 wiring standards, the detector should draw no more than 50 mA from the vehicle’s fuse box. Most installations finish in 20 to 30 minutes. As of 2026, states such as Virginia and Washington D.C. still ban radar detectors, so check local laws before you begin.
The next section explains why the right power source matters.
How to Install a Radar Detector
Mount the detector to the windshield or dashboard using the suction cup. Run the red wire to a constant 12 V fuse in the fuse box. Connect the black wire to a clean chassis ground point.
If using OBD‑II, plug the adapter into the diagnostic port. Power on the unit and verify detection on a test radar.
Problem & Why It Matters
Radar detectors help you avoid speeding tickets, but only when installed correctly. A poor mount can block the driver’s view or interfere with airbags. Choosing a constant power source prevents battery drain and ensures the unit stays on.
Ignoring local laws can lead to fines or device confiscation. For clean mounting, see mounting tips that avoid airbags. For fuse box access, refer to fuse box access guidance.
Review NHTSA radar detector guidelines for legal requirements in your state.
Core Explanation: How Radar Detectors Work & Installation Basics
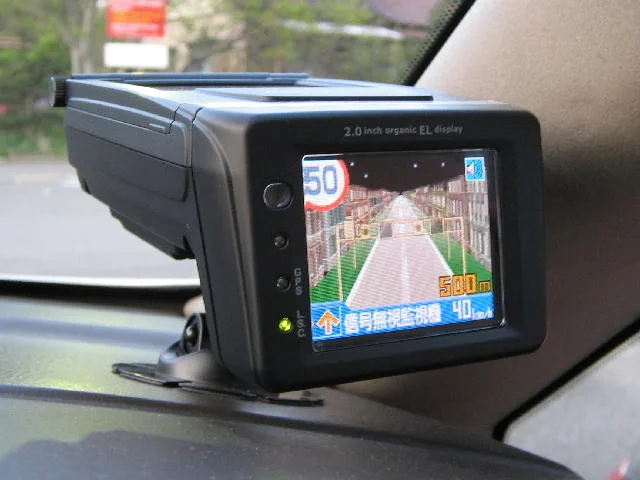
A radar detector contains a receiver, a processor, and an alert system. The receiver picks up X‑, K‑, and Ka‑band frequencies used by police radar. The processor filters out false alerts from garage doors or other sources.
Power options include a hardwire kit, an OBD‑II adapter, or a cordless battery pack. Choose a mounting spot that offers a clear view of the road without obstructing the driver. Use a suction cup or adhesive pad for easy removal.
For detailed wiring, see the windshield mounting guide. Refer to SAE J1292 for approved wire gauge and fuse ratings.
Power Source Options
| Power Source | Typical Current Draw | Installation Time | Pros | Cons |
|---|---|---|---|---|
| Hardwire (constant 12 V) | 20‑30 mA | 20‑25 min | Reliable, no battery drain | Requires fuse tap |
| OBD‑II adapter | 30‑40 mA | 15‑20 min | Plug‑and‑play, easy removal | May draw from vehicle’s computer |
| Cordless battery | 15‑20 mA | 10‑15 min | No wiring needed | Battery must be replaced |
Step-by-Step Installation Workflow (Decision Tree)
- Choose power source, constant 12 V for reliability, OBD‑II for simplicity.
- Select mounting location, windshield upper corner or dashboard edge, away from airbags.
- Prepare wiring, strip 1/4‑inch of insulation, crimp connector, secure with heat‑shrink.
- Connect to fuse box, tap into a constant fuse, verify correct amperage.
- Ground the unit, attach black wire to a clean chassis point.
- Mount the detector, apply suction cup, press firmly, check for wobble.
- Test the system, drive near a known radar source, confirm audible alert.
- Calibrate settings, set city/highway mode, adjust volume, enable GPS lockout zones.
For detailed mounting steps, see the light bar mounting tips. If you prefer a plug‑and‑play route, the OBD‑II adapter eliminates wiring altogether.
Common Mistakes & How to Avoid Them
- Wrong fuse, tapping a switched fuse causes the detector to turn off with the ignition. Use a constant fuse instead.
- Improper grounding, a loose ground can cause electrical noise or false alerts. Clean the chassis point and tighten the bolt.
- Mounting too low, a detector near the dashboard can be blocked by the steering wheel. Place it high and centered.
- Ignoring local laws, installing in a banned state can result in fines. Verify state regulations before you start.
- Using thin wire, undersized wire can overheat and melt. Follow SAE J1292 gauge recommendations.
To avoid grounding issues, refer to the side mirror wiring guide for clean connection techniques. Always double‑check that the detector is not interfering with the vehicle’s ADAS sensors.
Use Cases / Best For / Who It's Right For
Radar detectors are most useful for daily commuters on high‑traffic routes. They also benefit long‑distance interstate drivers who want early warning of speed‑enforcement zones. Fleet managers can install multiple units to protect company vehicles.
Motorcycle riders often prefer handlebar‑mount detectors for visibility. Professional installers may use the process as a repeatable service offering. For a similar windshield setup, see weather‑tech deflectors.
Costs / Pricing / Data / Specs
Most DIY installations cost between $130 and $580 total. The table below shows typical prices and technical specs.
| Item | Price Range | Typical Value |
|---|---|---|
| Radar detector | $100‑$500 | 20‑50 mA draw |
| Hardwire kit | $30‑$80 | SAE J1292 compliant |
| Professional install | $50‑$150 | 20‑30 min labor |
| Alert range | — | Up to 800 m (Ka‑band) |
If you need a scanner later, the OBD‑II scanner guide covers selection tips.
Expert Tips / Pro Advice
- Run a test drive near a known radar source before final mounting.
- Use a multimeter to verify 12 V at the fuse before connecting wires.
- Keep the detector away from the steering column to avoid airbag interference.
- Store the OBD‑II adapter in a dry place when not in use.
- Update firmware annually for improved false‑alert filtering.
When tightening lug nuts, the impact wrench guide shows proper torque.
Safety / Legal / Compliance / Warnings
Check your state’s radar detector regulations before installation. Virginia and Washington D.C. still ban the devices as of 2026. Use UL‑listed wiring to prevent electrical fires.
Ground the unit to a clean chassis point to avoid voltage spikes. Do not mount the detector where it blocks the driver’s view or interferes with airbags. For official guidance, see the Virginia DMV radar detector page.
Maintenance / Long-Term Optimization
- Wipe the detector lens monthly to keep the display clear.
- Inspect the suction cup for wear; replace if it loses grip.
- Reset the unit after battery replacement to clear old settings.
- Update GPS lockout zones quarterly for new speed‑trap locations.
- Store the device in a cool, dry place when the vehicle is parked for extended periods.
If you need to remove step pads later, the step pad removal article explains the process.
Real Scenarios / Case Examples
A commuter in Dallas installed a hardwire detector on a constant 12 V fuse. After a week, the unit warned of a speed‑trap on I‑35, allowing the driver to reduce speed before the radar. The installation took 25 minutes, and the driver reported no false alerts during rush hour.
This example shows how proper wiring and placement reduce unnecessary alerts. For building a stable platform, the car ramps guide provides plans.
Frequently Asked Questions
How long does the installation take?
Typical DIY installation takes 20 to 30 minutes. Professional installation may add 10 to 15 minutes for testing.
Do I need special tools?
You need a screwdriver, wire strippers, crimping tool, and a multimeter. All are standard automotive tools.
Can I install it on a leased vehicle?
Yes, as long as you can access the fuse box and do not damage the interior. Remove all components before returning the vehicle.
Will a radar detector drain my battery?
A hardwire unit draws 20‑30 mA, which is negligible. The OBD‑II adapter draws slightly more but still won’t drain a healthy battery.
Is it legal in my state?
Check your state’s DMV website. As of 2026, radar detectors are legal in most states but banned in Virginia and Washington D.C. For additional accessories, the tonneau covers overview explains options.
Final Recommendation / Verdict / Decision Guide
For most drivers, a hardwire installation offers the best balance of reliability and legality. Choose a detector with GPS lockout zones and adjustable city/highway modes. If you prefer a plug‑and‑play solution, the OBD‑II adapter works well for temporary use.
Always verify local regulations and follow SAE J1292 wiring standards. With proper setup, a radar detector can provide early warnings and help you avoid costly citations.
