
When your rear brakes start squealing or the pedal feels spongy, worn brake shoes are often the culprit. Ignoring them can lead to reduced stopping power and even brake failure. Replacing them yourself saves time and money, and it’s a straightforward DIY job.
In our research, most drivers can complete the job in under two hours.
According to FMVSS 105, brake shoes must retain at least a 0.35 coefficient of friction after 1,000 cycles. If your shoes are past the wear limit or the return spring is broken, it’s time to act. This guide walks you through the entire process, from safety prep to final testing.
Let’s get your brakes back in shape.
How to Replace a Brake Shoe
Remove the drum, springs, and old shoes. Install new shoes, adjust the backing plate, and re‑mount the drum. Torque lug nuts to 80 to 100 ft‑lb and test brake performance.
Ensure the drum bore is clean and within 0.002 in tolerance. Check shoe orientation and spring tension before final installation.
What a Brake Shoe Is and Why It Matters
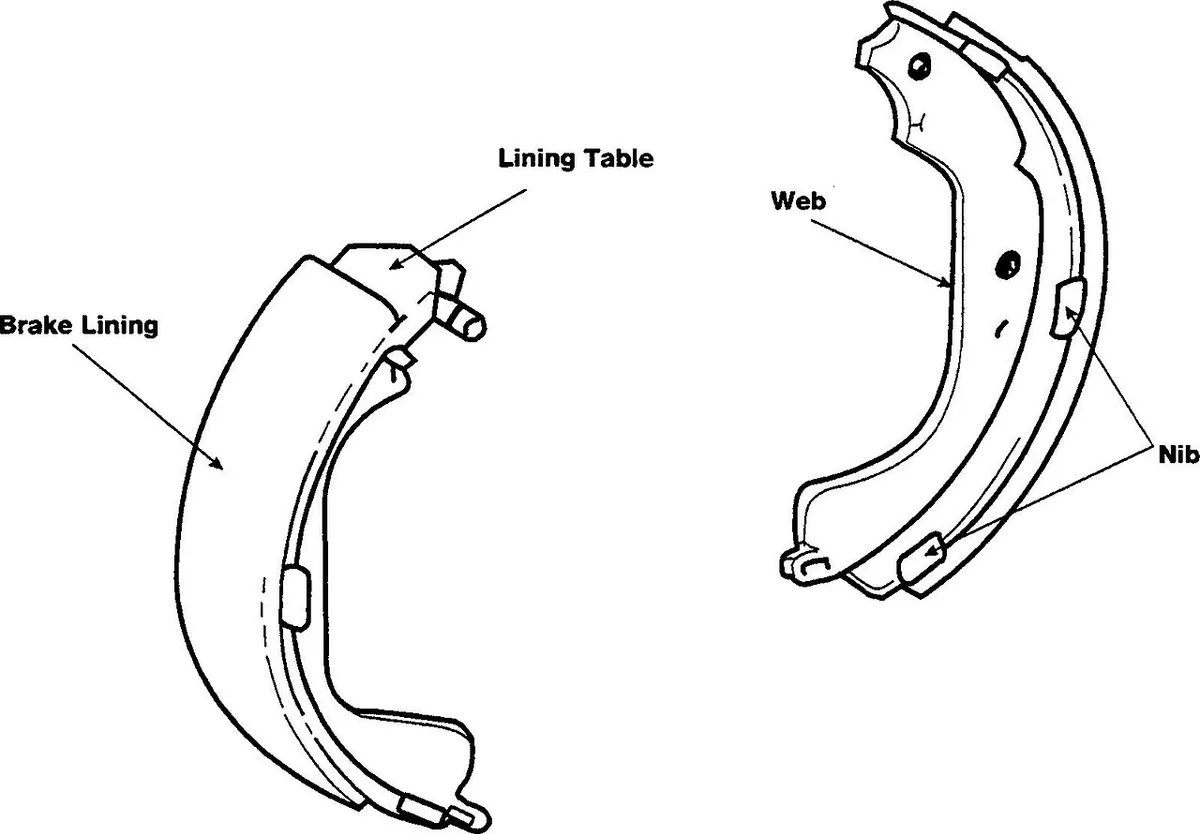
A brake shoe is a curved friction lining mounted on a backing plate inside a drum brake. It presses against the rotating drum to slow the wheel when the brake pedal is pressed. The shoe is held by primary and secondary return springs and pivots on a pin.
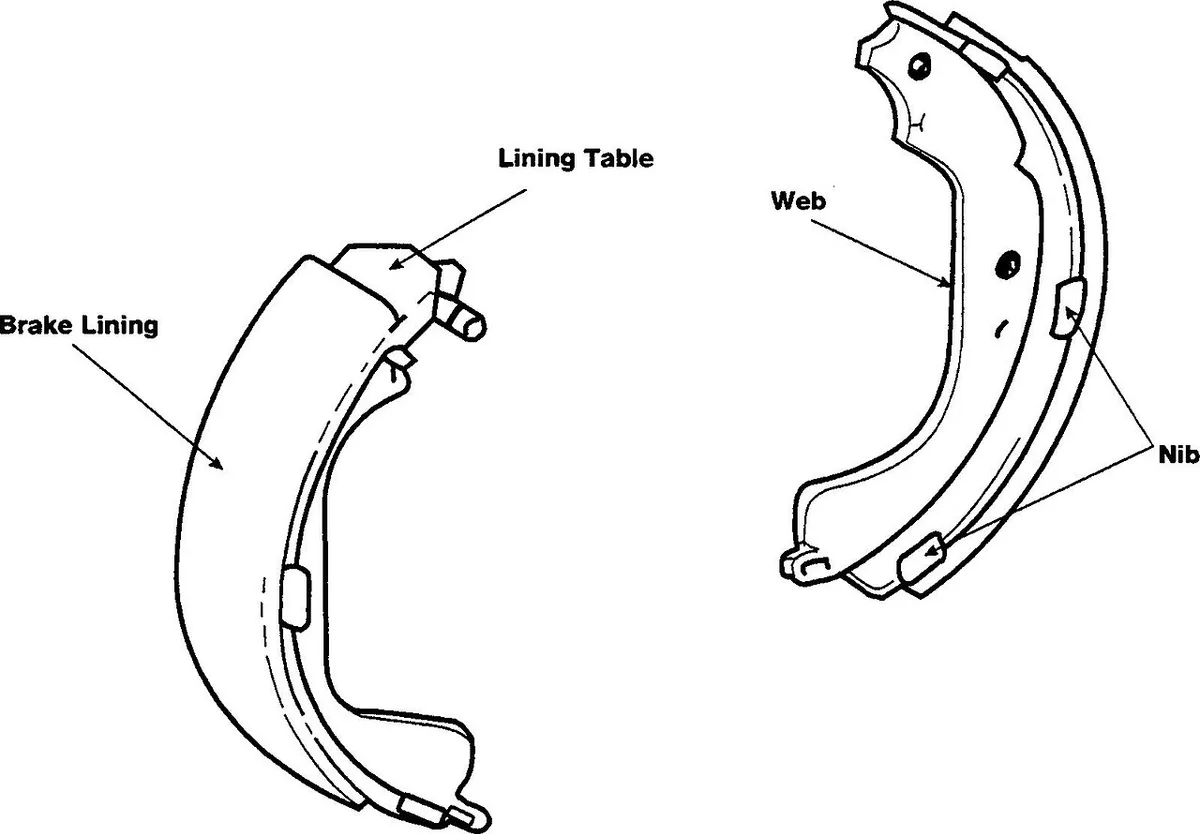
- Brake shoe (lining material: semi‑metallic, organic, or ceramic)
- Backing plate (steel, riveted or bonded)
- Primary & secondary return springs (tension 30, 50 lb)
- Adjuster (self‑adjusting or manual)
When lining thickness falls below 0.5 mm, braking performance drops below FMVSS 105 standards. A broken return spring can let the shoe drag, overheating the drum and creating a safety hazard. Typical shoes last 30,000, 60,000 mi, but harsh driving or heavy loads can cut that in half.
Before you start, secure the vehicle on jack stands or sturdy ramps to prevent it from rolling. Per FMVSS 105, the minimum coefficient of friction for street use is 0.35.
Step-by-Step Process
Follow these steps to replace the brake shoes safely and correctly.
| Item | Purpose | Typical Cost |
|---|---|---|
| Jack and jack stands | Lift and support vehicle | $30–$80 |
| Lug wrench or impact wrench | Remove lug nuts | $20–$50 |
| Brake drum puller (optional) | Remove stubborn drum | $15–$30 |
| Brake spring tool | Compress and release springs | $10–$20 |
| New brake shoes (OEM or aftermarket) | Replace worn friction | $15–$45 each |
| Brake adjuster (if needed) | Maintain proper clearance | $5–$15 |
| Torque wrench | Verify lug nut torque | $20–$40 |
- Park on a level surface, engage the parking brake, and loosen lug nuts with an impact wrench technique.
- Jack up the car and place jack stands under the frame rails; use secure the car on ramps to keep it stable.
- Remove the wheel and fully loosen lug nuts, then remove the wheel hub and brake drum.
- Use a brake spring tool to compress the primary and secondary springs, then detach them from the shoes.
- Slide the old shoes off the backing plate, noting their orientation for reinstallation.
- Install new shoes onto the backing plate, attach the pivot pin, and mount the primary and secondary springs.
- If the adjuster is worn, replace it and set the initial clearance to 0.5 mm.
- Re‑mount the drum, torque lug nuts to 80 to 100 ft‑lb, and verify drum runout is under 0.002 in.
- If you also plan to add a light bar, the same impact wrench works for mounting brackets; see mounting brackets for a light bar.
- After brake work, you may want to top up transmission fluid; follow top up transmission fluid after brake work.
Pump the brake pedal several times to seat the shoes, then perform a low‑speed test drive to confirm proper operation.
Costs, Benefits, and Common Mistakes
Understanding the costs and typical pitfalls helps you avoid expensive rework.
New brake shoes: $15, $45 each; a set of four typically $60, $180.
A set of four quality lug nuts usually runs $20, $40; see typical lug nut price range.
Optional parts: springs $5, $15 each, adjuster $5, $15.
Restored braking performance and pedal feel.
Even wear extends shoe life to 30,000, 60,000 mi.
Avoids drum replacement, saving $100, $200.
Installing shoes backward (front vs rear) causes premature wear.
Skipping spring tension check leads to brake drag and overheating.
Not cleaning the drum bore results in uneven contact and noise.
Forgetting to adjust the backing plate before re‑mounting the drum can cause misalignment.
Per SAE J441, correct installation sequence and torque values are essential for safety.
Frequently Asked Questions
How often should brake shoes be replaced?
Replace them when lining thickness drops below 0.5 mm or when return springs are broken. Typical service intervals are 30,000, 60,000 mi, but harsh conditions may require earlier replacement.
Can I use aftermarket shoes on OEM drums?
Yes, as long as the shoes match the drum’s bore size and curvature. Aftermarket shoes often meet or exceed OEM specifications, but verify the lining material suits your driving style.
What are the signs of a faulty adjuster?
A faulty adjuster causes uneven shoe wear, a spongy pedal, or a brake that drags. If the self‑adjuster doesn’t move the shoes after a few pedal applications, it should be replaced.
Do I need special tools to replace brake shoes?
A brake spring tool and a drum puller are recommended. An impact wrench speeds lug nut removal, and a torque wrench ensures proper lug nut torque. Basic hand tools can work, but the spring tool is essential for safety.
Should I replace the drum when changing shoes?
Only if the drum is scored, out of round, or exceeds 0.005 in runout. A clean, smooth drum can be reused after proper resurfacing or replacement of worn shoes.
