
A hard brake pedal almost always comes down to one thing. The power assist that normally multiplies your leg force has stopped helping, or something mechanical is fighting the pedal. If you're searching why is my brake pedal hard, the fastest way to frame it is a split.
Either the boost is gone, or a caliper, hose, or fluid fault is holding the brakes partly applied.
Federal rules show what normal looks like. FMVSS 135 sets a hard stopping-distance target from 62 mph, and it also tests cars in a partial-failure mode. Lose assist and you're outside that tested envelope, pushing with leg muscle alone.
That gap is why the next ten minutes of diagnosis matter far more than the repair bill.
Why Is My Brake Pedal Hard
Your brake pedal is hard because the power assist has stopped working. Most cars use engine vacuum to multiply your foot pressure. A cracked hose or a bad booster kills that vacuum.
The brakes still stop the car, but you must push much harder. That stiff pedal is a warning, not a quirk.
Why a Hard Brake Pedal Deserves a Careful Look, Not a Guess
Two very different failures produce almost the same feeling under your foot. That's the trap.
The first is a boost failure. The hydraulic circuit is healthy, so the car will stop, but your leg is now the booster. The second is a mechanical or hydraulic fault.
A dragging caliper, a collapsed hose lining, or a contaminated master cylinder can hold pressure and stop the pedal from travelling.
One of those means "drive carefully to a shop." The other can mean "park it and call a tow."
What actually changes when assist quits
A vacuum booster roughly doubles or triples the force your foot sends to the master cylinder. Take that away and the same pedal stroke needs several times the leg pressure.
In practice, that shows up as three things:
- Longer stopping distances, because you can't generate peak line pressure quickly.
- Poor modulation, because a stiff pedal gives you less feel near lockup.
- Rapid fatigue, especially in stop-and-go traffic or while holding the car on a hill.
At highway speed, with a full load, or on a downhill grade, "I can still stop it" turns into "I can stop it eventually." That difference is measured in car lengths.
The "monitor it" advice is the dangerous part
Generic advice online often ends with "keep an eye on it." For brakes, that's a bad call.
NHTSA logs brake-related defect investigations and recalls by make, model, and year, and those records are worth a two-minute check at the federal safety database. If your vehicle already has an open campaign for a booster, an ABS module, or a brake line, your diagnosis just got shorter.
Meanwhile, the physical side matters too. When a pedal goes stiff mid-drive, drivers tend to brace one hand on the wheel and one on the shifter. Keeping both hands planted on the rim gives you far better control while you modulate a heavy pedal.
Three questions that set your risk level
Ask yourself these before you turn another wrench:
| Question | Safe answer | Warning answer |
|---|---|---|
| Does the pedal firm up only with the engine off? | Yes | No, it's hard while running too |
| Does the car pull or drag after a short drive? | No | Yes, one wheel is hot |
| Can you stop from 30 mph in a normal distance with firm pressure? | Yes, roughly | No, it takes a runway |
Two or more warning answers and you should treat the car as immobile until someone qualified looks at it.
Hard vs. Spongy vs. Sinking vs. Low: Reading Your Pedal's Language
Pedal feel is diagnostic data. Each pattern points at a different system, and mixing them up sends you shopping for the wrong part.
A hard pedal is a resistance problem. A spongy pedal is an air problem. A sinking pedal is a leak.
A low pedal is a travel or adjustment problem. Those four fixes share almost nothing.
| Pedal feel | What it usually means | Risk level | Check first |
|---|---|---|---|
| Hard and high | Boost loss, seized caliper, blocked hose | High if it came on suddenly | Engine-off pump test, hose and check valve |
| Spongy, sinks under steady pressure | Air in the hydraulics, failing master cylinder | High | Fluid level, leaks, bleed the system |
| Low, close to the floor | Rear brake adjustment, air, fluid loss | High | Fluid reservoir, wheel cylinders |
| Hard only when cold, then normal | Sticking booster valve or moisture in the vacuum line | Medium | Hose condition, check valve |
| Hard after brake work | Pushrod length, glazed pads, unbedded pads | Medium to high | Recheck the install |
Why "hard" and "spongy" get confused
Both feel wrong, so people lump them together. The test is simple. Pump the pedal with the engine off until it's firm, hold steady pressure for 20 seconds, then watch your foot.
If the pedal holds its height, your hydraulics are sealed. If it creeps toward the floor, fluid is escaping or air is compressing, and you have a leak or a bleed problem, not a booster problem.
What a hard pedal after a fluid flush means
Air trapped in the system usually makes a pedal spongy, not hard. So if your pedal got stiff right after a flush, look elsewhere.
Common culprits are a vacuum line knocked loose during the job, a check valve installed backwards, or a booster hose left disconnected. On some vehicles, a reservoir cap left off during bleeding lets the level drop far enough to pull air in. That gives you a soft pedal plus a hard one, depending on the day.
When the pedal is hard but the car still stops normally
This is the classic failing booster pattern, and it's the best-case version of a bad situation. The assist is weak or intermittent, so the pedal is heavy but the hydraulics are intact.
You'll often notice it first at low speed, in a parking lot or at a cold start. That's because idle vacuum is lowest right after startup, and a marginal booster has the least to work with. Don't wait for it to become a full failure.
How Brake Assist Actually Works: Booster, Vacuum Source, and Pushrod Geometry
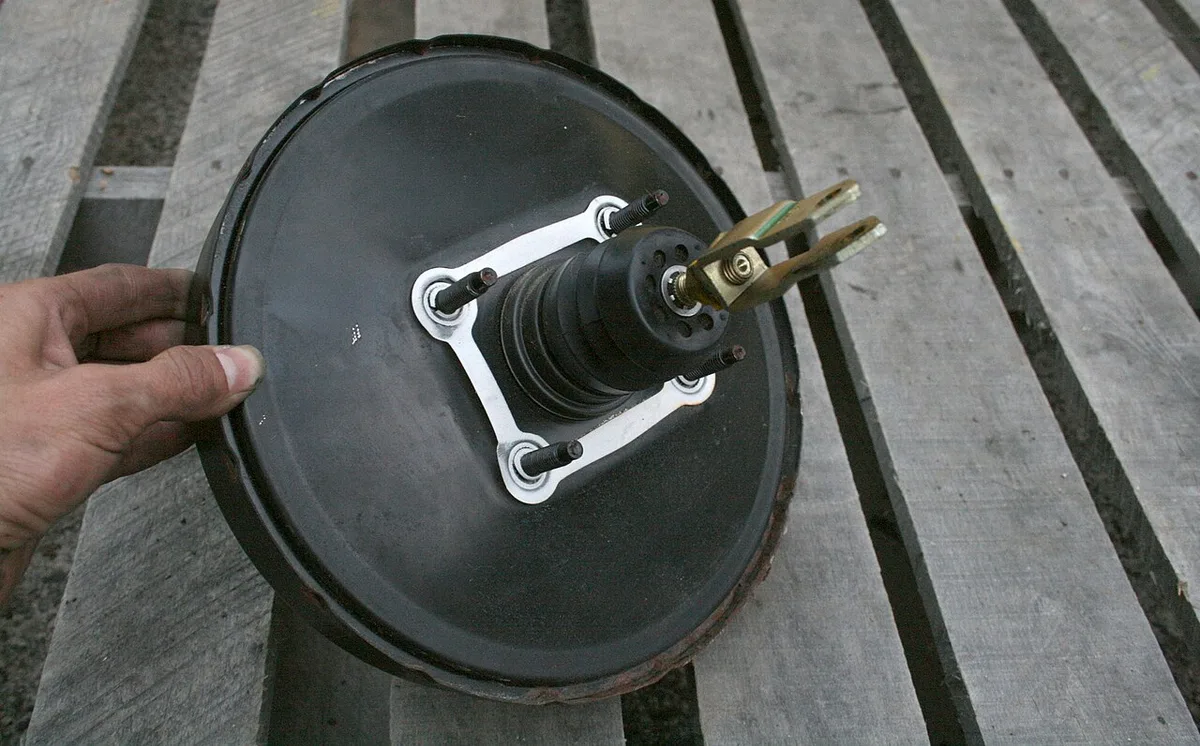
Image source: Wikimedia Commons / Ildar Sagdejev (Specious) (CC BY-SA)
A vacuum brake booster is a large steel canister bolted to the firewall, with the master cylinder on its nose. Inside, a rubber diaphragm splits the can in two. At rest, engine vacuum sits on both sides, so nothing moves.
Press the pedal and a valve opens. Air enters the rear chamber, pressure drops on the front chamber, and the pressure difference shoves the diaphragm forward. That extra push is what your leg feels as light pedal effort.
Where the vacuum comes from
Not every car makes vacuum the same way. This matters more than most guides admit, because the fix changes completely.
| Engine type | Vacuum source | Failure pattern |
|---|---|---|
| Naturally aspirated gasoline | Intake manifold vacuum | Low idle vacuum, rough running, hard pedal |
| Turbocharged gasoline | Manifold plus a mechanical or electric pump | Weak assist under boost, pump or check valve failure |
| Diesel | Engine-driven vacuum pump | Pump diaphragm or vane wear, oil-fed pumps leaking |
| Heavy-duty trucks and some SUVs | Hydro-Boost run off the power steering pump | Hard pedal plus heavy steering at the same time |
| Hybrid and EV | Electric vacuum pump or electro-hydraulic unit | Pump failure, software faults, unfamiliar pedal feel |
A healthy engine typically pulls about 15 to 20 inches of mercury (roughly 50 to 70 kPa) at idle, measured at sea level. Anything near 12 or below points at an engine problem rather than a booster. On a turbo car, manifold vacuum vanishes the moment the turbo spools, which is why engineers add a pump.
It's the same reason anyone adding forced induction has to plan a vacuum supply, not just plumbing.
The check valve and vacuum reserve
The one-way check valve sits in the booster hose or the booster's front shell. It lets the engine pull air out and stops air from rushing back in.
That trapped vacuum is your reserve. Kill the engine, then press the pedal. You should get two or three powered presses before the pedal goes hard.
Fewer than that and the valve, the hose, or the diaphragm is leaking.
Pushrod geometry: the cheap mistake that ruins the job
Between the booster and the master cylinder there's a pushrod, and its length is set with a gauge, not by eye. Get it wrong and you get two different failures.
- Too long: the master cylinder piston is held partly depressed. Fluid can't return, the brakes drag, and the pedal feels high and hard while the wheels get hot.
- Too short: you get excess pedal travel and a low pedal before the brakes bite.
Worn front end hardware can also blur the picture during a test drive, and the same value question applies to steering parts as to pricier suspension parts.
Manufacturers publish a pushrod clearance spec, usually a few thousandths of an inch, in the factory service manual. SAE International's brake standards and technical papers cover the test methods behind pedal effort and system performance, which is why shops reference them rather than guessing.
The 60-Second At-Home Tests That Point You to the Right System
Do these in order. Each one narrows the field, and none of them requires tools beyond eyes, ears, and your right foot.
Park on level ground, in park or neutral with the parking brake set, and chock a wheel. Never run these tests in traffic or on a slope.
Test 1: the engine-off pump and hold
- Pump the brake pedal five or six times with the engine off. The pedal should climb and go firm. That's normal, because you're using up the stored vacuum.
- Hold firm pressure for 20 seconds. Height should stay put. A pedal that sinks means a hydraulic leak or air, so stop here and get the system inspected.
- Keep your foot on the pedal and start the engine. The pedal should drop slightly and feel softer. That drop proves the booster is getting vacuum and working.
If the pedal drops, your boost works. If nothing changes, you're looking at a vacuum supply or booster failure. That's the single most useful 30 seconds in this whole article.
Test 2: listen for the hiss
With the engine idling, press and release the pedal slowly and listen near the pedal box. A steady hiss that continues after you release points at a leaking booster diaphragm or a bad front seal.
A short whoosh on press is normal. A hiss that never stops is not.
Test 3: the hose and check valve check
Open the hood and trace the thick rubber hose from the booster to the engine. Look for cracks, soft spots, oil saturation, or a loose clamp. Oil-soaked rubber goes soft and collapses under vacuum.
Then pull the check valve and blow through it. Air should pass one way only. If it passes both ways, or not at all, replace it.
It's one of the cheapest parts on the car.
For anything that needs you under the front of the car, getting the front end up safely comes first, ideally on rated ramps or stands rather than a jack alone.
Test 4: check for a dragging caliper
Drive a few miles at moderate speed, coast to a stop, and carefully feel each wheel near the rim, not the disc. One wheel noticeably hotter than the others means that corner is dragging.
Handling the wheels is easier if you can spin the lug nuts off quickly with normal hand tools rather than fighting them at the roadside, so power tools on wheel fasteners are best left for the driveway.
Test 5: scan for stored codes
If the ABS or brake warning light is on, a capable scan tool that reads chassis codes will tell you which corner the module is unhappy with. Wheel speed sensor and ABS pump codes often surface alongside a hard pedal complaint on vehicles with electronic brake distribution.
If/then summary
- Pedal drops when the engine starts, but stays hard while driving: suspect the booster itself or a partially blocked hose.
- Pedal never drops: no vacuum reaching the booster, so check hose, valve, and pump first.
- Pedal sinks while held: hydraulic fault, stop driving.
- One wheel hot: seized caliper or slide pins, repair before the pads and rotor cook.
- Everything passes but the pedal is still heavy: check for a restricted hose or a mismatched pushrod after recent work.
A Failed Brake Booster: Symptoms, Vacuum Readings, and What Replacement Really Involves
A booster doesn't usually die all at once. It fades, and the early signs are easy to dismiss.
Symptoms that cluster together
Watch for this group rather than a single symptom:
- A pedal that's heavy at cold start and eases as the engine warms.
- A hiss under the dash when you brake.
- An idle that stumbles slightly each time you press the pedal.
- Assist that fades after a few quick stops, then returns after a short rest.
- Hard pedal combined with a rough idle or a check engine light on a speed-density engine.
That last one catches people. A vacuum leak big enough to cripple the booster also leans out the intake, and a tired engine with oil-fouled plugs or its own intake leak can't feed the booster properly in the first place.
Reading a vacuum gauge
Connect a gauge to the booster hose, engine idling.
| Gauge reading | Likely meaning |
|---|---|
| 18 to 22 inHg, steady | Healthy supply, so the fault is in the booster |
| 15 to 17 inHg, slightly shaky | Worn engine or small leak, check further |
| Below 12 inHg | Engine or pump problem, not the booster |
| Reading drops when you press the pedal | Normal, small dip is expected |
| Steady reading but no assist | Booster diaphragm or internal valve failure |
On a diesel, test at the pump outlet as well as the booster line. A failing vane pump can pull decent vacuum at idle and collapse under load.
What replacement actually involves
This is a real job, not a fuse swap. Budget two to four hours on most vehicles, more if the booster hides under the cowl or the master cylinder has to come out with it.
- Disconnect the battery and label the vacuum lines.
- Unbolt the master cylinder and move it aside without kinking the hard lines. If you open the circuit, you'll need to bench bleed and bleed the whole system after.
- From under the dash, disconnect the pushrod from the brake pedal.
- Unbolt the booster from the firewall and work it out.
- Transfer the check valve and any brackets to the new unit.
- Set pushrod length with the gauge tool, then reinstall in reverse order.
- Bleed the system if it was opened, then road test somewhere empty.
What it costs
These are typical US ranges as of 2026, and they move with make, model, and labor rates.
| Job | Parts | Total with labor |
|---|---|---|
| Vacuum hose | $10 to $40 | $20 to $100 |
| Check valve | $10 to $25 | $20 to $70 |
| Brake fluid flush | $10 to $25 | $90 to $180 |
| Vacuum booster (common passenger car) | $90 to $300 | $400 to $900 |
| Diesel vacuum pump | $150 to $450 | $400 to $1,000 |
| Caliper and slide pin service | $60 to $200 per corner | $150 to $400 per corner |
A rebuilt or salvage booster can cut the parts cost in half. Check the warranty, and check that the donor car matches your pedal ratio and engine package.
The fix that costs nothing
If your hard pedal arrived after someone replaced the master cylinder, booster, or a brake hose, the first step isn't a new part. It's rechecking the pushrod, the hose routing, and the check valve orientation. Install errors in those three spots account for a large share of "new parts, same problem" comebacks.
That's also the point where a second opinion pays for itself. A shop with a vacuum gauge and a factory manual can confirm the diagnosis in under an hour, and you'll know whether you're buying a hose or a booster before you spend anything.
Vacuum Leaks: Cracked Hoses, Stuck Check Valves, and Low Engine Vacuum
A booster with no vacuum is just a heavy steel can bolted to the firewall. Before you spend money on one, prove the supply side is healthy.
How a small leak turns into a heavy pedal
The booster works on a pressure difference. Any leak that lets air creep back into the shell or the hose bleeds that difference away.
You feel it as a pedal that's heavy on the first press and gets worse as the engine idles. Rubber ages badly, and heat from the exhaust side plus oil mist from the PCV system hardens the hose from the inside out.
Where these hoses actually fail
- At the booster grommet, where the plastic elbow pushes into the shell. The seal hardens and leaks quietly.
- At the clamp near the intake manifold, especially on turbo cars where the hose runs close to hot plumbing.
- Along the underside of the hose where it bends around the cylinder head. Cracks start there and stay hidden.
- At any spliced or taped section. A previous owner's repair is not a vacuum seal.
Squeeze the hose along its whole length with the engine running. If the idle changes while you squeeze, you found the leak.
The blow-through test for a check valve
Pull the valve out and blow through the booster side. Air should pass toward the engine and stop dead in the other direction.
A valve that flows both ways kills your vacuum reserve. A valve that flows neither way starves the booster completely. Both are junk, and both are among the cheapest parts in the system.
While it's out, look inside the hose for oil. A wet, oily hose means something upstream is pushing oil vapour into the booster, and that booster will fail if you don't fix the source.
Is low engine vacuum the real problem?
Sometimes it is. A healthy gasoline engine pulls roughly 15 to 20 inches of mercury at idle at sea level. If your gauge reads 12 or lower, the booster is innocent.
Usual suspects include an intake leak elsewhere, a clogged air filter, worn rings, a jumped timing chain, or a sticking throttle body. On speed-density engines, a leak big enough to starve the booster usually shows up as a rough idle too. The same conditions that foul plugs with oil will drag manifold vacuum down as well.
Fix the engine first. A fresh booster bolted to a sick engine will feel exactly as heavy as the old one.
If/then guide for the supply side
- Squeezing the hose changes idle: replace the hose.
- Valve flows air both directions: replace the valve.
- Gauge reads below 12 inHg: engine problem, not a booster problem.
- Gauge reads healthy but assist is missing: the booster's internal valve or diaphragm has failed.
- Hiss stops when you clamp the hose shut: the leak is inside the booster, not in the line.
| Leak location | What you notice | Fastest test |
|---|---|---|
| Hose body | Hiss at idle, heavy pedal at low speed | Squeeze test |
| Grommet at booster | Faint hiss under the dash, worse when braking | Wiggle the elbow with the engine running |
| Check valve | Assist works, then fades after two presses | Blow-through test |
| Booster diaphragm | Constant hiss, rough idle, hard pedal | Clamp the hose and listen for the hiss to stop |
Hose replacement without repeat failures
Use vacuum-rated hose. Fuel line collapses under vacuum, and heater hose swells. Both put you back at a hard pedal within a month.
Warm the new hose in hot water before pushing it onto the booster elbow. Cold rubber splits the plastic elbow, and a cracked elbow is a new leak on top of the old one. Keep the factory spring clamps where they exist and route the hose clear of exhaust parts.
Then rerun the engine-start test. The pedal should drop the moment the engine catches. If it doesn't, something in the chain is still open.
Seized Calipers, Collapsed Hoses, and Wet Fluid: The Mechanical and Hydraulic Side
Not every heavy pedal is a vacuum fault. Sometimes the pedal is hard because the brakes are already partly applied and your leg is fighting them.
How a dragging caliper stiffens the pedal
A piston that won't retract, or slide pins corroded solid, keeps the pad pressed against the rotor. The system is preloaded, so there's no free travel left at the pedal.
The constant friction then cooks the pads, the rotor, and eventually the fluid. Once fluid boils, you get a gas pocket. Depending on where that pocket sits, the pedal can feel stiff, spongy, or dead.
Wheel temperature is the tell. After five miles of light braking, all four wheels should be warm but similar. A corner too hot to touch is dragging.
Piston, slide pins, or parking brake
- Slide pins: the most common cause. Pull them, clean them, relube with high-temp silicone grease, and replace any pitted pin.
- Piston: corrosion behind the dust boot seizes the piston in the bore. A rebuild kit or a reman caliper solves it.
- Parking brake lever: on rear calipers with an integral lever, a seized lever or sticky cable holds the pad on. Check cable free play first.
- Collapsed hose: covered next. It can mimic a seized caliper at one corner and fool an experienced parts counter.
A collapsed hose acts like a one-way valve
Flexible brake hoses have an inner liner. With age it can separate and flap. Fluid pushes past it under pressure, then can't return.
The caliper stays applied after you release the pedal. That corner overheats, the pedal sits high and hard, and the car may pull. The hose looks perfect from the outside, which is why this one catches people out.
Crack the bleeder on the hot corner. If the wheel frees instantly, the hose is the restriction. Cheap part, big consequence, and it's the same story with brand-name chassis parts generally: the no-name bargain is where the failure starts.
Brake fluid, moisture, and boiling points
DOT fluid is hygroscopic. It pulls water from the air and through the reservoir over time. Water lowers the boiling point and corrodes the system from the inside.
| Fluid | Dry boiling point | Wet boiling point | Typical interval |
|---|---|---|---|
| DOT 3 | about 205 C (401 F) | about 140 C (284 F) | 2 to 3 years |
| DOT 4 | about 230 C (446 F) | about 155 C (311 F) | 2 years, sooner with hard use |
| DOT 5.1 | about 260 C (500 F) | about 180 C (356 F) | 1 to 2 years |
FMVSS 116 sets these ratings in the US, and the wet number is the one that matters on a used car. A three-year-old reservoir of DOT 3 sitting near the wet spec will boil fast on a long descent.
Fresh fluid won't fix a hard pedal on its own. It prevents the boiled-gas version of the problem, and it protects the master cylinder and ABS unit from rust.
Could the master cylinder or ABS unit be the culprit?
Possible, but the pedal feel usually gives it away. A master cylinder failing internally leaks past its seals, so the pedal sinks under steady pressure instead of going hard.
An ABS hydraulic control unit fault is rarer. It normally sets a code and lights the ABS lamp, which is where picking a scan tool that reads chassis codes pays for itself.
When the fault is at the rear
Rear drums with a failed self-adjuster give you a low pedal, not usually a hard one. Rear discs with a stuck parking brake mechanism can produce either.
If a heavy pedal came with a burning smell from one rear wheel, start at that corner. Rear calipers are the ones most often neglected, and they're the ones that seize from sitting.
Stiff Pedal Right After Brake Work: Pushrod Length, Bleeding, and Bed-In Mistakes
This one is for a specific reader. The pedal felt fine, you did the job, and now it's heavy.
The pushrod is your first suspect
Every time the master cylinder or booster comes off, pushrod length has to be checked. The spec is usually a few thousandths of an inch of clearance between the pushrod tip and the master cylinder piston.
Too long by even a little and the piston stays slightly depressed. Fluid can't return to the reservoir, the brakes drag, and the pedal sits high and hard. Drive far enough and you'll smell hot brakes at a stoplight.
Measure with a pushrod gauge or a depth gauge. Eyeballing it is how this failure happens.
Bench bleeding, and why air feels wrong here
Air in the hydraulics normally reads as spongy. So when the pedal comes back hard after a master cylinder swap, people look in the wrong place entirely.
Still bench bleed the new unit. Air trapped inside it travels and creates inconsistent feel. Air alone rarely makes a pedal hard, but it makes every other fault harder to read.
Pad bedding and glazing
New pads transfer a layer of friction material onto the rotor. Skip that step and the pads glaze. Glazed pads feel wooden, and the pedal can feel firm but unresponsive.
Bed them in with a run of moderate stops from around 45 mph, letting them cool between cycles. Keep hard stops from high speed out of the first 200 miles.
Twisted hoses and misrouted lines
A hose twisted during caliper installation can kink internally. So can one routed against a suspension arm at full lock.
Turn the wheels lock to lock with the car on the ground and watch each hose. Any stretch, pull, or contact with metal is a routing error that will become a restriction.
Bleeding order and the ABS bleed cycle
Bleed in the order the factory manual states. That usually means starting at the corner farthest from the master cylinder. Get it wrong and trapped air stays put no matter how much fluid you push through.
Many ABS-equipped vehicles also need a scan-tool-activated bleed cycle to purge the hydraulic unit. If you replaced the module, changed the master cylinder, or let the reservoir run dry, do that cycle. Skipping it is one of the most common reasons a pedal never comes back.
| Symptom after the job | Most likely cause |
|---|---|
| High, hard pedal and hot wheels | Pushrod too long, or a hose kinked at the caliper |
| Low pedal with more travel | Pushrod too short, or air still in the system |
| Spongy and sinking | Air, or a leaking flare connection |
| Hard pedal plus a pull to one side | Caliper installed dry, or slide pins left ungreased |
| Fine cold, hard when hot | Glazed pads, or fluid boiling from a dragging corner |
What to check before you take it apart again
Drive gently for two miles, then check wheel temperatures. Cool corners mean the hydraulics are free. Hot corners mean mechanical drag.
If all four run cool and the pedal is still heavy, the fault is boost related. Recheck the vacuum line you may have knocked off and confirm the check valve points the right way. It's a five-minute check that can save a whole rebuild.
Why Diesels, Turbos, Hybrids, and EVs Play by Different Rules
Same symptom, four different systems underneath. Diagnosing a diesel like a gasoline car wastes money fast.
Diesels use a dedicated vacuum pump
Diesel engines don't throttle, so they produce almost no manifold vacuum. Assist comes from an engine-driven or electric pump instead.
When that pump wears, you get a hard pedal that's worse at idle and improves with revs. Vane pumps degrade slowly, so the decline is easy to miss for months. Test at the pump outlet as well as at the booster line.
On oil-lubricated pumps, a failed seal pushes oil into the booster. A booster full of oil fails, and replacing it without fixing the pump repeats the job at double the cost.
Hydro-Boost ties braking to the power steering
Hydro-Boost runs on pressurized power steering fluid instead of vacuum. It's common on heavy-duty trucks and larger SUVs.
The giveaway is a hard pedal plus heavy steering at the same time. Both draw from one pump, so low fluid, a slipping belt, or a dying pump takes out both systems together.
Bleeding Hydro-Boost is its own procedure. Trapped air makes the pedal feel vague before it firms up and goes hard.
Turbo cars need an auxiliary supply
Manifold vacuum disappears the moment boost builds. Turbocharged cars use a check valve plus a reservoir, or a small electric pump, to keep assist alive under load.
If your pedal only goes hard while you're on boost, the check valve is the prime suspect. That failure shows up exactly when you need brakes most, which is at highway speed with the turbo lit.
Hybrids and EVs change the feel on purpose
Most hybrids and EVs use an electric vacuum pump, or a fully electro-hydraulic unit with no engine vacuum at all.
Two things confuse owners here. First, pedal feel is deliberately tuned and often firmer than a vacuum car's. Second, regenerative blending means the friction brakes may not engage at all under light braking, so the pedal can feel different at low speed versus a panic stop.
A genuinely hard pedal on one of these is usually a pump failure, a pressure sensor fault, or a software issue. Those set codes. Pull them before replacing hardware, and treat high-voltage brake work as shop-only.
| System | Assist source | Quick test | Common failure |
|---|---|---|---|
| Gasoline vacuum booster | Intake manifold | Pedal drop at engine start | Hose, valve, diaphragm |
| Diesel vacuum booster | Engine or electric pump | Gauge at the pump outlet | Pump vanes, oil seal |
| Hydro-Boost | Power steering pump | Pedal assist plus steering effort | Pump, fluid level, belt |
| Turbocharged gasoline | Check valve and reservoir or aux pump | Pedal behaviour under boost | Check valve, pump |
| Hybrid and EV | Electric pump or electro-hydraulic unit | Scan tool live data | Pump, sensor, software |
SAE International publishes much of the test methodology behind power-assist and pedal-feel performance, and OEM service manuals carry the model-specific numbers you actually set the wrench to.
One more crossover worth knowing: engine health and brake assist share a root cause on diesels. A tired engine with a worn injector set can idle badly enough to drag vacuum down, so a rough idle and a heavy pedal can be one problem, not two.
What Each Fix Costs and What Skipping It Costs You
Parts prices are easy to look up. The expensive number is the one that shows up three months later.
Prices by job as of 2026
These are typical US ranges. Labor rates and vehicle layout move them a lot, and trucks with Hydro-Boost sit at the top end.
| Fault | DIY parts | Shop estimate | Cost of waiting |
|---|---|---|---|
| Vacuum hose | $10 to $40 | $60 to $120 | Assist fails completely, no warning |
| Check valve | $10 to $25 | $50 to $100 | Reserve drops to zero, pedal hard at startup |
| Fluid flush | $10 to $25 | $90 to $180 | Master cylinder and ABS corrosion, $400 plus |
| Caliper service | $20 to $60 | $150 to $300 | Pads and rotors, plus possible fluid boil |
| Reman caliper | $80 to $200 | $250 to $450 | Heat damage to the hub and wheel bearing |
| Brake hose | $20 to $60 | $120 to $250 | One corner cooks, then the whole system suffers |
| Vacuum booster | $90 to $300 | $400 to $900 | Total assist loss with no progressive warning |
| Diesel vacuum pump | $150 to $450 | $400 to $1,000 | Oil pushed into a new booster, so you buy it twice |
| Hydro-Boost unit | $200 to $500 | $700 to $1,400 | Steering and braking degrade together |
The hidden costs nobody quotes
- Towing. A hard pedal that becomes no assist at speed is a flatbed call, often $150 to $300.
- Collateral damage. A dragging caliper that warped a rotor adds $80 to $200 per side.
- Downtime. Most brake work is same-day. Booster jobs can run into a second day while parts arrive.
- Liability. Driving a car you know has compromised brakes shifts fault to you in a crash. No price table covers that, and no insurer will thank you for it.
Should you do this yourself or hand it over
- Hose, valve, and fluid top-up: DIY friendly. Basic hand tools and half an hour.
- Fluid flush with an ABS bleed cycle: DIY with a scan tool and a helper, otherwise a shop.
- Caliper and slide pin service: DIY if you're confident lifting the car safely.
- Booster replacement: shop territory for most people. The pedal box work is awkward, and a wrong pushrod length ruins the result.
- Hydro-Boost and EV brake systems: shop only. Stored pressure and high voltage both bite.
New, rebuilt, or salvage
OEM new is the safest and the most expensive. Rebuilt boosters and calipers are common and usually carry a warranty. Salvage is a gamble on a part that fails with age, so it's rarely worth it for something this critical.
The truly bad option is the cheapest no-name part on the marketplace. You pay twice there, once for the part and once for the labor to redo the job properly.
Mistakes That Turn a Cheap Fix Into a Tow Bill
Most expensive brake repairs don't start with a dramatic failure. They start with a misread symptom, a shortcut, or a part bought before the diagnosis was finished. These are the mistakes that reliably cost people money.
Does pumping the pedal to the floor damage the master cylinder?
Yes, it can, and this one surprises people. The seals inside a high-mileage master cylinder spend their whole life cycling through one clean section of the bore. Push the pedal to the floor and you drag those seals across crud and corrosion they never normally touch.
Debris breaks loose. The seals score. Then the pedal starts sinking under steady pressure, which is a brand new failure you just created.
Bleed with short strokes that stay inside the normal travel range.
The parts-cannon mistakes
Buying parts before proving the diagnosis is the fastest way to pay twice.
| Mistake | Result | Cost of the error |
|---|---|---|
| Booster swapped before testing vacuum supply | New booster, same hard pedal | $400 to $900 spent twice |
| Master cylinder bought for a hard pedal | Hard is not how it fails | Wrong part, wasted labor |
| Fuel line used as booster hose | Collapses under vacuum | Same symptom in weeks |
| Check valve fitted backwards | No reserve, weak assist | Repeat diagnosis, new part |
| Pushrod length eyeballed after a swap | Brakes drag, pedal sits high and hard, rotors run hot | Master cylinder, plus rotors and pads |
Shortcuts that come back within a month
- Reusing old fluid. It's already loaded with moisture and it won't handle heat.
- Skipping the ABS bleed cycle after the reservoir ran dry. Trapped air lives inside the module for months.
- Greasing slide pins with chassis grease. It melts, dries, and glues the pins solid.
- Hanging a caliper by its brake hose. The inner liner separates and the hose becomes a one-way valve.
- Bleeding with the pedal mashed to the floor. You scrape the master cylinder seals across years of sediment.
- Bedding in new pads on a highway cruise. Pads glaze when they're never properly heated and cooled.
Diagnosis mistakes worth more than the repair
Ignoring codes is the big one. A hard pedal on a vehicle with a stored ABS code isn't a mystery, it's a message you skipped.
Ignoring heat is the second. A wheel too hot to touch after a short drive tells you more than any scan tool. Our advice is simple: feel all four wheels before you buy a single part.
And never lift a car for brake work on a jack alone. Rated stands or a solid set of wooden driving ramps keep a heavy car from landing on you.
When a Hard Pedal Means Park It: The Safety Line
There's a version of this problem you can drive to a shop. There's another version that ends with a flatbed. The difference is measurable, not a matter of confidence.
What actually happens to stopping distance
FMVSS 135 sets the federal stopping performance requirement for light vehicles, and it includes a partial-failure test mode. A car with dead assist isn't in that tested envelope anymore.
Losing boost can take pedal effort from light to well over 100 pounds, which is more than many drivers can apply smoothly at speed. Stopping distance stretches, and modulation near lockup gets clumsy.
That's on dry pavement, alone in the car, in daylight. Add rain, a full load, or a downhill grade and the picture gets much worse.
The triggers that mean stop driving now
- The pedal goes hard while the engine is running, not just after shutdown.
- You need both feet or a hand on the wheel to generate braking force.
- The car pulls hard to one side under braking.
- Smoke, a burning smell, or visible heat from a wheel.
- The brake warning light is on with the fluid level low.
- The pedal is hard and the parking brake won't hold the car on a slope.
Any one of these is enough. Two of them and the car shouldn't move another block.
How to get it somewhere safe
Towing costs far less than a crash. A short flatbed trip commonly runs $100 to $250, and most roadside plans cover part of it.
If you genuinely have no choice and the car still stops predictably at low speed, keep it off highways. Plan a route with no steep descents, leave triple the following distance, and use engine braking on any slope. Hazards on, daylight preferred.
Never ride the brakes to slow a dragging corner. Pull over and let it cool, because hot fluid boils and boiling fluid means no pedal at all.
What the rules and the paperwork say
US states vary on safety inspections, but every one of them treats knowingly driving a vehicle with faulty brakes as a violation. If you're in a crash with a documented brake complaint, fault shifts toward you.
The brake warning lamp isn't decorative either. It's tied to fluid level and, on many vehicles, to the pressure differential switch. A hard pedal plus that lamp is a hydraulic problem until proven otherwise.
NHTSA's vehicle safety database is worth checking before you authorize any repair. If a recall covers your booster or brake system, the manufacturer pays, not you.
The judgment call in one line
If the pedal is hard but the car stops in a normal distance at low speed, you can likely drive it carefully to a shop. If stopping distance itself has changed, park it. That's the whole rule.
Cold Mornings, Mountain Grades, and Rust-Belt Calipers: Keeping Assist Healthy Year-Round
Where you live and how you drive shape which part of this system fails first. The symptom is identical. The cause isn't.
Cold climates: rubber gets hard, seals get brittle
A vacuum hose that seals at 70 F can leak at 10 F. Cold rubber stiffens, shrinks slightly, and opens cracks that were invisible in summer.
That's why a stiff pedal that only appears on the first cold start of the day is such a common complaint. It also means a winter pedal check is worth doing in November, not January.
Cold weather makes weak batteries worse too. A slow crank means low idle vacuum for the first few seconds, so a marginal booster feels dead right when you need it.
Mountain driving: heat is the enemy
Long descents generate heat in the pads and rotors, and that heat travels into the caliper and the fluid. Moisture-laden fluid boils well below its dry rating.
Once gas forms in the caliper, the pedal can go long and soft, or briefly hard if the gas pocket sits elsewhere. Either way, you've lost reliable braking on a grade.
Use a lower gear and let the engine hold the car. Brake firmly and briefly rather than dragging lightly for a mile. If the pedal changes at all, pull over and let everything cool before continuing.
Rust-belt and coastal corrosion
Road salt and sea air attack two things here: the steel brake lines and the caliper hardware. Slide pins seize, bleeder screws snap, and lines rust from the inside out.
Annual inspection of the hard lines matters more than most maintenance lists suggest. A line that looks damp near a clip is a line about to fail.
| Region or condition | What fails first | Seasonal check |
|---|---|---|
| Cold winters | Vacuum hose cracks, hard seals, weak battery | Hose squeeze test each autumn |
| Mountain and towing use | Fluid boiling, glazed pads, warped rotors | Fluid moisture test before trip season |
| Rust belt | Slide pins, bleeder screws, steel lines | Underbody brake line inspection each spring |
| Coastal salt air | Caliper pistons, hose fittings | Caliper service every second year |
| Desert heat and dust | Dust boots, dried grease | Boot inspection after dusty season |
| Stop-and-go city use | Pads, fluid heat cycling | Fluid change on the shorter interval |
A maintenance routine that prevents most of this
- Flush brake fluid every two to three years, or annually if you tow or drive mountains.
- Squeeze the booster hose at every oil change. It takes ten seconds.
- Grease slide pins whenever the wheels are off for rotation.
- Test the vacuum reserve monthly. Engine off, two or three powered presses, then check the pedal holds.
- Keep lug hardware in good shape so wheels come off without a fight, which makes routine checks actually happen.
- Watch for a low pedal or a soft one. Those are earlier warnings than a hard pedal.
None of this is glamorous. It's the cheapest way to avoid ever feeling a pedal go stiff at 60 mph.
Verified Decision Guide: What to Do Next, Based on What You Found
Run the tests, then match your result to a row below. Every branch here ties back to something you can confirm yourself.
| What you found | What it means | Do this | Urgency |
|---|---|---|---|
| Pedal drops slightly at engine start | Boost is working | Move on to wheel temperature and hose checks | Routine |
| Pedal stays hard at engine start | No vacuum reaching the booster | Check hose, check valve, then vacuum source | High |
| Hiss under the dash that never stops | Booster diaphragm or front seal | Replace the booster | High |
| Squeezing the hose changes idle | Hose leak | Replace hose with vacuum-rated rubber | Medium |
| Valve flows both directions | Failed check valve | Replace valve | Medium |
| Gauge under 12 inHg | Engine or pump problem | Diagnose the engine side first | High |
| Pedal sinks while held | Hydraulic leak or air | Stop driving, inspect lines and master cylinder | Immediate |
| One wheel much hotter than the rest | Dragging caliper or collapsed hose | Free the corner, replace the failed part | High |
| Hard pedal after brake work | Pushrod length or routing | Recheck the install before buying parts | High |
| Hard pedal plus heavy steering | Hydro-Boost or pump fault | Check fluid and belt, then the pump | High |
| Hard pedal plus ABS lamp | Electronic fault | Pull chassis codes | Medium |
The three-sentence summary of the physics
Assist multiplies your foot. Lose it and you're pushing hydraulic pressure with muscle alone. A hard pedal is a pressure problem upstream of the calipers, unless a dragging corner is preloading the system.
What to tell a shop so you don't get upsold
Say what you tested and what you found. "Engine cold, pedal hard, no drop at startup, hose squeeze changes idle" gives a technician a starting point in one sentence.
Shops respect that. It also makes a wrong diagnosis their problem rather than yours, and it keeps the estimate honest.
Frequently Asked Questions
Can I drive with a hard brake pedal?
Only if the car still stops in a normal distance at low speed. A hard pedal with a longer stopping distance is a tow, not a drive. Braking performance standards assume working assist, so you're beyond the tested envelope.
Does a hard pedal always mean a bad brake booster?
No. A cracked vacuum hose, a stuck check valve, a weak engine vacuum supply, or a seized caliper can all do it. Test the supply side before buying a booster.
Hoses and valves cost a fraction of a booster job.
What is the difference between a hard pedal and a spongy one?
Hard means extra resistance, usually lost assist or a dragging corner. Spongy means the pedal compresses, which points to air or a failing master cylinder. They're opposite failures.
A pedal that sinks under steady pressure is a leak, not boost.
Why is my pedal hard only on cold mornings?
Cold rubber stiffens and old cracks open up. A marginal vacuum hose or booster seal leaks more at low temperature. It often eases as the engine bay warms.
Get it fixed before winter, because the leak grows.
Can low brake fluid cause a hard pedal?
Low fluid usually gives a soft or long pedal, not a hard one. But if the level dropped far enough to pull air into the ABS unit, pedal feel gets unpredictable. Top it up and find the leak.
Fluid doesn't disappear on its own.
How much does it cost to fix a hard brake pedal?
A hose or check valve is often under $120 installed. A booster replacement typically runs $400 to $900. Hydro-Boost and diesel pump jobs land higher.
Diagnosis first is what keeps the bill small, since the cheap fixes cause a surprising share of cases.
