
Coolant is disappearing, the reservoir keeps dropping, and you need to know how to fix a coolant leak before the gauge climbs into the red. Here's the honest version: most leaks are findable in about twenty minutes with a pressure tester, a flashlight, and a completely cold engine. The tricky part usually isn't the repair itself.
It's working out which of five very different problems you're actually staring at.
One number frames the whole job. Per manufacturer specifications, a typical passenger car holds 6 to 12 quarts (5.7 to 11.4 liters) of 50/50 mix and runs a radiator cap rated at 14 to 18 psi. Lose a quart a day and you'll overheat inside a week of ordinary commuting.
So before you buy a single part, pin down what kind of leak you have.
How to Fix a Coolant Leak
Fixing a coolant leak starts with finding the source. Let the engine cool completely. Pressure test the system to locate the drip.
Replace the failed hose, clamp, cap, pump, or radiator. Refill with the correct coolant and bleed out the air.
Why a Coolant Leak Is Really Five Different Problems
Two owners can describe the identical symptom and face bills that differ by a factor of fifty. One needs a four dollar spring clamp. The other needs the cylinder head pulled.
The word "leak" covers both cases, which is exactly why generic checklists fall apart so fast.
In our research across owner reports, published shop estimates, and OEM parts diagrams, nearly every coolant loss traces back to one of five places. Here's how they compare on cost and telltale signs.
| Where it's leaking | What you'll usually see | Typical part cost | Typical shop cost |
|---|---|---|---|
| Hose or clamp | Chalky crust at a hose end, drip when cold | $2 to $60 | $80 to $200 |
| Radiator tank seam | Hairline crack at the crimp, drip under pressure | $120 to $600 | $300 to $900 |
| Water pump seal | Drip from the weep hole, squeal or pulley wobble | $50 to $200 | $300 to $700 |
| Heater core | Sweet fog on the glass, damp passenger floor | $30 to $150 | $700 to $1,500 |
| Intake or head gasket | White exhaust, milky oil, bubbling reservoir | $50 to $300 and up | $1,500 to $3,500 and up |
Those part prices are typical US ranges as of 2026, pulled from OEM parts counters and aftermarket catalogs. Labor assumes dealer or independent shop rates, which swing a lot by region.
Four of those five are weekend jobs for a careful beginner with basic hand tools. The fifth is the one that decides whether a car is worth keeping. Most of the money and drama sits in that last row, so the rest of this guide is mostly about proving which row you're in.
Why "add coolant and watch it" is a decision, not a fix
Topping off is a legitimate diagnostic move. It buys you time to find the source without cooking the engine in the meantime.
What it isn't is a repair. Repeated top-offs change your mix ratio, and straight antifreeze poured in every week pushes concentration past 60 percent. That actually makes heat transfer worse, not better.
It also hides your leak rate, and the leak rate is the single best clue you have.
The 60-Second Verdict: Drive It, Top It Off, or Park It
The moment you spot the leak, the first question isn't which part to order. It's whether the engine should be started again.
Park it and let it cool if you see any of these
- The temperature gauge is in the red, or climbing past its normal resting point
- Steam or vapor rising from under the hood
- A coolant warning light or a "engine hot" message on the dash
- A sweet smell with obvious heat coming off the front of the car
- A steady stream, or a puddle forming while the engine idles
If any of that is true, shut it down and let it cool for at least 30 to 60 minutes. Driving a hot engine even a short distance can warp a head, drop a valve seat, or crack a plastic radiator tank. A $1,500 repair very often starts with "I just wanted to get it home."
Do not open the cap while the system is hot, either. A 15 psi system at operating temperature will spray coolant well above 200°F (93°C), and that's a burn unit visit.
Top it off and drive if the leak is slow
A slow leak is manageable while you plan the repair. Look for these signals.
- Damp residue or dried crust, but no drip on the ground
- Cold level sitting at or just under the MIN line, not below it
- Gauge holding steady through a full drive cycle
- Loss working out to ounces per week rather than ounces per mile
| What you're seeing | Rough loss rate | What to do |
|---|---|---|
| Damp residue, dried crust, no drip | Ounces per week | Check cold each morning, plan the repair |
| Active drip, dry ground underneath | Around a quart per week | Top off daily, book it in within days |
| Drip landing on hot exhaust, light steam | Around a quart per day | Short trips only, repair now |
| Stream at idle or puddle spreading | Fast, minutes to empty | Shut it down, tow it |
Can you drive with a coolant leak?
Sometimes, yes, but only at the slow end and only with the gauge in sight. Check the level cold every single morning rather than trusting the light. Keep a jug of pre-mixed coolant in the trunk.
Skip towing, skip long grades, and switch the AC off on hot days so the condenser isn't dumping extra heat into a system that's already struggling.
Watch the heater too. If it starts blowing cold at idle and warms up when you rev the engine, you've got air in the system from a low level. That's your cue to stop and top off.
One more thing about gauges. Plenty of modern dash clusters are heavily damped and sit at the same spot from 160°F to 230°F, then jump. A cheap scan tool reading live coolant temperature data is far more honest than the needle.
Our notes on picking a cheap scan tool cover what actually matters for live data.
If the leak is bad enough that the car can't be driven, arrange the tow before you start wrenching. Knowing where to hook a strap matters if you're winching a dead car onto a trailer rather than calling a flatbed.
External or Internal: The Split That Decides Everything
This one question decides your tools, your budget, and how fast you need to act. External leaks leave evidence on the car or the ground. Internal leaks leave evidence in the exhaust, the oil, or the reservoir.
External clues are the ones you can see and touch.
- Chalky white or dyed crust around hose ends, the thermostat housing, or radiator tank seams
- Wet spots that come back after you wipe them dry
- A visible drip line traced upward from the ground
- Dye glowing under a UV light after 100 to 200 miles of driving
Image source: Wikimedia Commons / Yoichi Okamoto
Internal clues need a closer look, and they carry far more weight.
- Thick white exhaust that doesn't thin out once the engine is warm
- A sweet smell at the tailpipe, distinct from normal exhaust
- Milky, tan, or chocolate-colored oil on the dipstick or under the oil cap
- Bubbles or an oil sheen in the reservoir while the engine runs
- Coolant vanishing with no puddle anywhere
- A heater that blows cold no matter what the gauge says
| Signal | External leak | Internal leak |
|---|---|---|
| Puddle or residue | Yes, usually | Often none |
| Exhaust appearance | Normal | White, persistent, sweet |
| Oil condition | Normal | Milky or emulsified |
| Reservoir behavior | Level drops, fluid stays clean | Bubbles, discolors, smells of exhaust |
| Typical cost to fix | $2 to $900 | $700 to $3,500 |
| Urgency | Days to weeks | Days, sometimes hours |
Oil where it shouldn't be is its own warning sign, and fouled plugs often tell the story before a compression test does.
My coolant is disappearing but there's no puddle. Where is it going?
It's going one of three places: out the tailpipe, into the oil, or into the air as steam you never notice. Burning it in the cylinders points at a head gasket or a cracked head. Leaking into the oil usually means a failed intake gasket or a breached head gasket passage.
Escaping as fine steam is the sneaky one, because a pinhole leak near the exhaust manifold can evaporate before it ever reaches the ground.
That last case fools a lot of people. If the level drops and the driveway stays dry, pressure test the system cold and then again at operating temperature. Heat opens gaps that cold metal holds shut.
Map the Puddle: What Drip Location and Color Tell You
Where the fluid lands narrows the suspect list before you even open the hood. You'll get better answers from underneath, so raise the front end on proper stands or ramps before you start hunting.
| Puddle location | Most likely source | How to confirm |
|---|---|---|
| Front center, behind the bumper | Radiator core, lower hose, drain petcock | Look for crust at the plastic tank crimp |
| Front center, under the belt line | Water pump weep hole | Mirror or borescope, check pulley for wobble |
| Passenger footwell or under the dash | Heater core | Damp carpet, sweet fog on the windshield |
| Rear of the engine, near the bellhousing | Rear core plug, intake gasket, head gasket | Dye plus a mirror, then a combustion gas test |
| Under the reservoir or expansion tank | Cracked tank, cap vent, hose nipple | Inspect the seam and test the cap separately |
| Both sides near the firewall | Heater hoses, heater control valve | Trace the wet trail upward with a light |
Fluid identification matters just as much, because three different systems can leave a puddle in the same square foot of driveway.
| Fluid | Usual color | Smell and texture |
|---|---|---|
| Coolant | Green, orange, pink, blue, or yellow | Sweet, thin, very slippery |
| Engine oil | Amber to black | Pungent, thicker, coats your fingers |
| Transmission fluid | Red or brownish red | Sharp, oily, stains skin |
| Washer fluid | Blue or pink | Soapy, faint alcohol smell |
| Brake fluid | Clear to amber | Caustic, strips paint on contact |
| AC condensate | Clear | No smell, watery, evaporates fast |
The red stuff is almost always transmission fluid, which has its own service routine and a completely different set of failure symptoms. Don't chase it as a coolant problem.
Does coolant color tell you which coolant to buy?
No. Color is dye and marketing, not chemistry. Coolant families are defined by their additive package: IAT (inorganic acid technology, the traditional green silicate formula), OAT (organic acid technology, such as Dex-Cool), and HOAT (hybrid OAT, used by several domestic and Asian brands).
Two bottles can look identical and be chemically incompatible. Mixing them can cause silicate dropout, sludge, or gasket attack over time. The spec printed on the bottle is what counts, things like Ford WSS-M97B44-D2 or GM 6277M, along with whatever your owner's manual lists for your engine.
Ethylene glycol, the base of most green and orange coolants, also carries workplace exposure limits for good reason. It's toxic, it tastes sweet, and a small spill is genuinely dangerous to pets and small children. In most US states used coolant counts as household hazardous waste, and the EPA points you toward local collection programs rather than the storm drain.
The Pressure Test: 15 Minutes That Rules Out Half the Tree
Everything downstream gets easier once the system is under pressure. A cooling system pressure tester is a hand pump with a gauge and a cap adapter. It clamps onto the radiator neck or the expansion tank and loads the system to its normal working pressure while the engine sits cold.
You aren't testing the engine here. You're testing the plumbing. Pump to the number stamped on your radiator cap, usually 14 to 18 psi, and watch the needle.
A healthy system holds. A leaking one drops, and the drop rate points you toward a pinhole or a split hose.
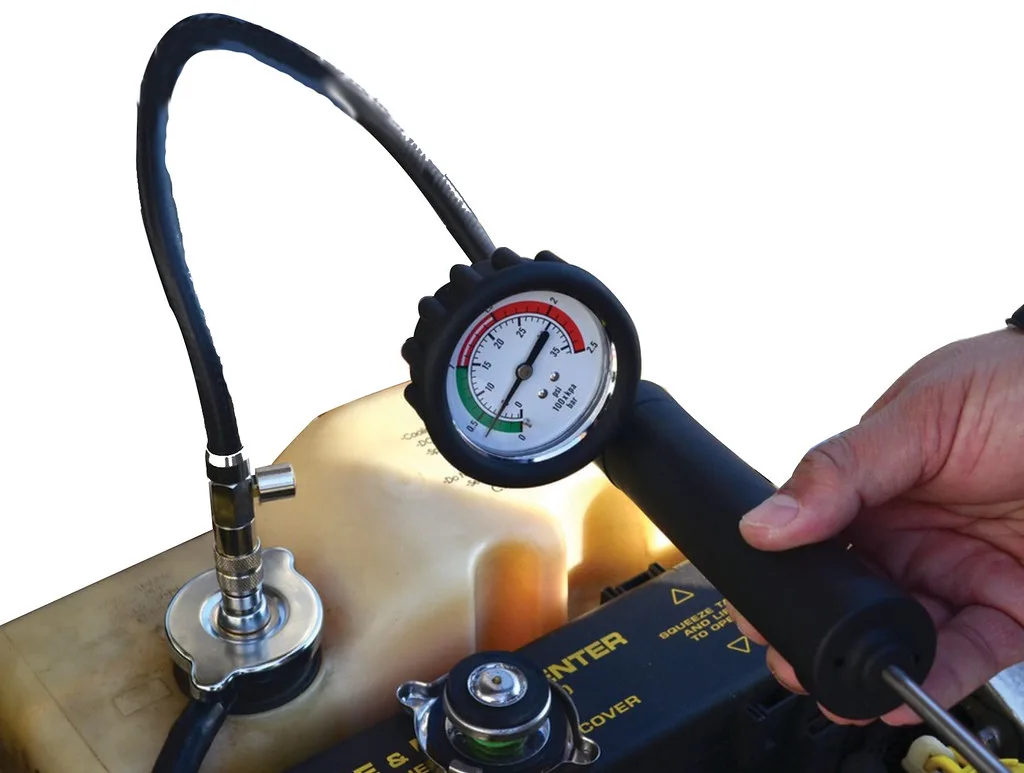
Image source: Openverse / sibiru_design (PDM 1.0)
What you need before you start
- Pressure tester with the adapter that fits your neck (most US parts stores loan these out with a deposit)
- Flashlight plus a small mirror, or a borescope for anything hidden behind the block
- Rag and a marker so you can flag where you already wiped
- UV dye kit if the leak refuses to show itself
- Cap tester, often bundled in the same kit
| Gauge behavior | What it usually means |
|---|---|
| Holds steady for 15 to 30 minutes | No external leak. Look internal instead |
| Drops slowly, nothing on the ground | Heater core, rear core plug, or a hose seeping under its clamp |
| Drops fast with a visible drip | Split hose, cracked tank seam, failed pump seal |
| Holds cold, drops hot | Head gasket, warped deck, or a seam that opens with heat |
| Pushes past cap rating | Combustion gas entering the system |
Cold test first, then hot
Start with the engine at ambient temperature. Cold testing catches shrinkage leaks, the faint ones that vanish once metal expands. That's why so many people pressure test, see nothing, and give up too early.
If the cold test is clean and you still have symptoms, run the engine to operating temperature and test again. Seams and gaskets that seal cold can open up hot. Just release pressure carefully and keep your face back from the neck.
Testing the radiator cap on its own
Test the cap separately, and do it every time. The cap is a spring-loaded pressure relief valve, and a tired one won't hold its rated pressure. The system then boils at a lower temperature and pushes coolant into the reservoir until it overflows.
Owners read that overflow as a leak. It isn't. It's a cap that quit doing its job, and it's an $8 to $25 part.
Tracing a drip you can't see
Pressurize the system and follow the wet trail upward, not down. Gravity lies to you. Coolant runs along frame rails, crossmembers, and wiring looms before it finally drips.
- Check hose ends, thermostat housing bolts, and the plastic tank crimp first
- Look at the water pump weep hole from underneath with the mirror
- Pull the passenger carpet corner back if you smell sweetness inside the car
- Add UV dye, drive 100 to 200 miles, then scan with a 365 nm light in a dark garage
A borescope earns its money on the rear of the block. Rear core plugs and intake gasket leaks sit where a flashlight can't reach and where a camera costs you ten minutes instead of a shop visit.
When a pressure test comes back clean
A clean pressure test with a falling reservoir points to one of three things: a leak into the combustion chamber, a leak that only appears hot, or a bad cap letting coolant escape as vapor. Run the hot test, test the cap, and then move to the combustion gas check in the last branch below.
If the system holds pressure for a full half hour with zero drop, stop shopping for parts. You don't have an external leak.
Branch 1: Hoses, Clamps, and Plastic Radiator Tanks
This is the cheap end of the tree, and it's where most leaks live. Rubber hoses are EPDM, often reinforced with fiber braid, and built to specs like SAE J20 from SAE International. They fail from age, ozone, oil contamination, and heat cycles.
Hose failures rarely happen in the middle. Look at the ends, where the clamp bites and where the rubber flexes hardest.
If you see a chalky crust, a swollen end, or a hose that feels hard and slick, replace it. A hose that's soft and spongy is just as finished.
Spring clamp or worm gear: which one goes back on
Spring clamps are constant-tension. They expand and contract with the hose as it heat cycles, holding force for years. Worm-gear band clamps are easy to find and easy to overtighten.
Overtightening is the classic DIY mistake. A worm gear cranked down hard will cut into the hose wall and crush a plastic radiator neck. If you fit one, snug it and stop.
You want the hose held, not strangled.
Replacing a hose in six steps
- Let the engine cool completely and drain coolant into a sealed container
- Slit the old hose lengthwise with a razor, then peel it off. Never pry against a plastic neck
- Clean the nipple until it's smooth. Old rubber residue causes new leaks
- Fit the new hose dry. No sealant, no grease
- Position the clamp behind the bead and tighten to snug
- Refill, bleed the air out, and recheck the level cold the next morning
Buy a molded hose shaped for your engine where you can. Universal flex hose works in an emergency, but it kinks, rubs, and rarely lasts as long.
Plastic tank seams: patch or replace
Aluminum cores with glass-filled nylon tanks are the norm now. The tanks are crimped onto the core and sealed, and that crimp seam is a fatigue point.
When the seam weeps, replace the radiator. Epoxy and stop-leak buy you weeks, not seasons. The crack keeps growing because the same heat cycles that caused it keep working on it.
A radiator job is more involved than a hose. You'll drain the system, pull the fan shroud, disconnect the hoses, and handle the transmission cooler lines on automatic cars. Budget two to four hours if you're careful and organized.
Branch 2: Water Pump Weep Hole and Thermostat Housing
The water pump has a small hole on its underside, and it exists to save you. It's a drain path for coolant that gets past the mechanical face seal. A few drops there is a warning.
A steady drip is a verdict.
What the weep hole is telling you
If coolant drips from the weep hole, the shaft seal is done. The pump isn't repairable and sealer won't fix it. Coolant also washes the bearing grease out over time, which is why pump failures come in pairs: seal first, bearing next.
Grab the fan or pulley and try to rock it. Any play means the bearing is going. So does a squeal or a chirp that changes with engine speed.
Coolant plus a squeal means stop driving
A wobbling pump pulley can throw the serpentine belt. On engines where the water pump runs off the timing belt, a seized pump takes the belt with it and can bend valves on an interference engine. That's a $2,000 problem caused by a $90 part.
If the pump is noisy, park the car. Don't wait for the weekend.
Thermostat housing: aluminum threads are the risk
Thermostat housings warp, gaskets harden, and plastic housings crack. The bolts usually thread into aluminum, which strips easily. Specs typically land around 15 to 18 ft-lb, and "good and tight" is how people destroy them.
- Clean both mating surfaces flat. Old gasket residue causes repeat leaks
- Use a new gasket or O-ring every time. Never reuse one
- Tighten in a cross pattern, in two passes
- Use RTV only where the manual calls for it. Most O-ring housings want none
- You can crack seized bolts loose with an impact gun, but keep the torque low on aluminum
Pumps on many transverse engines hide behind the timing cover. Check the book time before you commit, because a $120 pump can carry four hours of labor.
Branch 3: Heater Core: Bypass It or Pull the Dash
The heater core is a small radiator inside the dash. Coolant flows through it constantly on most cars, and the cabin fan blows air across it. When it leaks, coolant lands on your carpet or fogs your glass instead of hitting the driveway.
That's why this branch shows up as an internal-style symptom with an external-style repair.
How to confirm the heater core is the culprit
- Sweet smell through the vents, strongest with the fan on
- A greasy film on the inside of the windshield that keeps coming back
- Damp carpet or a coolant stain under the passenger floor mat
- Coolant loss with no visible drip in the engine bay
- Both heater hoses hot at the firewall with the engine running
To prove it, clamp off or loop the two heater hoses at the firewall and pressure test again. If the system now holds, the core is the leak. Read the sections above if the gauge still drops.
The bypass loop: legitimate or a hack?
A bypass loop is a short length of hose joining the two heater stubs. It keeps coolant circulating and seals the system, and it's a valid stopgap when money is tight or the weather is warm.
What it costs you is heat and defrost. A windshield that won't clear in cold rain is a safety problem, not a comfort problem. Treat a bypass as a temporary fix with a date attached.
Why labor dwarfs the part
The core itself runs $30 to $150. The job runs $700 to $1,500 because the dashboard usually comes out. Book times on a full dash-out commonly land between six and ten hours.
On a few older trucks and vans you can reach the core through the engine bay or a removable panel. On most modern cars you cannot. Get a quote before you decide, and remember a leaking core slowly soaks the carpet and the blower motor along with it.
If you plan on keeping the car, replace it. If the car is a beater with one more winter in it, bypass it and watch the gauge.
Branch 4: Intake Gaskets, Freeze Plugs, and the Head Gasket Question
This is the branch that decides whether the car stays in your life. It's also where generic advice fails hardest, because three very different failures present with the same missing coolant.
Intake manifold gaskets on some engines carry coolant passages. GM's 3.1L and 3.4L V6 are the famous example, leaking externally at the ends of the manifold or internally into the oil. Freeze plugs, also called core plugs, sit in the block and rust through from the inside.
Rear plugs behind the bellhousing drip where nobody looks.
Then there's the head gasket. Subaru's EJ engines and Ford's 6.0L diesel EGR cooler are the well-known repeat offenders, but any engine overheated once is a candidate.
The combustion gas test: what proves it
A block tester pulls vapor from the radiator neck through a blue fluid. Hydrocarbons in that vapor turn the fluid yellow or green. That color change means combustion gas is getting into the coolant, and on a liquid-cooled engine that means a failed head gasket, a cracked head, or a cracked block.
Image source: Wikimedia Commons / Lauri Veerde (CC BY-SA)
Run the test with the engine warm and idling, cap off, and the fluid at the right level. A weak yellow tinge after 15 minutes is a positive. A fluid that stays blue after several minutes of revving is a pass.
Compression and leak-down confirm, they don't guess
Compression testing looks for a cylinder that can't hold pressure. A variance of more than 10 to 15 percent across cylinders is a flag. Leak-down testing tells you where that pressure escapes: bubbles in the coolant mean the gasket, air at the throttle body means intake valves, air at the tailpipe means exhaust valves.
- Wet and dry compression on every cylinder, not just the suspect one
- Spark plugs that look steam-cleaned and bright are a classic coolant-in-cylinder clue
- A reservoir that bubbles continuously at idle is about as clear as it gets
Aluminum surfaces hate uneven torque. The same discipline that keeps manifold and header gaskets sealed applies here, and it matters more when coolant is in the joint.
If it's a head gasket, should you repair, swap, or sell?
Do the math honestly before you get emotional about the car.
| Situation | Sensible move |
|---|---|
| Car worth $6,000 or more, otherwise solid | Repair it. $1,500 to $3,500 is cheaper than replacing the car |
| Car worth $2,500, repair quoted at $2,800 | Sell it as a project or scrap it, and disclose the fault |
| Overheated once, no oil contamination, holds pressure | Retest in 500 miles before spending anything |
| Milky oil plus white exhaust plus bubbling reservoir | Stop driving. Every mile adds machining cost |
If you're repairing, ask whether the head gets pressure tested and resurfaced. A shop that just swaps the gasket on a warped deck is selling you a repeat visit.
Other places coolant hides
Don't stop at the big three. Coolant-fed turbochargers route lines to the center housing, and those banjo fittings and hard lines crack with heat cycles. Anyone planning a turbo conversion should plan the coolant feed and return before the manifold goes on.
Oil coolers, EGR coolers, and transmission heat exchangers can also breach internally, mixing fluids where you can't see either one. If coolant disappears and the oil or transmission fluid looks milky, stop driving and pressure test that exchanger on its own.
Refill and Burp: Why Air Pockets Cause the Second Overheat
You fixed the leak, topped it off, and the gauge still creeps up. Nine times out of ten there's air trapped somewhere in the system, and it's doing more damage than the leak did.
Air compresses. Liquid doesn't. A pocket of air sitting against a cylinder wall or behind a thermostat stops coolant from touching hot metal, so that spot gets far hotter than the gauge shows.
The pump can also cavitate and stop moving fluid at all.
That's the second overheat. It's self-inflicted, and it's the most common reason a perfectly good repair comes back.
The mix ratio that actually works
Mix 50/50 by volume with distilled water. That's the ratio most OEMs publish, and it's the sweet spot for both freeze protection and heat transfer.
| Concentration | Freeze point | Notes |
|---|---|---|
| 30 percent | About 0°F (-18°C) | Too thin for cold climates |
| 50 percent | About -34°F (-37°C) | Standard, best all-round |
| 60 percent | About -55°F (-48°C) | Only for extreme cold |
| 100 percent | Around 9°F (-13°C) | Worse cooling, worse freeze protection |
That last row surprises people every winter. Straight antifreeze has a higher freeze point than a 50/50 mix, and its specific heat capacity is roughly half that of water. Pouring it in neat gives you less cooling and less freeze protection at the same time.
Skip tap water entirely. The calcium and magnesium in hard water plate out as scale on radiator tubes, and the chlorides attack aluminum. A gallon of distilled water costs about a dollar.
Use it.
How much coolant does your system hold?
Buy the right quantity before you start. Under-buying mid-job is how people end up topping off with whatever's on the shelf.
| Vehicle type | Typical capacity |
|---|---|
| Compact car, 4-cylinder | 6 to 7 quarts (5.7 to 6.6 L) |
| Mid-size sedan | 8 to 10 quarts (7.6 to 9.5 L) |
| V6 crossover or SUV | 10 to 12 quarts (9.5 to 11.4 L) |
| Full-size truck, V8 | 14 to 18 quarts (13 to 17 L) |
| Diesel pickup | 16 to 24 quarts (15 to 23 L) |
Vehicles with rear climate control run higher. Minivans and three-row SUVs carry extra lines and a second heater core, so add a quart or two.
The burp procedure, step by step
- Park on level ground and raise the front end if you can. The radiator neck should be the highest point in the system.
- Set the heater to full hot and the fan to low. That opens the blend door and lets coolant flow through the core.
- Fit a spill-free funnel to the radiator neck or the reservoir, whichever the manual specifies. Fill until the funnel body holds coolant.
- Open any bleed screws on the thermostat housing or heater hoses. Many European and Asian engines have one or two.
- Start the engine and idle it. Watch the funnel. The level will drop as air works its way out, so keep topping it up.
- Wait for the upper radiator hose to get hot, then for the cooling fan to cycle at least once. That proves the thermostat opened.
- Shut it down, cap it, and let it cool completely. Then recheck the cold level and top off.
- Repeat the cold check every morning for two or three days. It usually takes one small top-off after the first full cool-down.
Vacuum filling is faster and cleaner
A cooling system air evacuator pulls a vacuum on the empty system, then uses that vacuum to suck coolant in from a bucket. No pockets, no burping, no spill.
A decent one costs $80 to $150, and it's the difference between a ten-minute refill and a forty-minute fight on a V8 or anything with a rear heater. Shops use them on every job. If you're doing this more than once, buy one.
What trapped air feels like from the driver's seat
- The heater blows cold at idle and warms up when you rev the engine
- The temperature gauge climbs, then drops suddenly when the thermostat opens
- Gurgling or rushing water sounds behind the dash
- The reservoir level rises after a drive and falls overnight
- The upper hose stays soft and cool while the gauge reads normal
Any of those after a repair means bleed it again. Don't drive it hoping the air finds its own way out.
Stop-Leak, "Universal" Coolant, and Other Shortcuts That Backfire
Sealer products work exactly as advertised. That's the problem. They plug leaks, and they don't much care which ones.
Understanding the mechanism explains the risk. Most liquid sealers use sodium silicate or suspended organic fibers that stay liquid until they meet air, heat, and a pressure differential. Then they congeal into a plug.
A crack in a radiator tank looks just like the passages in a heater core to chemistry. So does the gap between water pump seal faces.
What sealer plugs besides the leak
- Heater core tubes, which are the smallest passages in the whole system
- Radiator tubes and the transmission cooler built into the tank
- Water pump seal faces, which then wear faster
- Bypass passages and the thermostat jiggle valve
- Reservoir cap vents, which turns a small leak into a pressure problem
The heater core is the big one. Plenty of owners have traded a slow radiator seep for a winter with no defrost.
When sealer is a reasonable call
- A beater worth less than the repair quote
- A roadside emergency where you need 20 miles to get home
- A heater core leak you already planned to bypass
- A car heading to the scrapyard in a month
And when it isn't: any vehicle you plan to keep, anything under a factory warranty, and any suspected head gasket failure. Many OEMs will void cooling system coverage if they find sealer in the system, and it masks the real symptom while combustion gas keeps pressurizing everything.
Does head gasket sealer actually work?
No. Combustion pressure runs into the hundreds of psi. Cooling system pressure runs at 14 to 18 psi.
A sealer that sets at 15 psi cannot hold back 150 psi of compression.
The "head gasket in a bottle" products are thick sealer with fibers. Some reduce the white smoke for a few thousand miles by gumming up the breach. The gasket is still failed, the head is still getting heat-cycled wrong, and the eventual repair costs the same or more.
"Universal" coolant isn't universal
Universal formulas usually use a low-silicate OAT base designed not to cause immediate harm in most systems. That's a weaker claim than meeting a specification.
Look for the "meets" line on the bottle: Ford WSS-M97B44-D2, GM 6277M for Dex-Cool, Chrysler MS-9769, VW TL 774 for G12++ and G13, Toyota SLLC, Honda Type 2. If your manual names a spec and the bottle doesn't list it, keep looking.
| Family | Typical color | Common users | Service life |
|---|---|---|---|
| IAT (inorganic acid technology) | Green | Older domestic and Asian vehicles | 2 to 3 years, 30k miles |
| OAT (organic acid technology) | Orange, red, pink | GM Dex-Cool, many European makes | 5 years, 100k to 150k miles |
| HOAT (hybrid OAT) | Yellow, gold, green | Ford, Chrysler, some Asian makes | 5 to 10 years |
| Silicate-free OAT | Blue, pink, red | Toyota, Honda, Nissan | 10 years first fill |
| G12++ / G13 | Purple, pink | VW Group, Audi, Porsche | 10 years first fill |
Mixing families is where real damage happens. Dex-Cool's 2-EHA additive plus conventional green's silicates can drop silicate out of suspension, and the resulting gel blocks heater cores and radiator tubes. If you don't know what's in there, drain it and start clean.
The 100 percent antifreeze mistake
Covered above in the mix table, but it's worth repeating because it happens every single winter. Neat glycol cools worse and freezes sooner than a 50/50 mix. There's no scenario where straight antifreeze is the right call.
The Real Cost Table: $2 Clamp to $3,500 Head Gasket
Here's the whole decision tree in money. Figures are typical US ranges as of 2026, blending OEM parts pricing with independent and dealer labor rates.
| Repair | Parts | Shop total | DIY time | DIY difficulty |
|---|---|---|---|---|
| Hose clamp | $2 to $8 | $80 to $150 | 20 min | Easy |
| Radiator or heater hose | $15 to $60 | $150 to $300 | 1 hour | Easy |
| Radiator cap | $8 to $25 | $8 to $25 | 2 min | Easy |
| Thermostat and gasket | $15 to $60 | $200 to $450 | 1.5 hours | Moderate |
| Expansion tank | $25 to $90 | $150 to $350 | 1 hour | Easy |
| Water pump | $50 to $200 | $300 to $700 | 3 to 5 hours | Moderate |
| Radiator | $120 to $600 | $300 to $900 | 2 to 4 hours | Moderate |
| Heater core | $30 to $150 | $700 to $1,500 | 6 to 10 hours | Hard |
| Intake manifold gasket | $50 to $200 | $600 to $1,200 | 4 to 8 hours | Hard |
| Freeze plug, front | $5 to $20 | $150 to $400 | 2 hours | Moderate |
| Freeze plug, rear | $5 to $20 | $600 to $1,400 | 6 to 10 hours | Hard |
| Head gasket | $100 to $300 | $1,500 to $3,500+ | 12 to 20 hours | Expert |
Labor rates drive most of that spread. Independent shops in the US typically bill $90 to $150 an hour, and dealerships run $130 to $220. In the UK, expect £60 to £110 an hour depending on region and marque.
The costs nobody budgets for
- Coolant at $12 to $25 a gallon, and most jobs need two
- Distilled water, gaskets, clamps, and O-rings that don't come in the box
- Tool rental deposits, usually refundable but $100 to $200 out of pocket
- Used coolant disposal, free at many retailers but not all
- A rental car or missed work while the car sits apart
Add 15 to 25 percent to any DIY estimate for the second trip to the parts store. It's not pessimism. It's arithmetic.
When paying a shop is genuinely cheaper
If the job needs a lift, a press, or dashboard removal, pay someone. If you'd have to buy $200 in tools for a job you'll do once, pay someone. And if you don't have a backup vehicle, a two-day DIY mistake costs more in lost wages than the labor would have.
A diagnostic fee of $75 to $150 is worth paying when you're stuck between two branches. Most shops waive it if you authorize the repair, and a pressure test plus a combustion gas check answers the question that decides everything.
The scrap-value math
Here's the rule we'd use. If the repair exceeds half the car's private-party value, or exceeds a year of payments on a replacement, think hard before spending.
One caveat on head gaskets. An aluminum engine that's been overheated twice usually needs more than a gasket. Add $300 to $800 for pressure testing and resurfacing the head, or $600 to $1,200 for a remanufactured head.
Ask any shop whether that's included before you compare quotes.
Glycol Safety: Scalds, Pets, and Disposal Rules
The cap is a pressure vessel, not a lid
At 15 psi and 200°F (93°C), cracking the cap turns liquid into an instant steam-and-glycol spray. Face, hands, and forearms take the worst of it. This is the single most common cooling system injury.
Let the engine sit 30 to 60 minutes. Then crack the cap to its first stop and let the pressure hiss out. Only then remove it fully, with a thick rag over the cap and your head turned away.
Ethylene glycol is genuinely dangerous
A couple of tablespoons can kill a cat. A few ounces can kill a medium dog. It tastes sweet, which is exactly why animals drink it.
Most retail antifreeze now contains denatonium benzoate, a bittering agent added to deter children. It doesn't stop pets, and it doesn't make the fluid safe. A leaking heater core dripping into a driveway is a real hazard, not just a stain.
Clean up every spill immediately. Rinse the area, then cover the smell with absorbent material and bag it for disposal. Never leave an open drain pan out overnight.
Propylene glycol is less toxic, not safe
PG coolants are marketed as pet-safe, and they're a reasonable choice for a car that lives near animals. They're still not drinkable, still cause gastrointestinal injury in quantity, and still can't go down the drain.
Skin, eyes, and gloves
Ethylene glycol absorbs through skin slowly. Repeated exposure over years is the concern, not a single splash. Nitrile gloves and safety glasses are the right kit, and they cost less than lunch.
If it gets in your eyes, flush for a full 15 minutes with clean water. If you swallow any, call poison control immediately (1-800-222-1222 in the US, 111 in the UK). Don't induce vomiting.
Where used coolant legally goes
- Auto parts retailers that accept used antifreeze, usually free
- Your municipal household hazardous waste facility
- Shops running glycol recycling equipment, which recovers the base stock
- Nowhere else. Not the ground, not the storm drain, not the toilet, not a septic system
In most US states, used antifreeze falls under household hazardous waste rules, and the EPA directs you to local collection programs. In the UK, pouring it into a drain is an offence under environmental regulations, and household waste recycling centres take it.
Working underneath safely
Jack stands on level, solid ground. Wheel chocks behind the rear tires. Never put any part of your body under a car held only by a hydraulic jack.
Glycol mist near a hot exhaust manifold can ignite. Ethylene glycol's flash point is around 232°F (111°C), which is well within reach of exhaust components. Wipe up spills on the manifold rather than letting them bake on.
Storing the leftovers
Keep the jug sealed, labeled, and out of reach of kids and pets. Store it off the ground so a leak doesn't pool where an animal can find it. And never, ever put coolant in a drink bottle.
Keeping It Sealed: Coolant Chemistry and Inspection Rhythm
Match the specification, not the color
Color is dye. Chemistry is the specification. The bottle has to list the OEM standard your manual names, or it's the wrong fluid regardless of what shade it is.
Two identical-looking orange coolants can be different chemistries. Two different-colored coolants can be the same family. Read the label every time, especially on a used car where you don't know the service history.
How often should coolant be changed?
It depends entirely on the chemistry. Conventional green IAT is the shortest-lived at roughly 30,000 miles or 3 years. Dex-Cool and other OAT formulas typically run 5 years or 100,000 to 150,000 miles.
Many OEMs now specify 10 years or 100,000 miles for the first fill, then shorter intervals afterward. Toyota SLLC is a good example. Follow the owner's manual, not the bottle's marketing.
Testing freeze point correctly
A refractometer is more accurate than a floating-ball hydrometer and doesn't drift with temperature. Test a sample at room temperature, not straight out of a hot engine.
Aim for -34°F (-37°C) in most of the US and UK. Go to -40°F or lower if you're in the northern states, Canada, or the Nordics. If the reading is off, drain and refill with a known 50/50 mix rather than guessing at a top-off.
The inspection rhythm that prevents most of this
- Every oil change: check the level cold, squeeze the hoses, look for crust at clamp ends, inspect the cap seal
- Twice a year: pressure test the cap, check the water pump pulley for wobble, look for belt dust
- Before the first frost: freeze point check, hose inspection, plastic tank seam look
- Before towing or a track day: full pressure test, fan operation check, thermostat behavior
The squeeze test is underrated. A healthy hose feels firm and springs back. A hose that feels rock hard is heat-aged, and one that feels mushy is oil-soaked.
Both are on borrowed time.
Stray voltage eats aluminum
This one separates shops from DIYers. A bad engine ground can push current through the coolant, and the aluminum radiator and heater core become the sacrifice.
Test it with a voltmeter. Negative lead on the battery negative post, positive probe dipped in the coolant, engine running. Under 0.3 volts is normal.
Above that, start checking ground straps and engine-to-body grounds.
Flush or drain and refill?
A simple drain and refill gets maybe half the old fluid out on many cars, because coolant sits in the block and the heater core. A machine flush or several drain-fill cycles with distilled water gets far more.
If the system had a mixing problem, sludge, or a failed component, do a chemical flush, then two distilled water cycles, then refill with the correct mix. That's the only way to reset the chemistry.
Climate changes the failure list
Cold climates punish freeze plugs, brittle plastic tanks, and hoses that shrink and weep at the clamps. Hot climates heat-soak plastic end tanks and raise underhood temperatures until rubber hardens. Road-salt regions rust hose clamps, metal coolant lines, and radiator supports.
Adjust your inspection list to your climate. It's the cheapest reliability upgrade a cooling system gets.
