
Your generator ran fine last season. Now it coughs, surges, then dies the second you release the choke, and the shop wants $150 to $300 just to open it up. Learning how to clean a generator carburetor yourself is usually the entire fix, and it costs less than a tank of fuel.
The real fault is almost never the whole carburetor. It's one blocked jet, a stuck needle valve, or a film of varnish sitting in a passage you can't see.
Ethanol-blended pump gasoline starts breaking down inside an open float bowl within roughly 30 to 90 days, according to fuel specification data in ASTM D4814 and manufacturer storage guidance. That golden-brown film is what starves the idle circuit and makes the engine hunt. Honda, Briggs & Stratton, and Generac service literature all point to the same three inspection points on a no-start unit: the float bowl, the main jet, and the pilot circuit.
Before you touch a wrench, you need to know which part is which.
How to Clean a Generator Carburetor
Shut the fuel valve and run the engine until it stalls. Remove the carburetor, take off the float bowl, and pull both jets. Soak the metal parts in carburetor cleaner and blow out every passage.
Rebuild with a new bowl gasket and reset the mixture screws. Budget two to three hours for a first attempt.
Why Text-Only Instructions Fail, and What Photos Fix
Written carburetor instructions read smoothly on a screen. Next to the actual machine, they fall apart in about four minutes. The text says "remove the main jet." It never shows you that on your model the jet is threaded inside the bowl bolt you just loosened.
That gap is the whole problem. A carburetor is a stack of tiny parts with very specific orientations. Reinstall one piece flipped 180 degrees and the engine runs worse than it did before you started.
The Three Steps Where Written Instructions Fall Apart
- Identifying the part. A pilot jet, a needle seat, and a bowl drain screw can all be brass, threaded, and roughly the same size. Words alone don't separate them.
- Orientation. Bowl gaskets have a right way up. Emulsion tubes have staggered air-bleed holes that must line up with a passage in the carb body. Springs hook in one direction only.
- The cleanliness standard. "Clean the jets" is useless advice. You need to know what clean looks like when you hold the part up to a light.
Each of those steps is visual. That's why a phone camera does more for you here than another page of text.
Get the part identification wrong and you'll soak a component that never needed removing, or worse, poke a precision orifice wider than the factory drilled it. Get orientation wrong and you'll chase a vacuum leak that doesn't exist.
What You Need on Your Phone Before You Start
Shoot these seven frames before the first bolt moves. Store them in one album so you're not scrolling through vacation photos with a bowl of gasoline in your hand.
| Shot | What It Protects |
|---|---|
| Wide shot of the whole carb and linkage | Spring and rod routing |
| Close-up of the throttle and choke springs | Hook direction and which hole they sit in |
| Both ends of the fuel line | Clamp position and routing |
| The bowl bolt, before removal | Confirms whether the main jet lives inside it |
| The manifold and gasket mating surfaces | Gasket orientation and which face goes where |
| The mixture screw position | Count the turns in, write it down, photograph the screw |
| Every part laid out in removal order | Reassembly sequence and mystery-part recovery |
Add one more habit: a parts tray with compartments, laid out left to right in the order things came off. Gravel driveways eat float hinge pins. So do garage floors.
Confirm It's the Carb First: Visual Diagnosis Before Wrenching
Plenty of carburetors get pulled every spring that never needed to come off. A fouled plug, a clogged fuel filter, or a shutoff valve left half closed will mimic a dirty carburetor almost perfectly. Ten minutes of checking saves you an afternoon of unnecessary work.
The logic is simple. An engine needs four things: spark, fuel, air, and compression. If any one is missing, cleaning the carburetor changes nothing.
Spark, Fuel, Air, Compression: The 10-Minute Check
- Pull the spark plug and look at it. Wet and gassy means fuel is arriving. Bone dry after 20 seconds of cranking means fuel isn't reaching the cylinder.
- Check for spark. Ground the plug thread against the block and crank. No visible blue snap means you have an ignition problem, not a fuel problem.
- Crack the bowl drain screw. Fuel should run out steadily. Nothing at all points upstream, to the tank, filter, shutoff, or inlet screen.
- Inspect the air filter and intake. A filter packed with dust or a mouse nest in the housing will choke the engine exactly like a blocked jet.
- Run a compression check. Most small generators should show well over 60 psi, and manufacturer specs for your model will be higher. Low compression means a valve or ring problem no amount of carb cleaner will fix.
If the plug comes out wet and black, you're running rich. If it's white and blistered, you're running lean. Our breakdown of a plug that comes out wet walks through what each reading actually means, and it applies to small engines just as well as car engines.
One more caution. Spraying starting fluid down the plug hole will confirm a fuel problem in seconds, but it's brutal on a dry cylinder. Use a one-second burst, never a long spray.
Matching the Symptom to What You'll Actually See
| Symptom | Most Likely Cause | What to Look For |
|---|---|---|
| Surging or hunting at idle | Blocked pilot (idle) jet | Varnish in the tiny idle orifice, engine smooths out with choke partly closed |
| Runs only on half choke | Lean main or pilot circuit | Restricted jet, cracked manifold gasket, loose carb mounting bolts |
| Floods, fuel out the bowl vent | Stuck needle valve or sunk float | Gas in the bowl vent tube, float heavy with absorbed fuel |
| Starts, then dies after 30 seconds | Bowl not refilling | Blocked inlet screen, kinked fuel line, closed or failed shutoff valve |
| Hard start after storage, smells gassy | Varnish film in passages | Golden coating in the bowl, sticky needle valve |
| Black sooty plug, rough running | Rich mixture or partially closed choke | Choke plate not opening fully, wrong jet, high float level |
Symptom matching gets you to the right circuit. The parts diagram gets you to the right part. You need both before anything comes apart.
The Parts You Must Identify Before Anything Comes Apart

Image source: Wikimedia Commons / Photograph by Mike Peel (www.mikepeel.net). (CC BY-SA)
A float-bowl carburetor on a portable generator holds about a dozen serviceable parts. Five of them do almost all the work, and four of those five get misidentified on a first attempt.
Work with the carb off the machine and sitting on a clean towel. Get your eyes close. Most of these parts are smaller than a pencil eraser.
Float Bowl, Float, Needle Valve, and Hinge Pin
The float bowl is the cup-shaped reservoir on the bottom, usually held by one central bolt. Inside it sits the float, a sealed hollow body that rises and falls with fuel level.
The needle valve rides on the float tang and seats into a brass orifice called the needle seat. When the bowl fills, the float lifts and the needle shuts off incoming fuel. A Viton-tipped needle that has sat in ethanol can swell and stick open, which floods the engine and can push fuel into the crankcase.
The hinge pin is a thin rod through one side of the float. It drifts out with a small punch or a thin nail. Lose it and the carburetor is a paperweight until a replacement arrives.
Pull the float and needle as a set. Keep them together. On plastic floats, look for a dull, swollen surface or fuel sloshing inside, both signs the float has absorbed ethanol and sunk.
Main Jet vs. Bowl Bolt: The Part That Fools Almost Everyone
On a large share of small generator carburetors, the bolt holding the float bowl is the main jet holder. The brass hex you're turning isn't just a fastener. The main jet is threaded into the top of it.
This matters for two reasons. First, people soak the bowl and never clean the actual main orifice, then wonder why nothing changed. Second, people overtighten that bolt on reassembly and crack the standpipe or strip the threads in a zinc-alloy body.
Bowl bolt torque is light, typically single-digit newton-meters or roughly 10 to 20 inch-pounds. That's hand-tight with a short wrench. It's the same discipline that keeps you from over-tightening threaded fasteners anywhere else on a machine, and an impact driver has no business near a carburetor.
Some units have a separate bowl bolt and a jet that threads into the carb body beside it. Check your parts diagram before you assume. If the bolt comes out with a tiny brass jet inside it, congratulations, you've found the main jet.
Pilot Jet and the Brass Plug Hiding It
The pilot jet, also called the idle jet or slow jet, controls fuel at low RPM. It's the smallest orifice in the carburetor, which makes it the first thing varnish blocks and the hardest thing to see.
On many generator carburetors, the pilot jet sits under a small brass plug pressed into the carb body. The plug may be flush or recessed. Getting to the jet means drilling the plug, threading in a self-tapping screw, and pulling it out.
Think hard before you do that. If the pilot circuit isn't actually blocked, you've created a hole you now have to seal. Have the replacement plug or a rebuild kit in hand first, and confirm on the diagram that your model even uses a removable pilot jet.
Some are fixed and non-serviceable.
Emulsion Tube and Venturi Orientation
The emulsion tube, sometimes called the main nozzle, is a brass tube that sits above the main jet. It has a series of tiny cross-drilled air-bleed holes along its length.
Those holes are staggered, not in a straight line. They must line up with the air passage in the carburetor throat when the tube goes back in. Photograph the tube before removal so you know which way the holes faced.
The venturi is the narrowed throat where air speeds up and pulls fuel through the jets. When you look into the carburetor bore, you're looking at it. Any debris sitting in that throat gets pulled straight into the engine.
Working at a comfortable height makes all of this easier. A low bench or a set of shop-made wooden ramps that raise the machine to chest level beats crouching over a generator on the ground with a flashlight in your teeth.
Finding the Exploded Diagram for Your Exact Model
The exploded parts diagram is the single most valuable reference for this job. It shows every part in its correct position and orientation, which is exactly the information text can't give you.
Find it before you pick up a screwdriver. As of 2026, most major manufacturers still publish free parts fiches online, and they're usually a search away.
Where the Parts Fiche Lives for Honda, Yamaha, Briggs, Generac, and Clones
| Brand / Family | Where to Look | What to Expect |
|---|---|---|
| Honda GX and EU inverter series | Honda's official owner support and parts look-up pages | Model and serial specific, very accurate exploded views |
| Yamaha EF and i-series inverters | Yamaha generator support pages | Clean diagrams, part numbers listed per item |
| Briggs & Stratton and Kohler engines | Brand service and parts portals | Diagrams keyed to engine model and type code |
| Generac, Champion, Firman, Westinghouse, Wen | Owner's manuals and parts lists in the support section | Manuals often include a carburetor breakdown page |
| Predator and other import units | Harbor Freight parts listings and the printed manual | Diagrams exist but part numbers can change between runs |
| Onan and Cummins RV gensets | Cummins support documentation | Dense diagrams, tight access, worth studying twice |
You need the engine model and serial number, not just the generator brand. On most units it's stamped on a plate on the engine block or printed on a sticker under the fuel tank.
How to Read a Diagram When the Drawing Doesn't Match Your Unit
Manufacturers revise carburetors mid-production without changing the model name. A 2019 unit and a 2023 unit with the same model number can carry different carb bodies.
If the diagram doesn't match, try these in order:
- Search the parts fiche by engine serial number rather than generator model.
- Look for a revision letter or suffix on the carburetor casting itself.
- Compare your photo of the bowl and jet layout against the drawing rather than comparing the outer body shape.
- Check whether a service bulletin or running change is listed for your serial range.
When two diagrams are close but not identical, trust the one that matches your jet arrangement. That's the detail that changes the cleaning procedure. If neither matches, photograph every part and call a dealer's parts counter with the engine serial number.
They look this up all day.
One warning that matters for the environment as much as your engine: carburetors sold as replacements must meet EPA emissions requirements for small nonroad spark-ignition engines. A no-name carb with the wrong jetting can run lean, overheat the engine, and put you outside the rules in regulated states.
Spray-in-Place or Full Teardown: Choosing Your Depth of Clean
You have three realistic options, and picking the right one saves hours. The decision turns on how long the fuel sat and how bad the varnish looks.
Spraying cleaner into the throat with the carb still bolted on is fast and it feels productive. It also only reaches the surfaces the spray touches. Internal passages, the float needle seat, and the pilot circuit stay exactly as they were.
When an In-Place Clean Is Enough
Reach for the spray can only if the machine ran recently and the symptoms are mild.
- The generator was used within the last month or two.
- It starts, but idle is slightly rough or it stumbles coming off choke.
- The fuel in the tank is fresh and untreated fuel hasn't been sitting.
- You're doing pre-season prep on a machine that already starts easily.
In that case, run the engine, spray carb cleaner through the intake in short bursts per the product label, then change the fuel and add stabilizer. Accept that this is maintenance, not a repair.
When Only a Soak Will Touch the Varnish
Ethanol varnish is a cured film. Aerosol spray softens the surface. A soak dissolves it, and an ultrasonic cleaner lifts it out of passages you can't reach with a wire.
| Method | What It Reaches | Time | Best For |
|---|---|---|---|
| Aerosol spray, carb in place | Throat, visible surfaces, some external passages | 20 to 40 minutes | Light film, running machines |
| Spray plus jet removal | Main jet, pilot jet, emulsion tube, needle seat | 1 to 2 hours | Most no-start and surge complaints |
| Dip or soak bucket | Every metal passage, fully submerged | 4 to 24 hours, per label | Heavy varnish, white crust, green residue |
| Ultrasonic cleaner | Deep passages via vibration | 3 to 10 minutes of machine time | Stubborn film that a soak softened but didn't clear |
Two hard rules for soaking. Metal parts only. Rubber O-rings, diaphragms, plastic floats, and fuel lines swell or dissolve in most carburetor solvents, and they don't come back.
Also handle solvent safely. Flammable liquid storage and use in a garage falls under OSHA flammable liquid handling rules, and in plain terms that means ventilation, no pilot lights, no water heater in the same space, and a fire extinguisher within reach.
Signs You're Wasting Time and Should Pull the Carb
- Fuel weeps from the bowl seam or the bowl vent with the engine off (needle valve, not dirt).
- The engine only runs with the choke partly closed after a spray clean.
- White or green crust is visible in the bowl, which means corrosion, not just varnish.
- The carb body shows pitting or the bowl bolt threads feel soft.
- You've cleaned it twice and the symptom returns within a week.
That last one is the tell. If the carb keeps clogging, the problem is upstream: a rusty tank, a disintegrating fuel line, or a clogged in-tank screen feeding debris forward. Cleaning the carburetor without fixing the source guarantees a repeat visit.
At that point the honest question is clean versus replace. A $25 to $60 aftermarket carburetor is tempting, but the jetting often differs from OEM spec and the engine may idle poorly or run lean. It's the same trap as cheap aftermarket parts that fit but don't perform anywhere else on a machine.
Cleaning the original carburetor preserves factory jetting and emissions compliance, and that's usually worth the extra hour.
Bowl, Float, and Needle Valve: What Correct Looks Like at Each Step
The bowl comes off first, and this is where most people rush. Take thirty extra seconds before you wipe anything. The pattern of what's inside the bowl is diagnostic, and once you scrub it away, that information is gone for good.
Work over a clean tray with a light aimed straight into the bowl. If fuel drips, let it drain fully before you tilt the carburetor. Gasoline trapped in a bowl vent will run down the outside of the body and make every surface look wet.
Then compare what you see against the reference points below. Each one tells you whether the fault lives in the float circuit, the fuel supply, or somewhere upstream in the tank.
Photographing the varnish Pattern and Sediment
Shoot the empty bowl before cleaning, straight down, with the light at an angle. Varnish sits where fuel sat longest, so the pattern points at the circuit that failed.
Here's what the different deposits mean:
- Golden-brown film on the bowl floor only. Classic stale fuel. The main and pilot circuits are probably restricted but not blocked.
- Fine rust-colored powder. Debris coming from a corroding steel tank or a failing in-tank screen. Clean the carb and it will clog again.
- Grit or sand in the bottom. A missing or split fuel filter, or a fuel cap left off in a dusty environment.
- White or gray powdery crust. Aluminum or zinc-alloy corrosion from moisture, not ethanol. Common in humid coastal climates and on units stored in damp sheds.
- Green residue around brass parts. Copper or brass corrosion products. Often means water sat in the bowl for months.
- A ring of crud right at the fuel line level. The float was sitting at that height, which means the needle valve stuck open at some point.
That last pattern is worth a close look. A stuck-open needle valve can push fuel past the rings into the crankcase, and diluted oil scores a cylinder fast. If the oil smells like gas on the dipstick, change it before you run the engine again, no exceptions.
Inspecting the Needle Seat for a Wear Ring
The needle seat is the brass orifice the needle tip presses into. Hold a flashlight across it at an angle and look for a bright ring where the Viton tip has been seating for years.
A faint, even contact line is normal. A deep groove, a scored band, or visible grit embedded in the seat is not. Once the seat is damaged, no amount of cleaning stops the flooding.
Check the needle tip too. A Viton tip that has soaked in ethanol can look swollen, dull, or slightly mushroomed. Roll it between your fingers.
Any deformation means replacement, not cleaning.
Never lap or polish a needle seat with abrasive. It's a precision sealing surface, and you'll change the shutoff height in the process.
Plastic vs. Brass Floats and What Each One Does When It Fails
Floats fail in two completely different ways depending on material, and the symptom looks similar from the outside.
| Float Type | How It Fails | Shake Test | What You'll See |
|---|---|---|---|
| Brass (soldered hollow) | Pinholes or seam cracks let fuel inside | Sloshing sound, feels heavy | Dull surface, fuel weeping from a seam, sits low in the bowl |
| Closed-cell foam (Nitrophyl type) | Slowly absorbs ethanol-blended fuel and gains weight | No slosh, just heavy and dense | Surface looks fine, float height reads low, engine floods |
| Solid plastic or composite | Warps or swells, hinge tabs wear oval | No slosh | Float binds on the pin, doesn't rise freely |
Whatever the material, weigh the float against a new one if you have a rebuild kit handy. A dry float that feels noticeably heavier than the replacement has already absorbed fuel.
Test hinge freedom before you reinstall. The float should drop under its own weight and rise without dragging on the pin.
Jets, Emulsion Tube, and the Pilot Plug Nobody Mentions
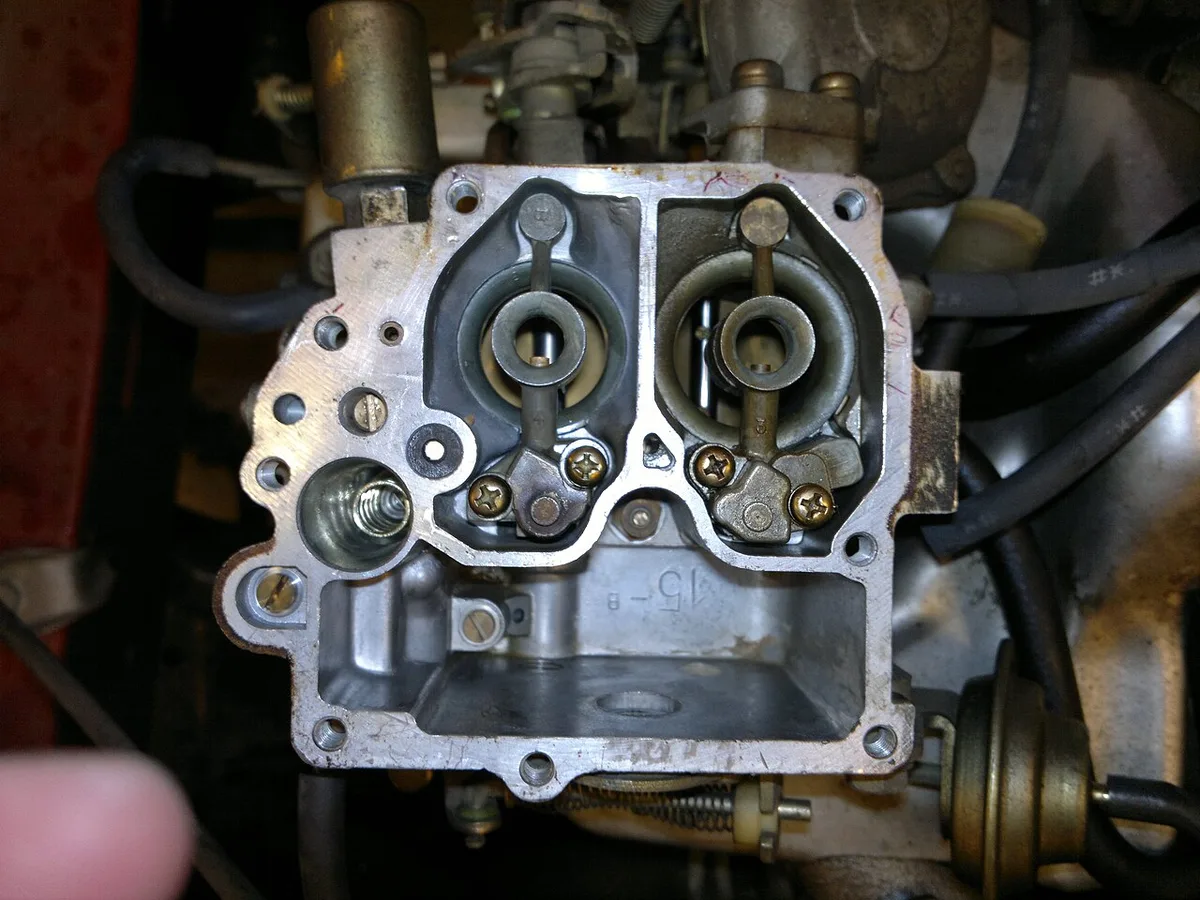
Image source: Wikimedia Commons / Hoikka1 (CC BY-SA)
The jets are where the actual fix usually happens. They're also the smallest, softest, most easily ruined parts in the whole carburetor. A brass jet is roughly the hardness of a cheap coin.
Slow down here. Everything in this section is done by hand, with light pressure, and with the part supported so it can't twist.
Which Jets Come Out and Which Are Pressed In for Good
Not every brass thing in a carburetor is meant to come out. Forcing a pressed-in jet turns a two-hour job into a carburetor replacement.
- Remove: the main jet (often inside the bowl bolt), the pilot or slow jet where a brass plug covers it, the emulsion tube, and any jet with a screwdriver slot and threads.
- Leave alone: pressed-in air jets, drilled passage plugs, ball plugs, and anything with no slot or hex.
- Never remove: the throttle plate screws on some units, which are staked from the factory. Removing them usually means replacing the throttle shaft assembly.
Your parts diagram settles this in ten seconds. Look for a part number next to the item. If the diagram shows it as a separately sold part, it's removable.
If it's drawn as part of the carb body casting, it stays.
Jet sizes are stamped on the head in hundredths of a millimeter. A jet marked 72 has a 0.72 mm orifice. That's about 28 thousandths of an inch, and it's the number you quote when ordering a replacement.
Sizing the Screwdriver So You Don't Round the Slot
Use a hollow-ground gunsmith-style driver that fills the slot end to end and bottom to top. A driver that's too narrow chews the center of the slot. One that's too thick never bottoms out and cams out under load.
A few habits that save brass:
- Press down firmly and turn slowly. Torque comes from the wrist, not a sudden jolt.
- If a jet won't budge, apply a drop of penetrating oil and wait. Brass in zinc alloy corrodes in place.
- Never use an impact driver, a cordless drill, or pliers on a jet head. The metal is softer than the tool every time.
- If the slot starts to deform, stop. A jet with a partially chewed slot still works. A jet sheared flush with the body does not.
The same principle applies anywhere you're working with soft fasteners under load. It's the reasoning behind choosing the right tool for the torque rather than the fastest one.
Air-Bleed Hole Alignment on the Emulsion Tube
The emulsion tube mixes air into fuel before it reaches the venturi. Its cross-drilled holes are staggered along the length, and they must index against the air passage in the carburetor throat.
Photograph the tube in place before you tap it out, with the light coming from the intake side. On reassembly, line the holes up with the witness marks or with the air inlet port.
If you don't know the correct orientation, look for a flat, a notch, or an off-center hole pattern that only fits one way. Most tubes are keyed. A few aren't, and those are the ones to photograph carefully.
Tap the tube out from the venturi side using a wooden dowel or a plastic-tipped punch. Never drive it out with a steel punch down the bore, because you'll score the throat.
What "Clean" Actually Looks Like: Daylight, Varnish, and White Crust
"Clean" is not a feeling. It's a test you can repeat, and it either passes or it doesn't. Without a standard, people reassemble a still-dirty carburetor and conclude the whole job doesn't work.
Here's the standard the trade actually uses. Hold the part up. Look through it.
If light passes evenly, it's clean.
The Daylight Test Through the Jet
Hold the jet up against a bright window or a work light and look through the orifice. You should see a clean, round, unobstructed circle of light with crisp edges.
What fails the test:
- A dim or uneven glow. There's a film inside the bore, even if the jet looks shiny from outside.
- An off-center or oval opening. Someone has already reamed it with a wire or a drill bit. The jet is now oversized and the engine runs rich permanently.
- Any visible debris ring. Back to the soak, then blow it out again.
Repeat the test with a light behind the emulsion tube as well. Each air-bleed hole should pass light on its own.
The typical mistake at this stage is poking a jet with whatever wire is nearby. A torch tip cleaner one size smaller than the jet is the correct tool. A guitar string works in a pinch.
A drill bit never does, because it cuts.
Golden Varnish vs. White Oxide vs. Green Residue
The three deposits look different and need different treatments. Treating them the same wastes time or damages parts.
| Deposit | Appearance | Cause | Best Treatment |
|---|---|---|---|
| Golden varnish | Amber to brown film, slightly sticky when fresh, hard when cured | Oxidized gasoline, ethanol phase separation | Solvent soak, then ultrasonic if stubborn |
| White oxide | Chalky white or gray powder, often on the outside too | Moisture plus zinc or aluminum alloy | Mechanical removal with a soft brush, then solvent, then dry fast |
| Green residue | Greenish film or crystals near brass | Prolonged water contact with copper alloys | Solvent plus a rinse, and check the brass parts for pitting |
White oxide is the one that ends careers. Once a zinc-alloy carburetor body has deep pitting around a passage, the metal is gone and no cleaner brings it back.
Scrub corrosion with a nylon brush and solvent, never with a wire wheel. Anything abrasive removes material from sealing surfaces.
Checking the Bowl Vent and Atmospheric Port
A blocked bowl vent will defeat a perfect jet cleaning. The bowl can't breathe, so fuel flow becomes erratic and the engine floods or starves depending on the day.
Trace the vent path from the bowl area up to atmosphere. On many generator carburetors it's a small drilling or a short tube, sometimes with a rubber hose to the air box. Blow through it with low-pressure air and confirm flow at the other end.
Also check the atmospheric port that feeds the float chamber. A mud dauber, a spider nest, or a fleck of paint will seal that hole, and the machine will behave as if the carb is starving when it's really air-locked.
Spray, Dip, or Ultrasonic: Picking Your Solvent Tier
The three cleaning methods aren't interchangeable. They use different mechanisms, reach different depths, and cost different amounts of time. Match the method to what you actually found inside the bowl.
If the bowl showed a light film and the machine ran recently, a spray can do the job. If you found cured varnish or white crust, spend the extra hours on a soak.
What Each Method Does and Doesn't Reach
Aerosol cleaner is a solvent blend delivered under pressure. Typical formulations use acetone, toluene, xylene, or methyl ethyl ketone, and the spray jet physically blasts loose material off surfaces. It reaches what it can see.
That's the limit. A spray cannot dissolve a cured film inside a 0.4 mm passage where the solvent runs straight through and evaporates.
A dip or soak bucket submerges the part and lets the solvent work chemically over time. It reaches every passage, including ones you can't see or reach with a wire. Heat speeds it up, but only with a properly rated heated unit, never a flame or a hot plate.
An ultrasonic cleaner adds mechanical energy. Cavitation bubbles collapse against surfaces and lift film out of blind passages. It's the most effective step and the fastest, typically three to ten minutes once the part is already softened.
| Method | Reach | Typical Time | Limitation |
|---|---|---|---|
| Aerosol spray | Visible surfaces, throat, external passages | 20 to 40 minutes | Evaporates before it penetrates small orifices |
| Dip bucket | All metal passages, internal and hidden | 4 to 24 hours per product label | Attacks rubber and plastic, harsh fumes |
| Ultrasonic | Deep blind passages after softening | 3 to 10 minutes | Won't remove cured varnish alone, needs a solvent or heated bath |
Working temperature matters more than people expect. Solvent at 100°F to 120°F works visibly faster than cold solvent. Keep any heat source indirect and away from open vapor.
Keeping Rubber, Plastic, and Diaphragms Out of the Bucket
This is the rule that ruins the most carburetors. Carburetor dip will swell, harden, or dissolve most elastomers and many plastics, and the damage is permanent.
Anything with a rubber seal, a rubber channel, a plastic body, or a flexible diaphragm is broke. A mechanical rule works: anything that isn't bare metal stays out.
Material compatibility matters beyond the soak too. Some solvents attack certain O-ring compounds, so replacement seals should be ethanol- and solvent-resistant grades. Never reuse a gasket that's been in a dip bucket.
Solvent contact also has a personal cost. These products are defatting agents and can cause chemical burns on prolonged skin contact. Use nitrile gloves, not latex, plus safety glasses or a face shield.
Work outdoors or with real cross-draft. Vapor from these solvents is heavier than air and carries across the floor to any ignition source. A garage with a water heater in it is not a workspace.
Solvent disposal belongs at a household hazardous waste site, never a drain, a storm gutter, or the ground.
Reassembly by Sight: Gasket Faces, Float Height, Air-Bleed Holes
Reassembly is where a clean carburetor turns into a running engine, or into a puzzle with leftover parts. The parts go back the way they came out, in the reverse of the order you photographed.
Lay everything out in that reverse sequence before you start. If a piece has no obvious home, stop and check your photos rather than guessing.
Which Way the Bowl Gasket Faces
Bowl gaskets are not symmetric. A formed rubber channel gasket has a groove side and a flat side. The groove goes against the bowl rim, and the flat side seats against the carburetor body.
Fiber gaskets are easier, but they still have a right orientation if there's a stamped lip. Set the gasket dry, with no sealer. Fuel dissolves most gasket compounds, and a squeezed-out bead of sealant inside the bowl becomes debris in the jet.
Clean, flat mating surfaces matter as much here as chasing leaks on exhaust flanges. Scrape old gasket residue with a plastic scraper, not a steel blade. A gouge across the bowl rim creates a leak path no gasket can seal.
Then torque the bowl bolt to spec. That's usually single-digit newton-meters, roughly 10 to 20 inch-pounds. Hand-tight with a short wrench, stopped before it feels fully tight.
Setting Float Height to Spec with a Caliper
Float height is measured with the carburetor inverted and the float resting under its own weight. The critical detail: let the needle drop and touch the seat, but don't compress the small spring pin inside the needle.
Measure from the bowl mating surface to the highest point of the float, following the orientation your manual specifies. Typical specs land around 10 to 15 mm, though many small engine manuals list the number in thousandths of an inch instead.
If it's out of spec, bend the tang, never the float arm. Small adjustments, measured after each one. A float set too high floods.
A float set too low starves the engine at load.
Where a spec isn't available, the drop measurement often accompanies it. Check for a listed float drop value too, and set both.
Mixture Screw Baseline from Your Recorded Turns
You counted the turns when you took the screws out. Now put that number back.
Seat each mixture screw gently until it just touches, then back it out the recorded count. If you didn't record it, the standard starting point is about 1¼ to 1¾ turns out from lightly seated, then fine-tune by ear at idle.
Never force a screw against its seat. The tip is tapered brass, and it will deform or snap off in the passage. A snapped tip means drilling, and that's a much bigger job.
Units sold in California and other regulated markets often have limiter caps on the mixture screws for emissions compliance. Leave them in place unless the service manual directs otherwise. Final idle adjustment happens after the engine is running, and that comes next.
Before you bolt the carburetor back on, do one last visual pass. Twist the throttle and choke linkages through full travel by hand. Confirm the float moves freely, the bowl is seated, and no jet or spring is still sitting in the tray.
Linkage, Springs, and the Manifold Seal: The Reinstall Photo Trail
The carburetor is clean, gasketed, and ready to go back on. Now the machine has to go together exactly as it came apart, and this is the stage where those photos earn their keep.
Bolting the body down is the easy part. Springs, rods, and gasket faces decide whether the engine idles at 3,600 rpm or screams past 4,000 the moment it catches.
Hooking the Return Spring Exactly as Photographed
Governor springs sit in specific holes for a reason. Shift one end to the next hole and you've changed the governed speed.
Pull up the spring photo from the teardown and match it hole for hole. If you skipped that shot, look for wear witness marks. A bright, polished scar in a hole shows where the spring actually sat.
There are usually three springs in play on a generator carb:
- Governor spring. Runs from the governor arm to the throttle lever, with light preload at rest.
- Throttle return spring. Pulls the throttle plate closed when the linkage is released.
- Choke return spring. Holds the choke plate fully open once the engine warms.
Test everything by hand before you add fuel. Twist the throttle, let go, and watch the plate snap back. A spring on the wrong hole will still return, just at the wrong rate.
Replace any spring that's stretched, kinked, or rusted through a loop. A tired governor spring causes idle hunting that no amount of jet cleaning will touch.
Verifying Full Throttle and Choke Travel
Full travel matters more than most people expect. A choke plate that only opens 90 percent richens the mixture enough to foul a plug and carbon up the combustion chamber over a season.
Open the choke by hand and look straight down the bore. The plate should sit flat and parallel to the airflow, not angled into it.
Do the same with the throttle. At full lever travel, the throttle plate should reach its stop. If it falls short, the linkage is binding or the rod is adjusted too long.
Then check the idle stop screw. It should rest against its pad with the throttle closed, with a hair of clearance so the plate doesn't grind into the bore.
The Manifold Gasket and Mating Surfaces
Replace the manifold gasket every single time, even when the old one looks fine. A crushed fiber gasket or a hardened O-ring will not seal twice.
Wipe both mating surfaces with a solvent-damp rag and let them dry. Run a fingernail across the face. If it catches on a scratch that crosses the sealing area, you have a vacuum leak waiting to happen.
Set the new gasket dry and align it with the bolt holes. Skip the sealer completely, since squeezed-out sealant finds its way into passages. Tighten the mounting bolts in a cross pattern, in two light stages.
A manifold leak reads as a lean surge at idle, an idle that hangs high and drops slowly, or a backfire through the intake. Those are the exact symptoms of a blocked pilot jet, which is why so many people clean a carburetor twice for a gasket problem.
First Start, Leak Check, and Load Testing
Fuel first, spark second. Reconnect the fuel line with a fresh clamp, open the shutoff, and let the bowl fill with the engine off.
Look before you crank. A drip at the bowl seam, the bowl bolt, or the fuel inlet means stop and fix it. Gasoline on a hot muffler is the start of a very short story.
Once it's dry and holding, start the engine and let it warm for a few minutes. Set the idle mixture screw for the highest steady idle, turning in small increments, then reset the idle stop screw.
A no-load idle proves almost nothing. Put a real load on it. A space heater, a heat gun, or a resistive load bank will show you a surge under load, a stumble when a big draw kicks in, and whether it recovers cleanly when the load drops off.
On an inverter generator, check output frequency with a plug-in meter. North American units should hold close to 60 Hz under load. UK, EU, and Australian units hold 50 Hz.
A reading that swings or sags points at a fuel restriction or a governor problem, not the electronics.
Finish with the habit that prevents the whole job next year. Shut the fuel valve and let the engine run until it dies, which drains the bowl.
Costs, Parts, and When a New Carburetor Beats Cleaning
The parts bill here is tiny. The labor bill is what stings, and that number decides whether you clean, rebuild, or replace.
As of 2026, small-engine shop rates commonly land between $90 and $150 an hour, often with a one-hour minimum plus a diagnostic charge. That's how a $400 generator earns a $250 repair quote.
| Item | Typical Price | Notes |
|---|---|---|
| Aerosol carburetor cleaner | $6 to $15 | One can covers a single carb |
| Dip or soak bucket | $20 to $40 | Reusable, but it degrades after opening |
| Gasket or rebuild kit | $8 to $30 | Buy it before you start, not after |
| Single replacement jet | $5 to $15 | Cheap insurance against a reamed orifice |
| Aftermarket carburetor | $25 to $60 | Inverter units run higher |
| OEM carburetor | $60 to $200+ | Factory jetting and emissions compliance |
| Shop repair | $150 to $300 | Labor minimum plus parts markup |
An ultrasonic cleaner is the one bigger outlay. Expect $60 to $150 for a tank large enough to swallow a small carb body. It pays for itself after two or three engines, especially if you also service a mower, snowblower, or pressure washer.
If the Body Is Sound, Rebuild It
A carburetor body with clean passages and good threads is worth rebuilding. New gaskets, a needle valve, and a float put you back to factory jetting.
That route preserves emissions compliance and keeps the engine running the way the manufacturer tuned it. It's also cheaper whenever the OEM kit is available.
If Any of These Are True, Replace It
- Deep pitting or white corrosion inside the bowl or around a passage.
- Stripped or soft bowl bolt threads in a zinc-alloy body.
- A mixture screw tip snapped off in its passage.
- A pressed-in pilot jet that's blocked, with no serviceable replacement.
- Two thorough cleanings and the same symptom back within a week.
- A cracked body at the mounting standoff or the fuel inlet.
Past that point, a replacement is the honest answer. Choose carefully, though. A $30 no-name carb often ships with different jetting than OEM, and it may idle poorly or run lean enough to overheat the engine.
The emissions label matters too. Small nonroad spark-ignition engines sold in the US must meet EPA requirements, and California layers its own certification on top. An uncertified replacement is a gamble on both the engine and the rules.
Cheap parts are also where people try to save a trip. A two-dollar gasket is not the place to cut corners, and it's the same false economy as shopping fasteners on price alone for anything that has to hold under load.
Safety and Storage: The Visual Warning Signs That Stop You
Every step up to this point involved small risks that add up. Gasoline, solvent, compressed air, and a spinning engine are a serious combination in a closed garage.
None of that should stop you. It should just change where you work and what you keep within arm's reach.
Solvent Fumes, Flash Point, and Where Not to Work
Gasoline has a flash point around −45 °F, which means it gives off ignitable vapor at temperatures well below freezing. That vapor is heavier than air, so it pools at floor level and travels toward ignition sources.
Carburetor cleaner is no gentler. Typical formulations rely on acetone, toluene, xylene, or methyl ethyl ketone, and the vapors are harmful to breathe in an enclosed space.
Work outdoors or with real cross-draft through the space. A garage with a gas water heater, a furnace, or a pilot light in it is not a workspace. Neither is anywhere near a running vehicle.
- ABC dry chemical extinguisher within reach, always.
- Nitrile gloves, not latex, plus safety glasses or a face shield.
- Eye-flush access, because aerosol jets bounce back off hard surfaces.
- No smoking, no grinding, no space heater, no shop vac running nearby.
Cap compressed air at around 30 psi for carburetor passages. Higher pressure drives solvent into your eyes, and never point a blow gun at skin. An air embolism from a compressed air injury is a real hospital visit.
Dispose of used solvent as household hazardous waste at a local collection site. Never a drain, a storm gutter, or the lawn.
Fuel in the Oil, Cracked Bowls, and Torn Gaskets: The Stop-Work Signals
Some findings mean you stop and reassess instead of pressing on. Catching these early is the difference between a gasket and a new engine.
- Oil that smells like gasoline on the dipstick. A stuck needle valve has been flooding the crankcase. Change the oil before running it, because diluted oil scores a cylinder fast.
- A warped or cracked float bowl. Usually the result of over-torquing the bowl bolt. It will never seal again.
- A torn manifold gasket you're tempted to reuse. Don't. A vacuum leak runs the engine lean and hot.
- White crust deep in a passage. The metal is gone, not dirty. Cleaning won't restore it.
- A carb body that's been previously drilled or reamed. Someone has already altered the jetting. You're chasing their mistake.
- Fuel weeping anywhere with the engine off. Shut the valve, ventilate, and fix the source before anything else.
Two more rules that aren't about the machine. Never run a generator indoors, in a garage, in a basement, or near a window, because carbon monoxide kills people every storm season, and the CPSC tracks those deaths annually. And check your warranty before starting, since DIY fuel-system work can void coverage on a new unit.
In regulated markets, mixture screws often carry tamper-resistant limiter caps for emissions compliance. Removing them may put you outside local rules for certified equipment. Leave them alone unless the service manual tells you otherwise.
The Storage Routine That Keeps You Out of This Job Next Season
Most carburetor cleanings are self-inflicted. Fuel left sitting in a vented bowl is the whole cause.
- Use ethanol-free fuel where you can get it, or add a stabilizer to fresh fuel before it goes in the tank.
- Fill the tank nearly full before storage. Less airspace means less condensation and less rust.
- Run the carburetor dry by closing the shutoff and letting the engine stall. For anything sitting more than 30 to 60 days, also drain the bowl.
- Change the oil before storage, not after, so acidic byproducts don't sit in the crankcase all winter.
- Pull the plug and add a few drops of oil to the cylinder, then crank it once with the ignition off.
- Cover intake and exhaust openings so mice and mud daubers don't move in.
- Do a pre-season check each spring: fresh fuel, clean filter, plug reading, and a five-minute run under load.
Store fuel only in approved containers, in the quantity your local rules allow, and never in a living space or an attached garage beyond those limits.
Frequently Asked Questions
Can you clean a generator carburetor without removing it?
Yes, for light cases. Run the engine and spray carburetor cleaner through the intake in short bursts, then add fresh fuel with stabilizer. That reaches the throat and visible surfaces only.
If the engine surges, only runs on choke, or won't start after storage, the internal jets are blocked and the carburetor has to come off.
How long can a generator sit before the carburetor clogs?
Roughly 30 to 90 days on untreated ethanol-blended fuel in a vented bowl. Varnish begins forming as the light fractions evaporate. After three to six months, hard starting is near certain.
Ethanol-free fuel or a stabilizer extends that window considerably, and running the bowl dry removes most of the risk.
Why does my generator only run on half choke?
A restricted main or pilot circuit. Closing the choke reduces air and richens the mixture, which compensates for fuel that isn't flowing properly. The usual culprits are a blocked main jet, a varnished pilot jet, a cracked manifold gasket, or loose carburetor mounting bolts letting air in past the seals.
What size wire should you use to clean a jet?
Use a torch tip cleaner one size smaller than the jet orifice, or a strand of fine wire. Never a drill bit, because it cuts metal and permanently enlarges the jet. A jet stamped 72 has a 0.72 mm hole, and opening it even slightly causes a rich condition you can't tune out without replacement.
Does fuel additive actually clean a carburetor?
Partially. Additives help prevent varnish and can loosen light deposits in a carburetor that's still flowing fuel. They can't dissolve a cured film blocking a 0.4 mm passage, and they can't fix a stuck needle valve.
Treat them as prevention, not repair. Once the engine won't idle, only physical cleaning works.
Is it worth rebuilding a carburetor or should you replace it?
Rebuild if the body is sound, the threads are good, and an OEM kit is available. You keep factory jetting and emissions compliance for $8 to $30. Replace if the body is pitted, a screw tip is snapped off, threads are stripped, or two cleanings failed.
A $25 to $60 aftermarket carb works, but expect rough idle and lean running on some units.
