
Most generators don't die in a storm. They die in the six months before it, sitting in a shed with untreated fuel and a battery quietly draining itself. Learning how to winterize a generator really comes down to a handful of moves: treat or remove the fuel, dry out the carburetor, change the oil, fog the cylinder, and protect the battery.
Do it once in the fall and the unit starts on the first or second pull in January.
The numbers explain why this matters. Untreated E10 pump gasoline starts degrading in roughly 30 to 90 days, and ASTM D4814, the specification that defines gasoline quality, doesn't promise storage stability beyond that window. That's why a machine that ran perfectly in October can refuse to fire in December.
Start with the short version, then we'll get into the why and the how.
How to Winterize a Generator
To winterize a generator, treat or drain the fuel, then run the carburetor dry. Change the oil while the engine is still warm. Pull the spark plug, fog the cylinder, and reinstall it.
Remove or tender the battery and seal the openings against rodents. Store the unit covered, dry, and off the ground.
Why Winterizing a Generator Is Really Engine-Protection Work
Stand in front of a generator in October and nothing looks broken. That's the trap. The damage happens quietly, inside a carburetor bowl and on the plates of a battery, long before you notice anything.
Winterization is maintenance aimed at four systems: the fuel path, the oil, the top end of the cylinder, and the starting battery. Miss one and the other three won't save you. A beautifully oiled engine still won't run on varnished jets.
In our research, the parts bill is where the real sting lands. Here's the spread between a skipped step and a spring repair.
| What you skip | What fails by spring | Typical repair cost |
|---|---|---|
| Untreated fuel left in the bowl | Varnished jets, plugged emulsion tube | $150 to $400 installed |
| Stale fuel left in the tank | Phase separation, corroded tank, split lines | $100 to $300 |
| Battery left to self-discharge | Sulfated plates, no crank | $50 to $120 |
| Bare cylinder for months | Rust ring, oil consumption, hard starting | $200 to $600 |
| Open intake and exhaust | Rodent nest, chewed harness | $80 to $300 in labor |
Now compare that to the supply cost of doing it right. A bottle of fuel stabilizer runs about $10 to $15 and treats 20-plus gallons. Fogging oil is under $10.
A battery maintainer costs $25 to $50 and lasts for years.
Parts pricing at the counter swings widely for even simple items, which is why a $12 bottle of stabilizer beats a $200 carburetor every single time. There's a paperwork reason too. Most manufacturers tie warranty coverage to documented maintenance, so a dated note written in the manual beats a verbal claim at the service desk.
The cheapest winterization is the one you do before the first hard freeze. Not the one you rush through in a 30-degree driveway in December with a flashlight in your teeth.
What Actually Kills a Generator While It Sits
Generators fail in storage for reasons that have nothing to do with build quality. Four culprits do almost all the damage: ethanol, water, time, and mice.
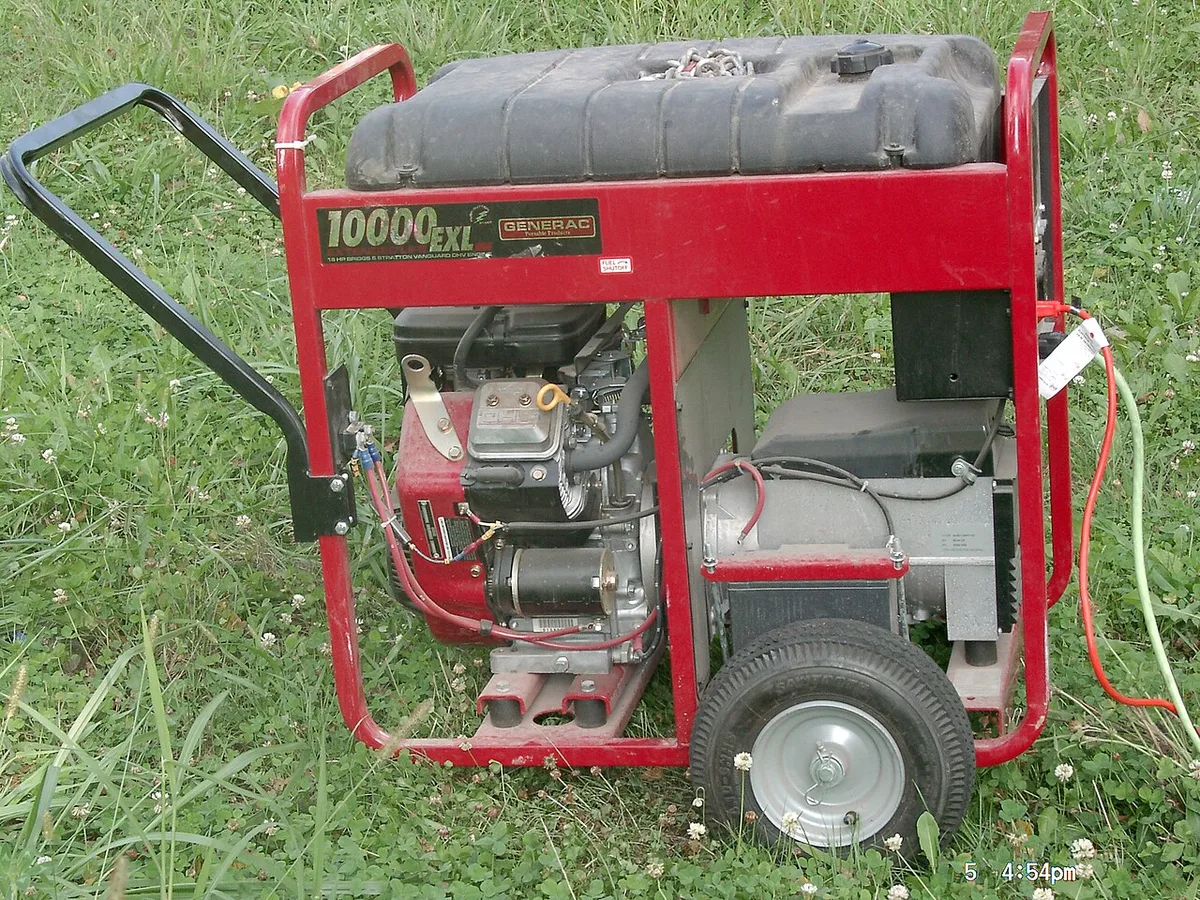
Image source: Wikimedia Commons / Wikimedia Commons contributor (CC BY-SA)
Ethanol, Phase Separation, and the Varnish That Clogs a Jet
Nearly all pump gasoline in the US contains up to 10 percent ethanol, labeled E10 at the station. Ethanol is hygroscopic, meaning it pulls moisture out of the air. A generator's fuel tank is vented, so humid air moves in and out every time the temperature swings.
When enough water collects, the blend comes apart. Phase separation happens at roughly 0.5 percent water by volume. The ethanol and water drop to the bottom as a distinct layer, and the gasoline left floating on top loses octane.
Two problems follow. That water layer sits right on the fuel pickup and the float bowl, which is where corrosion starts. The leaner fuel above it burns hotter and can cause detonation under load.
Then there's evaporation. Gasoline left in a carburetor bowl slowly evaporates and leaves gum and varnish behind. Those deposits are what block the main jet and the tiny passages in the emulsion tube.
The engine still gets fuel, just not the right amount, so it coughs, surges, or refuses to fire.
Here's the part people get wrong. Fuel stabilizer slows oxidation. It does not reverse phase separation and it won't dissolve varnish.
Once fuel has separated, no additive puts it back together. It has to come out.
Condensation, Rust, and the Battery That Sulfates Itself to Death
Steel fuel tanks breathe. Every warm day pushes moist air out, and every cold night pulls damp air back in. Water condenses on the bare steel above the fuel line, runs down the wall, and settles at the bottom.
A near-empty tank is the worst case. More air space means more exposed steel and more moisture to condense. Filling to 90 or 95 percent with treated fuel leaves almost no room for that cycle to run.
Batteries die the same slow death. A lead-acid battery self-discharges at roughly 3 to 5 percent a month at room temperature, and a battery sitting at partial charge begins to sulfate. Lead sulfate hardens on the plates and stops accepting a charge.
Cold adds a second risk. A fully charged battery won't freeze until far below zero Fahrenheit. A discharged one can freeze near 20 degrees, and a cracked case ends the argument permanently.
That's the whole case for a maintainer rather than a shelf.
Pull the plug in spring and you may find rust on the electrode from months of damp air. A wet spark plug points somewhere else entirely, and it's worth understanding before you blame the fuel.
A dry cylinder rusts too. Rings can stick to a bare bore over a long layup, which is exactly what fogging oil prevents. A thin film on the cylinder wall keeps rust from getting a foothold while the engine sleeps.
The Rodent Problem Nobody Plans For
Mice are the most underrated winterization risk. A generator offers everything they want: shelter, residual engine warmth, and foam air filters that shred into excellent nesting material.
The favorite spots are the air box, the muffler outlet, and the space behind the control panel. Chewed wiring is the expensive one. Rodent damage to a harness can run $80 to $300 in labor, and on some units it totals the machine outright.
Physical barriers work. Chemical deterrents mostly don't.
- Plug the muffler outlet with coarse steel wool, never plastic or paper.
- Screen the air intake and cooling vents with 1/4-inch hardware cloth.
- Set traps around the storage area, not inside the unit itself.
- Skip dryer sheets and peppermint oil as your only defense, because the evidence behind either is anecdotal at best.
Check for droppings and shredded foam before you add fuel in spring. A nest inside the cooling shroud also blocks airflow and can cook the engine on its first run.
Know Your Unit First: Portable, Inverter, Dual-Fuel, and Standby
The owner's manual for your specific model is the controlling document. Oil grade, plug gap, stabilizer dose, and the location of the bowl drain screw all vary by engine. Read it before you buy a single supply.
| Unit type | What changes for winter | Good to know |
|---|---|---|
| Open-frame portable (gasoline) | Full fuel, oil, plug, and battery routine | Most common. Usually has a fuel shut-off valve. |
| Inverter generator | Same fuel routine, plus keep electronics dry | Smaller oil sumps. Never pressure-wash the housing. |
| Dual-fuel or tri-fuel | Run the last cycle on propane to clear the gas bowl | Propane doesn't go stale. Only the gasoline side needs work. |
| Home standby (air-cooled) | Service rather than layup: oil, filters, battery load test | The weekly self-test already exercises it. |
| Liquid-cooled standby | Coolant freeze protection plus the usual service | Test antifreeze concentration with a refractometer. |
| RV or onboard genset | Coordinate with chassis winterization | Monthly exercise under load is often specified. |
The dual-fuel detail is worth repeating because it saves real grief. Propane and natural gas don't degrade in storage, so a tri-fuel unit stored on LP has no fuel problem at all. Run the engine on gasoline long enough to warm it, switch the selector to propane, and let it run until the gasoline in the bowl burns off.
Then close the LP valve.
Standby owners sit in a different category. A home standby generator isn't winterized, it's serviced. Air-cooled units need fresh oil, a clean air filter, a battery load test, and a clear path for intake and exhaust air.
Liquid-cooled units add a coolant check on top.
Snow is the sneaky one. A buried exhaust or a drifted-in intake can stall a standby unit during the exact outage it was installed to cover. Keep a three-foot clearance and check it after every storm.
Whatever the unit, never test-run it in an attached garage, basement, or carport, even with the door wide open. Carbon monoxide kills people every year in exactly that scenario, and the CDC tracks the cases.
When a component does fail, decide early when premium parts pay off rather than defaulting to the cheapest listing. A no-name carburetor that fits badly costs more in the long run than the OEM part.
The Fuel Decision: Run It Dry, Stabilize It, or Fill It to the Top
There are two honest schools of thought on winter fuel, and both work when they're done completely. The failures happen in the middle, where people half-drain a tank and call it finished.
| Approach | Best for | The catch |
|---|---|---|
| Run the carb dry | Storage over three months, ethanol fuel, small tanks | Dry seals and lines can shrink. Drain the bowl too. |
| Stabilize and top off | Steel tanks, units needed mid-winter, shorter layups | Treated fuel must actually reach the carburetor. |
| Full drain plus fogging | Six months or more of storage | You need a plan for disposing of old fuel. |
When Draining Wins
If storage runs past three months, draining is the safer bet. If the unit only ever sees E10, draining removes the ethanol problem entirely instead of slowing it down.
The if/then rules are simple. Drain if the tank holds under two gallons, if you've had carburetor trouble before, if the unit lives somewhere with big temperature swings, or if your manual specifies it.
When Stabilizing and Topping Off Wins
If the tank is steel and the unit might be needed in January, treat the fuel and fill it. Top off to 90 or 95 percent, dose according to the label, and run the engine 10 to 15 minutes with no load so treated fuel reaches the carburetor.
Typical dosing is about 1 ounce per 2.5 gallons, so read your bottle rather than guessing. Under-dosing is common and pointless. Treat fuel before it goes stale, never after.
If you're unsure what's coming out of your local pump, the EPA's fuel and ethanol information is a solid primer.
How to Actually Get the Carburetor Dry
- Run the engine 10 to 15 minutes with no load. Warm oil drains better, and warm fuel moves through the passages.
- If you're stabilizing, add the dose to the tank now and run five more minutes.
- Close the fuel shut-off valve while the engine is still running.
- Let it run until it dies on its own. That usually takes one to three minutes.
- Open the bowl drain screw and catch the fuel in a pan. Close it once the dripping stops.
- If there's no shut-off valve, clamp the fuel line with a proper line clamp or drain the bowl only.
Some units with a fuel pump hold fuel in the line between tank and carburetor. Drain that section too, or it sits there all winter turning to lacquer.
Do all of this outdoors with the engine cool before you open the drain. No pilot lights, no smoking, no garage. Funnel the drained fuel into an approved container with a lid and a date written on it.
In spring, people reach for a can of starting fluid when the engine won't catch. That masks a fuel problem instead of fixing it, and small engines don't need much of it to do damage.
If the bowl screw is seized, freeing a stuck fastener is a patience game. Use a right-sized driver, steady pressure, a shot of penetrating oil, and no rounded heads.
Step-by-Step: Winterizing a Portable Gas Generator
Get your supplies together before you start the engine. Half of these jobs need a warm engine, and hunting for a drain pan mid-process is how corners get skipped.
| What to have on hand | Why you need it | Typical cost |
|---|---|---|
| Fuel stabilizer | Slows oxidation in stored gasoline | $10 to $15 |
| Fogging oil | Protects the bore from rust | $8 to $12 |
| Engine oil, correct grade | Fresh fill for the layup | $8 to $20 |
| Drain pan and funnel | Clean capture of oil and fuel | $10 to $20 |
| Spark plug wrench and gap gauge | Plug service and gap check | $8 to $15 |
| Battery maintainer | Keeps the plates charged | $25 to $50 |
| Breathable cover | Keeps dust off without trapping moisture | $20 to $60 |
| Coarse steel wool and 1/4-inch hardware cloth | Rodent barriers | $10 or less |
The whole job runs 90 minutes to two hours on a dry day. Here's the shape of it before we go step by step.
| Stage | Time | Engine state |
|---|---|---|
| Warm-up run | 10 to 15 min | Running |
| Fuel treatment | 5 min | Running |
| Carb dry-out | 3 to 5 min | Running to stop |
| Oil change | 20 min | Warm, then off |
| Plug and fog | 15 min | Off |
| Air filter and sealing | 15 min | Off |
| Battery and cover | 15 min | Off |
Warm It Up and Treat the Fuel
Start the engine and let it run with no load for 10 to 15 minutes. Warm oil carries suspended grit out the drain hole, and warm fuel moves through the carburetor passages properly.
Check the oil level before that run, not after. A unit that's already low can trip its low-oil shutdown halfway through and leave you guessing why it quit.
If you're stabilizing, pour the dose into the tank now and run another five minutes. That's how you know treated fuel reached the bowl rather than sitting in the tank.
Dose at the label rate, usually around 1 ounce per 2.5 gallons. Adding extra doesn't help, and some stabilizers turn gummy when over-concentrated.
If you've chosen to drain instead, skip the stabilizer entirely. Treating fuel you're about to pour out is money in the recycling jug.
Shut the Valve and Run the Carb Dry
Close the fuel shut-off valve while the engine is still running, then let it burn off what's left in the line and bowl. It usually dies in one to three minutes.
Don't touch the choke during this. You want a clean lean-out, not a rich stumble that leaves fuel sitting in the passages.
No shut-off valve on your model? Clamp the fuel line with a proper hose clamp, or go straight to the bowl drain. Either way, don't leave fuel in the bowl for months.
After the engine stops, a small amount still sits in the bowl. That's why the drain screw exists, and it's the step people skip most often.
Drain the Bowl, Then Change the Oil
Open the bowl drain screw and catch the fuel in a pan. Close it once the dripping stops. Some bowls use a plastic float that cracks if you overtighten, so snug is enough.
Now pull the oil drain plug while the engine is still warm. Let it drain a full five minutes, and swap the crush washer if your model uses one.
Refill with the grade on the manual's chart. Many air-cooled engines spec SAE 30 above roughly 40°F, with 5W-30 or 10W-30 for colder service.
Small portables typically hold 0.6 to 0.8 quarts. Overfilling is worse than running slightly low, because it aerates the oil and can push past the seals.
Pull the Plug, Fog the Cylinder, Button It Back Up
Remove the spark plug with the correct wrench and look at the electrode. Dry and light tan is healthy. A plug that comes out wet points to a different problem entirely.
Spray fogging oil into the cylinder for one to two seconds. Then turn the engine over two or three slow pulls with the plug still out, so the oil spreads across the bore instead of pooling in one spot.
Fit a new plug or the cleaned original and torque it to spec, commonly around 15 to 20 ft-lb on small engines. Leave the plug boot off and tape a note to the fuel cap so nobody tries to start it in December.
If spring arrives and the engine won't catch, work through the fuel system in order first. Spraying past a hard start usually hides the real problem and makes it worse.
Clean the Air Filter and Seal the Openings
Foam elements wash in warm soapy water, dry completely, then get a light coat of foam filter oil. Paper elements get tapped clean or replaced. Never wash a paper element.
While the filter is out, look inside the air box for shredded foam or droppings. That's your first rodent clue of the season, and it's a lot cheaper to find now.
Plug the muffler outlet with coarse steel wool. Screen the intake and cooling vents with 1/4-inch hardware cloth, secured so it can't vibrate loose.
Don't seal the machine airtight with plastic and tape. Trapped moisture is how a frame rusts from the inside out over one winter.
Cover It Right and Store It Off the Floor
Set the unit on a pallet, blocks, or a shelf. Concrete wicks moisture, and a steel frame sitting on a damp floor is a rust story waiting to happen.
Use a breathable cover sized for the machine. A loose tarp traps condensation underneath and flaps against the paint for five months straight.
If you're shuffling a heavy frame around the shop, put it on wheels and use the proper lift points rather than the handle. The handle is there to steer, not to hang 200 pounds from.
A simple wooden ramp helps if you need to roll a wheeled unit up onto a bench or a stack of blocks for the winter.
Electric Start and Battery Care Through the Cold Months
An electric start is only as good as the battery behind it. Leave a lead-acid pack at half charge for three months and the plates begin to sulfate. That damage is permanent, and it stays invisible until you turn the key during a storm.
There are two honest approaches. Both work. What fails is doing neither.
| Approach | Best for | Watch out for |
|---|---|---|
| Remove and store indoors | Long layups, unheated sheds, hard freezes | It still needs a maintainer at room temperature, not a shelf |
| Leave it in place on a tender | Units needed mid-winter, heated storage | The charger must be regulated, not a bare trickle unit |
Self-discharge runs about 3 to 5 percent a month at room temperature. A quality maintainer holds the pack around 13.2 to 13.6 volts and then backs off, which is exactly what a plain trickle charger fails to do.
Cold makes everything harder. A lead-acid battery at 0°F delivers roughly half the cranking amps it manages at 80°F, so a marginal pack that spins fine in October will click in January.
Freezing is the real danger. A fully charged battery won't freeze until far below zero Fahrenheit. A discharged one can freeze near 20°F, and a cracked case ends the conversation.
Never charge a battery that's frozen solid. Let it thaw indoors first, because forcing current into ice can rupture the case and spray acid.
Terminal care is a two-minute job that pays for itself. Scrub the posts with a baking soda paste, rinse, dry, then coat them with dielectric grease before the cables go back on.
On serviceable batteries, check the electrolyte level and top up with distilled water to the split ring. Never top up with tap water, and never overfill.
Most generator batteries last three to five years, and a winter on a maintainer is often the difference between year four and year six. When replacement time comes, the same logic applies to premium versus budget parts. A cheap pack that dies in eighteen months costs more than the good one.
Jumping from a car will get you running in an emergency. It won't repair a sulfated pack, so treat it as a one-time rescue, not a maintenance plan.
Inverter, Dual-Fuel, and Propane Units: What Actually Changes
The fuel and oil routine stays the same across most portable types. What changes is the housing, the fuel itself, and how much electronics sit behind the panel.
Inverter generators add a sealed inverter module and a plastic housing with tight cooling paths. Never pressure-wash one, and never let water pool around the vents during storage.
Their oil sumps are smaller, often 0.4 to 0.6 quarts, so measure the fill instead of eyeballing it. Overfilling a small sump is easy and it foams the oil quickly.
Some inverter models also run best stored upright and level. Lay one on its side for a season and you can end up with oil seeping into places it shouldn't be.
Dual-fuel and tri-fuel units have the neatest winter story of the lot. Propane and natural gas don't go stale, so the gasoline side is the only part that needs attention.
Here's the sequence that works:
- Run the engine on gasoline long enough to reach operating temperature.
- Switch the fuel selector to propane while it's still running.
- Let it run until the gasoline in the bowl burns off and it switches cleanly.
- Shut down, close the LP cylinder valve, and disconnect the hose.
- Store the cylinder upright and outdoors, never in a basement or a garage attached to the house.
Propane cylinders in the US carry an overfill protection device, and that valve is not optional equipment. Store them upright, away from heat, and out of reach of anything that might knock them over.
Cold weather cuts propane performance more than most owners expect. A 20 lb cylinder loses vaporization pressure fast below about 20°F, and a big load will starve the regulator. For winter duty, plan on a larger tank or a cylinder blanket.
RV and onboard gensets follow their own rulebook. Manufacturer guidance for many onboard units calls for a monthly run under at least half load, often for around two hours, which keeps seals wet and burns off moisture.
Home Standby Generators: Winter Service Beats Layup
A standby unit doesn't hibernate. Its controller runs a short no-load exercise cycle every week, so the correct approach is annual service, not storage.
| System | Air-cooled standby | Liquid-cooled standby |
|---|---|---|
| Engine oil and filter | Change annually or per hour spec | Change annually or per hour spec |
| Air filter | Inspect and replace as needed | Inspect and replace as needed |
| Spark plugs | Replace on the hour interval, often 200 hours or two years | Replace on the hour interval |
| Battery | Load test, replace every 3 to 5 years | Load test, replace every 3 to 5 years |
| Coolant | Not applicable | Test concentration, typically good to about -34°F at 50/50 |
| Cold-weather kit | Battery warmer and oil warmer in hard-freeze climates | Block heater and battery warmer |
As of 2026, most air-cooled controllers handle the weekly self-test automatically, and that run is not the same as a load test. Exercising with no load keeps the engine oiled. It won't prove the unit can carry your house.
Ask for a load bank test or run a real transfer test once a year with the main breaker open. That's the only way to confirm the generator actually picks up the load it was sized for.
Battery health is the most common no-start cause on standby units. A pack that reads 12.6 volts resting can still fail under a starter load, so a proper load test beats a voltage check every time.
Airflow is the winter problem people miss. Drifted snow can bury the intake or the exhaust outlet and stall the unit during the one outage it exists for. Keep a three-foot clear zone and check it after every storm.
Fuel supply deserves the same attention. Propane tanks should never run below roughly 20 to 30 percent in winter, both for vaporization and because refill trucks get backed up during storms. Natural gas installs need the pipe sized correctly for the unit's demand.
Never box a standby unit in to keep snow off it. Those enclosures are designed for outdoor airflow, and a tarp or a lean-to over the exhaust turns a safe machine into a carbon monoxide source near your house.
Storage Location, Covers, and the CO Line You Never Cross
Where the unit sleeps matters as much as how you prepped it. A perfect winterization job in the wrong spot still ends in rust or, worse, a poisoned household.
| Location | Verdict | Why |
|---|---|---|
| Detached shed or outbuilding | Best option | Ventilated, dry, separate from living space |
| Detached garage | Good, with care | Keep fuel in approved containers, away from ignition sources |
| Attached garage | Never run it here | CO travels straight into the house, door open or not |
| Basement or crawlspace | Never store fuel there | Vapors pool at floor level and find ignition sources |
| Under a deck or carport | Acceptable short term | Rain gets in, rodents get in, and exhaust clearance is hard to keep |
| Truck bed with a cover | Fine for transport | A lockable bed cover keeps weather off between sites |
Carbon monoxide is the line you never cross. The Consumer Product Safety Commission has documented generator CO deaths for decades, and the pattern barely changes: a unit running in a garage, a basement, or too close to a window.
Modern portables with CO shutdown sensors add a real safety net, and UL 2201 covers that equipment. Treat the sensor as a backup, not a license to run indoors.
Put CO alarms on every level of the home and outside each sleeping area. Test the batteries when you winterize the generator, so both jobs get done on the same schedule.
Electrical safety belongs in the same conversation. Backfeeding a panel through a dryer outlet can electrify lines a utility crew is working on. The National Electrical Code, Article 702, requires a proper transfer switch for optional standby systems.
Fuel storage is a fire-code question, not a preference. NFPA 30 and local ordinances cap how much gasoline you can keep in a dwelling, commonly around 25 gallons in approved containers, and the number varies by jurisdiction.
Store gasoline only in containers listed for fuel, with the cap tight and the date written on the side. Rotate it into the mower or the car every few months rather than letting it age in the jug.
Covers need to breathe. Cotton canvas and purpose-made generator covers let vapor escape. A plastic tarp over a sealed unit turns the inside into a terrarium.
Finally, lift smart when you're repositioning a heavy frame for storage. Use the proper lift points on the frame, keep your back straight, and get help before you drag 200 pounds across a concrete floor.
Winter Fuel Storage: Containers, Shelf Life, and Fire-Code Limits
The fuel you keep back for the generator has its own winter clock. Gasoline in a vented jug breathes more than gasoline in a tank, so it ages faster than most owners expect. Store it wrong and you've simply moved the problem from the machine to the shelf.
Here's what to expect from each fuel type, based on manufacturer storage guidance and fuel specification data.
| Fuel | Realistic storage life | What limits it |
|---|---|---|
| E10 pump gas, untreated | 1 to 3 months | Oxidation and moisture absorption |
| E10 with stabilizer | 6 to 12 months | Container seal and storage temperature |
| Ethanol-free (E0) with stabilizer | 12 to 24 months | Still oxidizes, just more slowly |
| Alkylate canned fuel | 2 years or more | Cost per gallon, not chemistry |
| Propane (LP) | Effectively indefinite | Cylinder condition and valve seals |
| Diesel | 6 to 12 months | Water, microbial growth, oxidation |
What Container Rules Actually Matter
Use only containers listed for flammable liquids, with the cap tight and the vent closed. Glass, milk jugs, and unmarked containers are how people end up with a garage fire and no idea what caused it.
Leave a little headroom for expansion but don't store a jug half empty. More air space means more vapor and faster oxidation. Fill to about 95 percent and seal it.
Write the fill date on the side with a marker. You'll never remember which jug is fresh in March, and a date costs nothing.
Keep the jug out of sunlight and away from the furnace, water heater, or anything with a pilot light. Vapors are heavier than air and travel along the floor toward ignition sources.
How Much Gasoline Can You Legally Keep
NFPA 30, the flammable and combustible liquids code, sets the framework. Local fire codes then translate it into a number for your dwelling, commonly around 25 gallons in approved containers, sometimes less in apartments or attached garages.
Call your fire marshal if you plan to keep more than a couple of jugs. Some jurisdictions allow a approved storage cabinet to raise the limit. Others cap residential storage well below the national figure.
Never store fuel in a basement or a crawlspace, code or no code. Vapors pool at floor level and find the water heater every time.
What to Do With Fuel You Drain Out
Drained gasoline is household hazardous waste. Take it to a municipal collection day or a participating auto parts store that accepts it. Never pour it down a drain, into a storm sewer, or onto the ground.
Burning it in a fire pit is worse than it sounds. Aerosolized fuel and a water layer from phase separation make for an unpredictable fire.
If the fuel is only a few weeks old and looks clean, you can dilute it into a nearly full car tank and burn it there. Don't do that with separated fuel or anything with visible water in it.
Small volumes of genuinely stale gas can also go into a lawn mower you're about to run hard. Just don't put it in anything you care about.
Propane cylinders have separate rules. Keep them upright, outdoors, and away from heat. In the US, cylinders between 4 and 40 pounds must have an overfill protection device, and that valve is not optional equipment.
Mistakes That Take Generators Out by Spring
Most spring no-starts aren't bad luck. They trace back to about six habits, and every one of them is fixable in under an hour.
| The habit | What shows up in spring | The fix |
|---|---|---|
| Fuel left in the bowl | Surging, hunting idle, no start | Drain the bowl, clean the jet |
| Untreated tank left full | Water layer, corroded pickup | Drain, flush, refill with fresh |
| Plastic tarp over the unit | Rust, mold, flaking paint | Breathable cover, off the ground |
| Battery left connected, no charger | Clicking solenoid, dead pack | Maintainer or indoor storage |
| Open intake and exhaust | Nest in the shroud, chewed wires | Steel wool and hardware cloth |
| Over-tightening small hardware | Stripped bowl screw or drain plug | Snug plus a quarter turn, no more |
Tarping a Unit That Needs to Breathe
A plastic tarp is the single most common storage mistake, and it looks like the responsible choice. It isn't. Poly tarps trap moisture underneath and hold it against cold steel for months.
The cycle is relentless. Warm days push damp air under the tarp. Cold nights condense it on the frame, the tank, and the recoil housing.
By March you've got surface rust on every unpainted edge.
Mold and mildew join in on humid climates. So does paint wear, because a loose tarp flaps against the housing in every gust and slowly sands the finish off.
The fix is cheap. Use a cover made for the machine, or any breathable canvas that lets vapor escape. Cotton canvas, vented polyester, and purpose-built generator covers all work.
Then get the unit off the concrete. A pallet, two blocks, or a shelf breaks the moisture wicking path. A unit sitting directly on a damp slab will rust from the bottom up no matter how good the cover is.
If you have no covered space at all, a roofed lean-to beats a tarp every time. Airflow matters more than shelter.
Leaving Untreated Gas in the Bowl "Just for a Few Weeks"
This is the most expensive sentence in generator ownership. In warm weather, gasoline left in a carburetor bowl can start leaving gum deposits in four to eight weeks. "A few weeks" stretches into November, and then the unit sits until a storm.
The mechanism is simple. The light fractions evaporate first, and what's left behind is a sticky film that hardens into varnish. That film plugs the main jet and the tiny air bleeds in the emulsion tube.
The engine usually still starts. It just runs badly, surging under load and hunting at idle, because it's getting the wrong fuel mixture at the wrong time.
A plug that comes out oily tells a related story, and it's worth reading what a wet plug means before you blame the carburetor for everything.
The durable fix isn't a winter ritual. It's a habit. Close the fuel valve and let the engine die after every single use, not just the last one of the season.
Two minutes now saves a Saturday in April.
If you're already past that point, the recovery path runs in order. Drain the bowl, remove the bowl nut, and inspect the jet. Soak metal parts in carburetor cleaner, then blow every passage out with compressed air.
Never poke a jet with a wire or a drill bit. Brass jets are soft, and a scratched orifice changes the fuel curve permanently.
A rebuild kit with new gaskets, a float needle, and a bowl seal costs $15 to $40 and solves most varnished carbs. A replacement carburetor runs $150 to $400 installed, which is why the habit matters more than the repair.
What the Failures Cost and When to Hand It to a Technician
Skipped winterization doesn't produce one bill. It produces whichever bill your particular unit decides to hand you in spring.
| Repair | Typical cost | DIY difficulty |
|---|---|---|
| Carburetor cleaning and rebuild kit | $15 to $40 in parts | Moderate |
| Carburetor replacement | $150 to $400 installed | Moderate |
| Fuel pump replacement | $25 to $80 | Easy to moderate |
| Tank flush and reseal | $30 to $150 in supplies | Moderate |
| Wiring harness repair | $80 to $300 in labor | Hard |
| Battery replacement | $50 to $120 | Easy |
| Stator or AVR replacement | $200 to $400 | Hard |
| Shop diagnostic fee | $75 to $150 | Not applicable |
| Pickup and delivery | $50 to $100 each way | Not applicable |
Add the diagnostic fee to any shop quote before you compare it to doing the work yourself. A $120 diagnostic plus a $250 carb job is a $370 repair on a unit that may have cost $600 new.
When a Repair Stops Making Sense
Run the math before you authorize anything. If the repair quote passes roughly half the price of a comparable new unit, replacement usually wins, especially on an older machine with unknown hours.
The exception is a high-end inverter or a liquid-cooled standby, where the engine block and alternator are worth far more than the bolt-ons. There, a $400 carburetor is cheap insurance.
Our research across parts pricing suggests the same pattern you see with any mechanical component. The premium versus budget parts trade-off usually favors quality on anything you'll keep for years. A $30 OEM carburetor gasket set beats a $12 clone that fits badly every time.
What a Shop Will Do That You Probably Won't
A good small-engine shop does three things most owners skip. It ultrasonic-cleans the carburetor instead of spraying it. It checks valve lash.
And it runs the unit under load before it hands it back.
Valve lash matters more than people realize. Tight exhaust valves cause hard starting and power loss that look exactly like a fuel problem. That check requires feeler gauges and a torque wrench, plus the spec from your manual.
Hand the job to a technician if you see chewed wiring, a cracked block, metal in the oil, or a control board fault. Inverter module failures and stator faults aren't DIY territory.
Warranty work is another handoff point. Any internal engine repair on a unit still under coverage should go through an authorized service center, or you risk voiding the claim.
What you can reasonably do yourself: oil, filters, plugs, battery, fuel system cleanout, and covers. That's most of the annual maintenance and most of what winterization actually is.
Counter prices for small parts vary enough that it's worth a phone call before you drive. Knowing what a small part should cost over the counter turns a vague sense of being overcharged into a real comparison.
Mid-Winter Checks and Spring Recommissioning
Winterization isn't a set-and-forget job. A unit that sits untouched for five months is a unit you're trusting to guesswork. Two checkpoints keep it honest.
| When | What to do | Time |
|---|---|---|
| Monthly | Glance at the cover, check for rodent sign, confirm the maintainer light is green | 5 min |
| Every 30 to 60 days | Exercise under load for 20 to 30 minutes | 30 min |
| After each storm | Clear snow from the exhaust and intake on a standby unit | 5 min |
| First warm week of spring | Full recommissioning and load test | 60 to 90 min |
The Monthly Ten-Minute Check
Pull the cover back and look. You're checking three things: rodent droppings or shredded foam, moisture on the frame, and the status light on the battery maintainer.
If the maintainer has gone dark, the battery has been self-discharging for weeks. Test it with a voltmeter at rest. Anything below about 12.4 volts is already down on charge.
Top off a propane cylinder before it drops under about 20 to 30 percent. Vaporization pressure falls off fast in cold, and refill trucks get backed up during storm season.
Test the CO alarms on the same visit. It's the same trip to the garage, so it's the same chore.
Why Short Winter Runs Do More Harm Than Good
Firing the generator for five minutes in the driveway feels productive. It's often the opposite.
An engine that never reaches operating temperature doesn't burn off the moisture that combustion and cold metal create. That water ends up in the crankcase and the exhaust, where it promotes corrosion.
If you're going to run it, run it properly. Bring it outside, let it reach full temperature, and put a real load on it for 20 to 30 minutes. A pair of space heaters or a heat gun pulls enough current to matter.
Load matters because it's what dries the windings and burns off crankcase moisture. Idling proves the engine starts. It doesn't prove the alternator works.
Never do this in a garage, a carport, or a basement. Even with the door open, carbon monoxide accumulates faster than most people believe.
The Spring Start-Up Sequence
Work through it in order and you'll catch problems before they become damage.
- Inspect first. Look for nests, chewed wires, and moisture inside the shroud before anything goes in the tank.
- Check the oil. If it's been a full season since the change, drain and refill now rather than at the end of the season.
- Fill with fresh fuel. Open the fuel valve if you closed it in the fall.
- Set the choke, start it, and let it settle into a steady idle.
- Run it unloaded for 10 to 15 minutes to reach operating temperature.
- Add load in stages and watch for surging, smoke, or a stumble.
- Check output with a meter. You want roughly 120 volts and 60 Hz at no load in North America.
- Shut it down, recheck the oil, and note the hours in the manual.
If it won't catch, resist the urge to spray something into the intake and call it fixed. A quick hit of starting fluid down the plug hole can confirm a fuel problem, but it's a diagnostic tool, not a repair. Small engines don't need much of it to do damage.
One last handling note. If you're moving a heavy frame back into position for the season, use the frame lift points rather than the handle, and don't trust a single strap. Rated tie-down points on the frame exist for a reason, and a generator that lands on a foot costs more than a new carburetor.
Frequently Asked Questions
Can I leave gas in my generator over the winter?
Only if it's treated with stabilizer and the tank is nearly full. Even then, treat it before it goes stale, not after. Untreated E10 degrades in one to three months, and old fuel is the leading cause of spring no-starts.
Do I still need to run the carburetor dry if I use stabilizer?
Yes, that's the safer combo. Stabilizer slows oxidation in the tank. Running the bowl dry removes the fuel that would otherwise evaporate into varnish inside the jets.
Do both and you cover the whole fuel path.
Should I take the battery out or leave it in the generator?
Either works if the pack stays charged. Removing it and storing it indoors above freezing suits long layups and unheated sheds. Leaving it in place on a regulated maintainer suits units you might need mid-winter.
What fails is leaving it connected with no charger.
How often should I start a generator in storage?
Every 30 to 60 days, and only if you can run it outdoors under load for at least 20 minutes. Short no-load runs in cold weather add condensation instead of removing it. If you can't load it, leave it alone and keep the battery tended.
What should I do with the old gas I drained out?
Take it to a household hazardous waste collection site or a retailer that accepts fuel. Never pour it down a drain or onto the ground. Fuel that's only weeks old and visibly clean can be diluted into a nearly full vehicle tank.
Can I winterize a generator that runs only on propane?
Propane needs almost no fuel prep because LP doesn't go stale. Run the unit briefly to circulate oil, shut off the cylinder valve, disconnect the hose, and store the cylinder upright outdoors. The engine work, oil, plug, and battery care all still apply.
