
A rear brake pedal that sinks halfway to the floor is usually a drum brake asking for an adjustment. If you want to know how to adjust drum brakes, the short version is this: turn the star wheel until the shoes just kiss the drum, then back off to a light, even drag. That's the whole idea.
Getting it wrong isn't cosmetic. Manufacturer specifications typically call for shoe-to-drum clearance measured in thousandths of an inch, and any drum stamped with a discard diameter gets replaced, not sanded. Federal safety rules under FMVSS 135 set the performance bar these systems must meet.
Before you pick up a brake spoon, it pays to see what the hardware is actually doing.
How to Adjust Drum Brakes
The heart of adjusting drum brakes is the star wheel. Turn it until the shoes lock the drum. Back it off until the drum spins with light drag.
Reach it through the backing plate slot with a brake spoon. Inspect the shoes and wheel cylinders first.
Why Drum Brake Adjustment Is a Safety Job, Not a Chore
Brakes don't fail politely. They fail on a downhill off-ramp with a trailer behind you.
That's why we treat adjustment as a safety procedure rather than weekend tinkering. The rear brakes on a drum-equipped vehicle do a real share of the stopping work. When they're backed off too far, the front brakes carry the load and the pedal travels further before anything bites.
There's a second failure mode, and it's the sneakier one. Shoes set too tight drag against the drum constantly. That drag turns into heat, the heat glazes the lining, and a glazed lining grabs unevenly or fades when you need it most.
Here's how the two extremes show up in the real world:
| What you'll notice | Shoes set too loose | Shoes set too tight |
|---|---|---|
| Pedal feel | Long travel, low bite point | Firm but grabby |
| Drum temperature | Normal or cool | Hot enough to burn a finger |
| Wheel spin by hand | Free, almost too free | Hard to turn |
| Lining wear pattern | Front shoe worn heavy | Glazed and shiny |
| Parking brake | Won't hold on a hill | Holds, but the drum cooks |
Both ends of that table cost money. A dragging brake can warp a drum in a few hundred miles of highway driving. A loose one wears the front brakes faster and lengthens stopping distance on wet pavement.
Federal rules exist because this matters. FMVSS 135 defines the service brake performance light vehicles must deliver, and the federal standard for light-vehicle braking is written around a system that's properly adjusted and free of leaks. In the UK, the MOT test measures brake efficiency directly, roughly 58 percent for the service brake and 16 percent for the parking brake on a passenger car.
State inspection programs in Pennsylvania, New York, Virginia and elsewhere check lining thickness and pedal reserve too. An adjustment that's "good enough" often isn't.
None of this means you need a shop. It means you work carefully, you verify with your hands, and you don't guess. Getting the rear end up safely is the first real decision, and a set of sturdy wooden ramps or proper jack stands handles it better than a scissor jack and optimism.
How Drum Brakes Actually Work (and Why Clearance Matters)
A brake drum is a cast iron cup that turns with the wheel. Inside it sit two curved brake shoes covered in friction lining. Press the pedal, and hydraulic pressure from the master cylinder pushes the wheel cylinder pistons outward.
The shoes pivot against the anchor pin and press the lining into the spinning drum.
The friction slows the drum. The drum slows the wheel. Simple enough.
What makes drum brakes interesting is self-energizing action. As the drum rotates, it drags the leading shoe around with it, wedging that shoe harder into the drum. In a duo-servo design, the leading shoe's force transfers through a strut to the trailing shoe, which gets pushed into the drum as well.
That wedge effect is why a small wheel cylinder can stop a heavy vehicle.
It's also why clearance is unforgiving. The gap between lining and drum decides how far the wheel cylinder pistons have to travel before anything happens. Every extra thousandth of an inch is fluid that has to move, and fluid that has to move is pedal travel you feel under your foot.
Set the gap too wide and the pedal goes long. The self-adjuster eventually catches up, but only if it works and only if you reverse-brake enough to trigger it. Set the gap too tight and the shoes never fully retract.
The drum runs hot, the lining cooks, and the fluid in the wheel cylinder gets closer to boiling.
Here are the numbers worth keeping in your head:
| Specification | Typical value | Why it matters |
|---|---|---|
| Running clearance | A few thousandths of an inch, felt as light drag | Sets pedal travel and engagement speed |
| Drum out-of-round limit | About 0.004 in (0.10 mm) | Beyond this, no adjustment holds a steady drag |
| Lining replacement point | 1/32 in above rivet heads, 1/16 in for bonded lining | Thin lining overheats and cracks |
| Drum discard diameter | Stamped on the drum, often 0.030 to 0.060 in over original | Past this the drum flexes, warps and fades |
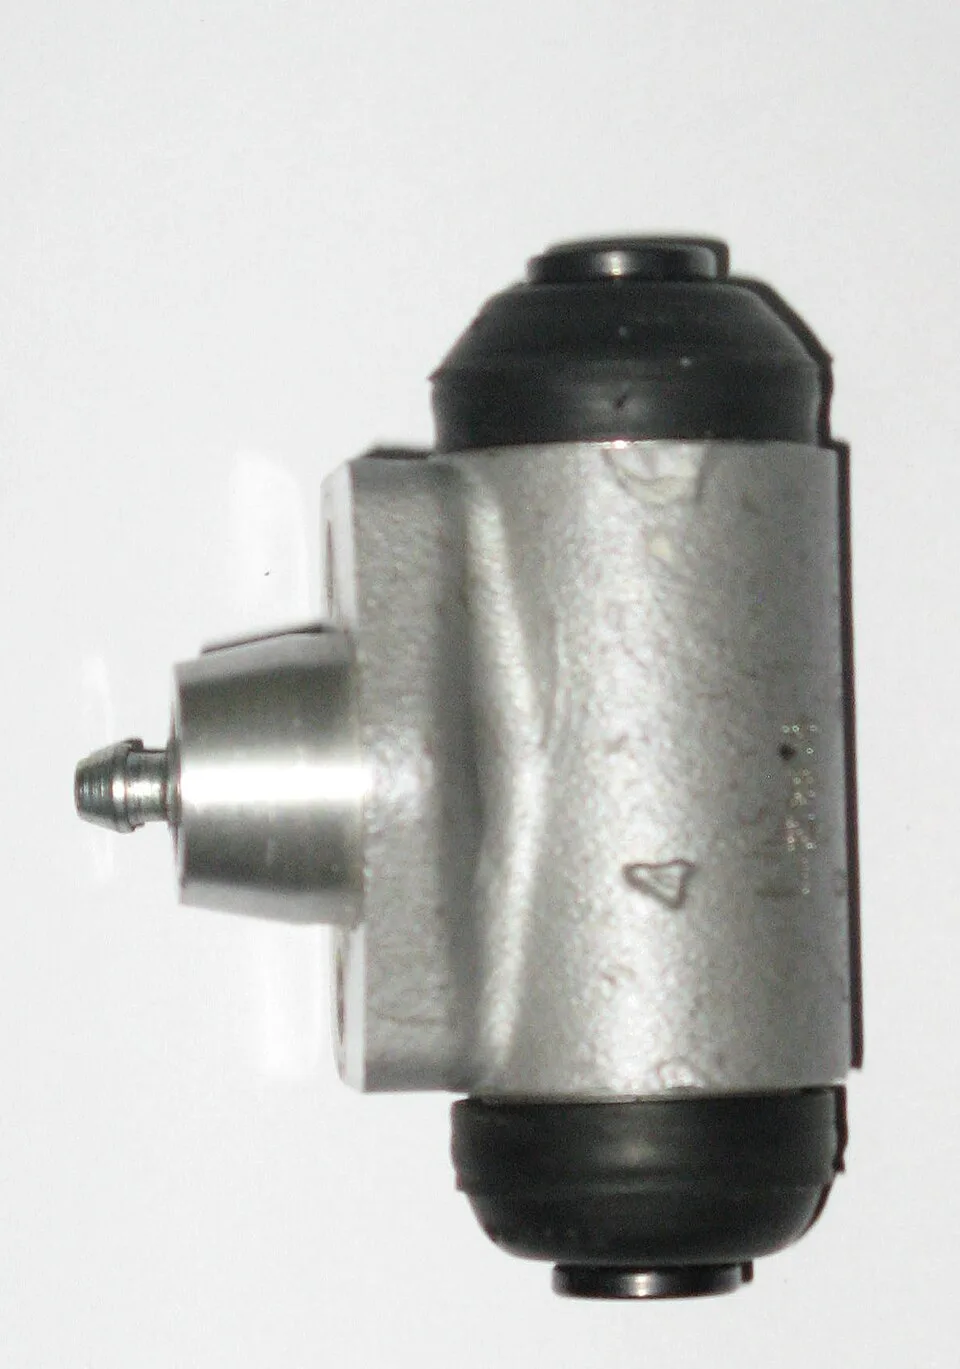
Image source: Wikimedia Commons / Ahmasmi (CC BY-SA)
One more thing about clearance. It's not a single number you set once. The drum grows as it heats, the lining wears, and the shoes settle into the backing plate pads.
That's why the self-adjuster exists and why a manual setup needs a look every so often. If you're chasing a soft pedal, the adjustment is one suspect. Air in the lines is another, and a leaking wheel cylinder is a third.
The Two Families You'll Meet: Self-Adjusting vs Manual Drum Brakes
Not every drum brake adjusts the same way, and this is where a lot of DIY jobs go sideways. People read one procedure online, apply it to a completely different design, and wonder why nothing clicks.
Broadly, you'll run into four setups:
| Design | How it adjusts | What to watch |
|---|---|---|
| Duo-servo, self-adjusting | Lever and pawl index the star wheel during reverse stops | Seized star wheel, bent lever, missing pawl spring |
| Leading-trailing, self-adjusting | Adjuster works off the parking brake linkage or forward braking | Cable slack hides a lazy adjuster |
| Manual only | Star wheel turned by hand through the slot or with the drum off | Nobody has touched it in years |
| Drum-in-hat parking brake | Separate small shoes inside the hat, adjusted through a slot | Adjusting the cable instead of the shoes |
The duo-servo self-adjuster is the one most people picture. It's a lever that rides on the secondary shoe and engages the star wheel teeth when the shoes move. Braking in reverse pushes the secondary shoe outward, the lever swings, and the star wheel clicks around one notch.
Do that enough times and the clearance closes up on its own.
The catch is that the mechanism only works when everything around it is free. A rusted star wheel won't turn. A bent lever misses the teeth.
A stretched pawl spring lets the lever flop without indexing anything. On a salt-belt truck, all three at once is normal.
Leading-trailing designs are simpler. The shoes don't servo off each other, so they need less self-energizing help. Some adjust off the parking brake lever, which is why a car that never uses its handbrake develops a long pedal.
Others adjust on forward braking with a ratchet mechanism built into the wheel cylinder.
Manual setups are the honest ones. There's a star wheel, a slot in the backing plate, and no automation. You turn it yourself.
Many older trucks and plenty of trailers fall into this group, and they stay correctly adjusted only because somebody remembers to check.
As of 2026, drum brakes still sit on the rear axle of a lot of economy cars, older pickups, SUVs, and most trailer axles. Parts availability has thinned for some older models, so check that shoes, springs and drums are actually buyable before you tear anything apart. Nothing stings like a car stuck on jack stands waiting on a hardware kit.
What's Inside the Drum: Parts That Decide How the Adjustment Goes
Pull a drum and you'll find more parts than most people expect. Each one plays a role in whether the adjustment holds or drifts.
| Part | Job | Adjustment-relevant failure |
|---|---|---|
| Brake shoes and lining | Friction surface pressed into the drum | Glazing, cracking, lining thinner than spec |
| Star wheel adjuster | Threaded screw and nut that sets clearance | Rusted threads, stripped nut, wrong-side thread |
| Self-adjuster lever and pawl | Indexes the star wheel automatically | Bent lever, worn teeth, popped-off spring |
| Return springs | Pull the shoes back off the drum | Stretched or broken springs cause drag or slack |
| Hold-down springs and pins | Keep shoes flat against the backing plate | Broken pins let shoes cock sideways |
| Wheel cylinder | Converts hydraulic pressure into shoe movement | Leaking cups soak the lining in brake fluid |
| Backing plate pads | Smooth landing points for the shoe edges | Grooved pads make shoes hang up |
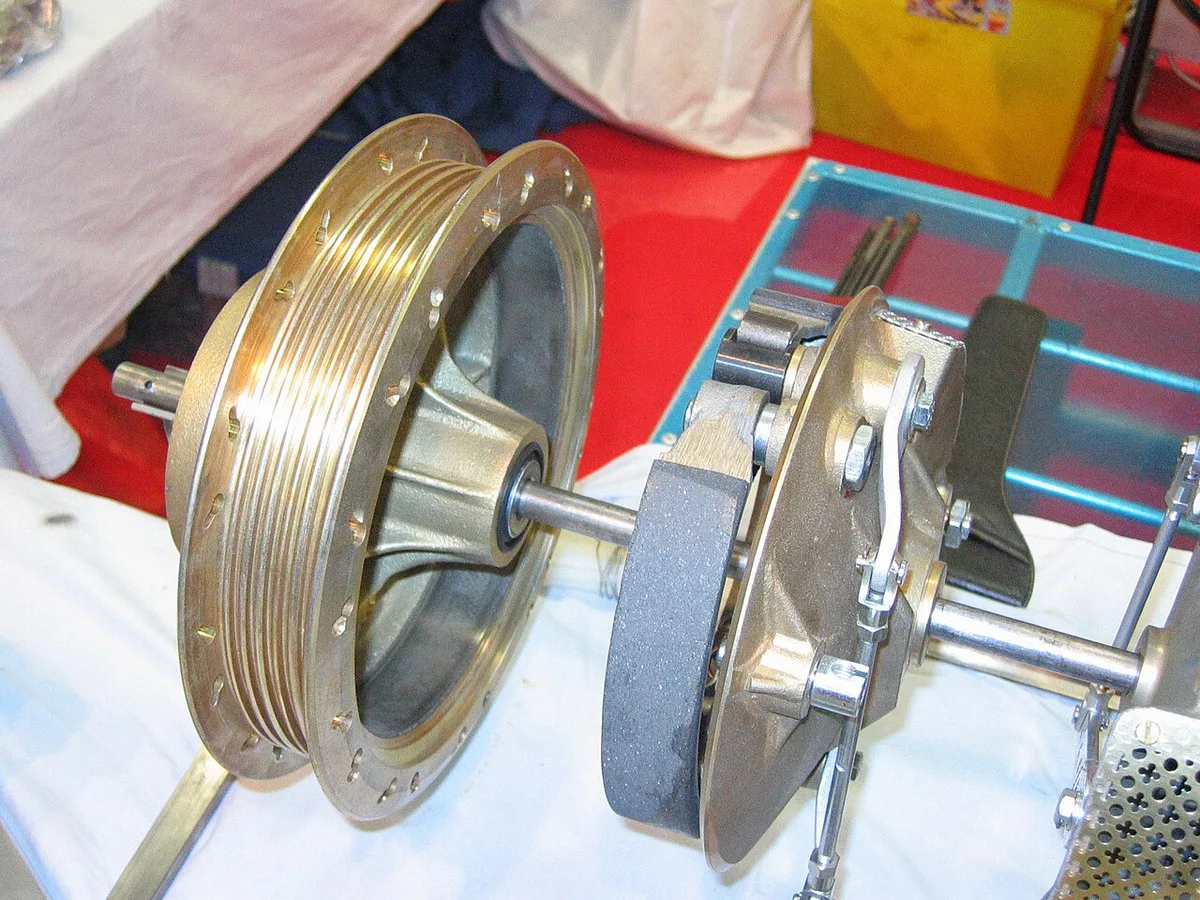
Image source: Wikimedia Commons / Wikimedia Commons contributor (CC BY-SA)
The star wheel adjuster is the part you're actually adjusting. It's a threaded screw and nut assembly that changes the distance between the shoe tips. Turn it one way and the shoes spread apart.
Turn it the other way and they come together.
Thread direction is the trap. On many duo-servo axles, the left and right adjusters use opposite threads, so the same hand motion tightens one side and loosens the other. Never assume.
Watch which way the shoes move while you turn, or check the thread direction before you install anything. Guessing wrong feels exactly like a seized adjuster, and plenty of people have bought a replacement star wheel they didn't need.
Leading and trailing shoes are the second trap. The primary shoe usually has a shorter lining, the secondary a longer one. Swap them and the self-energizing action works against you.
Braking gets grabby in one direction and weak in the other. Some sets are marked, some aren't, so lay the old shoes out before you pull them and match them up.
Springs deserve more respect than they get. Return springs are calibrated, not generic. A spring from the wrong side or the wrong kit changes how the shoes retract.
Reusing a stretched spring because it "looks fine" is how a fresh brake job ends up dragging within a month. The same logic that applies to whether premium parts pay off on suspension work applies here: cheap hardware is a false economy on a safety system.
The wheel cylinder is the quiet killer. A tiny seep past the cup seals soaks the lining in brake fluid, and fluid-soaked lining grabs, then fades, then fails. Check the boots for wetness every time the drum comes off.
If they're damp, the cylinder gets replaced, not cleaned.
Brake dust is the last thing to think about and the first thing to handle correctly. Never blow it out with compressed air. Wet it down, wipe it up, and wear a respirator if you're working on older or imported linings that could contain asbestos.
OSHA's asbestos rules exist because brake work was once a major exposure route, and the dust from a single drum is enough to matter.
Two more habits pay off here. Crack the lug nuts loose before you lift the car, and if you're spinning nuts off with power tools, keep the torque low and finish by hand. And when it's time to replace studs or nuts, know what fresh fasteners actually cost so a stripped stud doesn't turn into a surprise.
Before You Touch the Star Wheel: Pre-Work Inspection
Adjustment only fixes a brake that's otherwise healthy. If the lining is thin or the drum is past its wear limit, you're fine-tuning a system that's already done.
So inspect first. Ten minutes with the drum off tells you whether this is an adjustment job or a replacement job.
Getting the Car Up and the Drum Off Cleanly
- Chock the front wheels, then crack the lug nuts loose while the car still sits on the ground.
- Lift the rear and set jack stands under the axle tube. Never under the floor pan or a suspension arm.
- Release the parking brake. Shoes pressed hard against the drum will fight you the whole way.
- Mark the drum's position against the hub if it's swedged or carries a balance weight.
- Tap the drum with a dead-blow hammer, working around the circumference in small hits.
Don't pry between the drum and the backing plate. That lip is thin and it bends. If the drum won't come, back the star wheel off through the slot and try again.
A rust ridge on the inner lip is usually what's holding it.
If the ABS light is already on, sort that out before you go further. Rear wheel speed sensors live near this hardware, and picking the right chassis-code reader beats guessing with the cheapest plug-in dongle.
Measuring Lining Thickness and Drum Wear
Measure the lining at its thinnest point, not its thickest. Riveted shoes are finished at roughly 1/32 in (0.8 mm) above the rivet heads. Bonded lining typically gets replaced around 1/16 in (1.6 mm).
Uneven wear tells a story. If one end of the shoe is worn and the other is barely touched, the drum is likely bell-mouthed or the shoe is hanging on a grooved backing plate pad. Adjusting that brake just makes the taper worse.
Then measure the drum itself. An inside micrometer or a dedicated drum gauge goes at three depths and two axes, 90 degrees apart. Write the numbers down before you clean anything.
| Measurement | Typical limit | What it means |
|---|---|---|
| Lining thickness | 1/32 in above rivets, 1/16 in bonded | Below this, replace the shoes |
| Drum inside diameter | Discard size stamped on the drum, often 0.030 to 0.060 in over original | Past this, replace the drum |
| Out-of-round | About 0.004 in (0.10 mm) | Higher causes pulsation and uneven drag |
| Taper and bell-mouth | Should be minimal across the drum width | Beyond spec, no adjustment holds |
| Scoring depth | Grooves that catch a fingernail | Resurface or replace |
Any crack or blue heat spot means a new drum. Cast iron that's been cooked doesn't come back.
Checking the Wheel Cylinder, Springs, and Backing Plate Pads
Peel the boots back on the wheel cylinder. If they're wet, the cylinder gets replaced. Brake fluid destroys lining, and a slow seep you never noticed will ruin a fresh set of shoes in a few thousand miles.
Look at the springs next. Compare free length against a new hardware kit and check for stretched coils and shiny rub marks. Return springs are calibrated parts, not generic hardware.
Check the hold-down pins, the self-adjuster lever, and the pawl. A lever with a worn tip skips teeth. A missing pawl spring means the adjuster hasn't worked in years, which explains the long pedal you came in with.
Run a finger along the raised pads where the shoe edges ride on the backing plate. Grooves there make shoes hang up and drag. Smooth them with a file and add a thin smear of high-temp brake grease.
Keep that grease well away from the lining and the drum surface.
Tools and Materials Worth Laying Out First
| Item | Why you'll want it |
|---|---|
| Brake spoon or adjuster tool | Reaches the star wheel through the slot |
| Brake spring pliers | Saves knuckles and springs |
| Hold-down spring compressor | Prevents bent pins |
| Inside micrometer or drum gauge | Confirms drum wear |
| Lining thickness gauge | Removes guesswork on shoe life |
| High-temp brake grease | Lubricates contact pads and adjuster threads |
| Brake cleaner and shop towels | Removes dust and fluid residue |
| Nitrile gloves and a respirator | Brake dust is not a hand-washing problem |
Step-by-Step: Adjusting Drum Brakes Through the Backing Plate Slot
Slot adjustment is the quick path. It suits brakes with usable shoes that just need the clearance reset.
It's also the only option when a drum is rusted on and won't budge until the shoes back away from it.
When the Slot Method Is the Right Call
Use the slot if the lining is healthy and the hardware moves freely. Pull the drum instead if the star wheel is seized, the shoes are worn, or a spring is broken. And if the backing plate has no slot or rubber plug, you either drill an access hole or take the drum off.
There's no third option.
The Procedure, Step by Step
- Support the car on stands with the parking brake fully released.
- Find the adjuster opening. It's usually an oval slot on the lower half of the backing plate, covered by a rubber plug or a knock-out plug.
- Shine a light in and locate the star wheel teeth.
- Seat the tip of a brake spoon on a tooth.
- Turn the star wheel to spread the shoes. Expand until the drum locks.
- Reverse direction and back off until the drum turns with a light, even drag.
- Spin the drum by hand and listen. A steady light hiss is right. A tight spot once per revolution points to an out-of-round drum.
- Peer through the slot at the self-adjuster lever. If it isn't resting on the star wheel, that's the real problem, not the clearance.
- Refit the wheel and torque the lug nuts in a star pattern, commonly 80 to 110 ft-lb depending on the vehicle.
- Repeat the whole process on the other side before you lower the car.
Two cautions. Never lever the tool against the wheel cylinder or a brake line, because both are easy to crack. And work in short, controlled pushes.
A slot adjustment is finesse, not force.
| Stage | Time | What you're confirming |
|---|---|---|
| Support and access | 10 minutes | Car is stable, slot is clear |
| Expand to lock | 3 to 5 minutes per side | Star wheel turns freely |
| Back off to drag | 3 minutes per side | Even clearance all around |
| Verify and torque | 10 minutes | Drum spins, wheel is tight |
What If the Star Wheel Won't Turn?
It's seized, and more force from the slot won't fix it. Soak the threads with penetrating oil and work the wheel back and forth through the slot. If it still won't index, pull the drum and replace the adjuster assembly.
Adjuster kits are cheap, usually under $20, and they include the screw, nut, and lever.
A screwdriver jammed into the teeth does more damage than good. Chewed teeth will skip under the self-adjuster and you'll be back under the car in a month.
Step-by-Step: Adjusting With the Drum Off
Drum-off adjustment is the accurate way to do this job. You can see the shoe contact pattern, set the assembly to a measured diameter, and confirm the self-adjuster sits where it should.
When to Preset the Shoes Off the Car
New shoes, new hardware, a fresh drum, or a seized adjuster. Any of those four means the drum comes off and stays off until the setting is right.
It's also the smarter choice on a vehicle you don't know. You learn the condition of everything in one pass instead of guessing through a slot.
Presetting Shoe Diameter
Measure the drum's inside diameter first. Then set the shoe assembly slightly smaller than that number, using a caliper across the linings at their widest point.
A common working target is 0.010 to 0.020 in under the drum ID. Some service manuals publish an exact setting or supply a gauge. Manufacturer specs win over any rule of thumb.
- Clean the adjuster threads and apply a light smear of high-temp brake grease.
- Fit the shoes onto the backing plate and seat them against the anchor pin.
- Install the hold-down pins and springs, then the return springs.
- Turn the star wheel by hand to spread the shoes.
- Measure across the linings until you hit the target diameter.
- Confirm the self-adjuster lever tip sits in the star wheel teeth.
Checks Before the Drum Goes Back On
- Both shoes fully seated on the anchor pin, not cocked sideways.
- Shoe guide plates and retainers in place.
- All springs hooked in their correct holes and pulling evenly.
- Wheel cylinder boots dry, pistons free to move.
- Adjuster lever under spring tension, resting on the star wheel.
- No grease anywhere near the lining surface.
Slide the drum on and spin it. If it drags hard, the preset was too wide or a shoe is off its pad. Pull it, reset, and try again.
Forcing a tight drum on with the lug nuts is how drums get cracked.
Drum Orientation and Final Torque
Refit the drum in the position you marked at teardown. Balance weights and rust ridges are matched to a specific spot after years of wear.
Snug the lug nuts by hand first, then torque in a star pattern with the wheel mounted. If the drum has threaded retainer holes, use two bolts to push it off later rather than beating on it.
Which Way Does the Star Wheel Turn? Direction Rules by Side and Design
There's no universal direction. Thread handedness changes by side and by design, so the only dependable rule is to watch what the shoes actually do.
With the drum off, that's easy. Turn the wheel a quarter turn and watch the linings. If they spread apart, keep going.
If they draw together, reverse.
With the drum on, use drag as your signal. A quarter turn that makes the drum harder to spin means you're expanding. A turn that leaves it suddenly free means you just backed it off.
| Setup | Common thread arrangement | How to confirm |
|---|---|---|
| Duo-servo, left side of vehicle | Left-hand thread on many axles | Watch shoe movement, or check the stamping |
| Duo-servo, right side of vehicle | Right-hand thread on many axles | Same test, opposite result |
| Leading-trailing | Usually conventional thread both sides | Lever position and drag tell you |
| Replacement adjuster kits | Can differ from OEM | Read the kit instructions before installing |
Plenty of adjusters carry an L or R stamp, and left-hand threads visibly slope the opposite way when you look closely. Check before you install, not after.
If you've turned the star wheel several full rotations and nothing changes, stop. You may have backed the adjuster off its threads, which means the drum comes off anyway. Guessing with a wrench is how a five minute job turns into a hardware order.
How Tight Is Right: Setting and Verifying Shoe-to-Drum Drag
Right is a light, even drag you can feel but that doesn't stop the drum. Spin it by hand and it should turn with mild resistance and coast to a stop after a rotation or so.
Too free and the pedal goes long. Too tight and the drum cooks. There's a narrow window in between, and manufacturer specs are the final word on where it sits.

Image source: Wikimedia Commons / Pedro Simões from Lisboa, Portugal (CC BY)
The Lock and Back Off Method
Expand the shoes until the drum won't turn by hand. That's your reference point, not your finish line.
Then back off in small increments, checking drag after each one. Stop when the drum turns with light resistance and no hard spots.
Don't count clicks and assume you're done. The number of notches varies with thread pitch, shoe wear, and drum diameter. Feel beats counting every time.
Three Ways to Verify the Setting
- By hand: a firm push should carry the drum around with even resistance all the way.
- By ear: a steady light hiss, no scraping, no periodic chirp.
- By heat: after a road test, both drums should run close to the same temperature.
For the heat check, an infrared thermometer aimed at the drum face tells you more than a palm ever will. A 20 to 30 degree difference between sides usually means the hot one is dragging.
| What you find | Likely cause | Next move |
|---|---|---|
| Drum spins too freely | Shoes backed off too far | Re-expand and reset drag |
| Drum locks solid | Over-adjusted or shoe cocked | Back off, check shoe seating |
| Tight spot once per turn | Out-of-round drum | Measure, resurface or replace |
| Both sides hot after a short drive | Clearance too tight or a sticking cylinder | Recheck drag and cylinder free play |
| Pedal still low after adjustment | Air in the system or a failing master cylinder | Bleed the hydraulics |
Resetting the Pedal and Road Testing
Pump the brake pedal several times before you drive. That reseats the wheel cylinder pistons against the shoes after they've been pushed back.
Then take it somewhere quiet. Run a handful of moderate stops from about 30 mph and feel for pull, grab, or a pedal that sinks. Pull over and check drum temperature on both sides with the back of your hand near, not on, the drum.
If one side runs noticeably hotter, back that adjuster off a notch and retest. If the pedal is still long with correct clearance, the problem is hydraulic, not mechanical. Fresh shoes also need 200 to 500 miles of varied, moderate braking before they bed in fully.
Resetting the Self-Adjuster So It Actually Works
If the shoes are set right and the pedal still sits low after a few weeks, the self-adjuster is the suspect. It's the part that's supposed to keep clearance correct without you. When it stops indexing, the clearance grows and nothing pulls it back.
The mechanism needs three things to work. The star wheel has to turn freely. The adjuster lever has to reach the teeth.
And the return spring has to hold the lever against the wheel with enough tension to index it.
Lose any one of those and the adjuster goes quiet. It still looks assembled. It just isn't doing anything.
How the Self-Adjuster Indexes While You Drive
On a duo-servo axle, braking in reverse pushes the secondary shoe outward. That shoe drags the adjuster lever with it, and the lever tip catches a star wheel tooth. When the shoes retract, the lever swings back and the star wheel clicks around one notch.
Each click closes the clearance a hair. Dozens of reverse stops over thousands of miles add up to a properly adjusted brake.
Here's the catch. A car that only ever creeps forward in traffic never triggers the cycle. Same for a vehicle whose parking brake is never used on a leading-trailing setup that adjusts off the handbrake linkage.
If that sounds like your driving, the brake may be perfectly healthy and simply under-triggered. Ten or fifteen gentle reverse stops in an empty lot will often close the gap on their own.
Testing the Adjuster With the Drum Off
This is the only way to see what the mechanism is actually doing. With the drum removed, push the secondary shoe outward by hand and watch the lever.
- The lever should swing and catch a tooth.
- The star wheel should rotate one notch.
- Release the shoe and the lever should snap back under spring tension.
- The lever tip should sit in the tooth valley, not floating above the teeth.
If the lever floats, the tip is worn or the lever is bent. If it swings but the star wheel doesn't move, the threads are gummed or the pawl isn't engaging. If it doesn't return, the spring is stretched or hooked in the wrong hole.
Resetting After New Shoes or Hardware
New shoes change the geometry, so the adjuster has to start near the correct position. Set the shoe diameter just under the drum ID with the drum off. Then let the self-adjuster take over from there.
Don't preset the shoes tight and rely on the adjuster to back them off. Self-adjusters only ratchet one direction, outward. They will never loosen a brake that's set too tight.
| Symptom | Likely cause | Fix |
|---|---|---|
| Pedal slowly gets longer | Adjuster not indexing | Free the star wheel, replace the lever |
| Adjuster clicks but shoes stay loose | Worn lever tip or stripped star wheel | Install an adjuster kit |
| Shoes drag after new install | Preset too wide, adjuster can't back off | Re-set diameter with the drum off |
| One side adjusts, the other doesn't | Bent lever or wrong-side hardware | Compare both sides part by part |
Parking Brake Cable Adjustment: Only After the Shoes Are Right
Cable adjustment comes last. Always. If you take up shoe wear at the cable, the lever runs out of travel and the brake stops holding even though the shoes still have life in them.
That's the single most common parking brake mistake on drum-equipped vehicles. Someone feels a weak handbrake, tightens the cable nut, and buys six months before the whole assembly needs replacing.
Get the shoe clearance right first. Then check the cable.
Checking Lever Travel Before You Touch Anything
Count the clicks or notches as you pull the lever up. Most passenger cars land somewhere around three to six clicks before the brake fully engages. Trucks and SUVs vary more.
If the lever hits the top of its travel, the cable is either too loose or the shoes are backed off. If it engages in one or two clicks and the rear wheels drag, it's too tight.
Test on a slope you trust. A driveway incline works. With the lever set, the car should hold without creep in both directions.
Adjusting the Cable at the Equalizer
- Chock the front wheels and lift the rear.
- Release the parking brake fully and confirm the rear wheels spin free.
- Find the adjuster nut on the equalizer, usually where the single front cable splits into two rear cables.
- Hold the cable end and turn the nut to remove slack.
- Stop at the point where the cables are taut but the wheels still spin freely.
- Pull the lever up and count the clicks while watching both rear wheels.
- Confirm both wheels lock at roughly the same point.
Even lockup matters. If one side engages earlier, that cable is tighter, rusted, or the shoes on that side are set differently.
When the Cable Itself Is the Problem
A cable that won't slide smoothly in its housing is seized, not just loose. You'll feel it as a lever that pulls hard and returns slowly, or a rear wheel that drags with the lever fully down.
Rusted cables are the norm in salt-belt states. Replace them in pairs. A new cable on one side and a sticky original on the other gives you uneven engagement that no adjustment can cure.
On drum-in-hat parking brakes, the small shoes inside the hat have their own star wheel. Adjust those shoes through the slot first. The cable only takes up the last bit of slack.
Common Mistakes That Cause Drag, Heat, and Weak Rear Brakes
Most of the failed adjustment jobs we see follow the same handful of patterns. None of them are exotic. All of them cost money.
- Backing off the adjuster to silence a dragging brake instead of finding the cause. The drag returns because the real fault, usually a sticking cylinder or a stretched return spring, is still there.
- Tightening the parking brake cable to fix a long pedal. It masks worn shoes and burns through cable travel.
- Turning the star wheel the wrong way, then declaring the adjuster seized. Watch the shoes move before you apply force.
- Swapping leading and trailing shoes. Self-energizing action then works against the brake instead of for it.
- Reusing return springs because they look fine. Springs fatigue invisibly and change how the shoes retract.
- Getting grease on the lining. Even a fingerprint of high-temp grease reduces friction and causes grab.
- Forcing a tight drum on with the lug nuts. That's how drums crack and how shoes get bent.
- Adjusting one side and calling it done. Always match both sides before the car comes down.
- Leaving the parking brake engaged during the job. The shoes fight the drum the entire time.
- Skipping the pedal pump before the first drive. The wheel cylinder pistons need to reseat against the shoes.
- Torquing lug nuts with an impact wrench at full power. Hand torque in a star pattern is the standard.
- Bedding in new shoes with hard stops from day one. That glazes the lining instead of seating it.
| Mistake | What it feels like | Long-term damage |
|---|---|---|
| Over-adjusted shoes | Firm pedal, hot drum, burning smell | Warped drum, glazed lining, boiled fluid |
| Under-adjusted shoes | Long pedal, weak rear braking | Front brake overload, longer stops |
| Cable used to set clearance | Handbrake at top of travel | Stretched cable, worn lever ratchet |
| Wrong-direction adjuster force | Stripped star wheel teeth | New adjuster assembly needed |
Two of these are worth dwelling on. The first is the "just back it off" habit. A dragging brake has a cause, and clearance is rarely it.
Nine times out of ten you'll find a wheel cylinder that won't retract, a kinked hose holding pressure, or a return spring that's given up.
The second is the parts-quality question. Rear brake hardware is cheap enough that most people buy whatever's on the shelf. Fresh springs, a new adjuster kit and a clean backing plate cost less than a tank of fuel.
That's a better trade than reusing twenty-year-old hardware on a safety system. The same reasoning applies to brand-name suspension parts versus no-name equivalents elsewhere on the car.
When Adjustment Won't Fix It: Worn Drums, Seized Hardware, and Leaking Cylinders
Sometimes the clearance is right and the brake still misbehaves. That's when you stop adjusting and start diagnosing.
Work through the possibilities in order. Cheap checks first, expensive parts last.
| What you're seeing | Most likely cause | What to do |
|---|---|---|
| Pulsation through the pedal | Out-of-round or warped drum | Measure runout, resurface or replace |
| One wheel locks early | Fluid on that lining or a binding cable | Inspect cylinder and shoes |
| Pedal sinks slowly at a stop | Internal master cylinder leak | Replace or rebuild the master |
| Pedal spongy with correct clearance | Air in the hydraulic system | Bleed in the correct sequence |
| Both rear drums hot after a short drive | Residual pressure, kinked hose, or over-adjustment | Check hose routing and drag |
| Grinding or metal-on-metal | Lining worn to the rivets or backing | New shoes and drum inspection |
| Wheel wobbles when spun | Loose wheel bearing, not a brake fault | Check bearing play before adjusting |
Worn Drums Past the Discard Limit
Every drum carries a maximum diameter, either stamped on the outer face or published in the service manual. Once machining pushes the drum past that number, it goes in the scrap bin.
Thin drums flex under load. They also retain less heat, which shortens lining life and increases fade on long descents. No amount of careful adjustment compensates for a drum that's already out of spec.
Cast iron drums with visible cracks, deep blue heat marks, or a pronounced lip get replaced rather than turned. A brake lathe can only remove so much material, and most passenger drums have room for one or two light cuts at best.
Seized Adjusters, Bent Levers and Stuck Hardware
Rust is the usual culprit. Star wheel threads pack with road grit, the lever pivot seizes, and the whole assembly stops moving. Penetrating oil and patience sometimes free it.
Often it doesn't, and an adjuster kit is the honest answer.
Look at the backing plate too. A bent or corroded backing plate throws off shoe alignment, and the shoes then contact the drum at an angle. That creates a wear pattern no adjuster can correct.
Leaking Wheel Cylinders and Collapsed Hoses
A wheel cylinder that seeps fluid leaves a wet stain inside the drum and a lining that smells faintly of brake fluid. Replace the cylinder, replace the shoes on that side, and clean the drum with brake cleaner.
Rubber hoses fail from the inside. A hose with a flap of failed liner acts like a one-way valve, holding pressure against the shoes after you release the pedal. The symptom is a brake that drags for a few minutes and then frees up.
If the car pulls under braking and you're already holding the right grip on the rim, don't adjust anything. Pull is a hydraulic or friction imbalance, not a clearance problem.
Brake Dust, Asbestos, and the Safety Rules Worth Following
Brake dust is the part of this job people ignore. It's also the part with the clearest documented health risk.
Older linings and plenty of imported aftermarket shoes still contain asbestos. OSHA's exposure limit for asbestos in general industry is 0.1 fibers per cubic centimeter over an 8-hour shift, and brake work was historically one of the main exposure routes in automotive shops.
You don't need a shop to be at risk. One drum of dry dust, disturbed with an air nozzle in a closed garage, is enough to put fibers in the air you're breathing.
Cleaning Brake Parts the Safe Way
- Never blow dust out with compressed air. That's the single worst thing you can do.
- Wet the dust down with brake cleaner or a water spray before wiping.
- Use a dedicated brake washer with a HEPA filter if you do this regularly.
- Wipe into a sealed bag and dispose of it with household hazardous waste, not the shop floor.
- Keep food and drink out of the work area entirely.
- Don't take contaminated work clothes inside. Change and wash separately.
PPE Worth Wearing Every Time
| Protection | Why it matters |
|---|---|
| Nitrile gloves | Brake fluid and cleaner both absorb through skin |
| Safety glasses | Dust and fluid spray both travel |
| P100 or N95 respirator | Filters fibers and fine dust |
| Long sleeves | Keeps dust off forearms and out of the car |
Brake cleaner is its own hazard. It's a chlorinated or non-chlorinated solvent with strong fumes, and it burns if you get it near a heat source or a lit cigarette. Work in a ventilated space.
Wear gloves. Don't spray it on hot components.
Used brake fluid is toxic and shouldn't go down a drain. Collect it in a sealed container and take it to a recycling center. Most auto parts stores accept it.
One more rule that isn't about dust. Never trust a brake job you haven't verified with your own hands. Spin the drum, feel the drag, check the heat after a road test.
If something feels off, take it apart again. The cost of a second look is a few minutes. The cost of a missed failure isn't measured in minutes.
Costs, Specs, and What a Shop Would Charge
Adjustment itself is nearly free. You need a brake spoon, a jack, and stands. The money question is what happens when the inspection says the parts are done.
Here's where the real numbers land as of 2026, based on typical parts pricing and independent shop labor rates.
| Item | Typical cost | Notes |
|---|---|---|
| Brake shoes, per axle | $40 to $100 | Premium lining costs more, lasts longer |
| Hardware kit (springs, pins, levers) | $15 to $30 | Always replace with new shoes |
| Star wheel adjuster kit | $10 to $25 | Cheap insurance against a lazy self-adjuster |
| Wheel cylinder | $20 to $60 each | Replace in pairs on high-mileage cars |
| Brake drum | $40 to $90 each | Compare against resurfacing cost |
| Drum resurfacing | $15 to $30 per drum | Only if it stays under discard diameter |
| Brake fluid, DOT 3 or DOT 4 | $8 to $15 a bottle | Change every 2 to 3 years |
| Shop labor, rear brake job | $250 to $450 per axle | Higher in metro areas and on rust-belt cars |
A pure adjustment is a different transaction. Many shops will do it as part of a brake inspection, and a stand-alone adjustment often runs $60 to $120 per axle. Some won't quote it separately, because a shop that finds worn shoes isn't going to adjust them.
That's the honest trade. Adjustment is cheap when the hardware is healthy and pointless when it isn't.
What Pushes the Bill Up
- Rusted drums that need heat or a puller to remove.
- Seized or snapped bleeder screws, which turn a bleed into a cylinder replacement.
- Drum-in-hat parking brakes, where the small shoes wear separately and add labor.
- Seized parking brake cables that need replacement in pairs.
- Corroded backing plates that need cleaning before anything fits properly.
Salt-belt vehicles regularly run 30 to 50 percent above book labor because every fastener fights back. If you've ever priced what a chain-store counter charges for a part you could have ordered online for less, you know the pattern already.
DIY Versus Shop: Which Makes Sense
- Do it yourself if the shoes have life left and the hardware moves freely. You'll spend an afternoon and save the labor.
- Do it yourself if you already own stands, a torque wrench, and a brake spoon. The tool cost pays back on the first job.
- Take it in if a drum won't come off, a bleeder is snapped, or the pedal is soft after adjustment.
- Take it in if you find fluid inside the drum. That's a hydraulic repair, not an adjustment.
One more cost people forget: time. A first-time drum brake job with a rusted drum can eat a whole Saturday. A shop does it in two hours because it has done it four hundred times.
Maintenance That Keeps Rear Brakes in Adjustment
A drum brake that's correctly adjusted today will drift out of spec within a year of normal driving. The trick is catching it early instead of waiting for the pedal to tell you.
Our research on service intervals points to one simple rule. Check rear brake adjustment at every tire rotation, roughly every 6,000 to 7,500 miles, and inspect the hardware properly once a year.
Habits That Help the Adjuster Do Its Job
- Use the parking brake regularly. On leading-trailing designs, the handbrake linkage often drives the adjuster.
- Make a few gentle reverse stops in an empty lot once a month. Duo-servo self-adjusters index on reverse braking.
- Stop harder than usual occasionally from a safe speed. Self-adjusters need shoe movement to ratchet.
- Avoid riding the pedal downhill. Engine braking keeps heat out of the drums.
- Release the parking brake fully every time. Partial engagement cooks the shoes.
A car that only creeps through city traffic in drive, never reverses sharply, and never uses its handbrake is the classic candidate for a long pedal. Nothing is broken. The adjuster simply never gets triggered.
Seasonal and Regional Checks
| Condition | Extra check | Why |
|---|---|---|
| Winter road salt | Rinse the backing plates, inspect hardware yearly | Seized star wheels and rusted levers |
| Mountain or hilly driving | Drum temperature after long descents | Heat accelerates wear and fade |
| Dusty or gravel roads | Adjuster thread condition | Grit packs the threads and stops indexing |
| Towing or heavy loads | Lining thickness every 10,000 miles | Rear brakes work harder under load |
| Humid climates | Brake fluid moisture test | Fluid absorbs water and lowers boiling point |
Brake fluid is the quiet maintenance item. DOT 3 and DOT 4 fluid absorbs moisture through rubber hoses and seals, and wet fluid boils at a far lower temperature than dry fluid. A flush every two to three years keeps the hydraulic side healthy so the mechanical side can do its job.
What to Watch Between Checks
- Pedal height creeping downward over weeks.
- A handbrake that needs more clicks than it used to.
- Squealing that stops when you touch the brake, which often means the wear indicator.
- A burning smell after a normal drive.
- One rear wheel hotter than the other.
Any of those is a reason to pull the drum and look. None of them is a reason to turn the star wheel and hope.
Frequently Asked Questions
How do I know if my drum brakes need adjusting?
A low or long pedal is the main clue, along with a parking brake that needs extra clicks to hold. You may also hear scraping or feel the car pull to one side. Confirm by spinning each rear wheel with the car lifted and checking for excessive free play.
Can I adjust drum brakes without removing the wheel?
You can reach the star wheel through the backing plate slot with the wheel installed, but you'll need the car lifted and the wheel off the ground to spin the drum and feel the drag. Removing the wheel makes the job easier and safer. Many people pull the drum entirely for a proper inspection.
Which way do you turn the star wheel to tighten drum brakes?
There's no universal direction. Thread handedness differs between left and right sides on many duo-servo axles. Turn the wheel a quarter turn and watch the shoes, or feel whether the drum gets harder to spin.
If the drum frees up, you're going the wrong way.
How much does it cost to adjust drum brakes?
A stand-alone adjustment typically runs $60 to $120 per axle at a shop, and many brake inspections include it. Doing it yourself costs almost nothing beyond tools. If the inspection finds worn shoes or a leaking wheel cylinder, expect $250 to $450 per axle for a full rear brake job.
Can you over-adjust drum brakes?
Yes, and it's worse than leaving them loose. Shoes set too tight drag constantly, which generates heat, glazes the lining, warps the drum, and can boil brake fluid. Back off until the drum spins with light, even drag.
A drum that's hot to the touch after a short drive is over-adjusted.
Do drum brakes adjust themselves?
Many do, but only under the right conditions. Duo-servo self-adjusters index when you brake in reverse. Leading-trailing designs often adjust off the parking brake.
Cars that never reverse sharply or never use the handbrake can go years without a single click of adjustment.
Verified Bottom Line: A Checklist You Can Trust
Everything above boils down to a sequence. Inspect before you adjust. Adjust before you touch the cable.
Verify with your hands before you drive.
Here's the whole job on one page.
- Chock the fronts, crack the lugs, lift the rear, and set stands under the axle.
- Release the parking brake fully before anything else.
- Pull the drum and measure lining thickness and drum diameter.
- Replace shoes if the lining is at 1/32 in above the rivets, or 1/16 in on bonded shoes.
- Replace the drum if it's past the stamped discard diameter. No exceptions.
- Replace any wheel cylinder with wet boots, and clean or replace fluid-soaked shoes.
- Free and lubricate the star wheel threads and the backing plate contact pads.
- Check that the self-adjuster lever reaches the star wheel and springs back.
- Set shoe diameter just under drum ID if you're working with the drum off.
- Expand the shoes until the drum locks, then back off to a light, even drag.
- Spin and listen. A steady light hiss is right. A tight spot means an out-of-round drum.
- Refit the drum in its marked position, torque the lugs in a star pattern.
- Pump the pedal before driving to reseat the wheel cylinder pistons.
- Adjust the parking brake cable only after shoe clearance is correct.
- Road test with moderate stops and compare drum temperatures side to side.
Anything that fails a step goes back a step. A drum that won't spin freely after backing off means the shoes are hanging up. A pedal that stays low with correct clearance means air or a failing master cylinder.
None of this is beyond a careful DIY owner with a jack, stands, and a brake spoon. What separates a good job from a bad one isn't skill. It's patience at the verification stage, and the willingness to pull the drum a second time when something doesn't feel right.
That's the whole discipline. Feel the drag, trust the measurements, and never let a brake leave your hands without a road test behind it.
