
A brake pedal that goes to the floor is the one car problem you can't pencil in for next weekend. If you're looking up how to fix a brake pedal that goes to the floor, the honest first step isn't a wrench. It's working out which of three failures you're dealing with, because each one has a different fix and a different level of danger.
The numbers explain why this gets taken seriously. DOT 4 brake fluid boils at roughly 230°C (446°F) when fresh, and absorbed moisture drags that ceiling down fast, which is exactly why the federal standards test wet boiling points too. Pedal height and pedal feel are your only early warning system.
Here's how to read them before you touch a single fitting.
How to Fix a Brake Pedal That Goes to the Floor
Fix a pedal that goes to the floor by finding the fault first. A pedal that sinks slowly usually means a failing master cylinder. A pedal that drops instantly means a burst line or wheel cylinder.
Stop driving and tow the car in that case. Air in the system needs proper bleeding before anything else.
Why a Brake Pedal That Sinks Is Never Just a Soft Pedal
A soft pedal and a sinking pedal get lumped together in everyday conversation. They're different faults with different causes. Soft is a feel problem, usually trapped air or tired fluid.
Sinking is a pressure-loss problem, which means fluid is going somewhere it shouldn't.
Your brake system is a sealed hydraulic loop. Press the pedal and the master cylinder pushes fluid through the lines to the calipers and wheel cylinders. Brake fluid doesn't compress.
So the pedal should travel the same distance and stop at the same height, every single time.
When the pedal keeps creeping toward the floor under a steady foot, fluid is escaping. It's either leaking out where you can see it, or slipping past a seal inside the master cylinder where you can't. Both count as failures.
Neither one heals itself.
The dangerous part is what drivers mistake it for. Here's the short list of lookalikes:
- Brake fade. Heat causes a loss of friction, not a loss of hydraulic pressure. The pedal stays firm while the car refuses to stop.
- Normal ABS operation. The pedal pulses and kicks back under hard braking. That's the system working, not failing.
- Warped rotors. You feel a shudder through the pedal and wheel, but the pedal height holds.
- Rear drum shoes out of adjustment. Long travel at the top, then a solid pedal once the shoes meet the drum.
| What you feel | What's usually happening | Urgency |
|---|---|---|
| Pedal creeps down under steady pressure | Fluid bypassing a master cylinder seal | Stop driving |
| Pedal hits the floor and stays there | Ruptured line, hose, caliper seal, or wheel cylinder | Tow it |
| Long travel, then a firm pedal | Rear drum self-adjusters not working | Fix within days |
| Spongy first press, firm on the second | Air in the lines, or pad knock-back | Bleed it soon |
| Pedal pulses and vibrates | Warped rotor or ABS activation | Diagnose before it worsens |
Brakes fail in a predictable order too. Rubber hoses crack from the inside out, steel lines rot from the outside in, and seals wear with every stroke. The federal standards that cover brake fluid and vehicle brake systems exist precisely because those failure modes are so well documented, and because the margin between "a bit soft" and "no pedal" is smaller than most people assume.
The 60-Second Triage: Drive It, Tow It, or Fix It Where It Sits
Answer one question before anything else: will the pedal hold pressure right now? Pump it three times with the engine running and hold steady pressure for thirty seconds. What happens next decides your whole day.
| Situation | Verdict | First move |
|---|---|---|
| Pedal to the floor, no braking at all | Tow | Flatbed, not a rope |
| Pedal sinks to the floor within 10 to 30 seconds at a stop | Do not drive | Park it and diagnose |
| Pedal low but the car still stops normally | Drive gently to a shop | Book it today, avoid traffic |
| Pedal soft right after brake work | Air in the system | Re-bleed before driving anywhere |
| Pedal fine cold, sinks when hot | Fluid boiling or a seal failing with heat | Treat as unsafe |
If the pedal drops and stays down
If the pedal goes straight to the floor and never builds pressure, you have a major hydraulic loss. A steel line has rusted through, a flexible hose has burst, a caliper seal has let go, or a wheel cylinder has blown. Fluid is pouring out somewhere.
Don't drive it. Not to the shop, not around the block, not "just to see." A dual-circuit master cylinder often preserves some braking when one circuit fails, and that fact has saved a lot of lives. It is not a guarantee.
On a diagonally split system, one failure can leave you with two working brakes and a very long stop.
If you're stranded, call for a tow and know where to hook a strap so nobody yanks on a bumper cover or a suspension arm. If you're already rolling when it happens, downshift, ease the parking brake on gradually, and keep both hands planted on the wheel while you steer for the shoulder.
If the pedal sinks slowly while you sit at a light
This is the classic master cylinder bypass. You hold steady pressure at a red light and the pedal slowly descends toward the carpet. Pump it and it comes back up.
Pump it again and the same thing happens.
That's a brake system telling you it's on borrowed time. It might hold for another month of short trips. It might let go on a highway off-ramp.
The failure is progressive, and there's no way to predict the day.
Park the car and diagnose it properly. If you can't do the work this week, drive it only to a shop, and only if the pedal still holds firm when you hold it. Better yet, don't drive it at all.
If the pedal is low but firm
A low, firm pedal usually means the hydraulics are healthy and something mechanical has drifted. The most common culprits are rear drum shoes that aren't self-adjusting anymore, or caliper slide pins that have seized so the pads can't sit close to the rotor.
This one gives you a little breathing room. The car stops. The pedal just sits lower than it should.
Get it looked at within days rather than months, because a dragging caliper can cook a rotor and turn a cheap fix into an expensive one.
If the pedal is spongy on the first press and firm on the second
Spongy-then-firm is air, or pad knock-back. Air in the lines compresses under pressure, so the first stroke spends its travel squishing bubbles. The second stroke starts from a better position and feels normal.
Pad knock-back is different. A worn wheel bearing or a warped rotor pushes the caliper pistons back into their bores as the wheel turns. Your first pedal stroke has to take up that slack.
If the second press always feels better, suspect air first and knock-back second.
How Brake Pedal Pressure Works and the Four Behaviors That Point to the Failure
A brake pedal is a lever, and the master cylinder is a pump. Your foot pushes a piston with a certain surface area, and that piston pushes fluid down a bore. The caliper pistons have a larger combined surface area, so the force gets multiplied even though the travel gets longer.
Hydraulic pressure is what actually clamps the pads. In a hard stop, line pressure can climb well past 1,000 psi. The system holds that pressure because brake fluid is essentially incompressible.
Any gas in the loop, or any leak path out of it, changes the equation immediately.
Pedal feel is just a readout of where that fluid is ending up. Four behaviors cover almost every case, and each one narrows the diagnosis to a short list of parts.
Sinks slowly while you hold steady pressure
Steady pressure plus slow descent equals internal bypass. The master cylinder's primary cup seal can no longer seal against the bore, so fluid slips past the piston and returns to the reservoir instead of pushing the calipers.
You'll usually see no puddle, no wet spot, no fluid loss on the dip. The reservoir stays full while the pedal drops. That's the signature.
On higher-mileage cars it's often paired with dark, gritty fluid from years of moisture and degraded seals.
The fix is a new or professionally remanufactured master cylinder. Rebuild kits exist but have mostly fallen out of favor for DIY work, because bore scoring and pitting can't be fixed with fresh rubber.
Drops straight to the floor and won't hold
Instant, complete loss means a big hole opened up. Common sources:
- A steel line rusted through at a clip or bend
- A flexible hose that burst under pressure
- A caliper piston seal that let go entirely
- A wheel cylinder that blew its cups out
- A brake line fitting that gave up after a bad flare
Look for fluid at the wheels first, then trace the lines back. A wet backing plate behind a rear drum points straight at the wheel cylinder. Fluid dripping inside a wheel well points at the hose or caliper.
Low but firm, with long travel before it bites
Here the hydraulics are doing their job and the mechanical side is late to the party. The most likely cause is rear drum brakes where the star wheel adjuster has seized. As the shoes wear, the adjuster should click out to keep the shoes close to the drum.
When it stops clicking, the wheel cylinder has to push the shoes a long way before they contact anything.
The second most likely cause is a caliper that can't slide. Floating calipers ride on slide pins, and those pins seize in salt-belt climates. The piston extends, the caliper doesn't move, and the pad wears at an angle.
Test for it by feeling the pedal with the engine off. A low but firm pedal that firms up further after two or three quick pumps suggests a mechanical slack issue rather than a hydraulic leak.
Spongy on the first press, firm on the second
The classic air symptom. Air bubbles compress under pressure, so the first stroke loses travel to bubble squash. The second stroke starts closer to the pads and feels normal.
Air usually gets in one of four ways. The reservoir ran low during pad work and the master cylinder sucked dry. A line or caliper was opened and never bled properly.
A hose is drawing air past a cracked inner liner. Or the fluid boiled and released vapor that never fully recondensed.
There's one more scenario worth knowing about. Some ABS modulators trap air in the pump body after a master cylinder change or a reservoir run-dry. Standard pedal bleeding won't move that air.
The vehicle needs an automated bleed cycle run through a scan tool.
Air in the Lines: Why It Happens and Why Bleeding Fixes It
Bleeding works because of a simple difference. Liquids resist compression, gases don't. Get the gas out and the pedal firms up, provided nothing else is wrong.
Air enters a brake system through a handful of doors. The reservoir gets low during pad or caliper work. A bleeder screw gets opened and the pedal is pumped while the reservoir is uncovered.
A caliper is hung from the hose instead of being supported, and the hose pulls air past a tired seal. A master cylinder is installed dry without a bench bleed.
The procedure itself is straightforward. Get the wheels off the ground, open the bleeder at the farthest wheel from the master cylinder, and push fluid through until no bubbles appear. The standard order is right rear, left rear, right front, left front on most rear-wheel-drive-based vehicles, and some front-wheel-drive cars want a different sequence.
Check the service information for your specific model.
You'll want the car sitting level and safely supported. If you're working off the ground, raising the front end safely matters more than speed. A car that shifts while you're underneath it ends the project permanently.
Three things trip people up again and again:
- Running the reservoir dry mid-bleed. Air goes straight back in and you start over.
- Bleeding in the wrong order. You push old fluid from one circuit into the other.
- Forgetting the ABS unit. If the pedal is still soft after a clean bleed at all four corners, the modulator is holding air.
For that last one you need a tool that can command the ABS pump. If you're buying one for this and future jobs, choosing the right diagnostic tool is worth an afternoon of reading, since coverage varies a lot by brand and model year. On many GM and Volkswagen platforms as of 2026, the automated bleed routine is the only reliable way to purge the modulator.
Keep an eye on every fluid level as you go, not just the brake reservoir. It's the same habit that keeps the rest of the car healthy, and topping up with the wrong fluid is a mistake you only make once.
One note on method. Gravity bleeding is slow but nearly foolproof. Two-person pumping is fast but easy to do wrong.
Vacuum bleeders pull air past the bleeder screw threads unless you grease them. Pressure bleeders are the cleanest option but need the right adapter cap. We'll compare those head to head further down.
Master Cylinder Bypass: The Leak With No Puddle
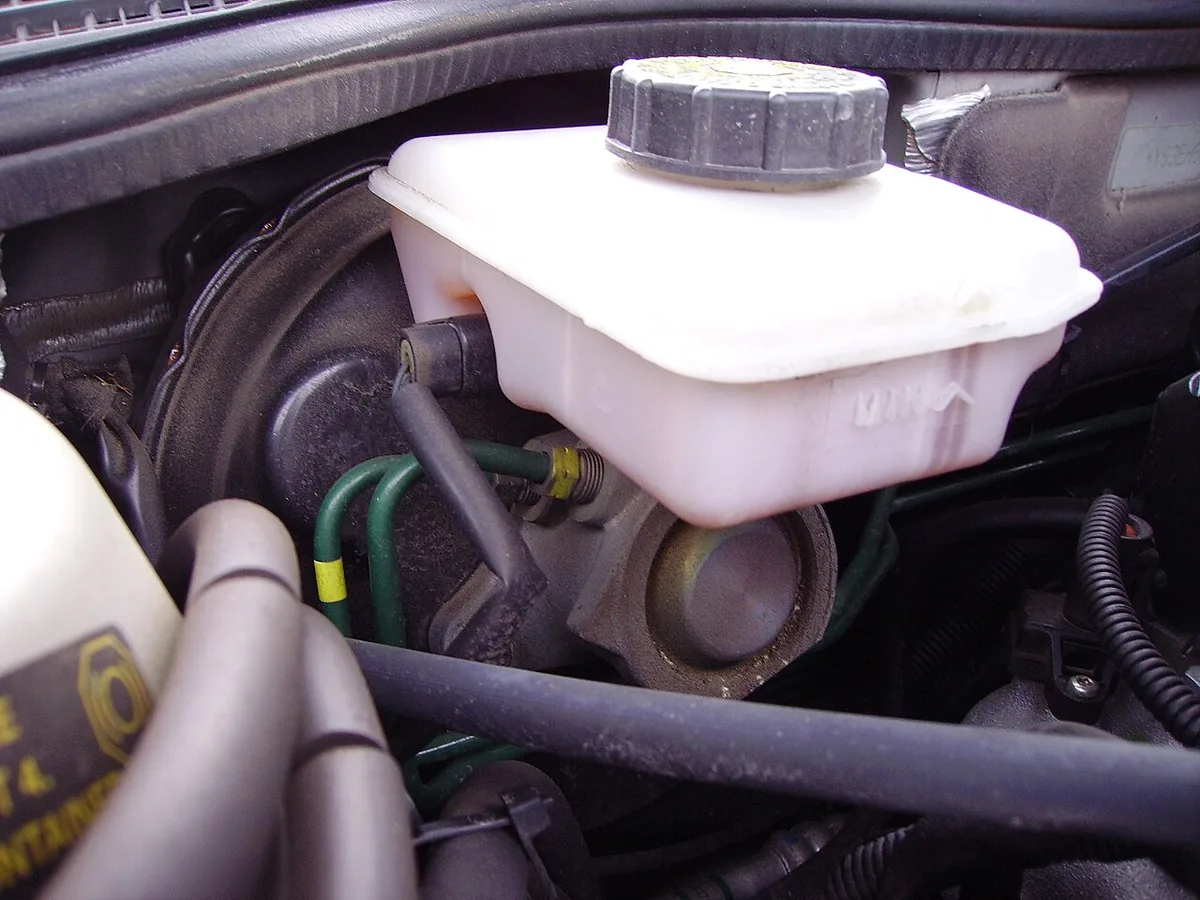
Image source: Wikimedia Commons / Ballista (CC BY-SA)
The master cylinder is a piston in a bore with rubber cups that seal against the walls. Press the pedal and the primary cup pushes fluid forward into the lines. Release it and a tiny compensating port lets fluid flow back so the system can breathe as it heats and cools.
When that primary cup wears or the bore scores, the seal stops sealing. Fluid slips past the piston and returns to the reservoir. The pedal sinks.
The reservoir level barely moves. Nothing drips on your driveway.
Symptoms that point at bypass rather than an external leak:
- The pedal sinks slowly while you hold steady pressure, then recovers when you pump
- Reservoir level stays put over weeks
- Fluid in the reservoir looks dark, grey, or gritty
- The pedal feels normal after pumping but fades within twenty seconds of holding
- Sometimes you find fluid seeping under the master cylinder where it meets the booster
That last one matters. A leaking rear seal lets brake fluid run into the vacuum booster. The fluid eats the booster's internal diaphragm over time, and you end up replacing both parts.
If the booster's underside is wet where the master cylinder mounts, plan for the bigger job.
A few facts that separate a clean install from a comeback:
- Bench bleed first. Every new master cylinder needs to be primed on a bench before it goes on the car. Skip it and you'll chase a soft pedal for hours.
- Check the pushrod clearance. Too little free play holds the compensating port closed, and the brakes drag as fluid heats up.
- Flush the whole system afterward. A new master cylinder pushing old contaminated fluid just contaminates the new seals.
- Follow the torque spec. Overtightening the mounting nuts distorts the bore on some aluminum-bodied units.
Fluid chemistry matters here too. Brake fluid is hygroscopic, meaning it absorbs water from the air. That water lowers the boiling point and accelerates corrosion inside the bore.
SAE J1703 and the corresponding ISO specifications test fluids for boiling point, viscosity, and compatibility with the rubber seals in your system, which is why mixing specs is a bad idea. DOT 5 silicone fluid will not mix with DOT 3, DOT 4, or DOT 5.1, and putting it in a glycol system swells the seals.
Rusted fittings are the other common roadblock. Soak them with penetrating oil a day ahead, use a proper flare nut wrench rather than an open end, and don't be surprised if a line twists off. Spinning off stubborn fasteners with power tools works fine elsewhere on the car, but brake lines need feel, not force.
Tracing External Leaks: Hard Lines, Rubber Hoses, Calipers, and Wheel Cylinders
External leaks always leave evidence. The tricky part is that brake fluid washes a clean, oily patch into road grime, then dust sticks to it, so older leaks hide in plain sight.
Start at the top and work down. Check the reservoir level first and write it down, because you'll compare it again in a few days. Then follow this route with a flashlight:
- The master cylinder body and the mating face where it bolts to the booster
- The proportioning valve and any junction blocks on the frame
- Steel line runs along the frame rails, over the fuel tank, and above the rear axle
- Flexible rubber hoses at each corner, especially near the steering knuckles
- Caliper piston boots and banjo bolt fittings
- The backing plates behind the rear drums
Wipe anything suspicious clean and recheck tomorrow. Fresh fluid on a freshly wiped part is unmistakable.
Rusted steel line runs and the salt-belt problem
Steel lines fail where water sits. Clips trap moisture, low bends collect it, and the long runs behind the fuel tank rot first because nobody ever rinses them. In road-salt regions this is the leading cause of a pedal that suddenly drops to the floor on vehicles past their first decade.
This failure has a paper trail. NHTSA has opened defect investigations over brake line corrosion on full-size pickup trucks, so before you assume your case is unique, search the recall database with your VIN. A covered repair costs you nothing.
When a line lets go, you have two repair paths:
- Replace the full run from master cylinder to hose. Cleanest fix, most labor.
- Splice a section using proper unions and new line. Acceptable when the rest of the run is solid.
Two rules are non-negotiable. Use only hydraulic brake line, never fuel line or compression fittings from the hardware store. Brake circuits run pressures past 1,000 psi and those fittings are not rated for it.
And match the flare type, since domestic vehicles mostly use inverted double flares while most imports use ISO bubble flares.
Nickel-copper alloy line, often sold as Cu-Ni 90/10, has become the go-to replacement material. It bends by hand, flares cleanly, and doesn't rust. Most parts stores stock it in 3/16-inch and 1/4-inch diameters.
Blown wheel cylinder and the wet backing plate
Drum brakes hide their leaks well. A wheel cylinder is two small pistons sealed by rubber cups. When a cup fails, fluid runs down the backing plate, soaks the shoe, and eventually weeps out the bottom of the drum.
What to look for:
- A reservoir that keeps dropping with no visible leak above
- A wet, oily film inside the drum once it's pulled
- A dark fluid streak on the inner face of the tire
- Brake dust mixed with fluid, forming a paste on the shoes
Pull the drum and inspect. If the shoes are soaked, replace them too. Contaminated friction material won't hold a pedal no matter how well you bleed the system.
Wheel cylinders run roughly $30 to $150 and should be replaced in axle pairs. While you're in there, check the return springs and adjuster hardware. A weak spring lets the shoes drag and quietly murders your fuel economy.
Seized caliper slide pins and torn dust boots
A floating caliper has to slide. The body rides on two pins tucked inside rubber boots packed with high-temperature silicone grease. Tear a boot and water gets in.
The pin corrodes into its bore and the sliding stops.
A seized pin leaves a fingerprint. The inboard pad wears to the backing plate while the outboard pad still has meat, because the piston can push inboard but the body can't slide to clamp the outboard side. The pedal also sits low, since the piston has to travel farther each stop.
Check the piston boot too. A boot that's torn or puffed out with fluid means the piston seal is failing. That's an external leak hiding where you can barely see it.
With the caliper off, push the piston back with a proper compression tool. Then try sliding the caliper on its pins by hand. Binding pins need cleaning, new boots, and fresh brake grease.
Chassis grease and anti-seize will attack the rubber.
Check the studs and lug nuts while the wheels are off. Rounded or cross-threaded hardware should be swapped out, and replacing the wheel fasteners costs far less than the damage a loose wheel causes.
Delaminated hoses that act like one-way valves
Rubber hoses age from the inside out. The inner liner cracks, lifts, and becomes a flap. That flap works like a one-way valve.
Pressure heading to the wheel may squeeze past. Pressure returning gets trapped.
So one bad hose produces two opposite symptoms:
- Blocked flow. A long, low pedal because fluid can't easily reach the caliper.
- Trapped pressure. The brake sticks on that wheel, the rim runs hot, and the car pulls to one side after you release the pedal.
A hose can also simply swell. Watch each hose while a helper presses the pedal slowly, once. A hose that balloons is finished, and so is one with any visible bulge, crack, or chafed spot.
Replace hoses in axle pairs, since they live the same life and fail on the same schedule. Hydraulic brake hose is built to standards like SAE J1401, and anything sold as brake hose at a reputable counter meets it. Fuel hose never will.
Rear Drum Adjustment and the Low-but-Firm Pedal
Drum brakes adjust themselves, in theory. As the shoes wear, a toothed star wheel ratchets outward and keeps the shoe-to-drum gap tight. Pedal height depends directly on that gap.
Self-adjusters fail quietly. The star wheel rusts solid, a spring breaks, or the cable stretches. The gap grows, the wheel cylinder has to travel farther each stop, and you get the classic low-but-firm pedal.
That's a mechanical wear gap, not a hydraulic fault.
Manual adjustment fixes it in minutes:
- Chock the front wheels and raise the rear on stands.
- Find the access hole on the backing plate, usually behind a rubber plug.
- Work a brake spoon through the hole and lever the star wheel to expand the shoes.
- Spin the drum by hand as you go, and expand until you feel a light drag.
- Back the adjuster off one or two clicks until the drum spins free.
- Repeat on the other side, then pump the pedal a few times to center the shoes.
The pedal should come up noticeably. If it doesn't, the shoes are worn out. Friction material below about 1/16 inch, or flush with the rivet heads on riveted shoes, means replacement, not adjustment.
Two traps to avoid here. Keep all grease away from the friction surfaces, and clean everything with brake cleaner only. And check the parking brake cables, because over-tightened cables drag the shoes while slack ones let the self-adjusters stop working entirely.
New shoes need a break-in period. Expect a slightly low pedal for the first hundred stops, then full height once the linings conform to the drum.
Bleeding Methods Side by Side: Gravity, Two-Person, Vacuum, and Pressure
Any method that moves clean fluid through the circuits will remove air. The real differences are speed, how many hands you need, and what the job demands.
| Method | People | Speed | Best for |
|---|---|---|---|
| Gravity bleed | One | Slow, 30 to 60 min | Full flushes, filling after a master cylinder change |
| Two-person manual | Two | Fast, 10 to 20 min | Quick bleed after a caliper or hose swap |
| Vacuum bleeder | One | Moderate | Solo corner bleeding with greased threads |
| Pressure bleeder | One | Fast, 15 to 30 min | Full-system flush and new line fills |
Gravity bleeding opens the bleeder and lets fluid drip on its own. Nothing pushes fluid violently, so sediment never gets stirred up. That makes it the gentlest option right after a fresh master cylinder goes in.
Keep the reservoir topped and let each corner run until clean fluid drips without bubbles.
Two-person manual bleeding is the classic. Your helper pumps three times and holds, you open the bleeder, the pedal sinks, you close it, repeat. It's fast but needs two rules.
Never let the pedal travel to the floor on an aging master cylinder, because the piston would stroke into a raw, unpolished part of the bore and wreck the seals. And close the bleeder while the pedal is still down, or you suck the air right back in.
Vacuum bleeding pulls fluid out at the screw with a hand pump. It works well solo, with one catch. The pump draws air past the bleeder threads, so bubbles show up in your bottle that aren't actually in the brakes.
Smear grease around the threads and the fake bubbles stop.
Pressure bleeding pushes fluid from the top through an adapter cap on the reservoir. Charge the tank to roughly 10 to 15 psi and it's the cleanest, most repeatable method. The only compatibility issue is the cap, since threaded caps are easy while bayonet-style caps need the exact adapter for your model.
For a pedal that dropped after brake work, two-person or pressure bleeding is fastest. For a full fluid flush, pressure or gravity moves the most old fluid out with the least turbulence.
Bench Bleeding a New Master Cylinder and the ABS Bleed Cycle Most People Skip
A new master cylinder ships full of air, not fluid. Bolt it on dry and bleed by pedal, and you'll chase bubbles that never quite leave. The bore is long and air clings to the walls.
Bench bleeding solves that before the unit touches the car:
- Clamp the cylinder gently in a vise with protected jaws.
- Screw the supplied fittings into the outlet ports and attach the clear tubes.
- Loop each tube back into the reservoir and fill it with fresh fluid.
- Stroke the piston slowly through full travel with a dowel.
- Watch the loops. Bubbles come hard, then thin out, then stop.
- Keep stroking until ten consecutive strokes produce nothing.
Some units ship with plastic plugs instead of tube fittings. Those block the ports while you pressurize, and you swap them one at a time. Follow the sheet in the box.
If the cylinder is already on the car, you can still loop the outlets into the reservoir and bleed it in place with the pedal. It's messier, but it works.
Two details finish the install correctly. Verify the pushrod free play against the spec, because a rod that's too long holds the compensating port closed and drags the brakes. And torque the mounting nuts to spec, since aluminum bodies distort when reefed down.
The ABS modulator holds air that pedal bleeding can't reach
The ABS hydraulic unit contains a pump and a maze of small channels. When a system runs low, air migrates into that maze and sits there. Pedal bleeding pushes fluid through the main circuits and past the modulator, not through it.
Many vehicles need a scan-tool automated bleed to clear it. The routine commands the ABS pump and cycles every valve while you feed fluid through the bleeder screws. GM trucks and SUVs from the mid-2000s onward are well known for requiring it.
Volkswagen and Audi platforms with electronic stability control are the other big group.
As of 2026, most mid-range scan tools include these routines, but coverage varies sharply by vehicle. Check the supported-vehicle list before buying anything. If you don't own the right tool, a shop can usually run the cycle for about an hour of labor.
That's cheaper than replacing parts that were never bad.
Run the cycle, then bleed all four corners again in the normal order. Some models want the cycle repeated twice. That's normal, not a sign of failure.
Step-by-Step: From Symptom to a Verified Firm Pedal
Here's the full repair flow, from first symptom to the moment you can trust the pedal again.
Prep, jacking, and safe fluid handling
Get your tools together before you start:
| Item | Why you need it |
|---|---|
| Jack and jack stands | Never work under a car held up by a jack alone |
| Flare nut wrench set | Line fittings without rounding them off |
| Bleeder wrench and clear hose | Fits the screws and shows bubbles |
| Catch bottle | Keeps old fluid contained |
| Fresh fluid matching the cap spec | Boiling point and seal compatibility matter |
| Torque wrench | Wheels and brackets to spec |
Some safety notes aren't optional. Brake fluid destroys paint, so wipe spills immediately and rinse with water, never rub. Wear eye protection, because a splash in the eye needs 15 minutes of flushing and a call to a doctor.
Dispose of the old fluid properly too. Brake fluid counts as household hazardous waste in most areas, and EPA disposal guidance says to hand it to a collection program rather than pouring it out. Many parts stores take it.
- Park on level concrete with the engine off.
- Chock the wheels you aren't lifting.
- Crack the lug nuts loose before the car goes up, never after.
- Lift at the manufacturer's jack points, then set stands under the frame.
- Give the car a hard shake before you slide under it.
Bleeding order and the 30-second pedal hold test
Bleed in the right sequence or you'll push old fluid from one circuit into the other. Most rear-wheel-drive-based vehicles want right rear, left rear, right front, left front. Some front-wheel-drive cars and anything with a diagonal split want a different order, so check the service information for your model year.
| Step | Action | What you're watching |
|---|---|---|
| 1 | Top the reservoir to the full line | Level, not above it |
| 2 | Open the farthest bleeder with hose attached | Steady stream, then bubbles |
| 3 | Close before the pedal bottoms out | No air drawn back in |
| 4 | Repeat until the stream runs clear | No bubbles at all |
| 5 | Check reservoir level after every corner | Never let it run dry |
| 6 | Move to the next wheel in sequence | Same procedure |
Two habits keep you out of trouble. Keep the reservoir above the minimum line the entire time, and check it after every single corner. And close the bleeder while pressure is still on the pedal, not after your helper releases it.
When all four corners run clean, do the hold test. Pump the pedal three times with the engine running, then hold steady pressure for thirty seconds. A healthy system holds firm the whole time with no creep.
If the pedal sinks even a fraction, you still have a fault, and it's usually a bypassing master cylinder rather than air.
Then test with the engine off. The pedal should feel hard and high. Start the engine and the pedal should drop slightly as the booster comes online, then hold.
If it drops a lot and keeps sinking, gravity is winning against a seal.
If the pedal is still spongy after a clean bleed at all four corners, three things are left. Air in the ABS modulator, a hose drawing air past a cracked liner, or a master cylinder that never got bench bled. Work through them in that order, cheapest first.
Low-speed verification before you trust it on the road
Don't take a freshly repaired brake system straight onto a highway. Prove it in a parking lot first.
- Start the car and pump the pedal five times. It should feel the same every stroke.
- Roll forward at walking pace and brake. The car should stop straight with no pull.
- Repeat at 10 to 15 mph, three or four times. Listen for grinding, scraping, or a rhythmic click.
- Get out and feel each wheel center. One that's much hotter than the others means a dragging caliper or an over-tightened drum.
- Recheck the fluid level and look under the car for fresh drips.
- Re-torque the lug nuts to spec with a torque wrench, then check them again after 50 miles.
A pull to one side usually means a caliper that isn't releasing or a collapsed hose on that corner. A pedal that's firm cold and soft warm points at fluid condition or a seal that's failing with heat. Neither one is a "drive it and see" situation.
Expect a slightly longer pedal for the first hundred stops if you replaced rear shoes, rotors, or pads. Fresh friction material needs to bed in before it grips at full strength. Keep speeds low and stops gentle while it does.
After that, the pedal height should settle in and stay there.
Parts, Tools, and What This Repair Actually Costs
The parts are rarely what makes this job expensive. Diagnosis time and rusted fasteners are, which is why you confirm the failure mode before buying anything.
| Repair | Parts (DIY) | Installed at a shop | DIY time |
|---|---|---|---|
| Brake fluid flush | $20 to $40 | $80 to $150 | 30 to 60 min |
| Master cylinder | $50 to $350 | $150 to $450 | 2 to 3 hours |
| Wheel cylinder pair | $60 to $300 | $200 to $450 | 2 to 3 hours |
| Caliper (remanufactured) | $50 to $150 | $200 to $400 | 1 to 2 hours |
| Rubber hose pair | $30 to $80 | $150 to $300 | 1 hour |
| Full steel line run (Ni-Cu) | $40 to $100 | $300 to $1,000+ | 2 to 6 hours |
| ABS bleed cycle | None | About 1 hour labor | Needs a scan tool |
Labor is the swing factor. As of 2026, independent shops in most US metros bill $100 to $175 an hour, and dealers run higher than that. A full line replacement on a salt-belt truck earns the estimate, because every fitting under there fights back.
If you're starting from an empty toolbox, here's the realistic investment:
| Tool | Typical cost | Needed for |
|---|---|---|
| Flare nut wrench set | $20 to $40 | Any line or hose work |
| Bleeder wrench and clear hose | $10 | All bleeding |
| Vacuum bleeder kit | $40 to $60 | Solo corner bleeding |
| Pressure bleeder | $60 to $150 | Full flushes |
| Flaring kit for Ni-Cu line | $40 to $100 | Line replacement |
| Scan tool with ABS routines | $150 to $400 | Modulator bleed cycles |
Remanufactured versus new is a fair question on master cylinders. Reman units cost less and carry a warranty, but quality varies by rebuilder. For the car your family rides in, a new unit from a name brand is the safer call.
Don't cheap out on hydraulic parts generally. The premium-versus-budget debate isn't unique to brakes. We hear the same question about pricier steering components, and the answer carries over here.
The part that fails first is rarely the one you just replaced.
Budget for the collateral damage too. Fluid-soaked shoes can't be saved. Drums may need machining.
If fluid has been leaking into the booster, that's a second part, and it isn't a cheap one.
Mistakes That Turn a Cheap Fix Into a Crash
Mistakes before you turn a wrench
- Topping off the reservoir and calling it fixed. You've reset the clock, not fixed the leak. This is how people drive for weeks on a system that's one hard stop from emptying.
- Buying parts before diagnosing. A master cylinder bought on a guess costs you double when the real fault is a $12 hose.
- Trusting recent shop work too much. Pedal went soft right after a pad job? Go back. They likely owe you a re-bleed, and a good shop will do it without an argument.
Mistakes during the repair
- Pushing the caliper piston back without cracking the bleeder. This forces dirty fluid backward through the ABS modulator and master cylinder. Open the bleeder first, always.
- Using compression fittings, fuel hose, or hardware-store line. Brake circuits run past 1,000 psi. None of those parts are rated for it.
- Mixing DOT 5 silicone into a glycol system. The fluids don't blend, and the silicone swells glycol-rated seals.
- Reusing fluid-soaked friction material. Pads and shoes bathed in fluid never recover. Replace them.
- Using the wrong grease. Chassis grease and anti-seize attack rubber boots and seals. Only silicone-based brake grease belongs on slide pins.
- Overtightening bleeder screws. They're hollow and they snap off in the backing plate. Snug is the target.
- Pouring from a bottle opened last year. Fluid pulls moisture through the cap once it's been opened. Date your bottles and toss anything older than about a year.
Mistakes after the repair
- Making the first test stop from highway speed. Prove the system at parking-lot speeds first, every time.
- Skipping the lug nut re-torque. Check them after 50 miles. Freshly mounted wheels settle.
- Settling for "better but not right." A pedal that's improved but still creeps is not a finished repair. Bleed it again or find the fault.
Fluid Flushes and the Maintenance That Keeps the Pedal Firm
A bleed removes air. A flush replaces all the fluid. They're different jobs, and the flush is the one that keeps a decade-old car from ever developing this problem.
Brake fluid is hygroscopic, meaning it actively pulls water out of the air. That water corrodes bores from the inside, swells seals, and lowers the boiling point until a hard stop boils the fluid. Vapor compresses.
That's a pedal straight to the floor with no warning.
| Fluid | Dry boiling point | Wet boiling point | Notes |
|---|---|---|---|
| DOT 3 | ~401°F (205°C) | ~284°F (140°C) | Cheapest, most common |
| DOT 4 | ~446°F (230°C) | ~311°F (155°C) | Standard on most modern cars |
| DOT 5.1 | ~500°F (260°C) | ~356°F (180°C) | Glycol-based, ABS-friendly |
| DOT 5 | ~500°F (260°C) | ~356°F (180°C) | Silicone, never mix with glycol |
Federal Motor Vehicle Safety Standard 116 sets the minimum wet boiling point for each grade, so any certified fluid meets the floor. What the standard can't do is tell you how wet your fluid has become.
Test strips measure it. Around 3 to 4 percent moisture content is the trigger for a flush. If you don't test, the calendar rule from most owner's manuals is every two to three years regardless of mileage.
The habits that matter most:
- Flush after any overheating event. A long mountain descent or a trailer stop that smelled hot means the fluid may have boiled. Change it.
- Use the parking brake every time you park. It's what keeps rear drum self-adjusters clicking, and it costs nothing.
- Downshift on long hills. Engine braking spares the fluid from heat cycles.
- Keep the reservoir cap closed. Open reservoirs collect dust and moisture.
- Inspect hoses at every tire rotation. Squeeze them. Check for bulges, chafing, and cracking near the ends.
- Watch the fluid color. Fresh fluid is light amber. Dark, grey, or milky fluid is overdue.
The same discipline applies to servicing your transmission and every other hydraulic system on the car. Fresh fluid in a sealed system is cheap. Replacing the parts that neglected fluid destroys is not.
When to Stop and Hand It to a Shop
There's no prize for finishing a brake job yourself. Hand the car over in any of these situations:
- The pedal dropped completely while driving. That car gets towed from wherever it stopped. No exceptions, no test drives.
- The whole underside is flaking rust. If brake lines shed scale when you touch them, the lines and probably the fuel lines need a professional's time and lift.
- You've bled the system twice and it's still soft. At that point you need a scan-tool ABS cycle or a second pair of eyes.
- Fluid is inside the booster. That's a two-part job with its own bleeding headaches, and most home setups aren't equipped for it.
- You can't lift the car safely. No jack stands means no job. Brakes under a car held up by a scissor jack is how garage accidents happen.
The money math is simple. A tow runs roughly $75 to $150 in most areas. A brake failure at speed runs a collision deductible at best, and hospital bills at worst.
There's no version of this where saving the tow fee wins.
Pick the shop with two questions. Ask whether they bench bleed master cylinders before install, and whether they can run a scan-tool ABS bleed cycle. A shop that answers both without hesitating is a shop that knows brakes.
ASE certification is the baseline credential to look for, and any legitimate shop will tell you straight.
Help them diagnose it faster. Tell them exactly what you observed: when the pedal sinks, whether it recovers when pumped, the fluid level history, and any recent brake work. That information can save an hour of billed diagnostic time, because you've already done the triage for them.
Frequently Asked Questions
Can I drive with a brake pedal that goes to the floor?
No, not safely. If the pedal drops instantly and won't build pressure, have the car towed. A pedal that's low but firm, on a car that still stops normally, is the only gray area.
Drive it gently straight to a shop. A pedal that sinks under steady pressure is a failure in progress. Park it.
How much does it cost to fix a brake pedal that goes to the floor?
Anywhere from about $80 to over $1,000. A shop fluid flush runs $80 to $150. An installed master cylinder runs $150 to $450.
Rusted line replacement is the expensive one, at $300 to $1,000 or more. The failure mode sets the bill, so diagnose before buying parts.
Why is my brake pedal still soft after bleeding?
Three usual reasons. The reservoir ran dry mid-bleed and let air back in. Air is trapped in the ABS modulator, which needs a scan-tool bleed cycle on many vehicles.
Or the master cylinder is bypassing internally, and no amount of bleeding will fix that. Run the thirty-second hold test to tell them apart.
Will air in the brake lines work itself out?
No. Brake systems don't self-purge. Tiny bubbles can slowly dissolve into fresh fluid, but that takes weeks and you can't verify it from the driver's seat.
The pedal stays unpredictable until each corner is bled in the correct order, with the reservoir kept topped the entire time.
Can a bad brake booster cause a sinking pedal?
Rarely. A failed vacuum booster makes the pedal hard and heavy, not soft. Sinking pedals come from hydraulics.
One useful clue: a pedal that holds firm with the engine off but sinks with it running often means the booster's extra force is exposing a worn master cylinder.
Is a sinking brake pedal covered by a recall?
Sometimes. NHTSA has opened defect investigations over brake-line corrosion on some full-size trucks. Enter your VIN in the NHTSA recall database before paying for anything.
Safety recalls are free, though standard warranties usually won't cover it, since hoses and cylinders count as wear items.
