
You press the brake, the car slows, but the pedal feels like it's pushing into a sponge. So why is my brake pedal spongy? Something in the hydraulic chain is compressing instead of transferring force.
Air, a worn master cylinder, a bulging hose, and boiled fluid all feel almost identical from the driver's seat.
Brake fluid is hygroscopic, which means it pulls moisture out of the air over time. Federal standard FMVSS 116 sets the boiling points that separate DOT 3 from DOT 4 and DOT 5.1. Those numbers fall sharply once water gets into the system.
Here's what's actually going on under your foot, and how to narrow it down before you start throwing parts at it.
Why a Spongy Brake Pedal Is a Stop-Driving Question, Not an Annoyance
A soft pedal isn't a comfort issue. It's a warning that your brakes have lost reserve.
A healthy system stops a typical passenger car from 60 mph in roughly 120 to 140 feet. A spongy pedal eats into both travel and modulation, and that lost margin shows up exactly when you can't afford it. The car still stops in the driveway.
It's the panic stop from highway speed that tells the truth.
Here's the part most drivers miss. Your pedal only has so much travel, and a spongy pedal is already using it up. When the fluid finally heats up on a long descent, or when a seal gives out completely, there's nothing left underneath your foot.
Modern cars are safer here than old ones. Dual-circuit master cylinders have been required on US cars since the late 1960s, so a single hydraulic failure usually leaves you two working wheels instead of none. That's a backup, not a free pass.
Half your braking power is still a crash waiting for a corner.
Federal defect data backs up how often this goes wrong. The NHTSA complaint database is full of soft-pedal reports on vehicles that were still under warranty, and plenty of those turned into recalls. As of 2026, brake system defects remain one of the most common categories in those filings.
The signs that mean park it tonight, not next weekend
- The pedal sinks slowly while you hold it at a red light.
- You can push the pedal to the floor with normal leg pressure.
- Fluid level in the reservoir dropped and you can't find where it went.
- The pedal goes soft only after hard braking, then recovers as things cool.
- You smell something sharp and hot near a wheel.
Any one of those is a "don't drive it tomorrow" item in our book. Two of them together is a tow.
Grip and hand placement matter here too, so it's worth sorting out where your hands sit before you need them in a hurry.
Why Is My Brake Pedal Spongy
A spongy brake pedal means something is absorbing your pressure. Usually it's air, moisture, or a worn seal. Four failures cause almost all of these.
Air in the lines is the most common. A bypassing master cylinder, a bulging hose, and boiled fluid cover the rest. Each one needs a different fix, so don't guess.
How the Brake Hydraulic System Works and Where the Squish Comes From
Your leg doesn't squeeze the brake pads. It pushes fluid, and the fluid does the work.
The pedal is a lever. A typical brake pedal multiplies your leg force somewhere around four to six times before it ever reaches the master cylinder. From there, a vacuum booster roughly sextuples it again on a gasoline engine.
That's how 40 pounds of leg effort becomes enough clamping force to stop two tons of metal.
Fluid is the middleman, and it has one job: stay incompressible. Liquid brake fluid barely changes volume under pressure, so force applied at the master cylinder arrives at the calipers almost instantly. Air doesn't play by those rules.
Air compresses, so a bubble in the lines soaks up pedal travel before any pressure reaches the pads.
Image source: Wikimedia Commons / Department of the Interior. Patent Office. (1849, 1925)
That's the whole mystery in one sentence. A spongy pedal means you're compressing something instead of clamping something.
The parts that can go soft and how each one fails
| Component | What it does | How it goes soft |
|---|---|---|
| Master cylinder | Pushes fluid into the lines | Internal seal bypass, no visible leak |
| Brake hoses | Carry fluid to each wheel | Bulges, cracks, or collapses inside |
| Calipers and wheel cylinders | Clamp the pads or shoes | Leaking seals, seized slide pins |
| ABS hydraulic control unit | Modulates pressure per wheel | Trapped air after a low-fluid event |
| Brake fluid itself | Carries force, must not compress | Moisture, heat, or bubbles |
Every one of those failure modes presents as a soft pedal. That's why "just bleed it" is a coin flip. The list is short, but the wrong guess costs you a weekend or a shop bill.
Why the fluid spec actually matters here
Brake fluid standards like SAE J1703 and FMVSS 116 exist because glycol fluid has to behave predictably at temperature. Fresh DOT 4 boils around 446°F dry. Once it absorbs roughly 3% water by volume, that wet boiling point drops toward 311°F.
Mountain descents and towing loads get you there faster than you'd think.
When the fluid boils, the moisture turns to vapor. Vapor compresses exactly like air does. That's a spongy pedal with no leak anywhere, and it's the reason a flush is sometimes the entire repair.
Read Your Pedal First: Spongy vs. Sinking vs. Long vs. Fading
Before you open the hood, spend two minutes learning what your pedal is telling you. The behavior pattern narrows the cause faster than any visual inspection.
What each pedal behavior points to
| Pedal behavior | Most likely cause | What to do |
|---|---|---|
| Squishy but firm-ish, pumps up after 2 to 3 strokes | Air in the lines | Bleed it, then find the air source |
| Sinks slowly while held at a light | Internal master cylinder bypass or external leak | Park it, tow it |
| Long travel from the very top, brakes otherwise fine | Rear drum adjusters or pad knockback | Drivable to a shop, fix soon |
| Soft only when hot, recovers after cooling | Boiled fluid or moisture saturation | Park, cool, flush the system |
| Pedal to the floor with almost no resistance | Burst line or blown wheel cylinder | Tow it, do not drive |
| Pulsation plus a normal-height pedal | Rotor thickness variation | Not a hydraulic problem |
The pump-up test is the single most useful thing you can do in your own driveway. Hold steady pressure with the engine running for about 30 seconds. If the pedal firms up after a few pumps, you're chasing air.
If it keeps sinking, you're chasing pressure loss.
Those two outcomes lead to completely different repairs. One is a bleed job. The other is a master cylinder, a hose, or a leaking caliper, and no amount of bleeding will fix it.
Why the difference decides whether you drive or tow
A pedal that holds firm under steady pressure is safe enough to move at low speed to a shop. A pedal that keeps bleeding down is not, because the next stage of that failure is no pedal at all.
We'd rather tell you to tow a car that didn't need it than read about you testing a sinking pedal on a highway ramp. Worn tie rods and loose wheel bearings can also knock the pads back, so it's worth knowing whether pricier front-end bits actually hold up before you start replacing things.
The heat correlation test
Drive gently for 15 minutes and note the pedal. Then do three hard stops from 50 mph in a safe, empty area, and check it again.
If the pedal goes soft only in the second scenario and comes back after 20 minutes of cooling, heat is the trigger. That points at fluid condition or a dragging brake, not at a hose or a caliper seal. A dragging caliper shows up as one hot wheel, and you'll usually smell it before you measure it.
Air in the Lines: The Most Common Cause, and How It Gets In
Air is the number one answer, and for good reason. Every brake job that opens the hydraulic system invites it in.
The usual suspects are simple. A caliper swap that drained the line. A hose replacement where the fluid ran out.
A reservoir that went dry mid-bleed. A master cylinder replaced without a bench bleed. Any of those leaves a bubble somewhere between the reservoir and the caliper.
Where air hides after a caliper, hose, or master cylinder job
Air doesn't always sit where you'd expect. It clings to high spots and hides in places gravity bleeding never reaches.
- The top of the caliper. Air rises. On many calipers the bleeder screw isn't the highest point until you unbolt and rotate the caliper.
- The master cylinder bore. A new or rebuilt master cylinder traps air behind the piston unless it's bench-bled before installation.
- The ABS hydraulic control unit. Modern ABS modules hold small passages and valve bodies that a normal two-person bleed can't push air out of.
- Behind a failing hose. A hose that's breaking down internally traps tiny bubbles and releases them slowly into the stream.
- Bleeder screw threads. Worn or unsealed bleeder threads pull air back in past the threads during a vacuum bleed.
That last one fools a lot of people. You bleed for an hour, see clean fluid, and the pedal is still soft because the pump is sucking air in at the screw instead of out of the line.
Why re-bleeding the same way five times fixes nothing
If the same method fails twice, the problem isn't effort. It's the method or the target.
A gravity bleed won't clear an ABS module. A vacuum bleeder on corroded bleeder screws pulls air past the threads. A two-person bleed with the helper releasing the pedal too early can draw air right back in.
Each of those produces a pedal that never quite firms up, and each looks exactly like "there's still air in there."
There's another trap. Some of what feels like air isn't air at all. A rear drum brake with a failed self-adjuster gives you a long pedal that mimics trapped air, and bleeding it ten times won't change a thing.
The tools that actually make a bleed work
You need a bleeder bottle with a clear hose, a box wrench that fits the bleeder screws exactly, and enough fresh fluid to keep the reservoir above the minimum line the whole time. A pressure bleeder beats a vacuum pump on most modern systems. On anything with ABS, you also want a capable scan tool that can command the automated bleed cycle.
Physically getting to the bleeder screws is half the job. A solid set of ramps makes the front corners easy to reach, and spinning the lug nuts off with the right tool beats fighting them by hand on the ground.
One safety note before you start. Brake fluid strips paint on contact. Keep a spray bottle of water nearby and rinse any spill on the fender immediately.
Master Cylinder Bypass: The Pedal That Sinks at a Stoplight
This is the failure that fools the most people, because nothing looks wrong. The reservoir is full. There's no puddle under the car.
Yet the pedal keeps creeping toward the floor while you sit at a light.
Here's what's happening. The master cylinder has a piston that slides in a bore, sealed by rubber cups. Those cups wear with age and with contaminated fluid.
When they do, fluid slips past the piston and back into the reservoir instead of pushing out to the wheels. You're moving fluid in a circle. No pressure ever builds at the calipers.
The tell is the pattern. Air gives you a pedal that pumps up and stays up. A bypassing master cylinder gives you a pedal that pumps up and then bleeds back down.
Hold steady pressure for 30 to 60 seconds with the engine running and watch your foot. If it keeps dropping, you've found your culprit in one test.
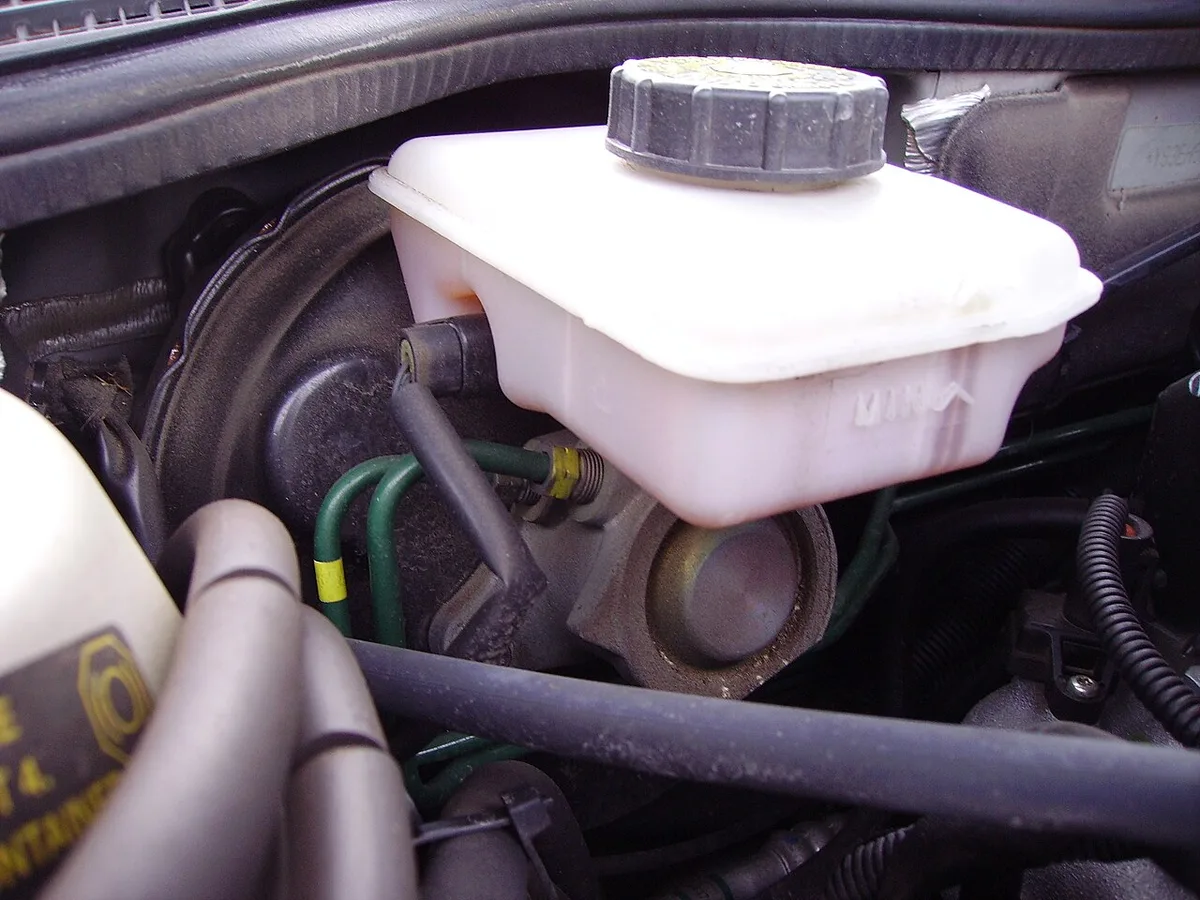
Image source: Wikimedia Commons / Ballista (CC BY-SA)
Internal leak vs. external leak
An internal leak stays inside the part. Fluid moves past the seals and returns to the reservoir, so the level barely changes and the ground stays dry. The only symptom is a sinking pedal.
An external leak shows itself. You'll see wetness where the master cylinder bolts to the vacuum booster, or a drip running down the booster's face. Sometimes it leaks into the booster itself, which is worse.
Brake fluid eats the booster's internal diaphragm, and then you get a hard pedal on top of the sinking one.
Check the underside of the master cylinder and the front face of the booster with a flashlight. Any dark, oily film around that joint means replacement, not a rebuild kit, because the booster may already be compromised.
Why there's no puddle and still no pressure
People assume a pressure loss has to leave a mark. It doesn't.
Two failure modes leave no trace at all. Internal bypass is one. The other is a small amount of air already in the system that compresses just enough to eat the first inch of pedal travel.
Neither one stains your driveway.
Don't skip the simple check either. Pop the reservoir cap and look at the fluid. Black grit or tiny rubber particles mean the seals are shedding material.
Dark fluid alone isn't proof of a bad master cylinder, but grit plus a sinking pedal is about as clear as it gets.
Rebuild kit or new unit?
Rebuild kits exist and they're cheap. For a daily driver, we lean toward a new or quality remanufactured unit.
A rebuild only refreshes the rubber. It doesn't fix a scored bore or corrosion pitting inside the cylinder, and those are exactly what killed the original seals. If the bore is damaged, new seals will fail the same way in a few thousand miles.
One more thing on this job. A new master cylinder has to be bench-bled before it goes on the car. Skip that step and you'll chase air through the whole system for a weekend and still have a soft pedal.
We'll cover the procedure later on.
Hoses, Steel Lines, and Calipers: Bulges, Weeps, and Internal Collapse
Hoses are the quiet failure. They don't usually burst. They swell, crack, or collapse from the inside out.
A brake hose is three layers. There's an inner liner that carries the fluid, a braided reinforcement that holds pressure, and an outer cover that keeps dirt and salt out. Any one of those can fail while the outside still looks fine.
The hose that acts like a one-way valve
This is the weird one, and it's genuinely dangerous. When the inner liner separates, a flap of rubber can hang into the fluid path.
Under pressure from the master cylinder, the flap gets pushed open and fluid flows to the caliper. When you release the pedal, the flap drops back and blocks the return path. The caliper can't release.
That brake drags, heats up, and eventually cooks the fluid on that corner.
The symptoms are a car that pulls to one side after braking, a wheel that smells hot, or a pedal that feels different after a hard stop. A dragging caliper gets blamed first, and sometimes the hose is the actual cause. Squeeze each hose between your fingers along its length.
A soft, spongy spot or a lump means internal breakdown.
The bulge test you can do with a helper
This test costs nothing and catches the obvious failures.
- Have a helper sit in the driver's seat with the engine running.
- Ask them to hold firm, steady pressure on the brake pedal.
- Look at each flexible hose at the wheel end, one at a time.
- Watch for any swelling, ballooning, or movement you can feel with a light touch.
Any bulge at all is a replacement. There's no acceptable amount of swelling on a brake hose.
While you're under there, look at the crimped fittings at both ends. A wet, oily ring around a crimp is a weep. It's a slow leak now and a bigger one later.
Steel line corrosion in salt-belt states
Hard lines rust from the outside, usually where a plastic clip holds them against the frame. Moisture and road salt sit in that clip and eat the coating away. The line looks fine two inches from the clip and paper-thin right at it.
Push on the line with a screwdriver handle. It should feel solid. A soft, crusty, or flaking line is a future pinhole, and a pinhole in a hard line means the pedal goes to the floor without warning.
If you live where they salt the roads, this is worth an annual look. A failed hard line isn't a soft pedal you can nurse home. It's a complete loss of half your braking, instantly.
Caliper seals, slide pins, and the drag that mimics hydraulics
A caliper has two jobs. It clamps, and then it lets go.
The piston seal does the clamping. When it weeps, air gets drawn in as the piston retracts, and you get a soft pedal that slowly worsens. When the slide pins seize, the caliper can't center itself.
The inner pad wears down to metal while the outer pad still looks new.
Check the pins by pulling the caliper and seeing whether it slides freely by hand. If it fights you, clean and regrease with high-temperature brake grease, or replace the bracket. Don't use ordinary chassis grease here.
It cooks and turns to glue.
Braided stainless lines: what they actually fix
Stainless braided hoses reduce expansion under pressure. That gives you a firmer, more direct pedal, especially on older cars with tired rubber hoses.
What they don't fix is sponginess caused by air, a bypassing master cylinder, or boiled fluid. If your pedal is soft because there's a bubble in the ABS module, braided lines will make that soft pedal feel marginally more expensive. Nothing more.
They also have a liner inside, and that liner can fail just like a rubber hose does. The braid protects against abrasion, not against internal collapse.
Fluid, Moisture, and Heat: The Pedal That Only Goes Soft When It's Hot
If your pedal is fine on the school run and goes soft after a mountain descent, this is your section. Nothing is broken. The fluid is just past its useful life.
Glycol brake fluid is hygroscopic, meaning it absorbs water from the air through the reservoir and through every rubber seal in the system. A typical car picks up one to three percent water by volume over a couple of years. That water has to go somewhere, and it goes into solution with the fluid.
The problem shows up at temperature. Water in brake fluid dramatically lowers its boiling point. Once the fluid in a caliper reaches that lower threshold, it boils and creates a vapor bubble right at the hottest point.
Vapor compresses. Your pedal goes to the floor-ish and comes back after everything cools.
Dry vs. wet boiling points by DOT grade
This table is the whole argument for changing your fluid on schedule. The "wet" column is what you actually have after a couple of years of service.
| Grade | Dry boiling point | Wet boiling point | Notes |
|---|---|---|---|
| DOT 3 | ~401°F | ~284°F | Most common in US passenger cars |
| DOT 4 | ~446°F | ~311°F | Higher performance, still glycol-based |
| DOT 5.1 | ~500°F | ~356°F | Best of the glycol family, ABS-safe |
| DOT 5 | ~500°F | ~500°F | Silicone, not for ABS systems |
Those numbers come from FMVSS 116, the federal standard for brake fluid, and the parallel SAE International J1703 specification. The wet values are measured after the fluid absorbs a set amount of moisture, which is exactly the condition most used cars are in.
Notice the gap on DOT 4. You lose roughly 135°F of headroom once it's wet. That's the difference between a firmer pedal and a soft one on a long downhill with a loaded car.
Why a two-year flush is cheaper than a caliper
Fresh DOT 4 costs somewhere around $10 to $20 a quart. A shop flush runs roughly $80 to $150 depending on where you live. Compare that to a caliper replacement at $200 to $500 per corner, or an ABS module at four figures.
Water doesn't just boil. It corrodes. It pits the inside of calipers and wheel cylinders, and it attacks the aluminum valve body inside the ABS unit.
Those are the parts that turn a $100 maintenance item into a $1,200 repair.
Most manufacturer maintenance schedules call for a fluid change every two years regardless of mileage. That interval exists for a reason, and it's not a dealer upsell.
Does dark fluid always mean bad fluid?
No. Color is a rough guide, not a measurement.
Fluid can darken from normal seal wear and still test low for moisture. Fluid can look clear and still be saturated. The only reliable check is a moisture tester, either a conductivity pen or a boiling point tester if you want real numbers.
A conductivity tester is cheap and gives you a rough percentage. Anything at or above three percent moisture means it's time. If you're heading into a track day, a towing season, or a mountain trip, change it regardless of what the tester says.
The DOT 5 mistake that wrecks ABS systems
DOT 5 is silicone-based. It doesn't mix with DOT 3, DOT 4, or DOT 5.1, and it aerates badly in ABS systems because of how it behaves under rapid pressure cycling.
If someone tops off a glycol system with silicone fluid, you get two fluids that don't blend. The result is a spongy pedal that no amount of bleeding will fix, plus swollen seals. Flushing that out properly is a full system teardown in the worst cases.
Read the cap. It says which fluid the system wants, and that's the only fluid that goes in.
Rear Drum Adjustment and the Long Pedal That Isn't Hydraulic at All
Not every low pedal is a fluid problem. On cars with rear drum brakes, the pedal can sit low and still be perfectly firm.
Drum brakes use a star wheel adjuster that takes up slack as the shoes wear. It's supposed to self-adjust, usually when you brake while reversing. That mechanism seizes up constantly, especially on cars that rarely back up under braking or live in wet, salty climates.
When it stops adjusting, the shoes sit further from the drum. The wheel cylinders have to push further before the shoes contact. You feel that as a pedal that starts low but feels solid once it engages.
How to tell drum adjustment from a hydraulic fault
The giveaway is feel. Pump the pedal twice at a standstill. If it comes up high and stays firm, and the car brakes evenly, you're looking at adjustment or slack, not air.
The parking brake is the other clue. A rear drum system shares hardware with the parking brake. If the handle or pedal now travels much further than it used to, the rear shoes are out of adjustment.
One more check that costs nothing. Drive slowly and listen for a soft scraping from the rear that goes away when you brake. That's often a shoe that's too far out or a drum with a rust ridge.
Adjusting the star wheel
On many rear drum setups you can adjust through a slot in the backing plate.
- Chock the front wheels and lift the rear axle safely on stands.
- Remove the adjuster plug from the backing plate slot.
- Insert a brake spoon or flat screwdriver and turn the star wheel.
- Turn until the drum drags lightly, then back it off a few clicks.
- Refit the plug and check the parking brake travel.
Drum-in-hat parking brakes on rear disc setups have the same adjuster inside the rotor hat. Same procedure, tighter space.
If the adjuster is rusted solid, the drum comes off and the hardware gets replaced. A seized adjuster plus a stretched parking brake cable is a common pair on ten-year-old cars.
Pad knockback and the long pedal after hard cornering
There's one more non-hydraulic cause worth knowing. Hard cornering or a worn wheel bearing can push the caliper pistons back into their bores. Your first brake application then has to take up that gap.
The pedal feels long for one stroke and then normal. That's knockback. It's not air, and bleeding won't touch it.
Worn bearings, loose wheel hardware, or flex in the suspension are the usual sources. If it happens on a daily commute with no hard cornering involved, get the bearings checked before you touch the brakes.
The Diagnostic Triage: What to Check, in What Order
Work through this in sequence. Each step either eliminates a cause or sends you down a specific branch.
| Step | Check | If it fails |
|---|---|---|
| 1 | Fluid level and condition | Top up, then find the leak before driving |
| 2 | Leaks at all four corners and the firewall | Replace the leaking part, don't just bleed |
| 3 | Pedal-hold test, 30 to 60 seconds | Sinking means master cylinder or leak, park it |
| 4 | Pump-up test | Firms up means air, bleed and find the source |
| 5 | Hose bulge test with a helper | Any swelling means replace that hose |
| 6 | Heat correlation drive | Soft only when hot means fluid or a dragging brake |
| 7 | Rear adjustment and parking brake travel | Long but firm means adjust the rear brakes |
Step 1: fluid level and color
Start at the reservoir with the engine off and the car level. The level should sit between the minimum and maximum marks.
A level that's dropped below minimum without an obvious leak is a red flag. Fluid went somewhere, and it's either leaking externally or being drawn into the booster.
Look at the color and texture. Grit, sludge, or a dark, opaque look all point to a system that's been neglected. That doesn't tell you the pedal is soft because of it, but it raises your suspicion for the next steps.
Step 2: leak inspection at all four corners and the firewall
Get the car up safely and pull the wheels. A proper look at each caliper takes two minutes per corner.
You're checking four spots per corner. The caliper piston area, the banjo fitting or flex line connection, the bleeder screw, and the hard line fitting where it meets the flex hose. Any wetness means a leak.
While the wheels are off, it's a good moment to look at your wheel hardware too. If you're pulling wheels on a car you just bought, knowing what a set of replacements runs saves a surprise later.
Then check the firewall side. Shine a light at the back of the master cylinder where it meets the booster. Any fluid there means the rear seal is done.
Step 3: the pedal-hold test
Engine running, transmission in park, foot on the brake with steady, firm pressure. Hold it for 30 to 60 seconds.
A pedal that stays exactly where you put it is healthy. A pedal that drops slowly and steadily means fluid is escaping somewhere, either internally at the master cylinder or externally at a leak point. If Step 2 found nothing, the master cylinder is the prime suspect.
This test is the single most informative 60 seconds in the whole diagnostic. Do it before you buy a bleeder kit.
Step 4: the pump-up test
With the engine off, pump the pedal five or six times to bleed off the booster's stored vacuum. Then hold pressure and start the engine.
The pedal should drop slightly as the booster engages and then hold firm. If it pumps up higher each stroke and stays there, you have air. If it pumps up and then sinks again, you have a pressure loss.
Don't confuse a normal booster drop with a fault. That initial dip when the engine starts is the assist kicking in, not a leak.
Step 5: hose bulge test with a helper
Same test as before, done properly now that you know what you're looking for. Helper holds steady pressure, you watch and feel each hose.
Do the front hoses first since they take the most heat and the most steering movement. Then the rears. Any bulge, soft spot, or visible cracking between the reinforcement ribs is a replacement.
Step 6: heat correlation drive
Fifteen minutes of gentle driving, then note the pedal. Then three hard stops from 50 mph in an empty area, and note it again.
Soft after the hard stops, normal after cooling means fluid condition or a dragging brake. If one wheel is much hotter than the others after a normal drive, that corner is dragging. A cheap infrared thermometer makes this objective instead of guesswork.
Step 7: rear adjustment and parking brake travel
Count the clicks or measure the travel on the parking brake. Compare it to the spec in your service manual, or just compare it to how it felt a year ago.
Then do the two-pump test at a standstill. Long pedal that pumps up to firm and stays there, with no fluid loss anywhere, points squarely at rear adjustment.
When the triage says stop
If you get a sinking pedal with no visible leak, or a pedal that goes to the floor, stop. Don't drive it to the shop to save a tow bill. The next stage of that failure happens at speed, and it happens without warning.
If you do call for a tow, know where the rated hook points are before the driver arrives. Pointing at the wrong spot under a plastic bumper is how bumpers get torn off.
Bleeding It Right, Including the ABS Unit Most Guides Skip
Bleeding is simple in principle. Push fresh fluid through the lines until the air is gone. The practice is fiddly, because air hides in spots where fluid doesn't want to flow.
Read this part before you buy anything. The order, the method, and one extra step on ABS cars decide whether you finish in an hour or fight it all weekend.
Bleed in the right order, and know why
Convention says farthest wheel from the master cylinder first. On a left-hand-drive car that's usually right rear, left rear, right front, left front.
The logic is contamination. The longest line carries the oldest, dirtiest fluid. Clear that run first and you're not pushing its crud back through the junction block into lines you already cleaned.
Some manufacturers specify a different sequence, and a few split the system diagonally. Check the service manual for your car. Bleeding in the wrong order on a split system can leave one circuit half full of air.
Which bleeding method actually fits your car
| Method | Best for | Where it lets you down |
|---|---|---|
| Two-person pedal pump | Older cars, tight budgets | Helper lifting early pulls air back in |
| Gravity bleed | Solo work, low-risk systems | Slow, won't clear ABS or a high spot |
| Vacuum pump | One person, speed | Sucks air past worn bleeder threads |
| Pressure bleeder | Modern ABS, cleanest result | Needs the right adapter cap |
| Reverse bleed | Air that refuses to move | Needs a syringe kit and patience |
If you own one car and bleed it once a year, a pressure bleeder is worth the money. It keeps the reservoir topped up under pressure, so you never risk running it dry mid-job.
The two-person method, done correctly
Three errors wreck this method, and all three are common.
The first is releasing the pedal before the bleeder screw is closed. That pulls air straight back down the line. The sequence has to be pressure on, open screw, close screw, then release.
The second is pumping fast. Rapid strokes churn the fluid and whip tiny bubbles into it. Slow, steady strokes push a solid slug of fluid.
The third is letting the reservoir drop below the minimum line. A dry reservoir means you've just pumped a full tube of air into the system. Check the level after every corner, no exceptions.
Bench bleeding a new master cylinder
Skip this and you'll chase a soft pedal forever. The air trapped behind a new piston has nowhere to go once the unit is bolted to the booster.
- Clamp the master cylinder in a bench vise by its mounting flange, level.
- Fill the reservoir with fresh fluid to the minimum line.
- Thread bleed fittings or short lengths of hose into the outlet ports, routed back into the reservoir.
- Fill the bore with fluid through the outlet ports using a syringe.
- Push the piston slowly with a screwdriver or bleeder tool, then release.
- Repeat until the strokes feel firm and no bubbles come out of the return hoses.
- Cap the ports, keep the unit level, and install it without tilting.
Some new units ship with plastic bleed plugs and instructions. Follow those if they exist. The bench routine works either way, and it takes ten minutes.
Triggering the ABS bleed cycle
This is the step most guides leave out, and it's the reason a pedal stays soft after a textbook bleed.
The ABS hydraulic control unit holds valve bodies and small passages. During normal braking, fluid barely moves through them. When a low-fluid event or a caliper swap lets air into the module, that air sits in a dead-end passage.
Pedal pressure alone won't push it out.
The fix is a scan tool that can command the ABS pump and cycling valves. Different brands call it different things, but you're looking for an automated bleed, ABS service bleed, or a function test that runs the pump.
The procedure is usually a loop. Run the automated bleed, then manually bleed the corners, then run it again. Two or three rounds clears most systems.
Some European cars need a dealer-level tool for this, and that's worth knowing before you start.
If you don't own a scan tool that reaches the ABS module, this is the point where a shop makes sense. A soft pedal after a fluid flush on an ABS car is often just trapped air in the module.
How do you know when you're done?
The pedal tells you, not the fluid bottle.
You're finished when three things are true. Clean fluid with no bubbles comes out on two consecutive strokes at every corner. The pedal feels firm and sits high with the engine running.
And the 30-second hold test shows no creep.
Then do a low-speed road test in an empty lot. Two or three stops from 20 mph, checking pedal height each time. If the pedal is still soft, don't keep bleeding blindly.
Go back to the triage list and look for a leak or a bypassing master cylinder.
Bedding the pads in afterward
New pads need a transfer layer of friction material on the rotor before they bite properly. That's a bedding procedure, not a repair.
Do six to eight moderate stops from 40 mph with a couple of minutes of cooling between them. Avoid full-stop panic braking in the first 200 miles, which can leave uneven deposits.
Bedding won't fix a soft pedal. If the pedal is spongy going in, it'll be spongy coming out. Deal with the hydraulics first.
What Each Fix Costs, DIY vs. Shop
Costs vary hugely by region, vehicle, and how rusty things are. These ranges come from aggregate parts pricing and typical independent shop labor rates, and they're a planning tool, not a quote.
Labor usually runs $100 to $180 an hour at an independent shop. Dealers sit at the high end of that. Rust-belt cars often go over the estimate because fasteners break.
| Repair | DIY parts cost | Shop installed cost | Typical time |
|---|---|---|---|
| Fluid flush | $15 to $30 | $80 to $150 | 45 to 90 min |
| Brake bleed only | $10 to $20 | $70 to $120 | 30 to 60 min |
| Brake hose, one corner | $20 to $60 | $150 to $280 | 30 to 60 min |
| Master cylinder | $80 to $250 | $300 to $600 | 2 to 3 hours |
| Caliper, one corner | $80 to $200 | $200 to $500 | 1 to 2 hours |
| Rear drum hardware and adjust | $40 to $90 | $180 to $350 | 1 to 2 hours |
| Hard brake line, one run | $25 to $60 | $180 to $400 | 1 to 3 hours |
| ABS module | $300 to $900 | $900 to $2,000+ | 3 to 5 hours |
Where the shop bill actually goes
Parts are usually the smaller half. You're paying for lift time, a pressure bleeder, a scan tool with ABS capability, and the disposal of old fluid.
You're also paying for the diagnostic. A good shop pressure-tests and inspects before quoting. That's why a master cylinder job sometimes comes with a hose inspection the advisor didn't mention on the phone.
Ask for the old parts back. It's a fair request and it keeps everyone honest.
When DIY makes sense
Do it yourself when three things line up. You have a level, safe place to work. The car isn't your only transport for the next two days.
And the job is a bleed, a flush, or a hose swap on a car that isn't rusty.
A gravity bleed or a two-person bleed needs almost no tooling. A bottle, a clear hose, a box wrench, and fresh fluid gets you through it.
When to hand it over
Pay someone when the job involves the ABS module, a seized bleeder screw, or a hard line that's flaking rust. Those are the jobs where a rounded fitting turns a $200 repair into a $700 one.
Pay someone if you don't have a scan tool that can cycle the ABS pump on a modern car. That's the single most common reason a DIY bleed fails.
Pay someone, or tow it, if the pedal sinks. That's not a cost question anymore.
The hidden costs nobody budgets for
- Bleeder screw replacement. Seized or rounded screws usually snap. Extracting one runs $50 to $150 at a shop.
- Fluid disposal. Most municipalities and auto parts stores take used brake fluid free or cheap. Don't pour it down a drain.
- Tow. Roughly $75 to $150 for a short local hook, more after hours.
- A second bleed. Plenty of first-time bleeds need a redo after a test drive. Budget the fluid.
- Paint damage. Brake fluid on a fender is a repaint, not a wipe. Keep water handy.
The cheap fix that costs more later
Topping up a low reservoir and driving on is the classic bad trade. It hides a leak that will grow.
The second is bleeding a system that needs a master cylinder. You'll spend $20 on fluid and a Saturday, and the pedal will be soft again within a week.
The third is skipping the two-year flush because the fluid "looks fine." A $100 service now is insurance against a $900 ABS module later. That math is one of the few places in car maintenance where the cheap option really is the cheap option.
Mistakes That Turn a Soft Pedal Into a Dangerous One
Most of these come up in our research over and over. None of them are exotic. They're the ordinary shortcuts people take when a brake job runs long.
Mixing DOT 5 silicone into a glycol system
DOT 5 is silicone-based and does not blend with DOT 3, DOT 4, or DOT 5.1. Mix the two and you get a pedal you can't bleed out, plus seals that swell and soften.
Read the reservoir cap. It names the fluid. That's the only spec that matters, no matter what a parts counter employee suggests.
Reusing fluid you just bled out
Drained fluid has been through the system, picked up moisture, and possibly picked up air. It's not going back in.
The same goes for that half-used bottle on the shelf. Glycol fluid starts absorbing water the moment the seal is broken. An open bottle sitting for a year is closer to its wet boiling point than its dry one.
Buy fresh, use it, seal it, and toss it if it's old.
Test-driving a sinking pedal to see how bad it is
This is the mistake that ends in a crash. A pedal that sinks under steady pressure is a hydraulic system with a known leak path. The next failure stage can be total.
There's no test drive that makes that safer. Diagnose it in the driveway at zero speed, or put it on a truck.
Bleeding with the reservoir running dry
Air goes in at the top and travels down. Once it's in the master cylinder bore, you're starting over.
Top up after every corner and keep the cap on between checks. If the reservoir does run dry, expect to bench bleed or at least perform a long gravity bleed before pedal feel returns.
Pushing the pedal to the floor during a bleed on an old master cylinder
Here's one most people have never heard. In normal use, the master cylinder piston only travels the first inch or so of its bore. Beyond that point sits years of sediment and a wear ridge.
Flooring the pedal during a bleed drives the cup seal over that ridge and through the sediment. It can tear the seal or roll its lip. You start with a working master cylinder and finish with a bypassing one.
Bleed with smooth, moderate strokes. Short travel is enough to move fluid.
Compressing caliper pistons without opening the bleeder
When you push a piston back to fit new pads, the fluid behind it has to go somewhere. If the bleeder is closed, it goes backward, up the line, and into the ABS module.
That's how dirty fluid and sediment end up in the most expensive part of the system. Crack the bleeder screw and let it drain into a bottle while you compress the piston.
Hanging a caliper by its brake hose
The hose carries fluid, not weight. Hanging a caliper from it stresses the inner liner and the crimped fittings.
Use a bungee, a wire hook, or set it on a bucket. This one costs nothing to avoid and a hose to fix.
Using the wrong grease on slide pins
Chassis grease and wheel bearing grease can't take caliper temperatures. They cook, harden, and glue the pins in place.
Use a dedicated high-temperature brake lubricant rated for the job, and use it sparingly on the pins and the pad ears. Not on the friction surface, and never on the piston boot.
Overtightening bleeder screws and rounding them off
Bleeder screws are hollow and small. They strip easily, and an open-end wrench on a 10 mm hex is how it happens.
Use a six-point box wrench or a flare nut wrench that grabs all the flats. Snug is enough. The sealing surface is the tapered seat, not the torque.
Assuming new pads and rotors will fix a soft pedal
Pads and rotors fix noise, grinding, and pulsation. They don't fix a hydraulic problem.
If the pedal was soft before the job and soft after, the job didn't touch the cause. It may even have added air. Go back to the pedal tests.
When to Park It, Tow It, and Hand It Over
This is the section to read twice. Getting this call wrong is the difference between an inconvenience and a headline.
| Symptom | Verdict | Why |
|---|---|---|
| Pedal sinks while held at a stop | Park it, tow it | Active pressure loss, next stage is no pedal |
| Pedal goes to the floor with light pressure | Park it, tow it | Likely burst line or failed seal |
| Red brake warning light on with a soft pedal | Park it, tow it | Usually low fluid from a real leak |
| Fluid level dropped with no visible puddle | Park it, tow it | Leak into the booster or an internal loss |
| Soft pedal, pumps up, holds firm | Drivable at low speed to a shop | Air, no pressure loss |
| Long pedal, firm, no fluid loss | Drivable, fix within days | Rear adjustment or knockback |
| ABS light only, normal pedal feel | Drivable, diagnose soon | Sensor or module fault, hydraulics intact |
What the dashboard lights are telling you
The red brake warning lamp is the serious one. It usually means low fluid, a hydraulic fault, or the parking brake is engaged. If the pedal is also soft, treat it as a hydraulic failure until proven otherwise.
The amber ABS lamp alone means the antilock function is offline. You still have normal brakes, just without antilock. That's drivable, but don't sit on it for months.
Both lights together with a soft pedal is a stop-now combination. Something has gone wrong in the hydraulic or electronic pressure side.
Why fluid loss is a hard stop
Any measurable drop in the reservoir without a recent service means fluid escaped. Sealed systems don't consume fluid as pads wear.
The two worst places for it to escape are into the vacuum booster and past a wheel cylinder seal inside a drum. Neither leaves a puddle you'll spot. One destroys the booster, the other soaks the brake shoes and kills rear braking.
Refill it, watch it for a day, and if it moves again, you have your answer. Don't refill and forget.
Driving to the shop when it's borderline
If the pedal pumps up and holds, and there's no fluid loss, a slow drive to a nearby shop is a reasonable call. Keep the speed down, leave a big gap, and avoid highways.
Do a driveway check before you leave. Engine running, hold the pedal for 30 seconds. If it doesn't creep at all, the risk is lower.
If it creeps even slightly, don't go.
There's no prize for saving a tow bill. The average local hook is cheaper than a deductible and a lot cheaper than a hospital visit.
Hybrid and EV braking: regen doesn't rescue you
Hybrids and EVs blend regenerative braking with the hydraulic system. Under light pedal pressure, the car may slow using the motor alone. That masks a soft pedal in everyday driving.
The hydraulic circuit is still there, still full of fluid, and still fails the same way. It's what stops you in a panic stop and what holds the car at a light. A failing master cylinder on an EV is exactly as dangerous as on any other car.
One extra caution. On hybrids and EVs, the brake system often runs an electric vacuum pump or a hydraulic accumulator. That means the pedal can feel different with the car on versus off, and stored pressure can remain after shutdown.
Follow the service manual's depressurization steps before touching anything.
Older cars, rust-belt cars, and project cars
Cars that sat for months are a category of their own. Seals dry out, fluid absorbs moisture, and rust forms inside steel lines above the fluid level.
A car that sat two winters and now has a soft pedal should get a full hose and hard line inspection, not just a bleed. Corrosion hides at the clips.
What to tell the shop so they find it faster
Be specific about behavior, not about parts. "The pedal sinks about an inch over 30 seconds at a red light, cold and hot, and the fluid level hasn't moved" is worth more than "the brakes feel weird."
Add when it started. After a brake job, after a long descent, after the car sat, or with no trigger at all. Each one points somewhere different.
And say what you've already tried. If you've bled it twice, tell them. That saves an hour of labor and gets you to the real cause faster.
Frequently Asked Questions
Can a spongy brake pedal fix itself?
No. Air doesn't leave a sealed hydraulic system on its own, and a worn seal doesn't heal. A pedal that feels better after cooling down is telling you the fluid boiled and re-condensed, not that the problem went away.
It will come back the next time the brakes get hot.
Can I drive with a spongy brake pedal?
Only if it pumps up and holds firm with no fluid loss, and only to a nearby shop at low speed. If the pedal sinks while you hold it, or goes near the floor, don't drive. That's a tow.
The failure stage after a sinking pedal is no brakes at all.
Why is my brake pedal soft after new pads and rotors?
Air got in during the job, or the problem was already there. Pushing caliper pistons back without opening the bleeder can trap air, and a reservoir that ran low pulls air into the master cylinder. On ABS cars, air in the hydraulic control unit needs a scan tool to clear.
Does pumping the brakes fix a spongy pedal?
It's a diagnostic, not a repair. If pumping brings the pedal up and it stays firm, you have air in the lines and need a proper bleed. If it pumps up and then sinks again while you hold it, you have a pressure loss, likely a bypassing master cylinder.
Pumping hides the symptom for a moment and changes nothing.
Why does my brake pedal only go soft when it's hot?
Moisture in the fluid is boiling. Water lowers the boiling point of glycol brake fluid dramatically, so hard braking or a long descent turns it to vapor at the caliper. Vapor compresses just like air.
A fluid flush usually fixes it, and a dragging caliper or a seized hose is worth ruling out at the same time.
How often should brake fluid be changed?
Most manufacturer schedules call for a flush every two years regardless of mileage, because glycol fluid absorbs moisture over time. Humid climates, heavy towing, and mountain driving shorten that window. Testing moisture content with a cheap pen tester is a reasonable way to decide if you're between services.
